Defrosting baby food nhs
Children's food: safety and hygiene
Keep your child safe from food bugsBabies and young children are especially vulnerable to bacteria that can cause food poisoning.
Make sure your child isn't put at risk because of the way you prepare or serve food.
- Always wash your hands before preparing food and after touching raw meat, chicken, fish and shellfish, raw vegetables and eggs.
- Check that your child's hands are clean before feeding.
- Teach your children to wash their hands after touching pets and going to the toilet, and before eating.
- Keep surfaces clean and keep any pets away from food or surfaces where food is prepared or eaten.
- Thoroughly wash all bowls and spoons used for feeding in hot soapy water, and make sure chopping boards and utensils are also kept clean.
- Keep raw meats and eggs covered and away from other foods in the fridge, including cooked or ready-to-eat meats – you should always store raw meats in clean, covered containers at the bottom of the fridge to prevent any drips from falling onto other foods.
- Cook all food thoroughly and cool it until lukewarm before giving it to your child.
- Don't save and reuse foods that your child has half eaten.
- Wash and peel fruit and vegetables such as apples and carrots.
- Hens' eggs stamped with the British Lion mark, or produced under the "Laid in Britain" scheme, are fine for babies and children to have raw (for example, in homemade mayonnaise) or lightly cooked.
- Avoid eating raw or lightly cooked shellfish. Babies and children should only eat shellfish that's been thoroughly cooked.
- Don't give children food or drink when they're sitting on the potty.

Find out which foods to avoid giving babies and young children
Storing and reheating food for children- Cool food as quickly as possible (ideally within 1 to 2 hours) and put it in the fridge or freezer. Food placed in the fridge should be eaten within 2 days.
- Cool rice as quickly as possible (within 1 hour) and put it in the fridge or freezer. Rice placed in the fridge should be eaten within 24 hours and never reheated more than once. Find out why reheated rice can cause food poisoning.
- Frozen food should be thoroughly defrosted before reheating. The safest way to do this is to leave it in the fridge overnight or use the defrost setting on a microwave.
- When reheating food, make sure it's steaming hot all the way through, then let it cool down before giving it to your child.
 If you're using a microwave, always stir the food and check the temperature before feeding it to your child. Don't reheat cooked food more than once.
 - To cool food quickly, put it in an airtight container and hold it under a cold running tap. Stir it from time to time so it cools consistently all the way through.
Remember, always stay with your child while they're eating in case they choke.
Find out how to stop a child from choking
Page last reviewed: 5 September 2022
Next review due: 5 September 2025
Food Safety | Go to guide: preparing, freezing and reheating foods for baby
There’s no doubt that there are so many exciting things to think about when you begin your weaning journey with your little one; choosing a highchair, shopping for snazzy bibs, debating which cup and cutlery is best and deciding what amazing tastes to expose your baby to first… but it’s important not to forget that amongst all of this, any food you serve needs to be safe! Babies and young children don’t have the same immune system as us adults (or even older children) so food safety is essential.
 We need to make sure we’re extra careful with their little tummies!It is estimated that there are 2.4 million cases of food-borne illness in the UK every year but it’s not just restaurants that cause food poisoning – cooking at home can also make you (or your family) sick. The good news is that there are so many things you can do whilst preparing food to prevent this happening. Below, we give our top tips for baby food safety.
Keep it clean
When it comes to food safety, keeping clean is so important. In reality, this doesn’t mean having a ‘spotless’ kitchen but instead, a clean environment where you prepare food, with clean hands, using clean equipment! Here are some top tips to help you organise your kitchen and help you safely prepare meals for your baby and the rest of the family:
- Wash your hands – always wash your hands thoroughly before preparing any food, and particularly after handling raw meat
- Clean work surfaces – disinfect food preparation surfaces using a clean dishcloth before starting any food prep.
 If you can, use a paper towel squirted with antibacterial spray to clean surfaces after preparing raw meat and poultry as this will help to make sure that you don’t pick up food poisoning germs and spread them around the kitchen
 - Clean utensils – make sure equipment is clean before you start using it and if you can, opt for colour coded equipment to reduce the risk of cross contamination between raw and ready to eat foods. Never prepare ready to eat food such as salad on a board that was previously used to prepare raw meat
- Wash fruit and veg – they might be low risk foods, but bacteria can also be found on fruit and veggies too so don’t forget to wash these thoroughly under cold running water before serving to baby. If you’re using frozen veggies in baby’s food, make sure that these are cooked according to the back of pack information before serving to your baby.
- Don’t be tempted to wash raw chicken! – washing your chicken will not ‘wash off’ the bacteria (only cooking will make it safe to eat!).
 If you wash chicken, instead you are more likely to cause food poisoning by inadvertently spreading more bacteria around the kitchen.
Food Safety – Cooking food for your baby checklist!
Cooking veggies by steaming, boiling or roasting is pretty straightforward, but those first tastes don’t last for long and you’ll soon be branching out to more exciting foods for your baby to try, many of which may include meat or fish. Regardless of how you serve meat to your little one, it’s important to make sure that it is thoroughly cooked.
Remember – just because it’s cooked on the outside, doesn’t mean it’s cooked on the inside! Here’s how you can check that meat is safe for your baby to eat…
- Use a food probe - checking the temperature of the thickest part of the meat is the most accurate way (and the way I would recommend) to check food is cooked, whilst also making sure it is not overcooked! If using a probe, make sure the probe is clean and the meat has a core temperature of 75C for at least 30 seconds.

- Cut into the thickest part of the meat to make sure there is no pink meat visible
- The meat must be steaming hot throughout
- Meat juices run clear
If you find your baby puree needs thinning after cooking, check out Jenna’s article Top tips for thinning baby purees
Cool foods quickly
I am a huge fan of keeping leftovers to use as an easy meal another day! After cooking, make sure you cool any leftovers and pop into the fridge or freezer as soon as possible. Never allow food to sit out on the side for more than 2 hours after cooking.
Be aware that simply putting your hot food in the fridge may not be enough to make sure it is cooled down quickly and safely. There are lots of things you can do to help speed up the cooling of food, such as dividing into smaller portions, using an ice bath or stirring regularly.
Keep leftovers for another day
Whatever your situation, whether you have children or not… reheating leftovers is always a good idea! As a rule of thumb, leftover food can be kept in the fridge and used within 2 days (1 day for rice) but if you want longer than this, then pop your leftovers in the freezer.
Even if you used raw meat or veg which was previously frozen, once cooked you can freeze the leftovers. Freezing “pauses” the growth of bacteria, locks in nutrients, prevents spoilage and ultimately helps reduce wastage!
Defrosting baby purees
If defrosting baby purees, the best way to do this would be overnight in the fridge and use within 24 hours. But, did you know that you can cook baby purees from frozen?!
Reheating baby purees
Baby purees are often best served at room temperature, but don’t be tempted to partially reheat food for your baby to avoid having to wait for it to cool. Unless served cold straight from the fridge, baby purees should always be reheated until piping hot, which means steaming throughout, to kill off bacteria.
The best ways to reheat baby purees are:
- On the hob
- In the microwave
If cooking a portion of baby puree from frozen, make sure you increase the cooking time and stir regularly (every 20 – 30 seconds) to ensure there are no hidden hot spots and that the puree is evenly heated so it is piping hot throughout.
Remember that foods can only be reheated once so make sure you divide your puree into baby friendly portions before storing in the fridge or freezer!
We hope these tips and tricks have helped you become more confident when it comes to food safety for your little ones!
Jenna is a fully qualified Environmental Health Practitioner specialising in food safety and public health.
She obtained a first-class Batchelor (BSc) degree in Environmental Health and has since qualified as an Environmental Health Practitioner with the Chartered Institute of Environmental Health (CIEH). Over the past 12 years she has worked in both the public and private sector advising businesses on all things food safety and public health.
Since becoming a Mum to her 2-year-old little girl Mia, she understands first-hand how much things change when you have a little one to think about too! She has always been passionate about food safety and her mission as Food Safety Mum is to help give parents confidence when cooking at home or when eating out and about!
For lots more food safety advice, follow Jenna on Instagram
@Foodsafetymum
Defrosting and serving baby food.
 Your baby from birth to two years old Defrosting and serving baby food. Your baby from birth to two years
 WikiReading
Your baby from birth to two years old
Sears Marta
Contents
Defrosting and serving baby food
Frozen meals should not be thawed at room temperature for long periods of time. When it's time to use frozen baby food, try these tips:
• For slow defrosting, place one serving or a day's supply in the refrigerator and leave for three to four hours.
• For quick defrosting, use an electric defrost or place a frozen cube or open jar in a heat-resistant small container and place in a small saucepan. Fill the pot with water just short of the rim of the food container. Defrost and reheat over medium heat, stirring occasionally to heat evenly.
• Before giving baby food to a baby, be sure to mix it thoroughly and taste to make sure there are no areas too hot for the baby. Touch the product with your upper lip each time you load another spoon. Even the smallest amount of food that is too hot can teach a child not to trust what lies in the spoon approaching him. You can better check the temperature with your finger.
• Because microwave heating can create hot spots in food that can burn your child's mouth, we do not recommend this method. If you choose a microwave, be very careful to stir and always try a little yourself to see if the food is evenly heated before feeding your baby.
• To avoid wasting food, feed your baby with a spoon of the portion you think he can handle. If he wants more, use a clean spoon to place the topping on his plate. You can store the rest of the dish in the refrigerator for two days, but only if saliva does not get into it.
Some babies don't eat "baby food" at all, and all this information on how to make it can be skipped if your baby tolerates a fairly firm texture, refuses solid foods for a long time, can't stand being spoon-fed, or transitions immediately to hand feeding.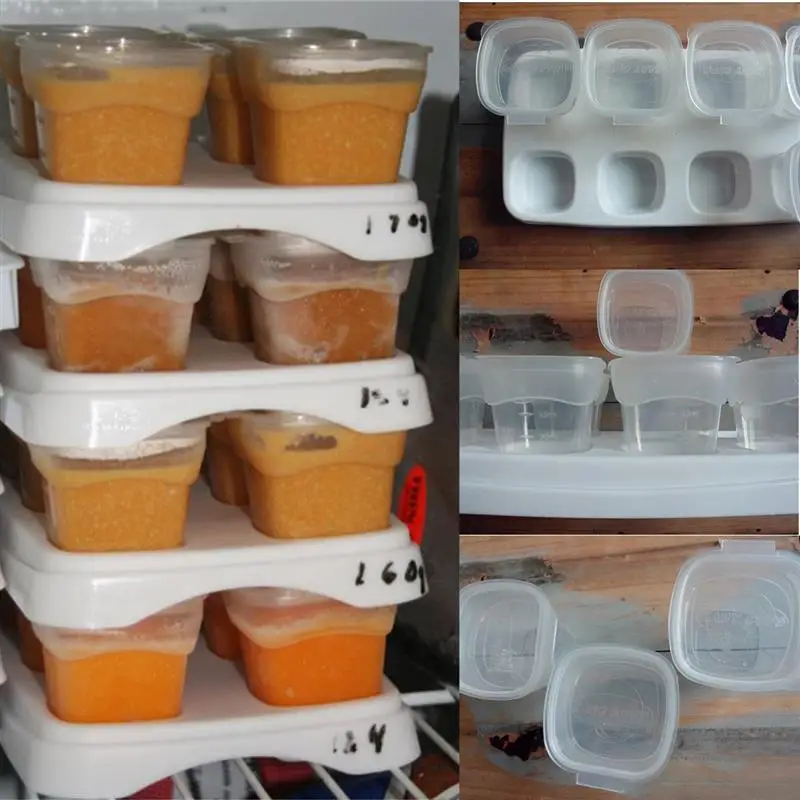 Some mothers really go into making baby food; others simply cook for the whole family and mash a portion for the child with a fork.
This text is an introductory fragment.
Table and chair
Table and chair Do two exercises with your child and ask him to guess where the chair turned out and where the table turned out. Riddle No. 1: Place your left palm vertically up. From below, put the fist of your right hand with your thumb towards you. (Chair) Riddle #2: Clench your left hand into a fist. Top
Tip 12 More variety, please
Tip 12 More variety on the table, please Almost like adults These adults are strange people - we are with you. We trumpet on all corners that food should be as diverse as possible: only in this way, they say, the body will receive everything it needs. For breakfast we eat one thing, for lunch - another, for dinner
Power mode
Diet • Food should be fresh and look appetizing. • It is very important that meals take place at the same time. Then you will be able to ensure a regular supply of nutrients to build the growing tissues of the fetus, uterus, mammary glands, amniotic
Manufactured baby foods
Industrial baby food products What applies to baby food products of industrial production for children of the first year of life • Canned fruit, vegetable and fruit and vegetable juices and purees. • Dry instant cereals and
Level 3: submission
Level 3: Submission The methods of presenting impromptu speeches are not much different from presenting prepared speeches. At the third level, you will work on gestures, pauses, eye contact, intonation, and other delivery methods. The goal of this level is
"To the table!"
"To the table!" The rhythm of the life of a French family is built around this sacred phrase, because the ritual of eating at a common table is the most important moment in learning good manners. It hardly needs to be reminded that the main dishes of French cuisine must be served and tasted
They put him at the table, and he put his feet on the table
They put him at the table, and he put his feet on the table It happens. We just can’t stand it, just to eat. And antics, and fidgeting in a chair, and a pigsty in a plate. Again, let's look into the dining room, where they dine in silence and peace, without quarrels and antics. But here is a two-year-old little girl acting up at the table,
2.3. Round table for teenagers: "How do friendships develop and sometimes break?"
2. 3. Round table for teenagers: "How do friendships develop and sometimes break?" For modern teenagers, it is more difficult to get to know each other even in the courtyard of the house on the playground than for the previous generation of children. Gone are many traditions of courtyard games, which in
Help the nanny set the table
Help the nanny set the table They want to have breakfast in the group, Everyone around is in a hurry to help Carry dishes on the tables. Only the Hedgehog said: - I won't! I won't go, I'll sit And I will look at you! I don't want to help Better to just wait. It's unpleasant for everyone. All Hedgehog
Wash your hands before you sit down to eat
Before you sit down at the table, wash your hands On the birthday of the Frog Her friends gathered. frolicked, played And then they began to have lunch. Only one thing was forgotten: The guests didn't wash their hands! Treats at the tables They took it with dirty hands. And the frog, probably It was
Making your own baby food
Making baby food with your own hands Good nutrition, or lack thereof, can have an impact on your child's health and behavior. It's worth spending a couple of hours a week preparing meals for your child. You know what it's made of and you can cook
Packaging and storage of homemade baby food
Packaging and storage of homemade baby food Store your home-cooked meals in the freezer. Allow the food to cool slightly before freezing in small portions. What do you need to make your own baby food? • Kitchen
How to wash the refrigerator inside to destroy bacteria and odor
Home » Miscellaneous » How to wash the refrigerator inside to destroy bacteria and odor
6 recipes to clean the appliance so that it does not stink
Cleaning the refrigerator inside has its own specifics.
Since this appliance is designed to store food, do not use chemical agents to remove dirt and odors.
We have to look for safer hygiene products and methods. We will show you how to properly wash the refrigerator so that it does not smell, what approach to apply to No Frost systems and classic devices.
Why can there be a stench?
There can be several reasons for the appearance of an undesirable odor :
- low-quality plastic housing that can absorb absolutely all “aromas”;
- non-compliance with the rules and terms of food storage - spoiled food and dishes exude a musty, poorly weathered smell;
- periodic melting of ice and clogging of drain holes - this provokes the growth of mold, emitting its own specific smell;
- storage of too spicy and fragrant products - smoked meats, fish, spices;
- a recently purchased unit is normal, the smell should dissipate on its own over time.

In general, "odor" appears due to rare cleaning, when microorganisms and fungus rapidly spread inside the unit.
Important! Unwashed food storage containers - egg trays, containers for vegetables and fruits can exude an unpleasant odor.
Loading ...
Cleaning considerations for different models
Hygiene measures for the refrigerator compartment may vary depending on the model. Moreover, freshly purchased refrigerators are also subject to processing, even if there is no specific aroma from them.
No Frost
No Frost is a special freezing system that prevents the formation of frost on the walls of the freezer. This effect is achieved through innovative ventilation technology that prevents the growth of condensate. The No Frost refrigerator does not require periodic defrosting, but an unpleasant smell for such devices is a common occurrence .
The problem is the condensate tray, which serves as a breeding ground for bacteria and a source of harmful fumes. The situation is aggravated by the fact that access to the tray is often difficult, and to clean it, you need to dismantle the back wall of the refrigerator.
The system requires periodic disinfection, approximately twice a year. Whiteness can be used to disinfect surfaces. It is diluted with water in a ratio of 1 to 10, a soft cloth or sponge is dipped into the resulting solution and all accessible areas are wiped.
Particular attention is paid to shelves, corners, areas with mold - they are moistened with a solution and left for 10-15 minutes, after which they are wiped off with a cloth.
Use a vacuum cleaner or a narrow long brush to remove dust from the condenser located on the rear wall. The drain hole, which often causes an unpleasant odor, is cleaned with a medical bulb or syringe, pouring water directly into the channel.
Conventional models
Conventional refrigeration units should be maintained according to the instructions. It should indicate the frequency of processing and indicate the approved cleaning products. We recommend using a soft cloth or dishwashing sponge for cleaning.
Using detergent, clean all walls and shelves, moving from top to bottom. Particular attention will have to be paid to the door, small trays and containers, where dirt and food debris accumulate the most. Armed with an old toothbrush, clean the rubber seal.
Important! Do not clean the door seal with vinegar or acids. If the gum has lost elasticity, you can treat it with vegetable oil.
When dirt has been removed, wipe dry all surfaces and leave the refrigerator open until completely dry. If after washing the smell has not gone away, a variety of remedies and recipes will come to the rescue, which will be discussed later.
Preparation
Do not clean the refrigerator until the unit has been disconnected from the power supply. Pre it is necessary to set the temperature controller to zero .
Remove all food and containers from the chamber, conduct a thorough audit, getting rid of the delay and spoiled food. Perishable and frozen foods are placed in a bowl and placed in a dark, cool place or immersed directly in a basin in a bath of ice and cold water.
All soiled containers and packages are also washed out, otherwise the smell will not go away after they are put back into the chamber.
Defrosting can be accelerated by spraying the walls with hot water with a spray bottle. You can put an open container or plastic bottles filled with hot liquid into the chamber. As the water cools, it is changed to hot, and so on until the frost thaws.
All removable shelves, containers, side racks will have to be removed. It is most effective to wash them separately - directly under running water or in a basin with soapy water.
How to quickly wash with folk remedies?
Safe cleaning, without the use of chemicals, will provide homemade preparations prepared according to folk recipes.
Vinegar
Regular vinegar cleans and removes odors well.
- We prepare a cleaning solution - dilute 9% vinegar with water in a ratio of 1 to 1.
- Dip a clean cloth or sponge into the resulting solution and wipe all surfaces.
- Then you can walk through the same areas again, only now with clean water.
- We complete the process by wiping with a clean cloth, after which the refrigerator is left with the door open for at least 3 hours so that the smells completely disappear.
Vinegar is great for removing grease in the oven, see instructions in this article.
Baking soda
The safest yet one of the most effective cleaning products is baking soda.
It can be used as a powder, you just need to make sure that your refrigerator model can be washed with mild abrasives.
Soda solution will provide a more gentle cleaning :
- Dissolve 2 tablespoons in a liter of water. spoons of soda.
- Remove all shelves and grids, wipe them with the resulting solution.
- Wash the entire refrigerator inside.
- Wash off any soda residue with a cloth dampened with clean water.
- Dry surfaces with a dry towel.
Baking soda not only serves as a good cleaner, but also disinfects all parts of the device. With it, you can wash almost all household appliances and more. So, with the help of soda, you can easily and simply wash the electric kettle.
Ammonia
How to use ammonia for cleaning :
- Dilute 1 tsp. a spoonful of ammonia in 1 liter of clean water.
- Soak a cloth in the solution and go over the inside of the refrigerator, the rubber seals and the drain hole.

- Leave the chamber to air out for a few hours.
Important! You can increase the effectiveness of the ammonia solution by adding dishwashing detergent to the composition.
Ammonia can also be used to clean stainless steel coated cooktops.
Lemon
Lemon juice acts like vinegar - acid effectively breaks down fat, removes dirt and unpleasant odors.
Boiling water is poured over a lemon to give more juice, cut into two halves and one of them is well squeezed into a separate bowl.
The resulting juice is diluted with a liter of water and used as a detergent for wiping the internal and external walls of the refrigeration apparatus.
In general, citric acid is an all-purpose cleaner. For example, with its help you can clean the microwave from fat, as described in this article.
Hydrogen peroxide
This medicinal product is considered the most powerful in the fight against unpleasant odors. In the open air, it quickly evaporates, taking all the "flavors" with it.
Work progress :
- Dilute a teaspoon of hydrogen peroxide in a liter of clean water.
- Add a small spoonful of vinegar to the solution.
- Treat all walls, removable parts and accessories carefully.
- Ventilate the refrigerator.
The preparation may also be used for irrigation of particularly contaminated surfaces.
The prepared aqueous solution is poured into a spray bottle and sprayed onto dirty areas. After 10 minutes, the dirt is removed with a soft, damp cloth.
Laundry soap
Soap has cleaning properties due to the alkaline composition, which is harmful to mold and germs, and also does an excellent job of removing dirt.
Instructions for use :
- Grate half a bar of laundry soap.
- Dissolve shavings in a small amount of water until a slurry is obtained.

- Apply mixture to all areas and leave overnight to react.
- In the morning, wash off the soap and wipe dry.
Tip! Cleaning the refrigerator with a weak solution of potassium permanganate will help get rid of the smell of rotten meat.
You can use laundry soap to clean the outside of the refrigerator, instructions can be found here.
Did our advice help you?
YES NO
Use of odor absorbers
There are a variety of odor absorbers available in the household product line that can absorb odors in the refrigerator. They are available in the form of balls that can be placed directly on the shelves, or in the form of cartridges with a grid hanger.
They include seaweed extracts, deodorizing additives, activated carbon, mineral salts in the form of crystals - all of them effectively neutralize unpleasant "aromas".
One of the latest developments is the Refrigerator Electroionizer.![]() This is a device that saturates the chamber space with useful ions. They act not only as absorbers and fresheners, but also destroy pathogenic bacteria.
This is a device that saturates the chamber space with useful ions. They act not only as absorbers and fresheners, but also destroy pathogenic bacteria.
Some foodstuffs also have absorbent properties, in particular:
- lemon - sort citrus peels;
- salt - arrange in open jars;
- rice - place in a wide saucer;
- apple - cut and put on a shelf, change the fruit as it dries;
- black bread - cut into pieces and arrange in the chamber.
Aromatic spices and ground coffee are able to neutralize and kill the “odor”. They are scattered in small containers and placed inside the unit in random order. But it should be borne in mind that all dishes and products can be saturated with such spicy aromas.
An interesting option is the combination of lemon and baking soda. The lemon is cut into two halves, the pulp is cleaned, and a spoonful of soda is poured into the resulting recess.
Such an impromptu freshener is placed vertically on a saucer and placed in a refrigerator.
What should I do to prevent the appliance from smelling?
All freezer systems need maintenance cleaning approximately every 6 months.
During the shutdown, the unit will have time to “rest”, and the hostess will carry out wet cleaning. In order not to spend a lot of effort on the general cleaning of the refrigerator, its order should be maintained constantly:
- remove dirty smudges and prints immediately, without waiting for them to dry;
- keep egg containers and trays clean;
- if possible, keep all dishes and foodstuffs covered, especially those with a strong smell;
- use a deep dish to defrost meat and fish to prevent the thawed water from running down the shelves;
- clean drain hole once a month;
- monitor the expiration date of products, regularly get rid of “delays” and conduct an audit in the chamber;
- do not store spoiled fruits and vegetables.

Hygienic cleaning can be carried out once a week without turning off the refrigerator. You just need to free the shelves from the products and quickly walk through them with a wet napkin, grabbing the walls as well.
All of the described ways to get rid of the smell in the refrigerator are quite effective. But it’s much easier to prevent the appearance of a “darling” - it’s enough just to provide the device with regular care and careful handling.
Helpful video
How to remove the smell from the refrigerator with just one ingredient
Refrigerators have become an integral part of our daily lives. Can you imagine life without it?
Where would you store perishable foods such as milk, fresh fruits and vegetables, or even ready-to-eat meals? Where can I get ice for cold drinks? Without a refrigerator, you can say goodbye to a tall glass of homemade iced coffee or chilled iced tea.
We use refrigerators to store all types of food and drink. Many foods - especially fresh garlic and onions or dishes prepared from them - can leave a lingering odor.
Food and drink can leave a strong odor behind
Over time, the mixture of odors can make your refrigerator very unpleasant. Unpleasant smells can penetrate even fresh food and kill your appetite as soon as you open the refrigerator door.
Regular cleaning of the refrigerator obviously helps. But if you've put that task aside, you can still remove the smell from your refrigerator fairly easily using any of the seven methods below.
Method 1: Baking soda
Baking soda can be used to successfully remove any bad odors left in the refrigerator. As soon as you put the baking soda in the refrigerator, it will begin to absorb all the odor-causing particles from the enclosed air, forming porous solids that look like crystals.
One Step Method: Place Baking Soda in Refrigerator
Place Baking Soda in Refrigerator
- Clean out any old items that have gone bad or are starting to go bad.

- Place a bowl of baking soda on a shelf.
- Close the door for at least 5-6 hours.
- Then you can throw out the baking soda and restock the refrigerator.
- To avoid bad odors, you can always keep an open bowl of baking soda in the refrigerator.
Method 2: Coffee grounds
Fresh coffee grounds will not only help remove the smell from the refrigerator, but will leave everything with the sinful smell of rich dark coffee.
If you are the type of person who can sit in a coffee shop for hours just breathing in all the heavenly aroma, then this technique is simply necessary for you.
One-step method: Use dry, fresh coffee grounds to eliminate bad odors from the refrigerator.
Place dry, fresh coffee grounds in the refrigerator.
- Place an open glass bowl with dry, fresh coffee grounds in the refrigerator.
- Leave on for 2-3 days.
- Bad smell will disappear and you will smell great coffee every time you open the door.

- If the smell is really strong, place a bowl of fresh coffee grounds on each shelf and inside each compartment.
You can also mix fresh coffee grounds and baking soda in a bowl and place it in the refrigerator to enjoy the dual benefits of effective odor removal and sparkling coffee aroma.
Method 3: Lemon
Lemons are the obvious choice for ridding your refrigerator of unpleasant odors. There is nothing fresher and citrusier than lemons. After all, there's a reason most household cleaners smell like lemon.
In fact, you can also use lemons to clean a wooden cutting board, removing all old stains and odors.
One-step method: Place lemon wedges all over the refrigerator.
Use lemon slices to eliminate odor.
- Cut several lemons into quarters.
- Place lemon wedges on all shelves and in all compartments, even in the refrigerator door.
- Leave them there for 3-4 days to get rid of bad smells.

- To keep your refrigerator smelling fresh and fragrant, always keep lemon wedges in it. Replace lemons as needed, for example once a week.
Method 4: Activated carbon
Activated carbon is known for its excellent absorbency. It will effectively absorb all the odor causing particles inside your refrigerator.
In fact, you can also use activated charcoal to deep cleanse your pores and even get rid of food poisoning.
One step method. Place the bowl of activated charcoal in the refrigerator.
Place the bowl of activated charcoal in the refrigerator.
- Set the minimum temperature in the refrigerator.
- Place a small bowl of activated charcoal powder in the refrigerator.
- Keep the refrigerator door closed for 3 days for the most effective odor removal.
- During this time, you can place your perishables in the ice cube fridge.
The best thing about using this product is that the activated charcoal can be reused. You just need to freshen it up by placing it in the oven for 20 minutes at 350°F.
Method 5: Vinegar
Vinegar can be used in many ways to get rid of bad odors from the refrigerator. Like baking soda, white vinegar neutralizes bad odors.
It is particularly effective in removing the bad smell from decaying organic matter, which is the most common cause of bad smells coming from the refrigerator.
White vinegar also acts as a powerful disinfectant, killing all odor-causing bacteria and germs. It can be used to prepare a cleaning solution for the refrigerator.
Step 1. Mix vinegar and water.
Mix vinegar and water in a bowl.
- Pour ¼ cup white vinegar into a bowl.
- Add an equal amount of water.
Step 2. Place the solution in the refrigerator to eliminate odor
Place the diluted vinegar in the refrigerator
- Place the bowl of the solution in the refrigerator for 3-4 days.
- You can also use this solution to clean your refrigerator. It will remove any stains or residue that may be causing the odor.
Method 6: Vanilla essence
Who doesn't love the smell of vanilla? Using vanilla essence is another great way to remove odor from your fridge. After you clean your fridge with vanilla essence, old musty smells will be gone and your fridge will smell fresh and inviting.
One-step method: Rub vanilla essence onto shelves in the refrigerator.
Moisten a cotton pad with vanilla essence and rub it on the shelves.
- Pour some vanilla essence into a bowl and dip a cotton pad into it.
- Rub vanilla essence on refrigerator shelves to get rid of stale food odors.
Alternatively, you can soak a cotton pad in vanilla essence and place it in a small bowl in the fridge to get rid of bad smells. Just remember to replace the soaked cotton pad with a new one every 7 days to keep it from getting moldy.
Method 7: Oats
Oats are another highly absorbent ingredient. This tool is again incredibly simple. Just put a bowl of oatmeal in the fridge to absorb any bad odors.
One step method. Place the bowl of oats in the refrigerator.
Place the bowl of oats in the refrigerator.
- Place a bowl of oats in the refrigerator to absorb bad odors.
- Leave it in the refrigerator for 4-5 days to remove the smell from the refrigerator.
- You can also keep a bowl of oats in the refrigerator regularly to prevent odor buildup. Just replace the oats at regular intervals, such as every 7-10 days.
Tips
- The most important thing to do to keep your refrigerator odor free is to clean it regularly.
- Dispose of empty boxes or expired foods. Also remove any tiny pieces of old fruits and vegetables.
- If something is spilled inside the refrigerator, wipe it off immediately with a damp kitchen towel.
 You can also clean it with the white vinegar solution described in Method 5 above.
 - The combination of citrus and cloves can also prevent or eliminate bad odors from the refrigerator. Cut a lemon or orange in half and insert whole cloves into the fragrant pulp of each half. Put the two halves in the refrigerator to get rid of bad smells. You can also use this technique to keep flies away from your home.
.
How to Stop a Refrigerator Leaking
- Home and Garden
- Home Improvement
- How to Stop a Refrigerator Leaking
Gary Hedstrom, Peg9 Hedstrom, Judy003 Demands Immediate Solution Before proceeding with the repair, it is important to first find out why water is leaking from the refrigerator. There are many reasons for a leaking refrigerator. The most common cases are water may not get into the drain due to the wrong level or because the defrost drain is really clogged. In these cases, any homeowner can fix the situation with their own hands and stop the leak quite easily (see our steps below). Other causes may include improper installation (such as a water filter) or equipment damage such as a cracked drain. These problems may require replacement parts and professional help.
Leveling the refrigerator
When you see water under the refrigerator, check the front feet. Water (actually condensate) should drain from the refrigerator into the drain hole and then into the pan underneath where it evaporates. If the refrigerator is fully level or slightly tilted forward, water may not drain down the drain. All you have to do to get it working is to adjust the front legs so that the fridge tilts back slightly. This tilt also causes the door to close when you turn away from the refrigerator.
Here's how to level the refrigerator so that water doesn't leak into it:
-
Have an assistant tilt the refrigerator back slightly so you can climb under it.
-
Unscrew the front feet a couple of turns to raise them. (But do not remove them.)
-
Place the refrigerator.
-
Use a spirit level on the front edge of the refrigerator to make sure the legs are level.
-
Partially open the door and leave. Now it should close by itself.
Tilt the refrigerator only slightly because it is designed to be (almost) level, and too much tilt can cause problems elsewhere.
If you cannot adjust the legs, place a shim about 1/8" thick along the wide edge under each leg.
Cleaning the drain
If adjusting the feet does not stop water from leaking, the drain should be cleaned. It becomes clogged with food particles that can prevent water from draining, resulting in overflow and leakage. In this case, take the following measures to prevent water leakage from the refrigerator:
-
Locate the drain pipes at the back of your refrigerator or freezer.

-
Push a small plastic tube or pipe cleaner through the tubes.
-
Pour a mild solution of soapy water and ammonia into the drain tube to kill bacteria. If you have turkey paste or a syringe, squeeze water into the hole.
-
Check the tray under the refrigerator, on the left, by removing the front grille.
-
If the soapy water has not drained into it, the problem has not disappeared. Go to Step 6.
-
Working inside the refrigerator, push the tube or tube cleaner into and through the drain tube.
-
Flush the hole again with water.
-
Now you have to find water in the pan. If yes, don't worry; it evaporates.
Water problems can also occur if the refrigerator is placed in an unheated garage, porch or basement. As heat from the engine flows through the cold outside surface, it condenses and forms water that drips onto the floor. All you have to do is put a heater nearby, and if there is no more water, condensation is the problem. Solve the problem permanently by moving the refrigerator to a warmer location.
About the Author
Gary and Peg Hedstrom are self-taught repairmen with experience in carpentry, plumbing, appliance repair and more. Judy Ondrla Tremor - writer and editor of various newspapers and magazines.
.
Cleaning to Prevent Germs: How to Kill Bacteria
Whether you like it or not, bacteria are part of our lives. You will encounter this every day of your life, and while some of them are good, some are not. This leads many to ask, "What kills bacteria?"
Luckily, we have 10 top tips that will show you how to prevent germs and kill bacteria that can harm you.
Why you need to know how to kill bacteria
Bacteria produce toxins in the body that make us sick. They can cause a range of diseases, from mild cases of food poisoning to more serious illnesses such as whooping cough, cholera, and typhoid fever. Learning what kills germs is an important part of protecting yourself and your family from these diseases.
When it comes to figuring out how to kill germs, keeping your home clean and hygienic should be your number one priority. It is very important to regularly wipe, wash and replace old things.
What kills bacteria?
Finding bacteria-killing products is on the agenda of many people. FAQ: Are antibacterial products worth it and does bleach kill germs?
The answer to both questions is yes. Antibacterial products are designed specifically to fight bacteria and help reduce them, while bleaches like Domestos can be effective against many different types of bacteria.
Bleach is also very toxic to humans, so you should always follow the directions on the package before use. Products containing bleach should only be used in well-ventilated areas and should never be mixed with other cleaning chemicals as this can generate toxic gases. These products should always be stored in a safe and secure place away from children.
Top 10 Germ Prevention Tips
Want to know what kills germs and how to clean your home to get rid of them? Follow these ten tips and keep your home on top.
- Clean touch points - stop the spread of germs by wiping things like doorknobs with Handy Andy
- Wipe food preparation surfaces with Antibacterial Cleaner - especially before and after handling food
- Wash regularly hands - use antibacterial soap to fight bacteria

The most important thing when you learn to kill bacteria is to take preventive measures whenever possible. Act quickly, knowing there is a potential problem, and keep your home clean and hygienic.
.
How to Kill Germs and Bacteria in the Laundry
When you need to clean and sanitize your fabric, whether it's due to mold or mildew or a recent illness, it's important to know if your regular wash will do the trick. If you don't use the right germ-killing methods, your fresh clothes can become even dirtier after you wash them, as the machine inadvertently allows bacteria to spread from one item to another.
Some scientists have suggested that washing machines could become a haven for bacteria, as germs can remain after washing our dirty clothes. Viruses such as coronavirus (COVID-19) are still being researched to find out how they are transmitted, so taking action washing clothes precautions is a good idea to keep yourself safe.
How to Stop the Growth of Bacteria in Your Washing Machine
To prevent germs from getting into the washing machine or onto clean clothes, you must clean the washing machine itself.
-
Run an empty cycle with a cup of bleach or vinegar
Run an empty cycle with a cup of bleach or vinegar once a week.
 This will sanitize your washing machine and prevent germs in the drum. You must do this regularly to keep the machine in good condition.
 -
Ventilate the washing machine drum
To prevent mold spores from growing in the machine, keep the door open after washing so that it can come out.
-
Wipe the rubber ring with an antibacterial cleaner.
Wipe the rubber or plastic ring around the door regularly with an antibacterial cleaner.
-
Clean the fluff filter
Clean the fluff filter at least once every two weeks.
Another preventative tactic is to sort your laundry to avoid cross-contamination. Underwear, towels, and facial wipes are more likely to contain pathogens—bacteria that cause disease. A load of underwear alone will contain about 100 million E. coli in the wash water, which can lead to cross-contamination of the next load of laundry. Avoid washing such items in large batches to reduce bacteria with each wash, and remember to sanitize your machine regularly. Learn more about cleaning your washing machine here.
Does laundry detergent kill germs?
The combination of hot water and detergent is a great way to get rid of any remaining bacteria and germs. But it's important to balance these two factors to get the best possible wash (very high temperatures can negatively affect the cleaning power of biodetergents) and to be aware of your clothing's limitations. Washing a wool jumper at 80 degrees will cause it to shrink and other fabrics may melt, so always check the garment label before washing.
-
Using hot water (60 degrees is best) will make many detergents more effective at fighting oils and dirt that harbor bacteria. It is also recommended to use oxygen bleach whenever possible.
-
For deep disinfection, you can soak your laundry in a mixture of oxygen bleach and water for about half an hour before placing it in the normal wash. Just be sure to read the label on any laundry product you use to ensure your safety and the safety of your clothes.

-
Finally, when it comes to sanitizing your clothes, place tumble-dryable items in your tumble dryer to kill bacteria. For items that can't be tumble dried or if you don't have one, one of the most effective germ-killing tools is the sun, so lay your laundry out to dry in natural sunlight whenever the weather permits. you an opportunity.
Before washing your clothes, be sure to check the care label and follow the instructions accordingly. Here you can find more information on how to disinfect your clothes.
Disclaimer:
The information in this article is current at the time of publication. However, as the situation around COVID-19 continues to evolve, it is possible that some of the guidance has changed since it was posted. While Cleanipedia tries to keep our content as up to date as possible, we also encourage readers to stay up to date with news and recommendations using GOV UK and NHS .