How to hand feed baby conures
Hand green cheek conure breeding
Hand green cheek conure breeding: Green Cheek Conure As I specified in the reproduction part we sometimes end up with hand breeding the cause being bad parents, or to have an extremely sociable companion bird.
For or against it is always a debate that I leave open to each of you and of which I respect every opinion on this subject.
The fact is that an exam (if he has been socialized from his young age with these congeners) can become an exemplary parent, the proximity of the man no longer scares him when we check if everything is going well in the nests.
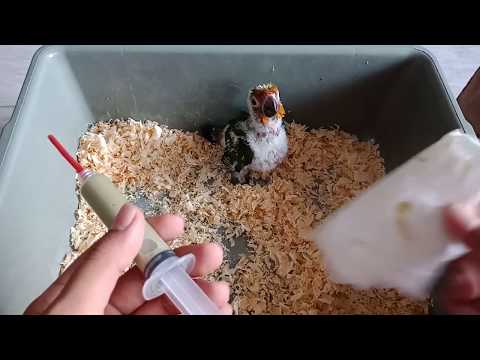
1 Green cheek conure hand feeding schedule
2 Hand Feeding 4 week old Baby Green Cheek Conures
Green cheek conure hand feeding schedule
-The spoon
-The syringe
-The probe (syringe with a plastic tip that is directed directly into the crop).
for my part since the beginning of my breeding I chose the spoon.
Usually, I remove babies between 8 and 10 days before they open their eyes this way when they do open them I am identified as the adoptive parent.
It is assiduous work and full time the person who says to himself we are not within an hour to give them food is mistaken the raised by hand requires rigor, patience, and precision because from the moment we decided to raise them by hand; the young are totally dependent on us for a period of 8 weeks for this species.
To start here is the material that I use I take an infrared lamp with a power of 100 watts, a plastic bin of a dimension L60 / l40 / h40, and voila I know it’s a craft but I have never experienced any loss to this day.
Place everything in a room where temperature variations are nonexistent why (I adjust my lamp to 30 degrees precisely and adjust the height of my hanging lamp in relation to the baby) imagine a variation of 2 degrees and the little ones would suffocate so much they would have hot and vice versa, they would shiver so much they would be cold so everything must be precise.
When the juveniles start to feather, the temperature is gradually lowered to reach 26 degrees when they are completely covered with feathers.
The mistake to avoid, do not to place them behind a window door because a ray of sunshine in the tile and the temperatures soar causing the death of babies or burns.
The feeding itself, various patée for breeding by hand is up to you to choose the one that best meets the needs of the birds and especially the species,
the patée will be more liquid at the start of feeding to become more consistent by the then the temperature should be between 38 and 42 degrees Celsius, too hot the babies burn themselves too cold they will not eat.
Hand green cheek conure breeding
In the beginning, the feeding takes place every 2h40 for babies aged 8 days, we start very early in the morning 4h to finish around 22:30 / 23h.
After about two weeks we go to every 4 hours, in fact, it is necessary that between each meal the food in the crop be digested otherwise we risk having bacteria or other problems. The temperature of the lamp also has a role to play in the digestion phase.
Around the age of 4 to 5 weeks, I place in my tray 3 small pots, one with water, another with greasy patée, and another with my mixture of large parakeets, apples, and carrots, so weaning will be really easy.
An important phase after each feeding the material used must be perfectly disinfected and cleaned the tank with the droppings of the babies for my part I use absorbent paper. Hygiene must be irreproachable in order to have healthy birds.
At 6 weeks I only give food morning, noon, and evening then morning and evening to arrive at 7 to 8 weeks once in the evening and so the weaning is done gently.
For my part, I am not at all in favor of their wing cuttings: why?
I have known cases where the pyrrhura had behavioral disorders that are to say tore the feathers from the tailor mutilated them.
The pyrrhura is stressed not to fly and you know like me that the molt only happens once A year therefore the pyrrhura is condemned to stay where you want for a year or it seems good for you but may not be for him.
To get to say that I had a case where the pyrrhura had lost all desire to fly. After having re-stimulated it (put on the arm by making movements from the bottom-up) for three good months he finally found the ability to fly.
For me, if we designed two wings for him, it is for free flight whereas some people stop their whims by wanting to show that we have a pyrrhura on the shoulder and that it does not move; you are surprised or would you like that he goes poor !!!
But some people call it EAM !!! well it only commits me but it’s my rant, but everyone does what he wants
After having expanded on the subject; all you have to do is enjoy this love between your bird and your breeder, a wonderful contact has been created, and the complicity is born …
a hand-reared pyrrhura is extremely intelligent he has a keen eye a fast flight like lightning, is very friendly and endearing, and player always wanting to explore something, and the males can say a few words audible in the ear that’s why I strongly advise learning to know the pyrrhuras ….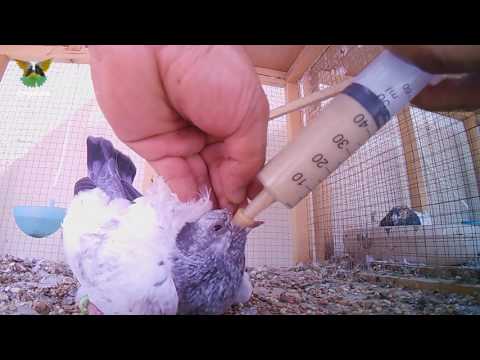
in high hand, they are not garish like the ones raised by the parents, in my eyes it is a bird that has many qualities and unlike many people, it is a bird that knows what it wants to take my word for he has a strong character.
Here I think that I put forward the breeding of pyrrhuras and that people will appreciate it at its true value.
SOURCE:Rita Garris
Instructions For Hand-Feeding Baby Birds
More Bird Topics ▼
The idea of a new baby bird in the family is an exciting proposition that brings a new dimension to your life. However, if you decide to hand-feed your new pet, you will need some knowlege, a lot of patience, and a good diet for a growing bird.
Veterinarians and naturalists have developed techniques for hand raising nesting birds, and
there are now easy-to-use special baby bird formulas for feeding the ever-hungry little babies.
Higgins Intune Baby Bird Hand Feeding Formula and
Higgins Intune Hi Energy Baby Macaw Hand Feeding Formula
are super foods that meet the extraordinary nutritional needs of these unusually fast
growing babies. It is rice based (sourced from North America) and corn free. inTune® Natural Hand Feeding uses natural and healthy, high end sources for nutritional fat like coconut oil and macadamia nut meal. It is also the only commercial hand feeding formula on the market with natural banana & mango aroma.
The need to cook the formula has also been eliminated. It
can now be prepared with hot water!
It is rice based (sourced from North America) and corn free. inTune® Natural Hand Feeding uses natural and healthy, high end sources for nutritional fat like coconut oil and macadamia nut meal. It is also the only commercial hand feeding formula on the market with natural banana & mango aroma.
The need to cook the formula has also been eliminated. It
can now be prepared with hot water!
Most baby birds arrive in the world wet, naked, blind, and too weak to support themselves. When fallen from their nest, survival is questionable. Now, with help, they are able to grow and develop normally. Wild birds can be raised and returned to nature. Pet birds learn to accept people as friends. The real benefactors, though, are people. Nature returns many-fold for kindness performed.
Hand-Feeding
The most important considerations in the hand feeding process are the frequency
and volume of feeding. Baby birds grow at an extraordinarily rapid rate and this growth
requires a great deal of food to meet the nutritional needs of the bird. However, the crop
of a young bird holds a limited amount of food, so it must be filled frequently. As the
bird gets older, the capacity of the crop increases, and the number of daily feedings will
be reduced. The volume to be fed is base upon a combination of observation and judgement.
However, the crop
of a young bird holds a limited amount of food, so it must be filled frequently. As the
bird gets older, the capacity of the crop increases, and the number of daily feedings will
be reduced. The volume to be fed is base upon a combination of observation and judgement.
Procedure
Check the Fullness of the Crop
Nature designed a rather unique feature into the digestive system
of birds-a widening of the oesophagus at the lower pan of the neck This
widening acts as a compartment to hold a quantity of food, and is named
the crop.
The crop can be easily visualized in young birds while feathering is incomplete. In older birds with a well developed covering of feathers, the fullness can be checked by gently feeling the crop with a thumb and index finger.
The crop should be examined before each feeding. Ideally, in the rapidly
growing young bird, the crop should never be allowed to become completely
empty. Checking the crop fullness will help determine the frequency
and volume of feeding to be given. Normally the crop will empty in 4
hours. A crop that remains full or is not emptying properly indicates
some type
of problem.
Ideally, in the rapidly
growing young bird, the crop should never be allowed to become completely
empty. Checking the crop fullness will help determine the frequency
and volume of feeding to be given. Normally the crop will empty in 4
hours. A crop that remains full or is not emptying properly indicates
some type
of problem.
Position Bird for Hand-Feeding.
Wild birds are best fed while in a nest box. They will open their beaks and gape,
making feeding very easy. Avoid excessive handling of wild birds. Pet birds are removed
from the nest box and placed on a towel. By cupping a hand gently around the baby during
feeding , adequate support will be given to position him for eating.
Shop Avian Adventures Lifetime Cages
On Sale now. Free Shipping.
Carefully Introduce Feeding Device into the Mouth.
The introduction of an eye dropper or syringe into the mouth is relatively easy, as the baby birds will be eager to be fed and will be gaping (opening the beak wide in order to receive the feeding). Occasionally, a bird may not gape, and gentle tapping of the beak with the feeding device will encourage the bird to open its beak. The device should be carefully passed into the left side toward the right side of the mouth.
Administration of the formula should be synchronized with swallowing. Birds swallow with an unusual rhythmic bobbing of the head up and down. While the bird is swallowing, the formula is delivered quickly. With practice, a "feet" for the procedure develops, and, done efficiently, the filling of the crop can be accomplished in a surprisingly short time.
Volume of formula to be Given
The volume of food given is of critical importance. overfilling of the crop could
lead to backflow up the oesophagus, into the throat, and down the windpipe, which could
cause death. Under-filling the crop might result in starvation.
overfilling of the crop could
lead to backflow up the oesophagus, into the throat, and down the windpipe, which could
cause death. Under-filling the crop might result in starvation.
As t he food material is being delivered, the crop will begin to fill and bulge in the region of the lower neck. Careful observation and experience are necessary in order to determine when the crop is adequately filled.
Frequently, the bird will stop gaping when the crop is filled; however, some birds, will continue to gape even when filled. Watch closely when filling for any evidence of food material backing up into the mouth. If this occurs, immediately stop until the mouth is cleared.
When the bird appears to have had enough feeding material, determine the
state of fullness of the crop to make sure a sufficient amount of feeding
was delivered.
Any excess food material on the skin, beak or feathers should he removed with warm water when the feeding is complete. It can be followed with a few drops of warm water to aid in "cleaning the mouth." Feeding utensils should be cleaned immediately after use. Check the anus to be certain no fecal matter has accumulated. Ideally, monitor the bird's weight daily with an accurate scale. A healthy baby gains weight daily.
Preparation of Baby Bird Formula
Follow the manufacturer's directions when mixing the formula.
Important: "Use distilled or boiled water to eliminate bacteria growth from
contaminated tap water." The water should be approximately 105-110
degrees. Add the water to the powder gradually while stirring. After thorough
mixing
to eliminate lumps,
the formula should be the consistency of creamy pudding. This thickness
will allow it to be drawn into an eye dropper or syringe or will roll off
a spoon. For older birds the mixture may be made thicker.
Do not reuse mixed formula. Discard and mix fresh at each feeding.
If really necessary, sufficient amount of formula may be prepared at one time to last 3
days if covered and refrigerated after preparation. The amount needed for each feeding can
be heated and fed but not reused. Caution: You might need to add water in the heating
process. Diluting formula by increasing water will reduce the concentration of the diet.
Temperature to Feed Formula
The formula should be served warm- 104-106 F- but not hot, as excess
heat may damage the digestive tract. It should feel Slightly warm to the touch. It is
highly recommended to use a thermometer to measure the temperature.
In order to maintain the heat of the hand-feeding formula mixture, a double-boiler
type arrangement can be set up with the container of prepared formula placed in a
bowl or pan of warm water during the feeding process.
Feeding Area
Psittacine birds while being fed should be placed on a surface, such as a towel,
where there will be insulative properties to prevent excess heat loss and a surface where
they can grip with their feet, preventing slippage and possible injury.
Frequency of Feeding
Cockatiels and Small Parrots
Baby birds can be removed from their parents from between 8 to 21 days. Waiting
until 2 1/2 to 3 weeks is safer for the beginner, as the bird is hardier due to the
presence of some feathering.
Hatching to 1 week.
If the bird was removed from the nest shortly after hatching, for whatever
reason, feeding requires special care. There should be no attempts to feed the bird for at
least 12 hours after hatching. The crop is very small and will hold only a limited amount
of food. After continued use, it will expand. The first feeding at 12 hours should be one
drop of water. Approximately 1/2 to 1 hour later, another drop of water may be given.
Feeding too frequently during this period may overload the crop and lead to aspiration and
death.
Approximately 1/2 to 1 hour later, another drop of water may be given.
Feeding too frequently during this period may overload the crop and lead to aspiration and
death.
After these initial feedings, if the baby appears normal and is excreting, a few drops of very thin formula can be given. In order that the baby bird receive enough food, the hand-feedings are repeated every two hours around the clock.
One to two weeks - Birds can be fed every 2-3 hours around the dock. If the birds are kept especially warm and comfortable, the night feedings after midnight can be eliminated. However, feedings must begin again at 6:00 AM.
Two to three weeks - This is a relatively safe age to remove the baby
birds from the nest for hand-feeding. It is easier to check the crop and feed them. The
birds of this age can be fed every three to four hours from 6:00 A.M. to midnight.
Three to four weeks - Feed the birds every 4 hours. As feeding frequency tapers off, the formula can be slightly thickened. At 4 weeks, the birds can be put in a cage with low perches. Water in a bowl may be placed inside.
Five to six weeks - Feed the birds twice daily. A pelleted bird food and other foods may be placed in the cage to encourage the bird to eat on its own.
Seven weeks - Birds should be placed in a large cage with pellets in cups and scattered on the floor. Introduce the birds to a variety of succulent foods, but these should not make up more than 20% of the diet. Vegetables such as peas and corn are well accepted.
Weaning
Birds should not be weaned before 7 weeks, usually about 8 weeks. Before weaning
the bird off hand-feeding, keep close watch to see that the bird is actually eating
adequate amounts of pellets on its own and not merely nibbling at the food. Handle the
crop to determine the fullness and check the breastbone for degree of muscling. A weaning
bird may lose as much as 10% of it's weight normally. Any more than that may be an
indication of a problem. It is recommended that the bird be weighed regularly through this
period.
Handle the
crop to determine the fullness and check the breastbone for degree of muscling. A weaning
bird may lose as much as 10% of it's weight normally. Any more than that may be an
indication of a problem. It is recommended that the bird be weighed regularly through this
period.
When first weaning the bird, give them pellets, as these are a nutritionally complete and balanced diet for the bird. It is a good idea to keep an older bird in a cage next to the cage with the young weanling to teach them to eat through mimicry.
If the baby birds are not weaned, they will become "spoiled" and will not eat on
their own, preferring to be hand fed. However, if they are weaned too early, they will not
eat adequately, gradually lose weight, become weak and die. Therefore, if baby birds are
begging to be fed, even after they are weaned, there may need to be a reversal back to
hand-feeding as they may not be eating adequately.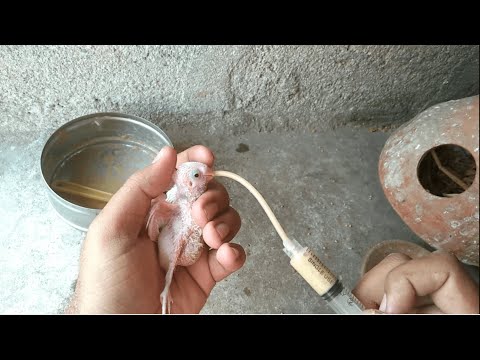
FREQUENCY OF HAND-FEEDING COCKATIELS and SMALL PARROTS
| Age in Weeks | Number of Daily Feedings |
0 |
Every 2 Hours (Around the Clock) |
| 1 | Every 2 Hours (Around the Clock*) |
| 2 | Every 3 Hours (6 a.m. to Midnight) |
3 |
"Safest" Period To Begin Hand Feeding Every 4 Hours (6 a.m. to Midnight) |
| 4 | Every 5 Hours (6 a.m. to Midnight) |
| 5 to 7 | Two Feedings Daily |
*If bird is kept especially warm and comfortable,
the 2 a.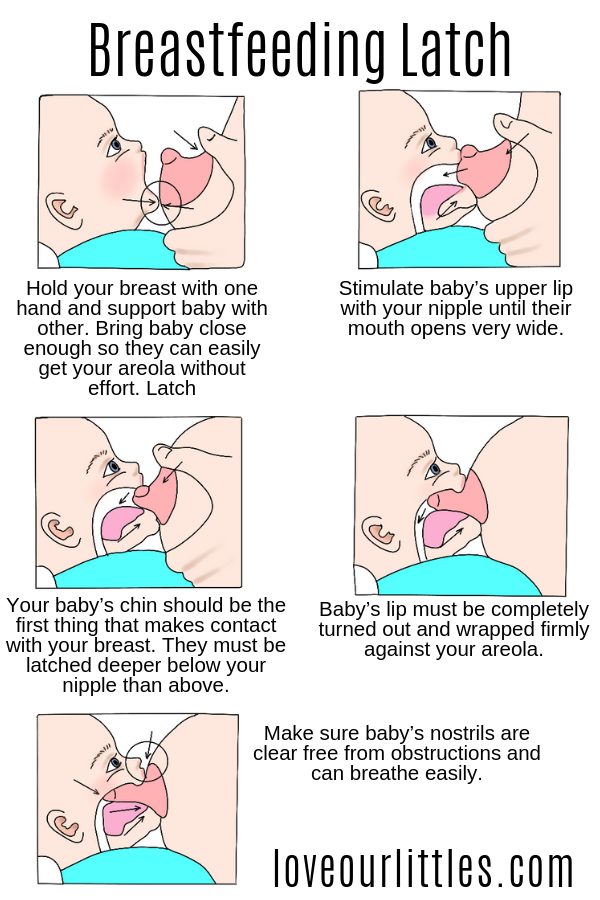 m. and 4 a.m. feedings can be eliminated.
Weaning Period - Important -
Make sure bird is eating adequately on its own before discontinuing hand-feeding. Check
fullness of crop.
Housing and Heat
A small cardboard box approximately 12" x12"xl2" or a small fish
aquarium with layers of paper towels over a one inch padding of cloth towelling on the
bottom will serve as an incubator and holding area while the babies are young. A heating
pad is placed under 1/2 of the box or aquarium. A towel is placed over the top. Either the
heating pad setting or the amount of the top that is covered by the towel may be adjusted
to provide a constant 85-90' for non-feathered birds. The temperature is gradually reduced
as they become feathered and mature. It is recommended to observe the babies carefully to
determine their comfort level. A cold baby will shiver and a baby that is too hot will not
sleep well and will breathe heavily through an open mouth. A bottle or tin filled with
water and holes punched in the lid to allow for evaporation will help to provide humidity.
A bottle or tin filled with
water and holes punched in the lid to allow for evaporation will help to provide humidity.
WILD BIRDS
Frequency of Feeding
The frequency and volume of feedings given to baby birds are largely determined
by their age. Judging the age of wild birds is difficult if untrained, so the best way to
determine feeding requirements is through the use of readily observable changes in the
bird. For example, whether or not the eyes are open, and if the bird is standing up
"off their hocks."
Before the eyes are open
If the baby birds appear strong and are peeping with their mouths gaping open,
then they can eat as much as they want. Ideally, baby birds of this young age should be
fed every 15-20 minutes until their eyes are open. They can go up to 30 minutes without a
feeding with no ill effects; however, more frequent feedings are preferred. They do not
require around-the-dock feeding as in nature, they are fed only during daylight hours. In
accordance with this, they are given feedings for a 12 hour period. Nonetheless,
hand-feeding wild birds is quite a commitment, as it requires nearly 50 feedings per day.
They do not
require around-the-dock feeding as in nature, they are fed only during daylight hours. In
accordance with this, they are given feedings for a 12 hour period. Nonetheless,
hand-feeding wild birds is quite a commitment, as it requires nearly 50 feedings per day.
When the eyes are open
As the bird becomes older, the frequency of hand-feeding can be reduced and the
volume increased. Efforts can be initiated to get the bird to eat on its own. When a bird
initially opens its eyes, it can be fed every half hour unless hungry or peeping.
When birds are "off their hocks"
When birds become stronger and begin to stand on their legs ("off their
hocks'), then feedings can be given every 45 minutes. Time between feedings can steadily
increased, and when the bird is out of the nest, feedings can be given at 2 hour
intervals.
FREQUENCY OF HAND-FEEDING FOR WILD BIRDS
| Age | Number of Daily Feedings |
Before Eyes Are Open: |
Feed Bird Every 15 Minutes (12 Hour Period) |
| Eyes Are Open: | Feed Bird Every 30 Minutes (12 Hour Period) |
| Off Their Hocks | Feed Bird Every 45 Minutes (12 Hour Period) |
| Bird Out Of Nest: (Standing On Their Own) |
Feed Bird Every 2 Hours (12 Hour Period) |
*Wean at 15 Days
IMPORTANT-Bird must be eating adequately on its own.
Weaning
Wild birds should begin showing interest in their surroundings and start to eat
on their own by 15 days. Provide live food (meal worms) and grass, twigs, etc. in the nest
to stimulate interest in the environment. Spreading seed on the bottom of the nest will
also encourage the bird to eat on its own.
During the weaning period, it is critical to keep a close watch on the bird in order that good nutrition is maintained. Many times, a bird may be pecking at seed, giving the impression that it is eating, when in actuality, it is not taking in enough for maintenance. Therefore, it is very important to observe if the bird is eating seed during this period and regularly check the crop for fullness.
If other young birds who are eating on their own are present, placing
the baby bird in the same cage will hasten socialization, and the bird
will
learn to eat on its own through the
imitation of others.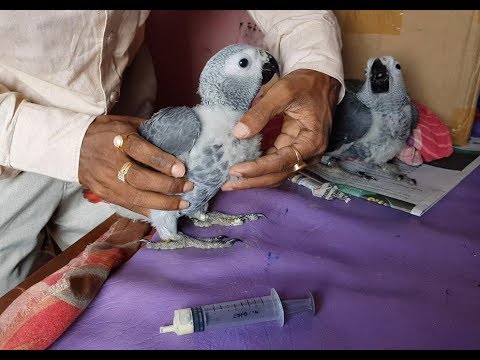
Housing For Wild Baby Birds
Following nature's design, a nest is constructed. The sides are formed from cloth
rolled to a diameter of 1 1/2 inches and then forming a circular shape like a doughnut.
The nest would have a diameter of 4-8 inches, depending upon the number and size of
the babies. The 1 1/2' height makes the sides of the nest sufficiently high to keep the
babies in the nest, but low enough to allow the baby bird to scoot backwards and pass his
waste over the side of the nest.
Paper towels are placed in the bottom of the nest to a depth of 1/2 inch and then placed over the top of the entire nest. The towels are arranged to form a sloping surface which enables the bird to back up to the top of the nest to eliminate, and the paper towels can be easily replaced to maintain cleanliness.
Heat and Humidity
To provide heat in the nest box, a heating pad can be placed under half of the
nest and dialed to a setting which will maintain temperature of 85-90 degrees for non
feathered birds and gradually reduced as they become feathered.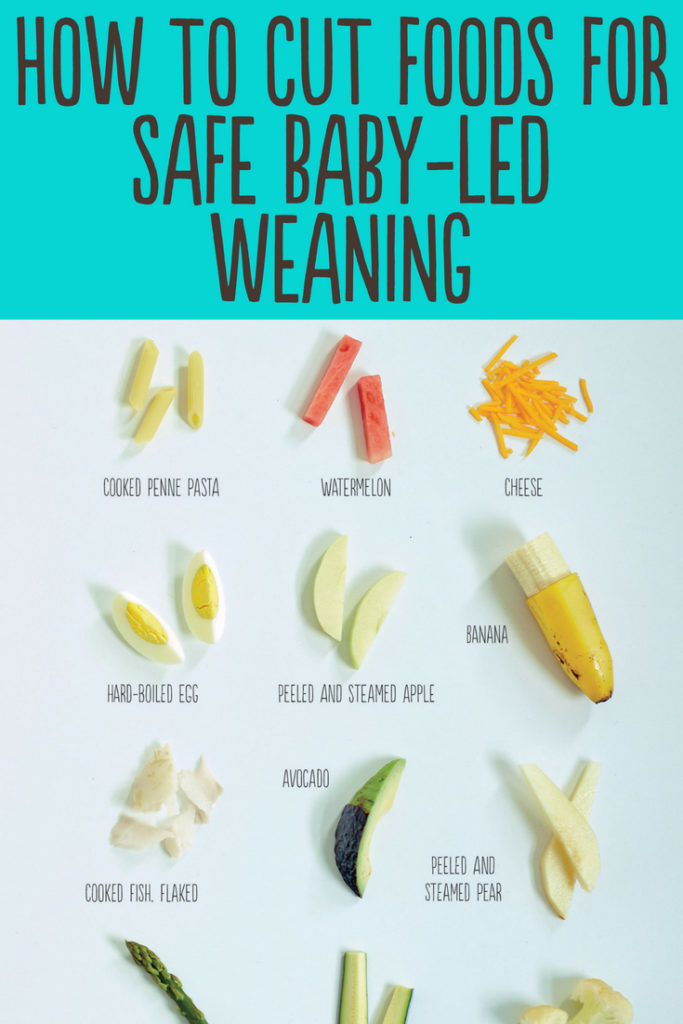 By placing heat under half
the nest, the bird is able to select the area where the temperature is most comfortable.
The box should be kept covered. A bottle or tin filled with water and holes punched in the
lid to allow for evaporation will help to provide proper humidity.
By placing heat under half
the nest, the bird is able to select the area where the temperature is most comfortable.
The box should be kept covered. A bottle or tin filled with water and holes punched in the
lid to allow for evaporation will help to provide proper humidity.
Caution
While raising wild birds is rewarding, please, do not make a wild bird a pet. For
more information contact your local Wildlife Agency, local Rehabilitation Center, Humane
Society, State Fish and Game Agency or the Federal United States Fish and Wildlife
Service.
Weaning Pet Birds With Avi-Cakes Food
Your pet birds have received a good start in life through the nutritional
benefits of Nutri- Start baby bird food. It is important to continue with high-quality
nutrition during the weaning stage and beyond. Lafeber's Avi-Cakes are an excellent
weaning food for your birds.
When birds reach the weaning stage, simply break Avi-Cakes into small
pieces and spread them near the babies.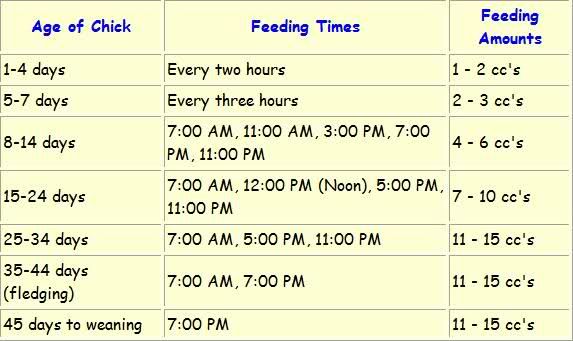 They will first investigate
the food; then, pick it up and start
self-feeding. (Supply fresh Avi-Cakes daily.) When the babies are eating
the Avi-Cakes you will first want to eliminate the middle of the day
hand-fed meal. As the birds continue
eating on their own, discontinue the morning and finally the evening hand-fed
meal.
They will first investigate
the food; then, pick it up and start
self-feeding. (Supply fresh Avi-Cakes daily.) When the babies are eating
the Avi-Cakes you will first want to eliminate the middle of the day
hand-fed meal. As the birds continue
eating on their own, discontinue the morning and finally the evening hand-fed
meal.
Since Avi-Cakes provide complete nutrition for pet birds, you may continue feeding Avi-Cakes or you may choose one of the other fine quality foods manufactured by Lafeber Company.
This bit of information was brought to you by Lafeber Bird Foods
Various breastfeeding positions
Try different breastfeeding positions to find the one that works best for you and your baby. You can see the options in our selection of photos
Share this information
There is no right or wrong way to hold the baby while
feeding, and mom and baby are sure to find their favorite position.
It is important that both you and your child feel comfortable. 1.2 It's good to learn a few different breastfeeding positions and techniques because life's circumstances often require us to be flexible, especially as your baby gets older and you start to leave the house more often.
Whatever position you choose to breastfeed your baby, remember a few simple rules.
- Prepare everything you need before feeding, including drinks, food, mobile phone, TV remote control, book or magazine. And do not forget to go to the toilet - the feeding process can take a long time!
- Make sure your baby is comfortable. Whichever position you choose, it's important to keep your baby strong, level, and provide good support for their head, neck, and spine.
- You should also be comfortable. Don't stress. If necessary, use pillows of different sizes or rolls of towels to support your back or arms.
- Make sure your baby is latching on correctly.
 Proper grip is the key to comfort when breastfeeding.
 - If your baby does not latch on well or you experience pain while feeding, contact a lactation consultant for help. The specialist will also be able to show you how to hold your baby more comfortably.
1. Relaxed feeding or reclining position
The relaxed feeding position, also known as biological feeding, 1 is often the first position for most mothers. If, immediately after birth, the baby is placed on the mother’s chest or stomach, normally, he instinctively reaches for the breast and tries to grab the nipple. This phenomenon is known as the breast seeking reflex. Skin-to-skin contact stimulates the infant's feeding instinct, and gravity helps him to latch onto the breast and maintain balance.
But not only newborns can be fed in the reclining position - this position is great for babies of any age. It can be especially helpful if your baby does not latch well in other positions or does not like to be touched during feeding, and also if you have too much milk flow or too large breasts.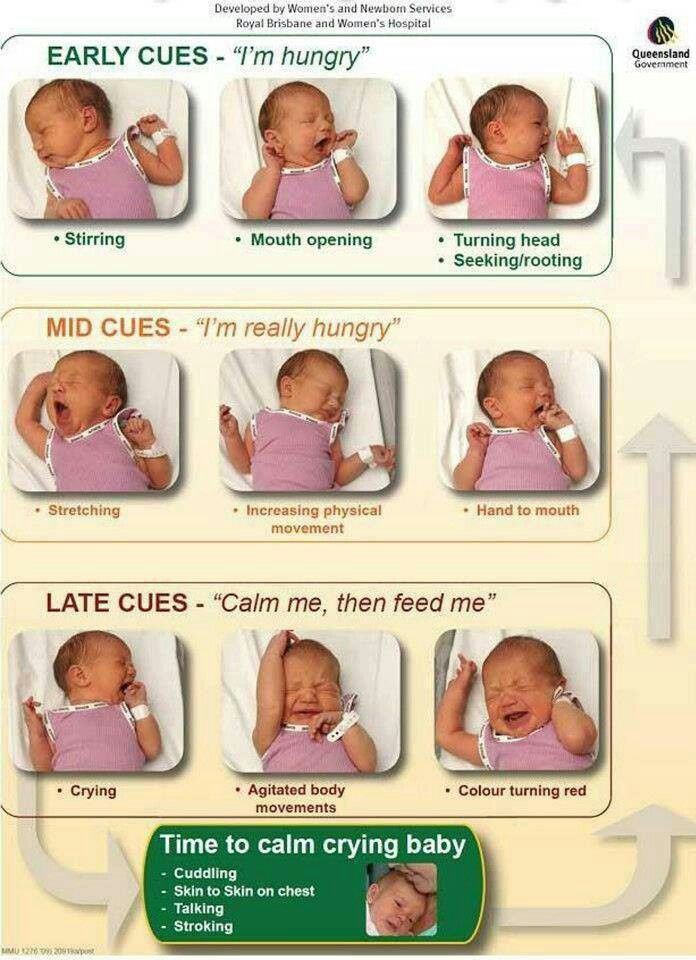 Isabelle, a mother from the UK, shares her experience: “I had large breasts, and the baby was born small - 2.7 kg, so it was not easy to find a comfortable position at first. After a few weeks, it became clear that there was no “correct” posture for me. As a result, I most often fed lying down, putting the baby on my chest. ”
It is more convenient to feed not lying flat on your back, but half-sitting, leaning on pillows. So you will have a back support and you will be able to watch the baby during feeding.
2. Cradle position
This is the classic
first thought of breastfeeding. Mom sits straight
, and the baby lies on her side on her arm, pressing his stomach against her stomach. 3 Although this is a very popular position, it is not always easy to master with newborns because it gives the baby less support. Try putting a pillow under your back, and put a special breastfeeding pillow on your knees and lean on it with your hands. So you can more reliably support the child, without overstraining your back and shoulders. Just make sure that the baby does not lie too high on the pillow for feeding. The breast should remain at a natural level so that the baby can grab it without effort, otherwise sore nipples cannot be avoided.
“I breastfed in the cradle position because it suited me perfectly! It was comfortable and I loved just sitting and looking at my little one,” recalls Rachel, a mother of two from Italy.
3. Cross Cradle
This breastfeeding position looks almost the same as Cradle, but the baby is on the other arm. 3 This gives your baby support around the neck and shoulders so he can tilt his head to latch on. This position is great for breastfeeding newborns and small babies, as well as for babies who do not latch well. Since the baby lies completely on the other hand, it becomes easier to control his position and you can adjust the chest with your free hand.
Julie, a UK mother of two, finds this position very practical: “I usually breastfeed my youngest in the cross cradle position.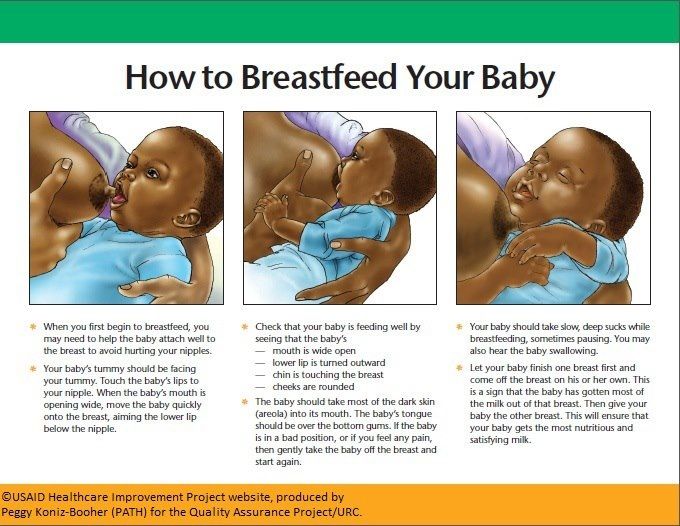 So I have a free second hand, and I can take care of an older baby at the same time. ”
Do not hold the baby's head at first, otherwise you may inadvertently press his chin against his chest. Because of this, the child will not be able to take the breast deeply, because the nipple will rest against the base of the tongue, and not against the palate, which will lead to inflammation of the nipples. As the child grows, this position becomes more comfortable, and he can rest his head on your palm (as shown in the photo above).
4. Underarm breastfeeding
In this position, also known as the “ball grip”, the mother sits with the baby lying along her arm at the side, legs towards the back of the chair (or any other seat). 3 Another comfortable position for newborn breastfeeding, you can give your baby good support, full control of his position and a good view of his face. And the baby feels safe in close contact with the mother's body. This position is especially good for those who have had a caesarean section or a premature birth, as well as mothers of twins and women with large breasts.
“When I breastfed my first daughter, I had very large K-sized breasts—twice the size of her head,” recalls Amy, an Australian mother of two. - I put rolls of towels under each breast, because they were very heavy, and fed my daughter in a pose from under the arm, but only sitting straighter so as not to crush her. This position was also convenient because I had a caesarean section and could not put the baby on my stomach.”
5. Side-lying position
The side-lying position is ideal for a relaxed
nighttime feeding in bed or on the couch. If you had a
caesarean section or ruptures during childbirth, this position may be more comfortable than sitting down. 3 In this position, mother and baby lie side by side, tummy to tummy.
“It was difficult for me to sit during endless night feedings, firstly because of the caesarean section, and secondly because of lack of sleep,” recalls Francesca, a mother from the UK. “And then I discovered that you can feed your baby lying on your side and rest at the same time.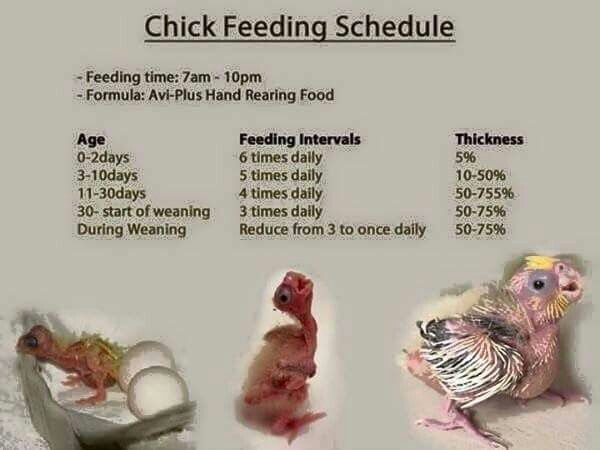 ”
”
“Because of the short tongue frenulum, Maisie could only properly latch on to her breasts while lying on her side. The lactation consultant showed me how it's done. In this position, the flow of milk was optimal for my daughter, and it was easier for her to keep the nipple in her mouth. As she got older, she became much better at grabbing her breasts in normal positions,” says Sarah, mother of two from Australia.
6. Relaxed breastfeeding after caesarean section
If you can't find a comfortable position for breastfeeding after caesarean section, 3 try holding the baby on your shoulder in a reclining position – this does not stress the postoperative suture and allows you to breastfeed your baby comfortably. You can also try side feeding.
7. Sitting upright breastfeeding or “koala pose”
When breastfeeding in an upright position or “koala pose”, the baby sits with a straight back and a raised head on the mother's hip. 4 This position can be tried even with a newborn if it is well supported, but it is especially convenient for feeding a grown child who can already sit up by himself. The upright sitting position, or “koala pose,” is great for toddlers who suffer from reflux or ear infections and feel better sitting. In addition, this pose may be suitable for children with a shortened frenulum of the tongue or reduced muscle tone.
“When my daughter got a little older, I would often feed her in an upright position, which was more comfortable for both of us, and I could still hold her close,” recalls Peggy, a mother from Switzerland. “Besides, it was possible to discreetly breastfeed her in public places.”
8. Overhanging position
In this position, the baby lies on his back, and the mother bends over him
on all fours so that the nipple falls directly into his mouth. 4 Some moms say this breastfeeding position is good to use occasionally for mastitis, when touching the breasts is especially unpleasant. Some say that this breastfeeding position helps with blockage of the milk ducts, although there is no scientific evidence for this yet. You can also feed in the “overhanging” position while sitting, kneeling over the baby on a bed or sofa, as well as reclining on your stomach with support on your elbows. Pillows of various sizes that you can lean on will help you avoid back and shoulder strain.
“I have breastfed several times in the 'overhang' position for clogged milk ducts when no other means of dissolving the blockage worked. And this pose seems to have helped. I think it's because of gravity, and also because the breasts were at a completely different angle than with normal feeding, and my daughter sucked her differently, ”says Ellie, a mother of two from the UK.
Feeding in the "overhanging" position is unlikely to be practiced regularly, but in some cases this position may be useful.
“I used to breastfeed in the overhang position when my baby was having trouble latch-on,” says Lorna, mother of two in the UK. - This, of course, is not the most convenient way, but then I was ready for anything, if only he could capture the chest. We succeeded and have been breastfeeding for eight months now!”
9. Breastfeeding in a sling or in a sling
Breastfeeding in a sling takes some practice, but it can be used to go out, look after older children, or even do a little household chores.
The sling is also useful if the baby does not like to lie down or is often attached to the breast. Lindsey, a mother of two in the US, notes: “I used the carrier frequently for both of my children. When we were out, I tied the sarong around my neck and covered the carrier with it. Under such a cape, the baby can eat as much as he wants until he falls asleep.
This breastfeeding position is best when the baby is already good at breastfeeding and can hold his head up by himself. Any slings are suitable for breastfeeding, including elastic and rings, as well as carrying bags. Whatever option you choose, the main thing is that you can always see the face of the child, and his chin does not rest against his chest.
10. Double hand-held breastfeeding
Double hand-held breastfeeding (or “double-ball grab”) is great for mothers of twins—you can breastfeed both at the same time and keep your arms relatively free. 4 When feeding in this position, it is advisable to use a special pillow for breastfeeding twins, especially at first. It will provide extra support and help keep both babies in the correct position, as well as reduce the burden on the abdomen if you had a caesarean section. In addition, the hands are freer, and if necessary, you can deal with one child without interfering with the second.
“My twins were born very tiny and had to be fed every two hours at any time of the day or night. Very soon it became clear: if I want to do anything besides feeding, I need to feed them both at the same time, - says Emma, mother of two children from the UK. “I breastfed them two by hand using a breastfeeding pillow.”
Other good positions for breastfeeding twins are two criss-cross cradles, one baby in the cradle and the other close at hand, reclining feeding, or sitting upright (one baby on one side, the other on the other).
11. Breastfeeding in the “hand-supported breast” or “dancer's hand” position
muscle tone (which is typical for premature babies, children suffering from various diseases or Down syndrome), try supporting his head and your chest at the same time. 4 Grasp your chest with your palm underneath so that your thumb is on one side and all the others are on the other. Move your hand slightly forward so that your thumb and forefinger form a "U" just in front of your chest. With the other three fingers, continue to support the chest. With your thumb and forefinger, hold the baby's head while feeding so that his chin rests on the part of the palm between them, your thumb gently holds the baby on one cheek, and your index finger on the other. So the baby gets excellent support, and you can control his position and see if he is holding his breast.
Literature
1 Colson SD et al. Optimal positions for the release of primitive neonatal reflexes stimulating breastfeeding. Early Hum Dev . 2008;84(7):441-449. - Colson S.D. et al., "Optimal Positions for Provoking Primitive Innate Reflexes to Induce Breastfeeding." Early Hume Dev. 2008;84(7):441-449.
2 UNICEF UK BFHI [ Internet ]. Off to the best start ; 2015 [ cited 2018 Feb ]. - UNICEF UK, Baby-Friendly Hospital Initiative, Start the Best You Can [Internet]. 2015 [cited February 2018].
3 Cadwell K. Latching - On and Suckling of the Healthy Term Neonate: Breastfeeding Assessment. J Midwifery & Women's Health. 2007;52(6):638-642. — Cadwell, K., "Latching and sucking in healthy newborns: evaluation of breastfeeding." F Midwifery Women Health. 2007;52(6):638-642.
4 Wambach K, Riordan J, editors.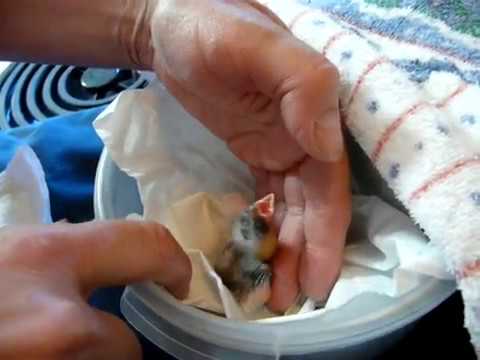 Breastfeeding and human lactation. Jones & Bartlett Learning ; 2014. 966 p . - Wambach K., Riordan J., "Breastfeeding and female lactation". Burlington, MA: Publishing House Jones & Bartlett Learning ; 2014. Pp. 966.
How to properly hold a baby in your arms
Bagdasaryan Kristina Genrihovna
Obstetrician-gynecologist, Ultrasound specialist
Clinic "Mother and Child" St. Petersburg
So, how to take the child from the supine position. Grasp his chest with both hands - thumbs in front, and the rest hold the back. If the baby is not yet able to hold his head, support it with your index fingers. Gently lift your baby up. Do not forget, your face turned to the child should always express the kindest feelings. Talk to the baby, tell him what you are doing, the voice should not be very loud, gentle.
Those who take a small child in their arms are divided into two categories: relatives who live with him under the same roof, and visitors. You should not allow a visitor to the child who has not taken off his outerwear, hat, street shoes, has not washed his hands with soap, has not freed his hands from rings, rings, watches, bracelets. The baby can be frightened by sharp extraneous odors, for example, the smell of tobacco, alcohol, perfume.
Sick people should not be allowed near the child - coughing, sneezing, as well as complaining of indigestion, suffering from skin diseases.
Even if loving relatives have come a long way on trains and planes to visit the baby, be persistent and keep the guests “in quarantine” for several days - will the infection picked up on the road show up? They may be offended, but the child will remain healthy! In order to more reliably protect the psyche and immune system of the child, it is useful in his first six months of life to limit the circle of people admitted to him.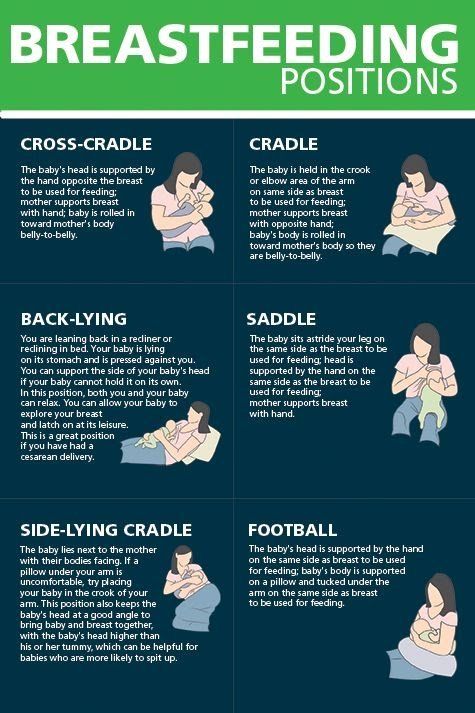 These are the rules, and no one - neither the formidable mother-in-law, nor the neighbor, nor the beloved boss - deserves an exception.
Some parents take the baby in their arms with unthinkable precautions, others, on the contrary, snatch it from the crib so famously. All these are extremes. So how should it be?
- do not make sudden movements when taking the baby
- never take it with one hand - only with both
- do not raise or lower the baby quickly, rapidly
- do not take it out of the crib by pulling on the handles
The position of the baby in the arms of the mother (or another adult), first of all, depends on his age, as well as on whether he will sleep or be awake. Up to 2-2.5 months (and sometimes longer), the baby’s head must be supported, so in a horizontal position (face up), arrange the baby on your arm so that the back of his head lies on your elbow, the back rests on your forearm, and your hands should support the buttocks and hips of the baby. You can put the baby on your forearm and stomach. In this case, the baby's head should be in the crook of the elbow, and your hands will close on the baby's stomach, and one hand will pass between the legs of the little one. If you want to hold the child in an upright position, for example, in order for him to burp excess air, then support his head and back: put one of your palms on the back of the baby’s head, with your forearm firmly press his body to you. With the other hand, fix the buttocks of the crumbs. In no case do not sit the child on your arm until he has confidently mastered the skill of sitting, which happens on average at the age of 6 months. From 2.5-3 months, you can already carry the baby, turning him away from you, holding him with one hand at chest level, with the other at hip level.
Depending on the age of the child, there are 6 ways to hold him in your arms.
Hanging. This method is good for babies up to 3 months old, when they still have trouble holding their head. With one hand support the neck and back of the baby's head, with the other - the buttocks, while his torso may be slightly bent, and his face turned towards you. This situation opens up scope for the much-needed emotional contact with the mother and other loved ones for a small child. Do not forget that in order to avoid the development of one-sidedness, the baby's head must be supported either with the left or with the right hand - periodically changing them.
On the arm. Ideal for babies aged 3-6 months, although you can keep your baby this way almost from birth. He rests his head on your shoulder, you hold his feet with your hand, and your arms with your forearm. With your other hand, you support the baby under the buttocks. At the same time, the child's legs should be bent at the knee and hip joints and bred. Don't forget to alternate hands.
In front of bust . Starting from 6 months, this way of holding the baby provides him with the same position as in the position on the back.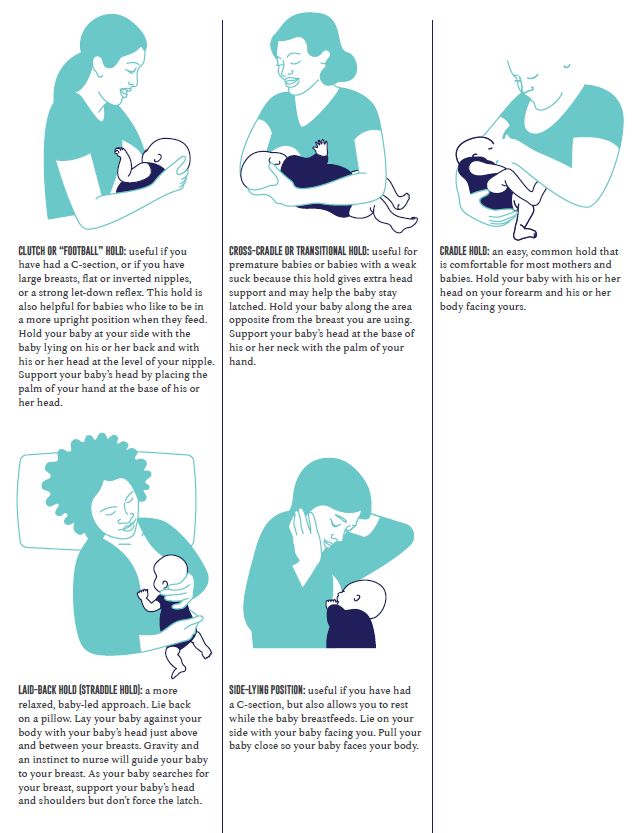 The baby leans back against your chest, his legs are bent and divorced, the soles are in contact. Hold the baby's shins with your thumbs, the feet with the index, middle and ring fingers, and the buttocks with the little fingers. This position is useful for the development of the child: as well as on the back, he can play with his legs, improving movements, mastering his body and gaining an idea of \u200b\u200bspace.
In front of the stomach . In children from 7 months old, this method allows you to reproduce crawling in a plastunsky way - a motor skill that they just need to master at this age. With one hand, take the child under the chest, and pass the other between the legs, supporting the stomach. Don't forget to switch hands.
On the side. Suitable for babies from 10 months, when they are already sitting confidently. Take the child so that he wraps his legs around your side, and rests his back on your forearm. You should support the baby's knee with your hand, giving it a slightly bent position. One arm of the child is on your chest, the other is free. Please note: you need to wear a child in this position alternately from one side to the other.
And, finally, a universal and completely international way to carry children of any age. Holding the palm of your right hand under the breast of the baby, firmly press his back to your chest. With your left hand, grasp the child's right thigh, bending his legs at the hip joints. Please note: the weight of a child under 6 months should not fall on your hand supporting the baby's pelvis - this is harmful to his spine and can ruin his posture in the future.
The baby grows, his body weight increases, and it becomes difficult to carry the baby in his arms for a long time (especially after 3 months of age, when the weight of the child reaches an average of 7 kg). Here, assistive devices for carrying children, such as a baby sling and a kangaroo backpack, can help out for a while. A baby sling is a modern modification of a piece of fabric that provides close physical contact between mother and child. In addition, with it, if necessary, it is easier to breastfeed a child while on the street or in another public place. You can use a baby sling from birth to a year and a half. It all depends on the weight of the baby and your physical capabilities. It is also very important to find the optimal position for the child and for the mother, which would provide both with maximum comfort. The basic positions of the baby in a baby sling are horizontal, with support for the spine, and (for older children) raised vertical or sitting, when the baby is tightly pulled by the fabric. A kangaroo backpack can be used only after the baby learns to hold his head confidently and his back muscles get stronger. Preference should be given to backpacks with a rigid back. But, nevertheless, you should not get too carried away with a baby sling and a kangaroo backpack. Firstly, it is still more useful for the baby to lie on the hard mattress of the crib or stroller. Secondly, it is unlikely that the child will like to sleep while sitting in a backpack.
 And, thirdly, a long stay of a child in the same position, which causes an uneven load on different parts of the spine, can provoke a pathology of the musculoskeletal system. Therefore, it is not recommended to keep the baby in a baby sling and "kangaroo" for more than 40 minutes a day. When the child grows up a little, you can practice the pose when the baby sits on his mother's side, facing her. The advantages of this position: the mother has one hand free, and the child has an excellent view. If the mother, for health reasons, is not recommended to take the baby in her arms, then you can often put him on her stomach, put him on her knees.
And, finally, many parents are concerned about the question, is it possible to spoil him by often taking the baby in his arms? If the needs of the child are not ignored, they are not denied affection and tactile contact, then this does not mean at all that he is spoiled and poorly educated. Love is not a synonym for bad parenting, especially if we are talking about a baby who is only a few weeks or months old.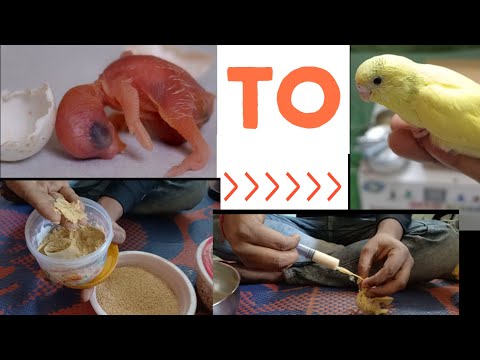 There is an opinion that it is impossible to spoil a child up to 12 months - until this age, all his "whims" are justified by needs, so an adult should indulge the baby in everything. And only when the baby reaches the year, parents should selectively treat his requests - based on what they are caused by. From this age, it is already possible to instill in the baby the concept that not only he, but also the people around him have needs.
Harsh parenting methods, according to which taking a child in your arms means pampering him, ignore the natural need of the baby for the constant presence of the mother (or the one who cares for him). While promoting the principle of early formation of "independence", they have significant negative features. Firstly, a child who is deliberately separated from his mother does not develop a trusting, kind attitude towards the world, and this will certainly have a negative impact in his adult life. Secondly, the restriction of bodily contact between mother and baby does not contribute to the emergence of mutual feelings between them. It is not surprising that the child in such cases is perceived as a hindrance to the usual way of life and ordinary affairs. And the baby constantly needs communication and his crying is a call to everyone, and first of all to his mother. Indeed, even in those cases when, it would seem, there are no reasons for tears, the baby may burst into offended or angry crying - because he is not yet ready for loneliness, his biological connection with his mother is still too strong. Thirdly, it should be borne in mind that a strict attitude towards a child, when adults try not to show their feelings and emotions in relation to a child, is not a guarantee of a good upbringing of a child and his further success. Most often, a young mother has a lot of chores around the house. Therefore, if she often takes the baby in her arms, she will have to sacrifice some things. In addition, carrying a child in her arms is also physically not very easy. In general, if desired, there are many reasons for minimizing physical contact with a child.
 Here you need to prioritize and decide what is more important for you - the daily routine or the development of the child. If you want to properly take care of the child and at the same time not start life, look for helpers-allies with whom you can do everything.
Make an appointment
to the doctor - Bagdasaryan Kristina Genrihovna
Clinic "Mother and Child" St. Petersburg
PregnancyManagement of pregnancyManagement of pregnancy after IVFManagement of pregnancy in Rh-conflictGynecologyDiary of pregnancyImmunological causes of miscarriageConservative gynecologyConservative treatment of cervical pathologyContracts for the management of pregnancyTreatment of miscarriagePlanning pregnancyHLA compatibility
By clicking on the send button, I consent to the processing of personal data
Attention! Prices for services in different clinics may vary. To clarify the current cost, select a clinic
All areasSpecialist consultations (children)Therapeutic research
01.