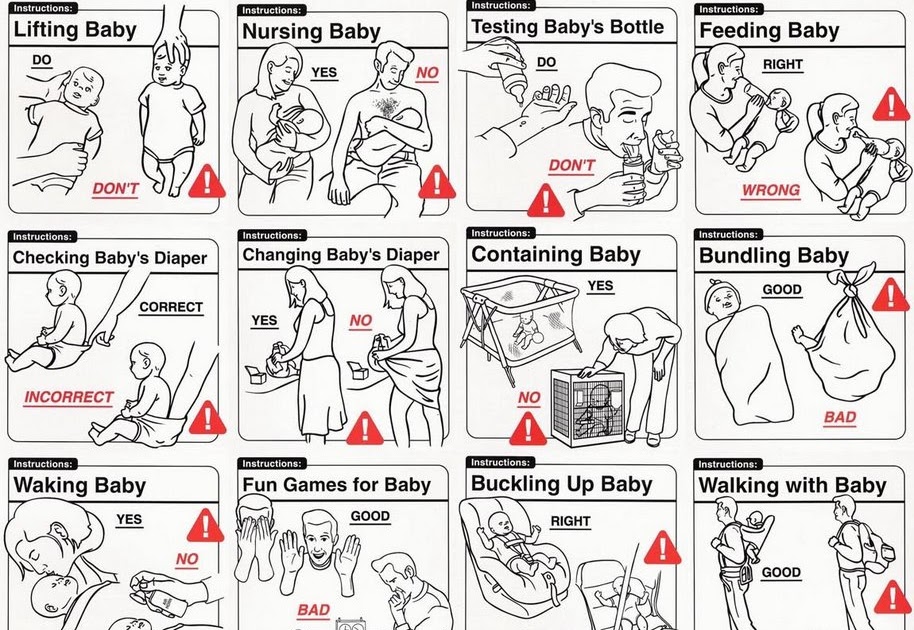
How to use baby feeder
Ultimate Guide to Baby Feeders: Mesh and Silicone
You may have seen baby feeders, whether mesh or silicone, and wondered what they are for. They are a great tool for feeding babies and toddlers—and are especially awesome for teething relief. There are many on the market though, so today I’m sharing the best of the best.
Baby Feeder
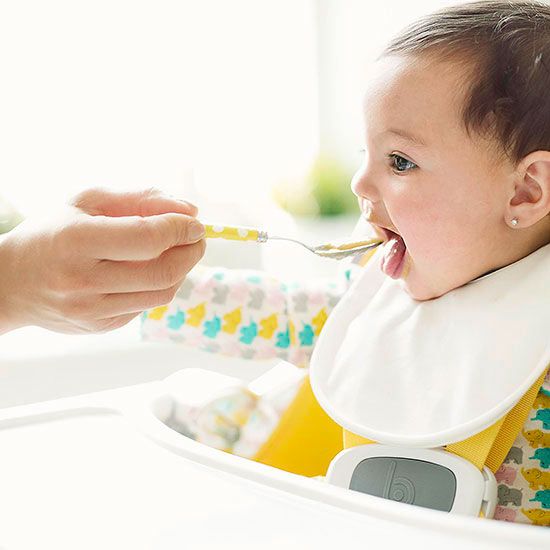
A baby feeder is made up of an easy-hold handle and a little pouch with lots of holes. The idea is that the holes allow some of the flavor and texture of the food to come out, without the concerns that may come with larger pieces of food.
This means you can worry less when it comes to choking risks.
One thing to keep in mind: They don’t allow babies to have the full texture experience of the food—since the texture is mostly the mesh of the feeder. That means you don’t want to use one of these for every meal (or even most meals).
Lots of exposures to lots of textures helps babies and toddlers gain confidence in handling all sorts of foods, which can make feeding kids a lot easier over the long run.
But an infant feeder can be a handy tool to have in the mix, especially if on the go, starting to transition to baby food, or trying out a new food that has you a little nervous.
And they are a great way to offer cold teething relief to soothe baby’s gums.
Baby Fruit Feeder
Many people like to use baby feeders to offer fruit, either fresh or frozen, since the product is a safe way for baby to suck on and explore the flavor of a wide range of fruit.
TIP: Another name for this is Baby Fruit Pacifier.
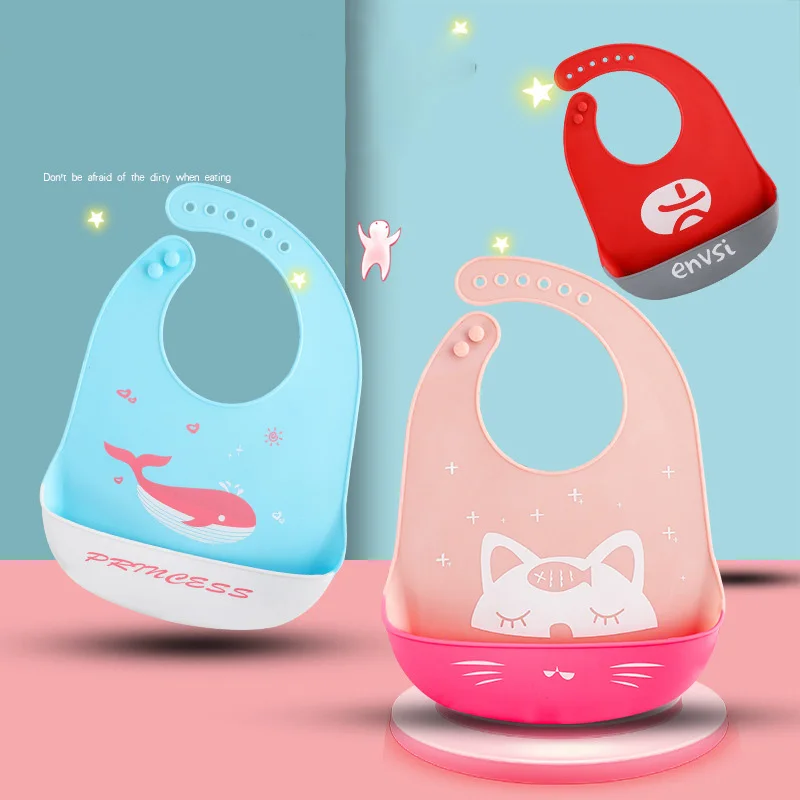
Best Baby Food Feeders
Below are my top picks for infant feeders chosen for ease of use, durability, and ease of care (as in washing!). There are different materials listed, as well as specific information on each product.
Best Mesh Feeder
Munchkin Baby Feeder, sold in a set of two. (Or choose the ones that come with travel caps.)
This baby feeder has a streamlined, simple design of a mesh bag for the food and a ring for baby to hold onto.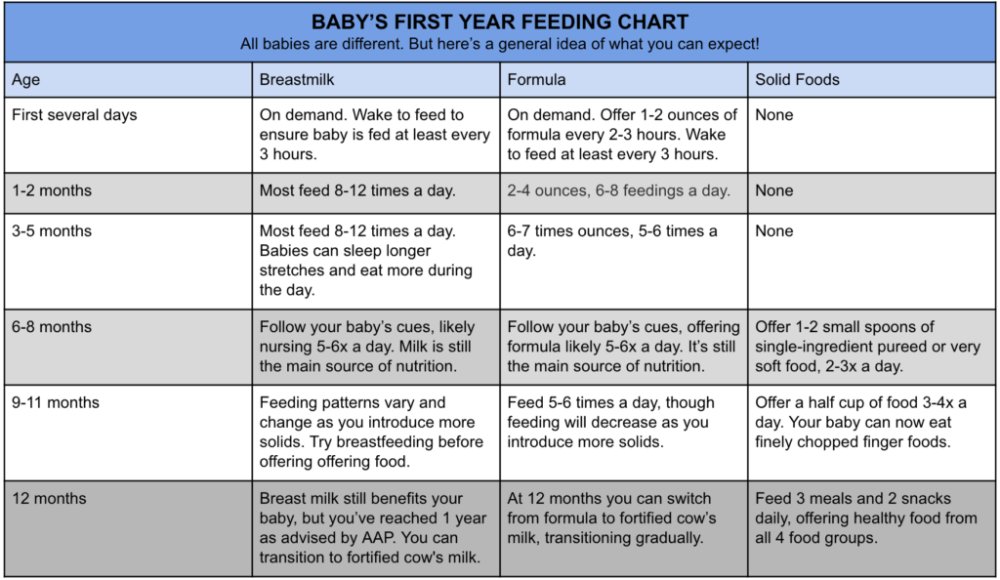 Small, digestible pieces of food come through so baby is getting some nourishment (and comfort if using for teething) without the risk of choking. It’s about $7 for two of them.
Best Silicone Feeder
Boon Silicone Feeder
This baby feeder, which is priced at under $6, is made from durable silicone and can be used with fresh or frozen foods. The interior stem forces food toward the tiny holes in the feeder and the small handle is sized just right for baby’s little hands.
Kidsme Baby FeederBaby Feeder Pacifier Combo
Kidsme Food Feeder
This popular Kidsme feeder has a replaceable silicone pouch that comes in two sizes, so you can adjust and replace as your child grows. It has a unique handle style that some babies may prefer and can be used as a pacifier too. It’s usually priced around $15 and is recommended for ages 4-24 months.
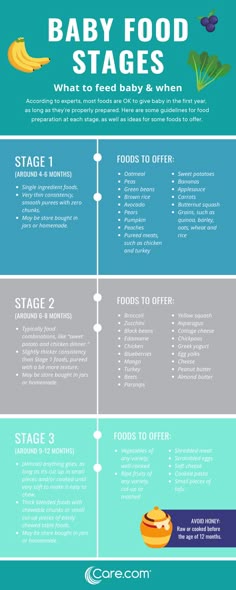
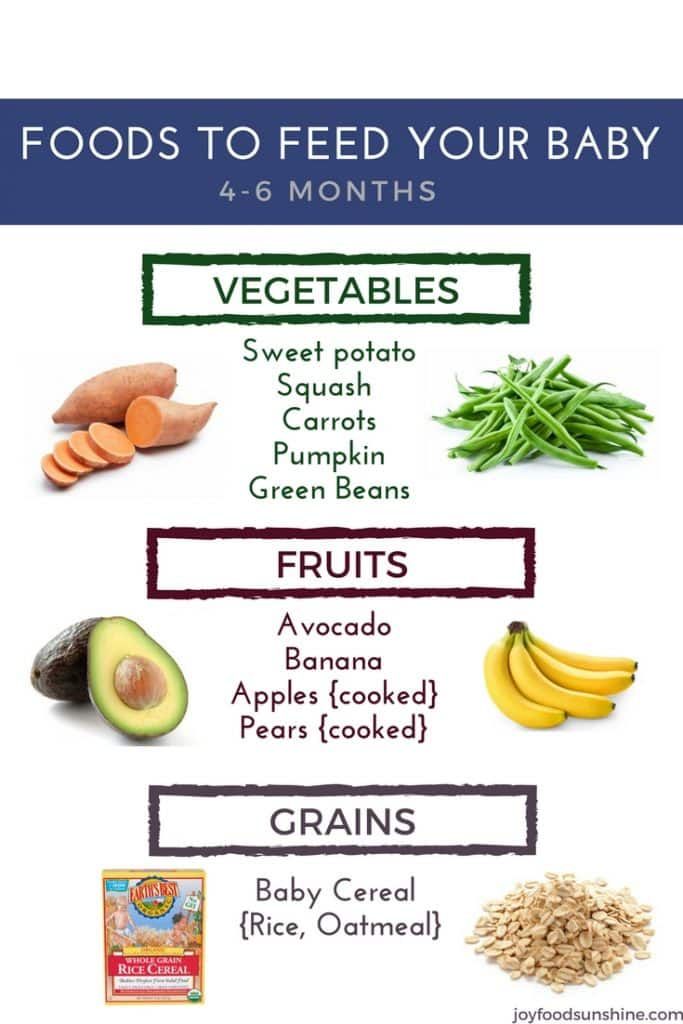
What baby foods should I put into a baby feeder?
Here are some fruits that are good to serve in a baby feeder:
- Raspberries, fresh or frozen
- Strawberries, fresh or frozen
- Blackberries, fresh or frozen
- Cantaloupe
- Honeydew
- Banana
- Mango, fresh or frozen
- Roasted sweet potato
- Roasted butternut squash
- Ripe fresh pear
- Fresh cucumber, skin removed
- Watermelon
- Cooked red meat such as steak
- Frozen grapes (These are NOT safe served to a child this age in any other way as they are a choking risk.
 They are fine served inside the feeder, though.)
TIP: You can use frozen fruit or ripe fresh fruit that’s soft and easy to gum. Avoid any fruits or veggies that are very hard as baby may be frustrated by that texture.
Frequently Asked Questions
What age can baby use a mesh feeder?
Babies can use an infant feeder soon after starting solids around 6 months, or when they can easily hold it and bring it to their mouth.
How do I use a baby feeder to help with teething?
If you fill the feeder, whether mesh or silicone, with frozen fruit, you can soothe teething in infants who are eating solids or in toddlers. It’s cold and yummy, yet requires no real work for the child to suck on, so it’s comforting.
Are all of these baby feeders BPA-free?
Yes, if you choose a mesh baby feeder or one made from silicone, they are BPA-free.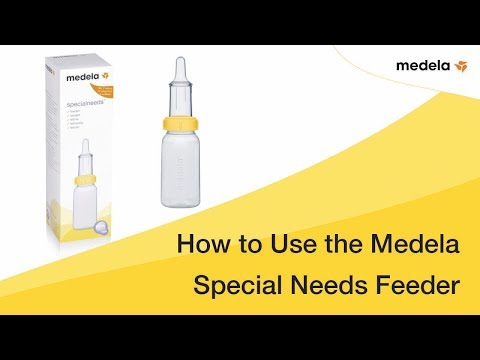
What’s the best way to clean a baby feeder?
Try using a bottle brush or just running water to clean out the mesh. It should be fairly easy to clean if you avoid letting it sit too long with food in it!
Are baby feeders good for babies?
The one downside could be that if you rely on them too much, the child learns the texture of the feeder, rather than of the food. This can make it harder for a child to learn to move actual food around in their mouths and harder for them to accept a range of textures in the future when you don’t want to be using the mesh feeder as much.
Because of that, I recommend using this product at limited times such as when on the go at a restaurant or to help sooth a teething infant, baby, or toddler.
This is not recommended as a way to feed your child at every meal.
If you are worried about choking, review this information on toddler choking and trust that if you serve foods that are easy to squish between your fingers, baby is sitting down at meals, and you are with them, they will learn to eat like so many other kids who have gone before them!
You May Also Like
- Best Baby Puffs
- Favorite Sippy Cups
- Best Snack Containers
- Best Lunch Boxes
- Favorite Suction Bowls
- Top High Chairs
I’d love to hear your thoughts on baby feeders in general or on these specific products, so please comment below to share!
This post was first published May 2019.
A Guide to Using Baby Fruit Feeder Pacifiers
Starting solids is an exciting time for you and your baby. It is one of the milestones in their development and your parenting. There are so many choices to make regarding which foods to give and how to feed them, but the one thing that can make the process a little easier is a baby fruit feeder pacifier.
In this post, we’ll share tips on using a baby fruit feeder pacifier, the benefits of using one, and the characteristics of the best one. So, whether you’re just starting your baby on solids or are looking for new ways to get your baby interested in food, read on for our full guide!
Benefits of Using a Fruit Feeder PacifierThere are various ways to introduce solids to your little one. You can let them rely on you through spoon feeding or allow them to enjoy soft baby food and biscuits using their hands. You can utilize different baby utensils like baby spoons and forks, suction bowls and plates, and sippy cups. But why choose a feeder pacifier? Check out these benefits!
Helps the transition from breast/formula feeding to solids
Babies are used to suckling as they feed on breastmilk or formula milk. A pacifier can help them transition from suckling to slowly eating solids. These pacifiers are designed with multiple holes allowing babies to suckle on juices and eat fresh fruit or vegetables.
Allows your baby to experience flavors
Feeding through a pacifier also introduces different flavors without risking your baby making a mess by spitting up food they do not like. Add grapes, apples, bananas, potatoes, mangoes, and sweet potatoes! When your little one begins eating full meals, they’ll surely recognize the flavors.
Provides safety when eating
Choking is one of the worries of parents like you. Babies put anything they hold into their mouths, including food. The design of baby feeder pacifiers only allows small bits of food to pass through, keeping this hazard at bay.
Eases teething
Aside from food safety, feeding pacifiers also fulfill the purpose of baby teethers. You can add frozen food inside the pacifier, which helps ease the pain teething babies experience. The friction in chewing the silicone nipple helps alleviate your baby’s discomfort. There are also baby food feeder pacifiers that are teether-friendly. The handles have holes where you can attach the teether, so your little one can have another toy to bite and chew on.
Can keep babies busy
Babies are filled with energy. Suppose you are eating together and are done feeding them their meals; chances are they may become fussy and want to leave their high chairs. Let them suckle on frozen fruit or dessert inside a food pacifier to keep them busy while you finish your meal.
Encourages feeding independence
Allowing your baby to hold onto their food and feed themselves even in this simple way of using a feeder pacifier encourages independence. This method is way better than spoon feeding them. As they grow, introduce new utensils to them and guide them on their proper use.
Do the benefits of feeder pacifiers sound enticing? If you think this feeding tool is suitable for your little one and want them to reap its benefits, you can try it. Here’s how to use it and a few reminders to make the most of it to help your baby’s development.
Step by Step Guide
- Prepare your choice of solid food. You can puree fruits and vegetables and freeze them before putting them in the pacifier. You can also put in some yogurt and other mashed treats.
- Put your choice of food in the pacifier and keep the seal tight. Ensure your baby cannot open it to avoid the risk of choking.
- Let your baby independently feed on the pacifier and enjoy the treat.
- After suckling, remove the remaining food.
- Clean the pacifier using soap and warm water, and let it dry.
A Few Reminders
- Not wasting food is a good practice to teach to your child, but saving leftovers inside the pacifier shouldn’t be one of them. Letting the leftovers stay inside the pacifier can cause bacteria to form, which may make your baby sick.
- Although pacifiers can keep your baby busy, do not let this be their activity to fight boredom during their free time. This keeps them from doing more productive activities, and can teach them bad habits.
- Plan when you’ll wean your baby from using a pacifier feeder. This feeder is best for introducing food, but you should also begin introducing bowls, spoons, forks, and other utensils to them too.
- Although a baby food feeder has food inside, it shouldn’t be your baby’s main meal. It can be used for snacks or desserts, but you still need to prepare a full meal for them.
When out in the market to scout and purchase food pacifiers, you’ll notice that they come in different designs. Some fruit pacifiers mimic the look of a regular pacifier but are bigger and have more holes. Some are made with a mesh feeder instead of silicone nipples. These designs allow food to go through the gaps.
Despite the different designs, these general characteristics make a food-grade fruit feeder pacifier a great choice:
- Free from BPA, phthalates, formaldehyde, and other chemicals harmful for babies.
- Has just the right hole size for small food portions to pass through.
- Has a baby-friendly color or design to encourage babies to use it.
- Easy to clean.
You may initially go through trial and error and purchase two or more pacifiers—this is normal. What matters is you get the food pacifier that fits your little one best.
So there you have it, our comprehensive guide to starting your baby on solids using a fruit feeder pacifier. We hope that you found this information helpful, and that it has eased some concerns you may have about transitioning from breast milk or formula feeding to solids. Remember, start with simple fruits like banana, apple, or pear and watch for signs of readiness before trying anything more adventurous. Don’t forget, Ashtonbee’s baby fruit feeder pacifiers make starting your little one on solids easier and more fun! Check it out, and get one now!
Bird feeder
On an autumn or winter evening, don't forget to make your own bird feeder with your child.
This is a great occasion for a child to do something useful, to take care of birds. In addition, it is very funny to look at the birds flying to the feeder, to observe their behavior, even if they are ordinary sparrows.
Each sparrow has its own character. One is nimble and brave, the other follows his relatives and does not dare to come closer. Probably new in these parts ... And what a joyful feeling overwhelms the child, if suddenly a titmouse or a nuthatch, a starling or a bullfinch flies up.
It doesn't take long to make a bird feeder. The feeder can be made very quickly, in minutes.
Plastic bottle bird feeder
An ordinary 1.5 liter plastic bottle will do just fine for a bird feeder. A plastic bottle can be found in every home. A 5 liter bottle or canister is even better. They have a wider bottom, so there is more space for birds.
To make a feeder, it is enough to cut a side hole in the bottle. It is better to make a larger hole in the bottle. Even better, make it through by cutting out two or four holes so that the birds can take off from the feeder at any time.
Bird feeder from a plastic bottle
First, draw a hole on the bottle with a marker, and then use a knife or scissors to cut the bottle along the contour. Here you can’t do without adults, because. even an ordinary plastic bottle is quite difficult to cut.
Cover the edges of the bottle with electrical tape or tape so that they are not so sharp and it is more convenient for the birds to hold on to the feeder.
So that the feeder does not sway too much on the bottom, you can put sand or earth in a plastic bag and pour food on top.
Bird feeder out of a box
The quickest and easiest way to make a bird feeder is to make a bird feeder out of a box.
Any box is suitable for a feeder: from under shoes, from under juice, from under sweets, etc. It is necessary to cut holes in the box, leaving a side at the bottom (at least 3 cm), thread the rope and the bird's dining room is ready!
Cardboard bird feeder
It will be very convenient for the birds if you stick a pencil, stick or any twig in the feeder.
Hang the feeder in your yard so you can see it from your window. You can attach the feeder directly to the window or on the balcony. The optimal height is from 1.5 to 3 meters. But it happens that even on the 10th floor, feeders are in great demand among birds.
The most important thing is that there is always food in the feeder. Pour it in more. A light feeder will be more stable. Remind your child to feed regularly.
Hanging bird feeder
Another easy way to make a bird feeder is to make an edible hanging feeder. Such a feeder is especially liked by forest birds: titmouse, goldfinches.
Simple hanging bird feeder
To prepare this edible bird feeder you will need:
- - Bird food
- - Lard or gelatine plain
- - Mold (cup, cookie mold)
- - Wire (25-30 cm)
- - Rope
Make a loop at one end of the wire. We wind the other end of the wire into a loose ball. This is necessary so that the feed sticks well to the wire. If you leave the wire straight, the clump of food will simply fall off.
Then you need to melt the lard over low heat and mix it with bird food to make a thick mixture. Gelatin can be used instead of lard.
Next, put the crumpled end of the wire into the prepared mold and fill it with a mixture of feed and lard so that only a loop of wire remains. Now you need to put the form in the freezer for several hours so that everything freezes well. When the mixture hardens, remove the molds. It remains only to tie a rope to the eyelet and hang beautiful and edible feeders in the garden. Such "pies" can also be hung in small colorful nets.
What to feed the birds
Almost all small birds have a favorite dish - sunflower seeds, they should be small and, of course, not fried. Clever birds do not swallow seeds whole, with a skin, but skillfully peck out a grain.
In addition, egg shells, millet and wheat can be added to the feeder.
The child must understand that feeding the birds is not only an important matter, but also a responsible one. You can not give the birds everything indiscriminately.
Ornithologists warn that birds should never be fed spicy, salty, spicy, fried, sour foods. It is undesirable to feed them rice and buckwheat. You can only give white bread, but black bread is dangerous - it turns sour in the goiter of birds, it is poorly digested (especially in cold weather).
I hope you choose the right option and make a bird feeder with your child. A child of any age will find this activity useful and interesting.
- Winter outdoor games
- Educational games from electrical tape
- Math example generator
- New Year letter generator from Santa Claus
Read related posts:
how to make a cardboard bird feeder?
In vain do many parents completely refuse to do such things with their child, referring to the fact that they have no talent for this, because in fact there are a huge number of cute little things that even a five-year-old kid can do.
And if we take into account the fact that today there are wonderful materials on the free market, from which you can make not only cardboard feeders, but even a miniature ship, plane or other complex structures, then it should be shameful to refuse such a useful and the required activity. So, for example, to make a cardboard bird feeder, you can purchase a specially designed kit for children's creativity with detailed instructions and all the necessary decorative elements in the kit. But if for some reason, parents want to make such a wonderful craft from improvised means, which, in principle, is even better, since it teaches the baby not only to take care of the world around him, but also to be able to use the little to achieve the tasks, that is, a lot of lungs and interesting ways to do it.
First of all, you need to prepare all the materials that will be needed to model this craft. These include thick cardboard (you can use a box of household appliances or furniture), a ruler, pencil, colored paper, thick felt rope, polyethylene or wide adhesive tape, a stapler, PVA-based glue and quick-set polymer glue, which is designed to work with thick paper. To begin with, you should design a “pattern” on a straight spread out sheet of thick cardboard (it is extremely important to ensure that the material does not have folds and cracks in these places, otherwise the finished craft will not keep its shape well). The ideal option would be to model a solid "pattern" for a cardboard feeder, in which all parts, including the roof, will be interconnected to the maximum.
It's great to have a small rectangular or square sheet of plywood on the farm, because in this case it can be laid on the base of the feeder, making it more water resistant and rigid (if using a plywood sheet, the cardboard "pattern" should be adjusted to its dimensions). Otherwise, the bottom of the feeder must be lined with thick plastic wrap, but first things first. The unfolded “pattern” of the craft should include its bottom, three blank walls of the same size located on three adjacent sides of the bottom (connected to the bottom along the lower base) and one blank wall on the fourth side, to which not only the bottom will adjoin, but also the base of a shed roof with a fragment of its support. In no case should you forget about such important elements as the notches necessary for gluing the walls of the pattern together after cutting it out.
They must be located on one side of each wall and around the entire perimeter of the free edge of the roof connected to its own support. It is best to work on cardboard not with scissors, as they strongly bend dense material, but with a sharp clerical knife. Since the feeder is not a birdhouse, the largest square or rectangular windows should be provided in its walls, which should be drawn in advance on the pattern with a pencil and a ruler, and subsequently cut with a knife. Bonding the notches to adjacent parts is best done with a quality, quick fix polymer adhesive.
The shed roof in this craft is provided for the reasons that moisture falling on the cardboard must certainly drain from its surface and in no case linger on it, which is basically impossible if the structure is equipped with a flat roof. A gable roof is heavier in execution and requires additional study of the side panels and their strengthening. In order for the feeder to be visible to birds from a distance, it must be bright and not get lost among the dark branches of trees.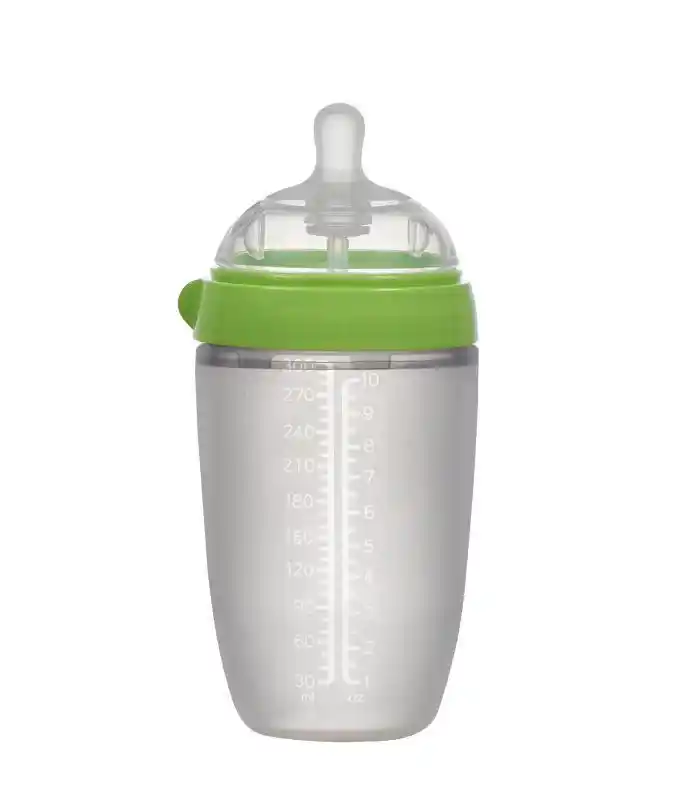 Therefore, its frame and base can be made in dark brown colors, and the shed roof can be made bright red. To do this, prepare in advance "wallpaper" from colored paper or cardboard of the appropriate colors and fix them on the walls of the craft using PVA-based glue.
We should not forget about such an important moment as waterproofing. In order to ensure it, you can use a special dense adhesive-based polyethylene, which should be applied to all surfaces of the workpiece, without exception. If such material is not at hand, then, as an option, it is allowed to use a dense film, which is fixed with a conventional stapler or, at worst, gluing the entire workpiece with wide adhesive tape.
This must be done, otherwise the feeder will not survive until the first rain. You need to hang it in such a way that there is a constant opportunity to add food and add water (a special drinker can be attached to one of the side wall beams using ordinary transparent silicone sealant).