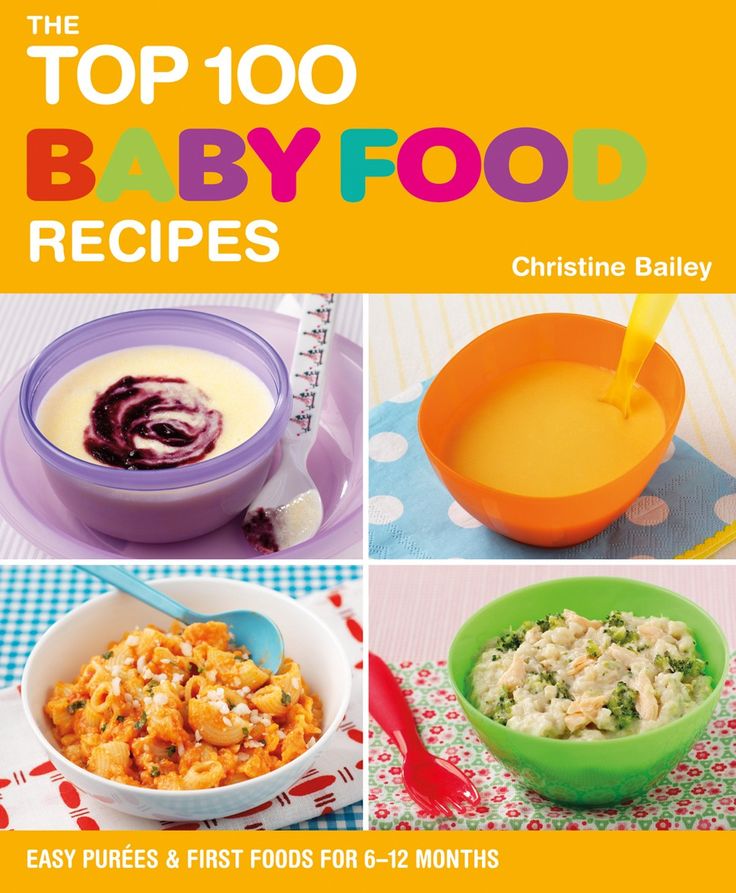
Wholesome baby food recipe book
Introducing Solids to Your 6 month to 8 month old Baby
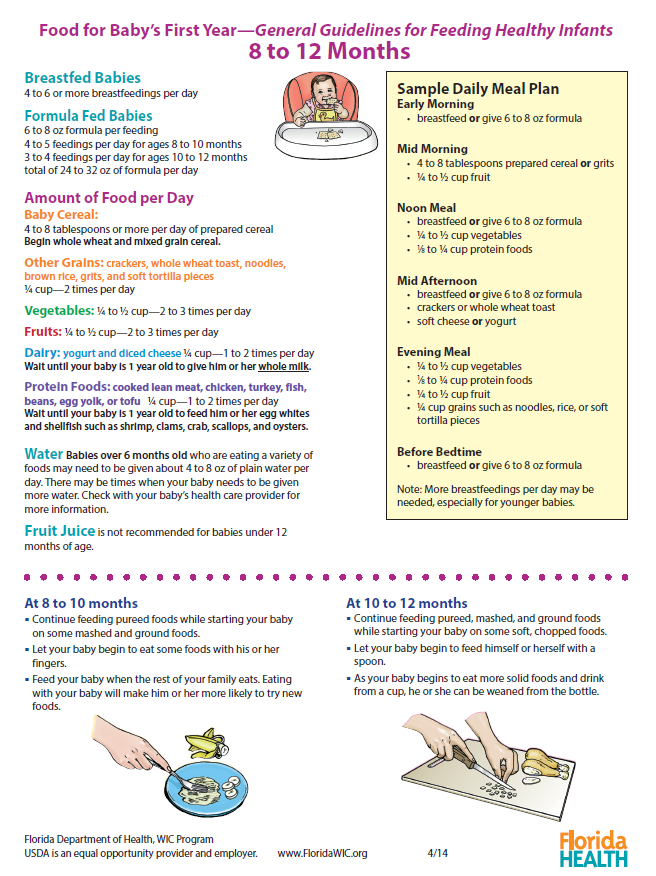
Introducing solid foods to your 6 month – 8 month old babyIf your 6 month – 8 month old baby is just starting solids at this stage, start slowly, preparing a very small amount of whatever food you have chosen to begin with. Nurse or bottle feed your baby first and then offer your little one solids. It’s important to remember that baby’s milk continues to be more important than solids at this age – don’t worry when baby won’t eat more than a few bites. Suggested Solid Food Chart for the 6 month old – 8 month old baby below:Click to Print What to Eat at 6 to 8 Months of Age?AGE & STAGE – 6 months to 8 months oldThe AAP recommends that an infant not be started on solid foods until after 6 months of age. Many pediatricians still start babies on solids around 4 months of age. Try mixing together the grains that your baby has had without any reaction(s) – Brown Rice and Oatmeal with Pear Sauce for example. FRUITSBegin making your own fruit combinations once baby has had several fruits without any reaction(s). After 8 months old – you may wish to try offering raw ripe fruits. Soft cooked fruits make for great beginner Baby Finger Foods; Learn about Introducing Baby Finger Foods. VEGGIESVeggie combinations are great to offer now. Ensure that all veggies have been previously offered without any reaction(s) prior to mixing & matching. After 8 months old – you may wish to try offering soft cooked veggies in dices or tiny chunks and bits. Soft cooked veggies make for great beginner Baby Finger Foods. PROTEINOnce your baby has reached 8 months old, try offering tofu finger cubes dusted with Cheerio “dust” or other cereal “dust”. Around 8 months old, you should be able to offer plain whole milk yogurt and mild cheeses to your baby. Many pediatricians even suggest yogurt as a great first food as early as 6 months of age. Mix some yogurt with a favorite fruit puree for a breakfast offering. Visit our Offering Your Baby Yogurt page for more information on introducing Yogurt and Cheese. Baby Led WeaningMore and more parents are opting to skip traditional baby food purees and choose Baby Led Weaning as a method for introducing solid foods. Baby Led Weaning means offering your baby (age appropriate) foods that soft-cooked and cut into small easily manageable pieces. These foods are then given to your baby to eat. You do the cooking, the dicing and the offering of the foods and your baby does the rest. If your 6-8 month old baby is just starting solid foods, you will probably only manage to have baby eat 1/2 of the tablespoon sized portion the very first times you begin solids. If you are using a Baby Led Weaning approach, your baby may only manage to get a few pieces of food into his or her mouth. Don’t fret if your baby does not “finish” a meal. Remember this is a new experience for your baby. As your baby becomes accustomed to eating solids, you will gradually increase the portion sizes. Read How Much Food Should My Baby Eat page for more information. Many parents find their babies will push the food out of their mouths on the first few tries. This is normal however it may also indicate that your baby is not yet ready for solid food.Only you know your baby and will be able to decide if baby is truly ready for solids. I have also compiled a sample schedule that you may find useful. This table gives you an idea of how and when to begin introducing baby to solid foods. Please keep in mind that this table was created from various medical authorities such as private pediatricians, the AAP, the AAFP and the WHO as well as our own experience. This table should be used as a guide only. Always consult your baby’s pediatrician about solid foods Download the new 6 to 8 month old food diary chart! Want to keep track of the foods baby likes and dislikes? Download the free PDF above to keep track of what baby likes to eat, the date of introduction and any allergic reactions baby may have had.
Click here for a printable version of the condensed solid food introduction chart
New Breast-Fed Baby Growth Charts from the World Health Organisation – Reflecting Breast-Fed Babies Growth Patterns The charts presented are general guidelines with solid baby foods that are age appropriate. They may seem somewhat conservative in nature compared to guidelines from other sources. We show age-ranges for different foods and we have researched and compiled these charts from various medical authorities such as private pediatricians, the AAP, the AAFP and the WHO. Feel free to print the chart and ask your Pediatrician about the listings and recommendations. Our visitors say their pediatricians are impressed with our Chart’s suitability and accuracy of listings. Remember, always consult with your pediatrician regarding introducing solid foods to your baby and specifically discuss any foods that may pose allergy risks for your baby. SHARE ON FACEBOOK SHARE ON PINTEREST |
 Many pediatricians are now recommending Meats as first foods due to the Iron content – ask your pediatrician.
 As with breastfeeding on demand, Baby Led Weaning is a method of introducing solid foods that leaves it up to your baby to decide when and how much to eat. While not necessarily a “hands off” approach, The foods listed on our 4-6 month old chart and those listed on the chart here make great foods for introducing solids using the baby led weaning method!
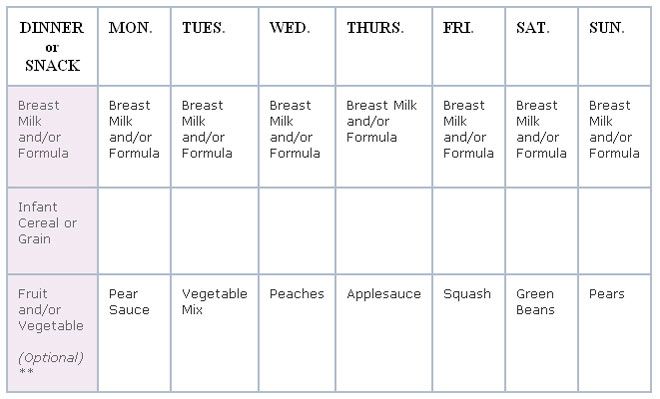 Remember, breast milk and/or infant formula are providing for the total nutrition of your baby at this stage.

Stage 1 Homemade Baby Food Recipes for Baby 4 to 6 Months and older.
Stage One Baby Foods – Commonly Offered Stage 1 Baby Foods:
Stage 1 Fruits:
Apples | Avocados | Apricots | Bananas | Mango | Nectarines & Peaches | Papaya | Pears | Plums & Prunes | Pumpkin
Stage 1 Veggies:
Beans (Green) | Carrots | Peas | Sweet Potato | Squash
Stage 1 Grains:
Rice | Oatmeal | Barley
What is a “Stage 1” baby food?
(4) 6-8 Months –
Baby Let’s Begin to Eat“Baby” cereal and soft cooked thinly pureed fruits and veggies should be baby’s first solid food experiences. Single ingredients only and at a space of 4 days apart with introducing each new food. You may skip the cereal and begin with a fruit like avocado or begin with a veggie like butternut squash or sweet potato.
Stage 1 Baby Food is a term that applies to baby foods that are highly pureed and strained. These foods are appropriate for babies who are just being introduced to solid foods. The foods in this range are targeted to babies who are between the ages of (4) 6 to 8 months old.
Stage 1 baby foods are thin and runny and are foods that are the lowest on the allergy scale. Stage 1 baby foods are typically those foods that are also more easily digested by a tiny tummy. Some of these foods include, sweet potatoes, butternut or winter squash and carrots. The term “Stage 1” was introduced by the Beechnut Baby Food Company to let parents know that these foods are appropriate for their infants who are just being introduced to solid foods.
There is a growing trend of parents skipping “stage 1” foods that are thin and runny purees. Many parents are turning to a more baby-led weaning approach and are offering soft cooked small bits of age-appropriate foods as they begin to introduce solid foods. Your baby might just be interested in this feeding approach!
Stage 1 Homemade Baby Food Recipes – Cereal, Fruits & Veggies
Rice Cereal- 1/4 c. rice powder (brown rice ground in blender or food processor)
- 1 cup water
Step 1: Bring liquid to boil in saucepan. Add the rice powder while stirring constantly.
Step 2: Simmer for 10 minutes, whisking constantly, mix in formula or breast milk and fruits if desired
Step 3: Serve warm.
Oatmeal Cereal
- 1/4 c. of ground oats (do NOT use instant or Quick Cook), ground in blender or food processor
- 3/4 c.
 water
water
Step 1: Bring liquid to boil in saucepan. Add the rice powder while stirring constantly.
Step 2: Simmer for 10 minutes, whisking constantly, mix in formula or breast milk and fruits if desired
Step 3: Serve warm.
Barley Cereal
- 1/4 c. ground barley (barley ground in blender or food processor)
- 1 cup water
Step 1: Bring liquid to a boil. Add the barley and simmer for 10 minutes, whisking constantly
Step 2: Mix in formula or breast milk or juice and add fruits if desired
Step 3: Serve warm
Did you know that baby’s first food does not have to be a commercial infant rice cereal? Many pediatric resources are acknowledging the fact that avocado, banana and sweet potato make great first foods for baby. For More Information About Homemade Baby Cereal, visit Our Homemade Baby Cereal FAQ
Feeding Baby Stage 1 Baby Foods
Start out slowly, preparing a tablespoon sized portion of whatever food you have chosen to begin with. Some parents begin offering their babies solid foods by using their (clean and washed) finger as a spoon. They say that this helps their babies take to solid foods because the “new” spoon and the “new” food all at once seem to confuse baby.
You will probably only manage to have baby eat 1/2 of the tablespoon sized portion the very first times you begin solids. Don’t fret if your baby does not “finish” a meal.
Apricot Puree 6-8 months+ (using dried un-sulphured apricots)
Vitamins: A, C, Folate
Minerals: Potassium, Phosphorus, Calcium
- 1 pound dried apricots
- 2 cups of white grape juice, pear or apple juice. Plain water is ok but the puree may be a bit bitter.
Step 1: Bring liquid and fruit to a boil and simmer for 15 minutes.
Step 2: Reserve any left over liquid to use for the puree
Step 3: Place into your choice of appliance for pureeing and begin pureeing.
Step 4: Add the reserved liquid as necessary to achieve a smooth, thin puree or
Step 5: Add cereal (if desired) to thicken up
Step 6: Note: puree will not freeze solid, but into slightly soft/slightly frozen cubes.
Have you ever Baked Fruits? If not, I highly recommend it. Baked fruits are naturally sweet, soft and oh so very yummy.
Apples/Applesauce (4)6 months+ Try Gala, Braeburn, Rome or Macs)
Vitamins: A, C, Folate
Minerals: Potassium, Magnesium, Calcium
This recipe is written so that you may use any amount of apples you wish.
Step 1: Peel, core and cut apple into slices/chunks
Step 2: Place slices or chunks into a pan with just enough water to slightly cover apples
Step 3: Boil/steam until tender; be sure to check on the water level and stir, T hat’s It. Easy Peasy.
Step 4: Apples may be mashed with a potato masher to achieve a smooth applesauce consistency. If your masher will not achieve a puree type of consistency, then follow steps 5 – 7
Step 5: Reserve any left over water to use for thinning out the apples
Step 6: Place into your choice of appliance for pureeing and begin pureeing.
Step 7: Add the reserved water as necessary to achieve a smooth, thin puree
Step 8: Add cereal (if desired) to thicken up the
Step 9: Ask your pediatrician about adding some cinnamon for new tastes.
You may also buy an “Adult” jar of Natural applesauce from your local grocers. Make sure you buy Natural Applesauce however. Read the labels if you are unsure. The only ingredients should be apples and water or just apples. A few companies may add ascorbic acid (vitamin C) or citric acid to their Natural Applesauce; this is fine.
Avocado (yes, avocado is a fruit.) (4)6 months+
Vitamins: A, C, Niacin, Folate
Minerals: Potassium, Phosphorus, Iron, Magnesium, Calcium
Step 1: Peel and take out the pit of a ripe avocado – do not cook
Step 2: Cut “meat” out and mash with a fork
Step 3: There should be no need to use a machine as just like bananas, avocados have a very soft consistency and texture. Avocados do not need to be cooked.
Visit the Avocado Baby Food page for more recipes and Information
Baked Apples 6-8 months+
Step 1: Core apple and leave peel on
Step 2: Place a wee bit of butter (if baby is ready for or has had dairy) on the inside of the cored apple (sprinkle a bit of cinnamon in the apple if your desire and if baby is ready for or has had cinnamon)
Step 3: Place in a pan with just enough water to slightly cover apples – about an inch of water
Step 4: Bake in a 400-degree oven for 30 minutes or until tender; be sure to check on the water level.
Step 5: Once baked, either cut apple into little bits and serve as a finger food or mash as directed above in the Apples/Applesauce recipe.
Banana Applesauce Mush (4)6 months+
- 1 apple
- 1 ripe banana
Step 1: Peel, core and cut apple into slices/chunks
Step 2: Place slices or chunks into a pan with just enough water to slightly cover apples
Step 3: Boil until tender; be sure to check on the water level.
Step 4: Apples may be mashed with a potato masher to achieve a smooth applesauce consistency or you can puree in an appliance as shown above
Step 5: Peel a ripe banana and mash in a bowl with a fork (heating in the microwave for approximately 20 seconds will soften the banana up if needed)
Step 6: Add applesauce to the banana and sprinkle with wheat germ* or crushed cheerios*
Step 7: Puree if necessary but mashing with a potato masher will typically get this mix smooth
*8 months+
Back to Top
Bananas (4)6 months+
Vitamins: A, C, Folate
Minerals: Potassium, Phosphorus, Selenium, Magnesium, Calcium
- 1 Banana or however many you wish
Step 1: Peel ripe banana – do not cook
Step 2: Place banana in a food processor/food mill or blender and puree
Step 3: You can also mash the banana in a bowl using a regular fork – heat in microwave for 25 seconds prior to mashing for extra softness
Step 4: Add formula/breast milk or water to thin or add cereal (if desired) to thicken up.
Mango Madness 6-8months+
Vitamins: A (1262 IU in one cup), C, E, K, Folate
Minerals: Potassium, Phosphorus, Magnesium, Calcium, Sodium
- 1 Ripe Mango
Step 1: Peel, de- seed and chunk the mango
Step 2: Place mango chunks in a blender or food processor
Step 3: Add Formula, Breast Milk, or Water and blend or mash until the proper consistency for your Infant is achieved.
How to Cut A Mango:
Cut the mango lengthwise, along the side of the mango pit. You will be cutting off its flesh from one side then repeating the same process on the other side. You will then cut the ends off the mango pit.
Cut the remaining flesh from the pit. Use a small sharp knife peel the skin from the flesh. Dice or cube as desired. It is easier to make your cubes/dices prior to removing the skin. Make sure you don’t cut through it. Once you have made your cube/dice “pattern” simply turn the skin skin inside out and slice the pieces away.
*Mango does not need to be cooked as it is typically introduced at an age where baby can tolerate raw fruits. Mango may be steamed to tender and then mashed if you prefer without harming it.
You may use mango as a great Baby Finger Foods. Simply peel, de-seed and then cut into dices or chunks that are manageable for your baby. You may wish to coat the mango pieces with “cheerio dust”, wheat germ or another cereal “dust” to help baby easily pick up the bits.
Papaya 6-8months+
Vitamins: A, C, Folate
Minerals: Potassium, Calcium
- 1 ripe papaya
Step 1: Peel, de-seed and chunk the papaya
Step 2: Place papaya chunks in a blender or food processor
Step 3: Add formula, breast milk, or water and blend or mash until the proper consistency for your Infant is achieved.
Some parents who have infants with sensitive tummies will give fruits a gentle steaming to help break down the sugars and fibers for easier digestion. If you feel this is the case for your infant, chunk the papaya and then steam for 5-10 minutes until very soft.
Pears, Plums, Peaches and Nectarines too
Pear (Great for Constipation.) (4)6 months+Vitamins: A, C, Folate
Minerals: Potassium, Phosphorus, Magnesium, Calcium
Step 1: Peel and cut into chunks so as to avoid the little seed portion.
Step 2: Steam gently until tender if baby is under 6 months.
Step 3: Place in a blender/food processor and puree until smooth; you may be able to just use a fork!
Step 4: Use the leftover cooking water if needed but Pears tend to be very runny and watery without adding liquid.
Step 5: Add some baby cereal to thicken if needed.
Plums (4)6-8 months+
Vitamins: A, C, Folate
Minerals: Potassium, Phosphorus, Magnesium, Calcium
- 2-3 ripe plums
Step 1: Peel and pit the plums
Step 2: Cut into chunks
Step 3: Steam until tender in a scant amount of water if baby is under 6 months.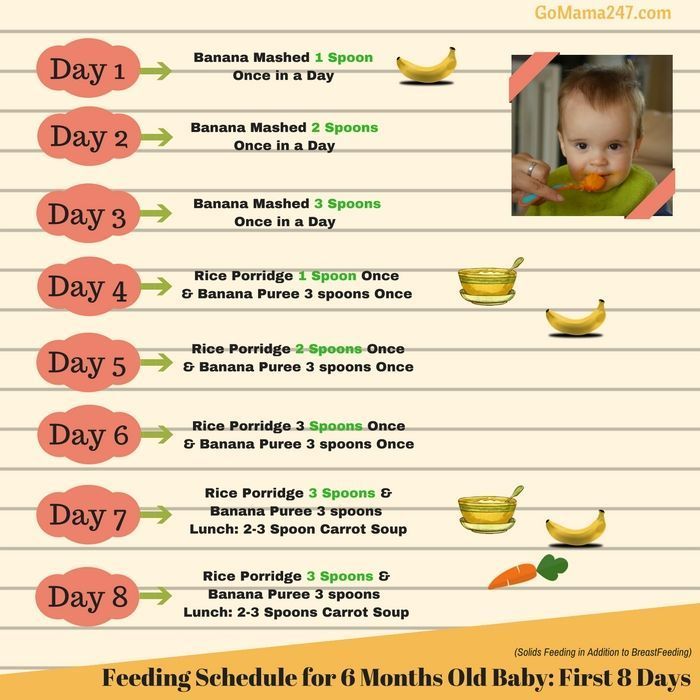
Step 4: Puree using the leftover cooking liquid.
You may need to mix in another fruit as plum purée has a tendency to be rather tart and/or bitter
Peaches (4)6-8 months+
Vitamins: A, C, Folate
Minerals: Potassium, Phosphorus, Magnesium, Calcium
You may steam or bake peaches; these methods work for nectarines, plums and pears as well. I HIGHLY recommend giving baked peaches a try at least once. You will find they are more tasty when baked.
Steam Peaches – Method 1
Step 1: Scrub fruit clean and carve an X into 1 side of the fruit
Step 2: Place X side down in a pan with an inch of water
Step 3: Bring water to a boil and steam until soft and tender
Step 4: Peel skin from fruit and remove pits and/or seeds
Step 5: Move to step #6 below
Steam Peaches – Method 2
Step 1: Peel fruit
Step 2: Pit the peach
Step 3: Cut the peach into dices
Step 4: Steam until soft and tender then
Step 5: Move to step #6 below
Bake
Step 1: Halve the fruit and place “open” side down in a pan filled with 1 inch of water
Step 2: Bake at 400F until soft and tender and/or puckering of the skin appears.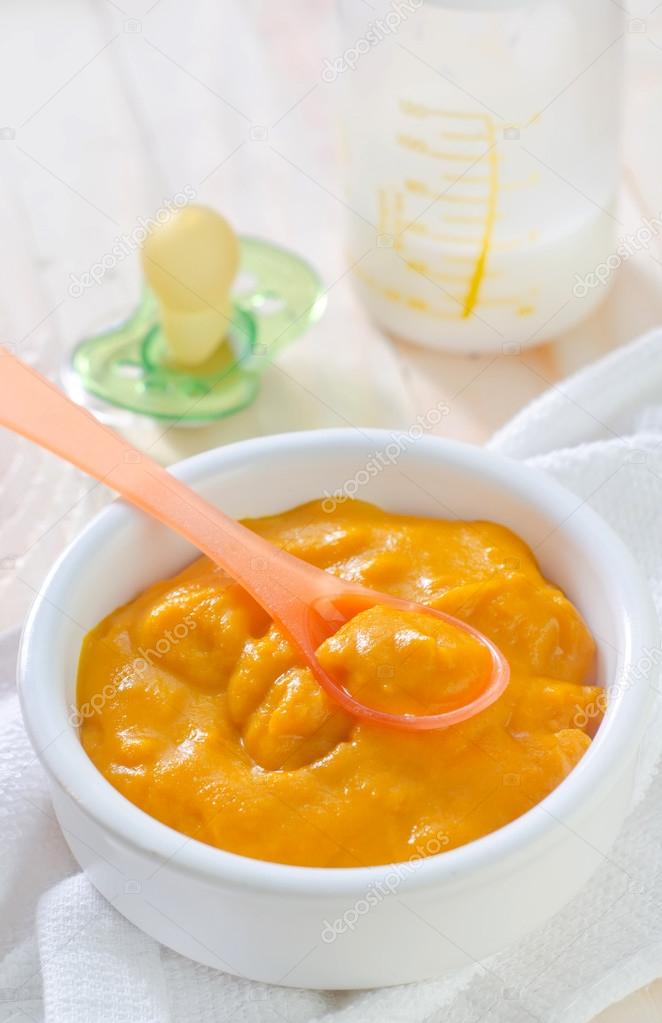
Step 3: Peel skin from fruit and remove pits and/or seeds then
Step 4: move to step #6
Step 5: Reserve any left over water to use for thinning out the fruits
Step 6: Peel off skin then place into your choice of appliance for pureeing and begin pureeing.
Step 7: Add the reserved water as necessary to achieve a smooth, thin puree
Step 8: Add cereal (if desired) to thicken up.
Back to Top
Prunes 6-8 months+
Vitamins: A, C, Folate
Minerals: Potassium, Phosphorus, Magnesium, Calcium
- 1 small bag of dried prunes (try to use unsulphured dried fruits whenever possible!)
Step 1: Soak dried prunes in warm water until they plump up or steam gently.
Step 2: Once plump and tender, toss into food processor or blender and begin to puree.
Step 3: Add liquid without sparing any.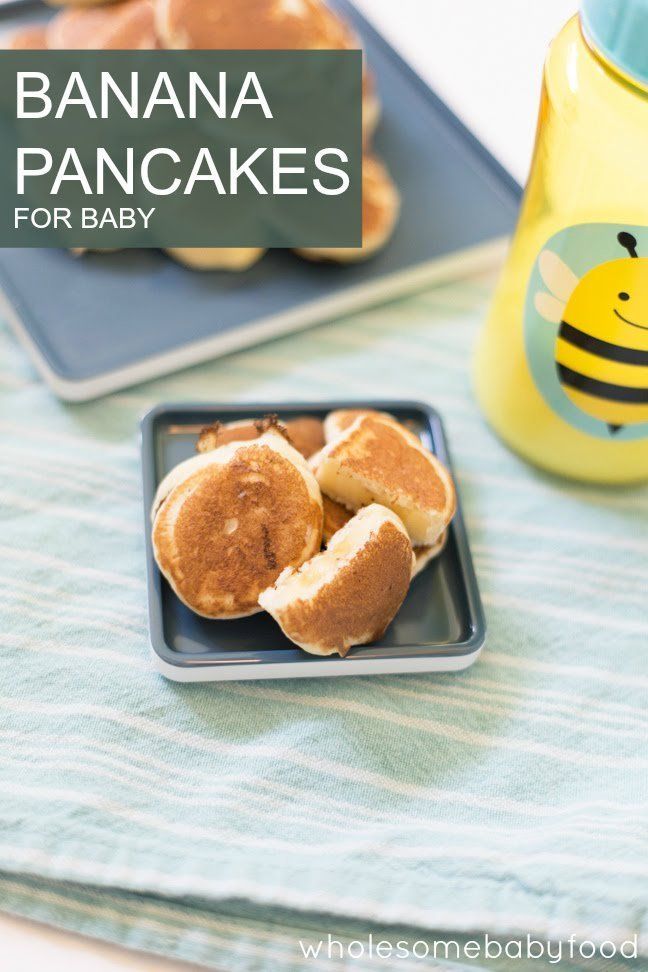 Prunes tend to become a pasty gluey consistency when pureed and the more water you add, the easier it is to puree to a texture your baby will tolerate.
Pumpkin (4)6-8months+
Read more about Pumpkin on the Pumpkin Baby Food page
Vitamins: A (12230 IU in 1 cup.), C, K, Folate, Niacin
Minerals: Potassium, Phosphorus, Magnesium, Calcium, Iron
- 1 medium sugar pumpkin, no heavier than 5 pounds
Step 1: Cut sugar pumpkin (the kind meant to be baked and eaten.) in half, scoop out seeds
Step 2: Place an inch of water in a baking pan, then place the halves “face” down in the pan. Check on water level while baking
Step 3: Bake in a 400 degree oven for 40 minutes or until the “shell/skin” puckers and halves feel soft then scoop squash “meat” out of the shell
Step 4: Place pumpkin “meat” into your choice of appliance for pureeing and begin pureeing.
Step 5: Add water as necessary to achieve a smooth, thin consistency.
Step 6: You can also peel the pumpkin, scoop out the seeds and then cut into chunks and boil/steam until tender (like when boiling potatoes for mashed potatoes) then follow steps 4 and 5.
You may also buy a can of pumpkin from your local grocers. Make sure you buy Pumpkin and NOT Pumpkin Pie mix however. Read the labels if you are unsure. The only ingredients should be pumpkin and water or just pumpkin. You do not need to cook canned pumpkin. You may thin the pumpkin with whatever liquid you prefer and then serve or warm and serve. You may also freeze canned pumpkin in ice cube trays if you wish.
Green Beans (4) 6 months+
(this method may be used for Peas as well)*
Vitamins A, C, K, Niacin, Folate
Minerals:Potassium, Sodium, Phosphorus, Iron, Magnesium, Calcium
Step 1: If using Fresh Beans, snap the ends off the beans and wash the beans. If using Fresh Peas, open the pods and scrape out the peas from the pod. If using frozen of either Peas or Green Beans, cook according to package directions.
Step 2: Place fresh beans into a steamer basket in a pan with a just enough water to slightly show through in the basket.
Step 3: Steam until very tender; be sure to check on the water level.
Step 4: Reserve any left over water to use for thinning out the beans.
Step 5: Place into your choice of appliance for pureeing and begin pureeing. It is best to use the setting that makes the finest liquid purees – green bean and pea skins are rather difficult to completely puree.
***Using a blender rather than a food processor or stick mixer might be better as well. ***
6. Add the reserved water as necessary to achieve a smooth, thin consistency
7. You may wish to push the green beans (or peas) through a sieve or mesh strainer to get rid of any remaining skins.
Carrots* 6-8 months+
Vitamins A (19,152 IU), C, Folate
Minerals:Potassium, Sodium, Phosphorous, Iron, Magnesium, Calcium
Step 1: Peel carrots and cut into small chunks
Step 2: Place chunks into a steamer pan with just enough water visible through the steamer basket
Step 3: Steam until tender
Step 4: Do not reserve any left over water to use for thinning out the carrots if baby is under 8 months old as Nitrates may seep into the cooking water
Step 5: Place into your choice of appliance for pureeing and begin pureeing.
Step 6: Add water as necessary to achieve a smooth, thin consistency
*(See Our article on Nitrates)
Garden Vegetable Combo
6-8 months+ after all vegetables have been introduced following the 4 Day Wait Rule
Green Beans, Summer Squash, Peas and Carrots
Step 1: Combine fresh or frozen green beans and peas, summer and/or zucchini squash and small pieces of chopped carrots.
Step 2: Add enough water to just cover the vegetables.
Step 3: Cook until tender, reserving water.
Step 4: Puree vegetables in blender or food processor,
Step 5: Adding reserved water from the vegetables until mixture is of the desired consistency.
Peas
Vitamins A (4533 IU), C, Niacin, Folate
Minerals: Potassium, Sodium, Selenium, Phosphorous, Iron, Magnesium, Calcium, Zinc
Step 1: If using Fresh Peas, open the pods and scrape out the peas from the pod. If using frozen type of either Peas or Green Beans, cook according to package directions.
Step 2: Place fresh peas into a steamer basket in a pan with a just enough water to slightly show through in the basket.
Step 3: Steam until very tender; be sure to check on the water level.
Step 4: Reserve any left over water to use for thinning out the peas.
Step 5: Place into your choice of appliance for pureeing and begin pureeing. It is best to use the setting that makes the finest liquid purees – green bean and pea skins are rather difficult to completely puree. Using a blender rather than a food processor or stick mixer might be better as well.
Step 6: Add the reserved water as necessary to achieve a smooth, thin consistency
Step 7: You may wish to push the peas (or green beans) through a sieve or mesh strainer to get rid of any remaining skins
Why can’t I get peas and green beans to puree smooth?
If you are using a Food Processor, try the Blender. The Blender seems to work the best for getting Peas into a more fine puree. Peas and green beans are very hard to get pureed into a very fine, smooth consistency. You can put them in a strainer and work out the “skins” if using fresh or you can use frozen for a smoother consistency and minimal effort to work out the “skins”.
Another method for getting beans and peas smoother is to immediately plunge them into ice cold water once you remove them from the stove top. Once cooled, puree as usual.
You may also use beans/legumes (kidney beans, lentils, split peas etc..) if your doctor says it is OK for baby’s age.
Please keep in mind that you will never be able to achieve the consistency equal to that of the baby food that comes in jars. Some parents choose to leave green beans and peas for later introduction, when baby enjoys texture and is able to eat them as Baby Finger Foods
Squash (Winter – Butternut, Acorn, Hubbard) (4) 6 months+
(nutrient info for squash of all types may be found at the Squash for Baby page)
- 1 medium sized butternut or acorn squash
Step 1: Cut acorn, hubbard, or butternut squash in half, scoop out seeds
Step 2: Place an inch of water in a baking pan, then place squash halves “face” down
in the pan. Check on water level while baking
Step 3: Bake in a 400 degree oven for 40 minutes or until the “shell/skin” puckers and halves feel soft then scoop squash “meat” out of the shell
Step 4: Place squash “meat” into your choice of appliance for pureeing and begin pureeing.
Step 5: Add water as necessary to achieve a smooth, thin consistency.
Step 6: You can also peel the squash, scoop out the seeds and then cut into chunks and boil/steam until tender (like when boiling potatoes for mashed potatoes) then follow steps 4 and 5
Squash (Summer/Zucchini) 6-8 months+
nutrient info for squash of all types may be found at the “Tips on Squash” page
- 3-4 small to medium sized yellow squash or zucchini
Step 1: Choose yellow squash or zucchini that are somewhat small in diameter, as these are the most tender.
Step 2: Wash squash thoroughly and cut into small slices or chunks.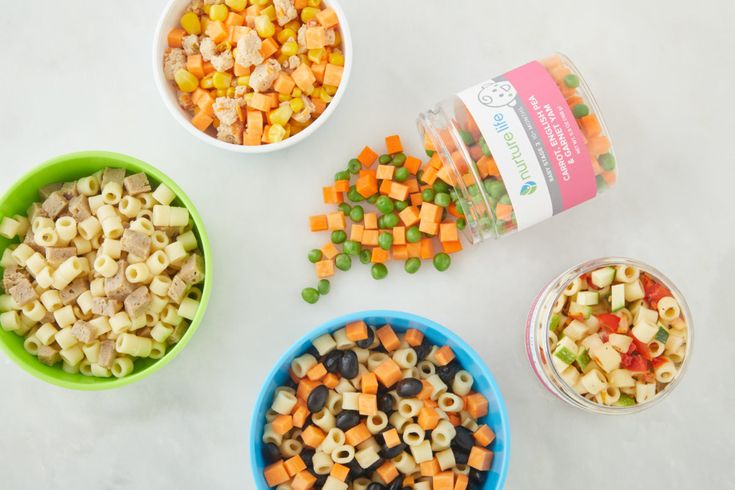 Do not remove skins.
*You may remove skins however an infant over the age of 8 months old should be able to digest squash puree with skins on
Step 3: Steam until tender then place into your choice of appliance for pureeing and begin pureeing.
Step 4: Add water as necessary to achieve a smooth, thin consistency
Yams/Sweet Potato (4)6 months+
Learn why a Yam really is NOT a Yam
Vitamins A (24,877 mg ), C, Folate
Minerals:Potassium, Sodium, Selenium, Phosphorous, Magnesium, Calcium
Step 1: Wash and poke holes in sweet potato with fork then wrap sweet potatoes in tin foil – do not peel for baking/microwaving (you can also do this in the microwave – only use plastic wrap and cook for 8 minutes on high or until tender).
Step 2: Place in a 400 degree oven and bake for 30 minutes or until soft
OR
Step 1: Peel sweet potatoes and cut into small chunks
Step 2: Place chunks into a pan with just enough water to slightly cover potato
Step 3: “Steam” boil until tender, be sure to check on the water level.
Step 4: Reserve any left over water to use for thinning out the sweet potatoes
Step 5: If you have baked your sweet potato, remove skins and use liquid from your preferred source
Step 6: Place sweet potato into your choice of appliance for pureeing and begin pureeing.
Step 7: Add the reserved water or other liquid as necessary to achieve a smooth, thin consistency
Remember, always consult with your pediatrician regarding introducing solid foods to your baby and specifically discuss any foods that may pose allergy risks for your baby.
These Stage 1 Homemade Baby Food Recipes are age appropriate for those babies who are between 4 and 6 months of age. Many babies start solid foods between 4 months and 6 months. Stage One fruits and veggies we have included are foods that your 4 month old baby who is a beginning eater will be able to tolerate.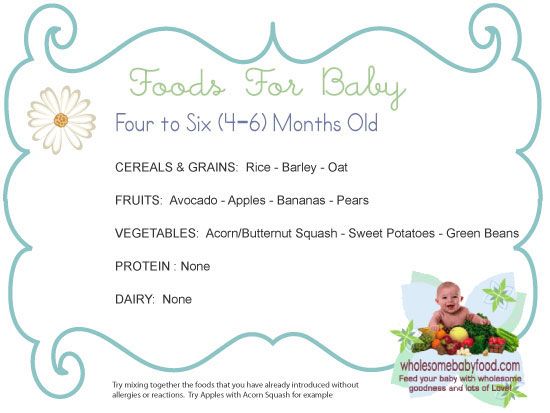 Of course, these recipes are also just yummy for babies who are older as well!
SHARE ON FACEBOOK SHARE ON PINTEREST
Read online "365 Healthy and Delicious Meals for Baby Food" - LitRes
Foreword
Nutrition - what could be more important for a growing organism? How your baby starts to eat when you wean him will affect his future development and perhaps even adulthood. In our time, in industrially prepared products, you can find a lot of food additives, flavoring and coloring, which are not at all useful for a small person - and in these conditions the importance of homemade food increases many times over. nine0005
The basis of human nutrition is meat, fish, dairy and sour-milk products, various vegetables and fruits, buckwheat is obligatory for cereals. Vegetarianism, fasting for children is unacceptable, and canned food at an early age is undesirable.
It is best to cook your own food from food purchased raw. It is advisable to buy meat and fish in a piece and not give a small child store-bought convenience foods. Remember that when preparing children's dishes (up to 8-10 years old), hot spices are not added. nine0005
Starting at about a year old, a child can get many meals from an "adult" table. It must be remembered that the child has already learned to chew and swallow rough food, but can he bite well? Gradually, the child must be accustomed to more and more varied foods, while noticing whether this or that product will cause an allergy. Unfortunately, this problem is now actual. Eggs, honey, later - chocolate and citrus must be introduced under control. But in our time, any products can give an undesirable reaction, which is why parents need to be careful. nine0005
If up to a year the child's diet mainly consists of pureed soup, cereals and mashed potatoes, then after a year it is already possible to give meat in the form of fried or baked cutlets, casseroles, meatballs; vegetables and cereals - not only in pureed form, but also in the form of pancakes, vinaigrettes, you can give raw vegetables, rye bread. The wider the set of products, the more fully and fully the child's need for proper nutrition is satisfied.
Dishes for infants
Recipe no. 1
Vegetable broth
Ingredients: 50 g vegetables, 100 g water.
One of these vegetables: Carrots, cabbage, turnips, potatoes or zucchini Wash thoroughly, peel, cut into small slices, cover with cold water and cook covered over low heat until tender. Then strain through sterile cheesecloth, bring to a boil and pour into a sterile bottle.
Vegetable decoction can be given to an infant between feedings as a drink. Usually, such supplementation is required if the child is bottle-fed or breast-fed "by the hour". If the child receives a breast on demand, then mother's milk is enough for him. nine0005
Recipe No. 2
Juices for the first feeding
To obtain 50 ml of juice, 100 g of any berries or fruits are required.
Wash fresh green apple, pour over with boiling water and grate. Put the resulting puree into cheesecloth, folded in half, and squeeze the juice with a spoon. Drain the squeezed juice into a glass dish and close the lid. If the apples are sour, add sugar syrup to the juice before feeding.
Red-skinned fruits can cause an allergic reaction, so a green apple is best. nine0005
Recipe No. 3
Juices for the second food
To obtain 50 ml of juice, you need 100 g of any fruit or vegetable.
Option 1.
Sort ripe plum fruits, rinse thoroughly, scald with boiling water, remove the seeds and put the pulp into a sterile double-folded gauze. Squeeze out the juice with a stainless steel spoon.
Option 2.
Wash young carrots (carrot), scald with boiling water and grate on a fine grater. Then squeeze the juice through cheesecloth. nine0005
Carrot juice is rich in vitamin A, so it is desirable to add it to other vegetable juices.
Recipe No.
 4
4 Fruit purees
To obtain 40-45 g of puree, 50 g of fruit are required.
Option 1.
Wash ripe apples or pears without spots or damage, pour over with boiling water, remove the skin, remove the seed nest and grate on a fine grater.
Option 2.
Wash fresh apricots thoroughly, cover with water, cook until soft. Rub through a sieve, add granulated sugar (1 tsp), boil again. nine0005
Blueberries, black currants, apples and pumpkins, strawberries, sea buckthorn, etc. can be puréed in the same way.
Recipe No. 5
Carrot puree
Ingredients: 1 carrot, 1/4 cup milk, 1/3 tsp butter or vegetable oil.
Wash the carrots with a brush, peel, chop, put in a saucepan, pour a small amount of boiling water and simmer under the lid in its own juice, stirring occasionally, until tender. Hot wipe through a sieve, add warmed milk, a little salt, put on a slow fire and warm, not boiling. Put butter or vegetable oil into the finished puree. nine0005
Recipe No. 6
Mixed vegetable puree
Ingredients: various vegetables - 80 g, potatoes - 20 g, milk - 1/2 cup, butter or vegetable oil - 1/3 tsp, sugar - 1/ 2 tsp
Wash fresh vegetables (carrots, turnips, cabbage, beets) with a brush, peel, chop, simmer covered in a saucepan with a little hot water so that the vegetables are stewed with steam in their own juice. Make sure that there is water at the bottom of the pan all the time (if necessary, add boiling water). Add sugar to speed up cooking. Bring vegetables to half-cooked and add peeled and chopped potatoes to them, then simmer until tender. nine0005
Pass hot vegetables through a sieve, add hot milk, a little salt and beat well, then put back on the stove and bring to a boil.
Add butter or vegetable oil to the puree.
Recipe No. 7
Spinach puree
Ingredients: spinach - 100 g, milk - 1/4 cup, butter - 1 tsp, flour - 1/2 tsp, sugar syrup - 2 ml .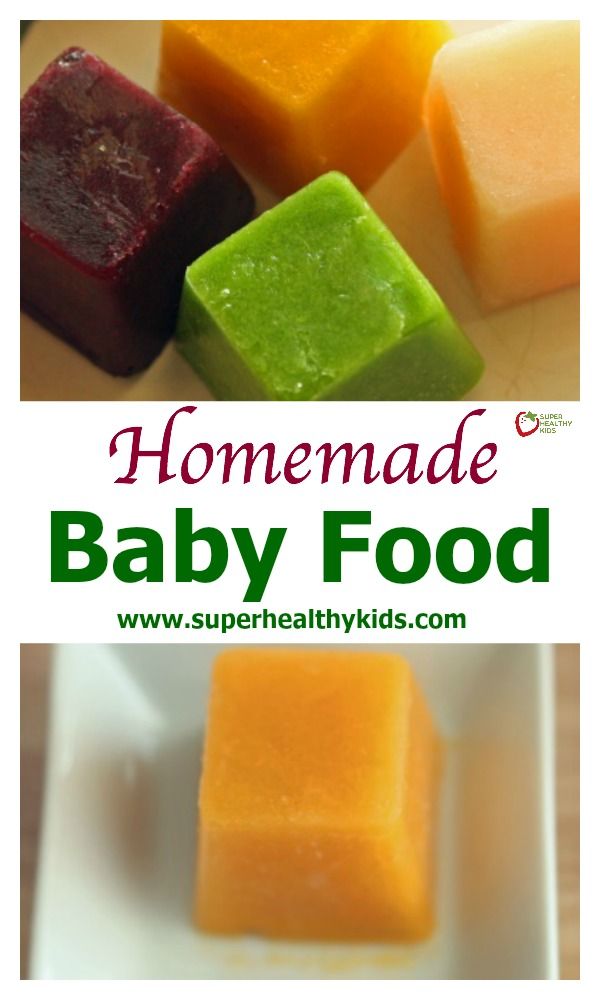
Carefully sort the spinach, discarding the brown parts, wash in running water, transfer to a saucepan and simmer in its own juice until soft (10-15 minutes). Then rub through a sieve and season with white sauce. For the sauce, dissolve the butter in a saucepan, fry the wheat flour in it, add hot milk and boil for 5-6 minutes. Add a little salt to the puree, seasoned with sauce, put on fire again and bring to a boil. Season the finished puree with butter and sugar syrup. nine0005
Spinach contains iron, phosphorus and magnesium and is therefore beneficial for the development of the child's body.
Recipe No. 8
Spinach-potato puree
Ingredients: spinach - 100 g, potatoes - 150 g, milk - 1/2 cup, sugar - 1/2 teaspoon, butter - 1/2 teaspoon.
Wash potatoes thoroughly with a brush, add a little boiling water, cover and boil. Sort the spinach, wash it, put it on a sieve and let the water drain, then transfer it to a separate pan, add granulated sugar and simmer in its own juice without adding water.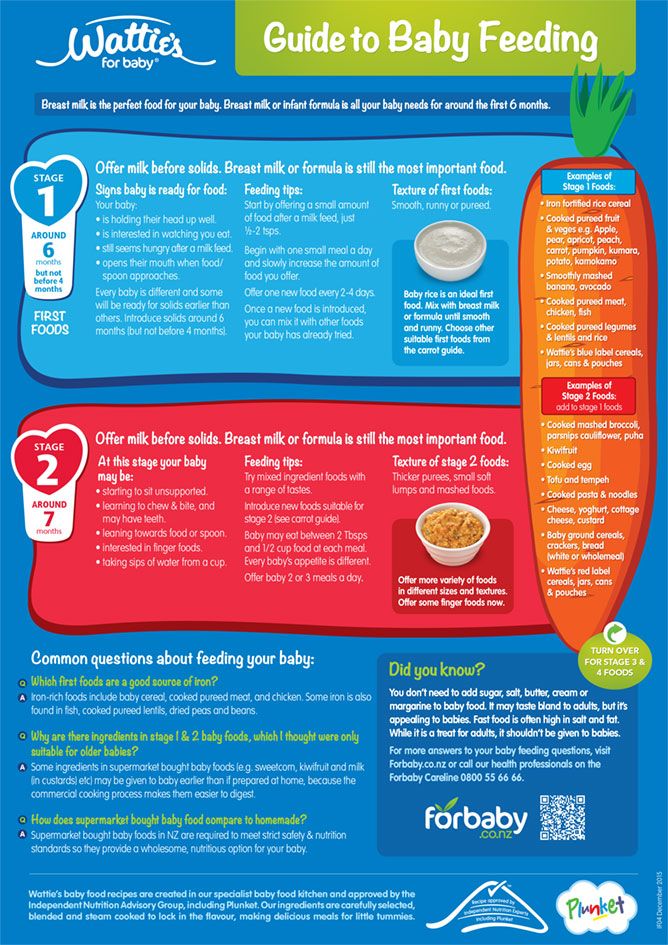 Peel the boiled potatoes and rub hot through a sieve. Grate the cooked spinach into the same bowl. Stir the puree, dilute with boiling milk, add salt, beat and bring to a boil over low heat. Fill the finished puree with butter. nine0005
Spinach is an excellent source of iron, one of the leaders among plants in terms of iodine content. The vitamin D content of spinach makes it useful in preventing rickets.
Recipe No. 9
Cauliflower and zucchini puree soup
Ingredients: cauliflower – 50 g, marrow – 50 g, egg yolk – 1/2 pc., butter – 1/3 tsp.
Peel the cauliflower, remove the green leaves, cut into small tufts and wash well. Wash the zucchini, peel and cut into small pieces. Put the cabbage and zucchini in a saucepan, pour a small amount of boiling water, close the lid and simmer over low heat until tender. Then pour the broth into a separate bowl, and rub the hot vegetables through a sieve. Add broth and salt to the puree, mix well and bring to a boil.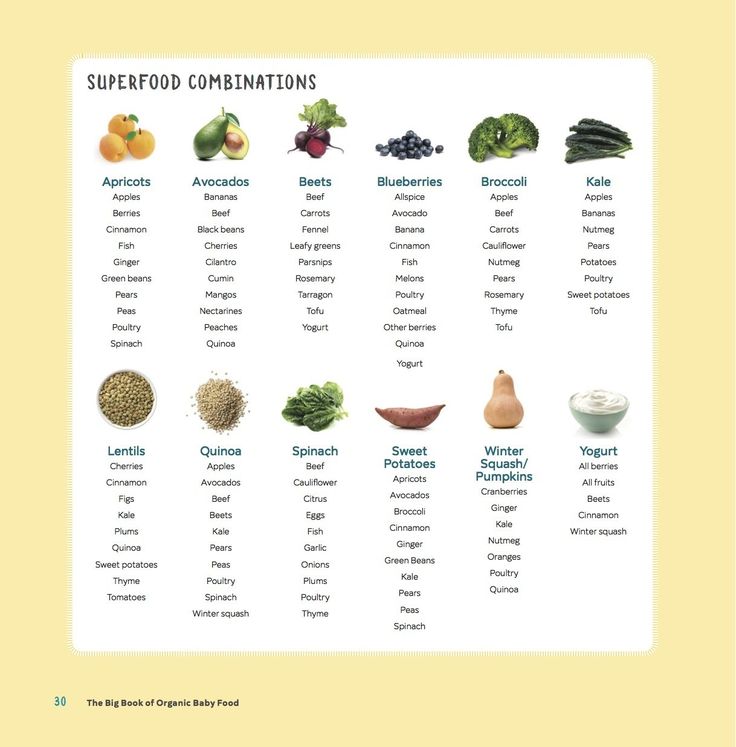 Season the finished soup-puree with butter, pounded with the yolk of a hard-boiled egg. nine0005
Recipe No. 10
Vegetable puree with liver
Ingredients: carrots - 100 g, potatoes - 100 g, liver - 50 g, broth - 1/2 cup, butter - 1/2 tsp.
Soak fresh steamed beef liver in running water, remove skin, cut across the grain and quickly fry in hot oil in a saucepan with a lid. Then add a little water or low-fat broth and put the saucepan in the oven for 5-10 minutes. You can pre-stew in oil, adding a little onion. nine0005
Steam boil potatoes and carrots, peel, rub through a hair sieve along with stewed liver, previously passed through a meat grinder. Dilute the puree with hot broth, salt, beat, put on low heat and, whisking, bring to a boil. Add butter to the finished puree.
The liver contains many minerals: iron, copper, calcium, zinc, sodium and others.
Recipe no. 11
Mashed potatoes with chicken
Ingredients: chicken meat - 100 g, potatoes - 200 g, milk - 1/4 cup, butter - 1/2 tsp.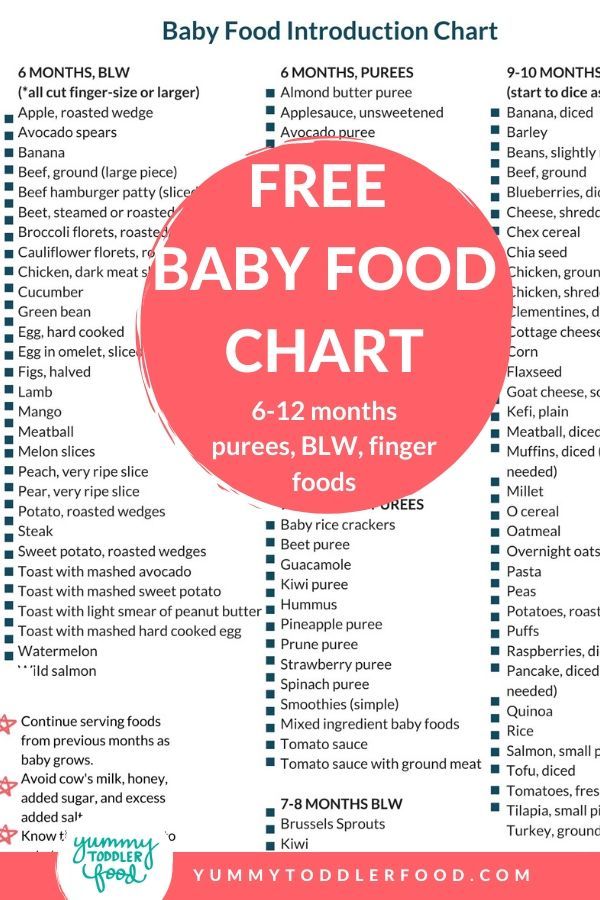
Boil low-fat chicken broth, strain through a wet napkin and pour it over the peeled and cut into large pieces potatoes. The broth should just cover the potatoes. Boil potatoes under the lid for 25-30 minutes, then rub through a hair sieve, adding pre-cooked and minced chicken meat. Dilute the resulting puree with boiling milk and beat with a whisk. Heat on the stove until boiling. Add butter to the finished puree. nine0005
Recipe No. 12
Vegetable cutlets
Ingredients: various vegetables (carrots, zucchini, kohlrabi, potatoes) - 250 g, egg - 1 pc., flour - 1 tbsp. l., sunflower oil for frying, crackers - 2 tbsp. l., parsley, salt.
Boil well-washed and chopped vegetables in salt water, finely chop and mix with egg yolk, herbs, salt, whipped egg white and breadcrumbs. Stew cutlets in a small amount of water.
May be served with sour cream. nine0005
Recipe No. 13
Semolina porridge
Ingredients: milk - 1/2 cup, water - 25 ml, semolina - 2 tsp, salt, sugar syrup - 3 ml, butter - 1/3 tsp. l.
l.
Pour water into half of the taken milk, boil, then pour the sifted semolina in a thin stream and cook over low heat, stirring constantly, for 15-20 minutes. Then salt a little, add sugar syrup and the remaining warmed milk. Bring the porridge to a boil. Put butter into the prepared porridge. nine0005
Semolina contains 70% starch, a lot of proteins, vitamins and minerals, and since it cooks quickly, all of them are preserved.
Recipe No. 14
Pink semolina porridge
Ingredients: semolina - 2 tsp, milk - 70 ml, water - 25 ml, sugar syrup - 3 ml, carrot juice - 30 ml, butter - 1/ 3 tsp
Pour juice from fresh carrots into ready-made, slightly cooled semolina porridge, mix thoroughly and immediately give to the child. nine0005
Preparation of carrot juice: wash carrots with a brush, scald with boiling water, scrape off the skin with a sharp knife, wash again with boiled water and grate. Put carrots in gauze scalded with boiling water and squeeze out the juice.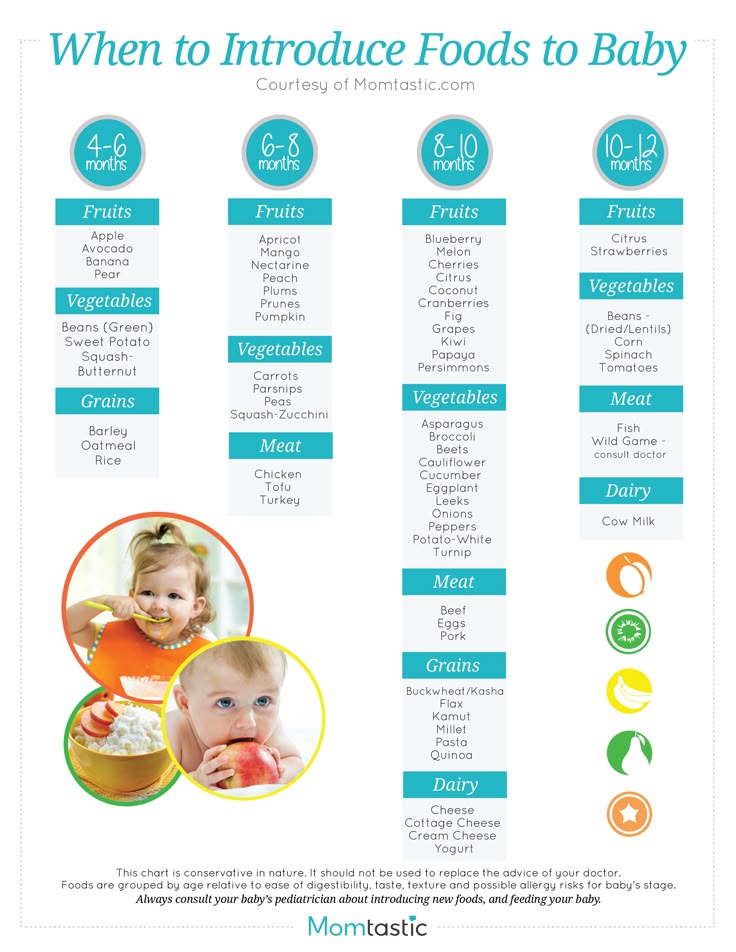
Recipe No. 15
Semolina porridge with pumpkin
Ingredients: pumpkin - 100g, sugar - 1 tsp, portion of semolina porridge.
Peel the pumpkin, cut into small cubes, sprinkle with sugar and, after extracting the juice, simmer until softened. Then mix with ready-made semolina and bring almost to a boil. nine0005
Pumpkin contains a large amount of carotene and vitamins, including a lot of vitamin D. Even a weakened body easily absorbs fiber, so pumpkin dishes are recommended for therapeutic and preventive nutrition.
Recipe No. 16
Semolina porridge with dried apricots
Ingredients: dried apricots – 1 tbsp. l., sugar - 1 tbsp. l., a portion of semolina porridge.
Prepare dried apricot fruit puree. Rinse dried apricots, add a small amount of water, close the lid and simmer until soft. Then rub through a sieve, add sugar and boil until thickened. Boil liquid semolina porridge and mix it with slightly cooled mashed potatoes. nine0005
Dried apricots contain significantly more minerals, including potassium, magnesium, calcium, iron and phosphorus than fresh apricots. Eating dried apricots is recommended for anemia, impaired vision, heart disease and as a general tonic.
Recipe No. 17
Dessert semolina porridge
Option 1.
Ingredients: small apple, sugar - 1 tsp. l., a portion of semolina porridge.
Prepare liquid semolina. Wash a small apple just before feeding the child, scald it with boiling water, peel, grate, mix with sugar and combine with slightly cooled porridge. nine0005
Option 2.
Ingredients: semolina - 3 tbsp. l., milk - 1 cup, salt, egg - 1 pc., flour - 1 tbsp. l., breadcrumbs.
Boil thick porridge from milk and semolina, salt and, when it has cooled down a bit, mix with egg and flour. Transfer the prepared mass to a board sprinkled with breadcrumbs and roll it out to a thickness of 0.5 cm.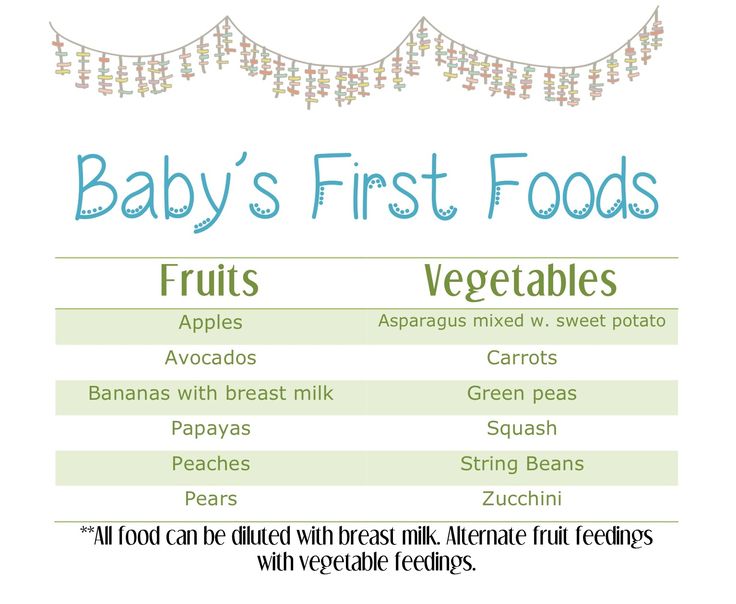 Then cut into squares 4 x4 cm and fry on both sides.
Serve with vegetables or salad.
Baby food 📚 - top of the best literature on the topic
Baby food 📚 - top of the best literature on the topic | Read and listen online on MyBookWhat to choose
Library
Subscription
📖Knigi
🎧Audioknigi
👌 Business books
🔥 Books
🎙 Top
📖Books🎧Audiobooks
👌Free Books
🔥News
❤️Top Books
🎙Top Audiobooks
Upload Your Podcast0005
- Home
- Library
- Topics
- baby food
Sort
Filters
Wants Filters
My baby won't eat!
Carlos Gonzalez
Premium
This is not a guide to getting your child to eat more. The central idea of this book is not to force a child to eat, never, for any reason and under no circumstances. Dr. Gonzalez, an experienced pediatrician and father of three, shows through rigorous scientific evidence that our ...
A Gift of a Lifetime
Carlos Gonzalez
Premium
This book is a complete and comprehensive guide to helping women who want to breastfeed. It covers in detail many topics related to breastfeeding: from the anatomy and physiology of the female breast to the growth of the baby in height and weight, from the technique of attachment to the breast to frequent...
My baby eats by himself. Lure with pleasure
Polina Kazimirova
Premium
It's time to introduce complementary foods to your child, and you are terrified that you will become a hostage to cereals and purees for a long time? Taught by bitter experience with the elder, have firmly decided not to arrange theatrical performances in order to feed the younger? Or are you looking forward to complementary foods, hoping that your baby will become like this. ..
..
Cooking for babies. Baby food from birth to school
Irina Pigulevskaya
Standard
A huge number of recipes and recommendations for the nutrition of children from birth to adolescence awaits you on the pages of the book. The author tells all about the features of feeding children. From the first part of the book, you will learn all about the main varieties of complementary foods necessary for a full, bal...
Soup first, dessert later
Maria Kardakova
Premium
Maria Kardakova, a nutritionist and mother of two, provides helpful, relevant, scientifically based advice on healthy diets for children from birth to adolescence. You will learn what factors influence your child's food preferences, learn how to determine whether he is getting enough...
Baby food. Various menus for every day from birth to five years
Tatyana Borisova
Premium
This book is a popular talk about the modern medical foundations of baby food from birth to five years. Much attention is paid to the first year of a child's life: mixed and artificial feeding, as well as feeding premature babies. Recommendations are given to the organization of food...
Multicooker for babies. 1000 best recipes
Unidentified author
Standard
A slow cooker is a very necessary thing, but every mother faces the question: is it possible to cook food for little gourmets in it? Of course! Moreover, you can simultaneously cook "duet dishes": one for adults, the other for kids. The capabilities of the multicooker allow you to use it in cooking ...
Multicooker. Meals for children from 0 to 7 years old
Unidentified author
Standard
This book contains recipes for a children's menu that can be prepared in a slow cooker. Dairy dishes and homemade products, mashed soups, meat and fish steam dishes are suitable for kids. For older children, according to the proposed recipes, you can cook the first and second . ..
..
Recipes for children older than a year
Unidentified author
Standard
Child nutrition is a very important family issue. After all, mistakes made in this area can lead to a delay in the physical and mental development of children, to serious metabolic disorders. And it is necessary to take care of high-quality and varied nutrition from the first days of a baby's life. This book will help...
Cooking for children
Collection
Standard
In this book you will find many recipes that will make your baby's food as comfortable as possible. A nutritionist's advice will help to gently adapt his digestive system to new foods, from the period of the first weaning to the age of three. Recipes for vegetable and fruit purees, cereals with milk ...
Filters
Filters
This section presents the top best books and audiobooks on the topic "Baby Food". A complete list of 40 popular books and audiobooks on the topic, ratings and reader reviews.