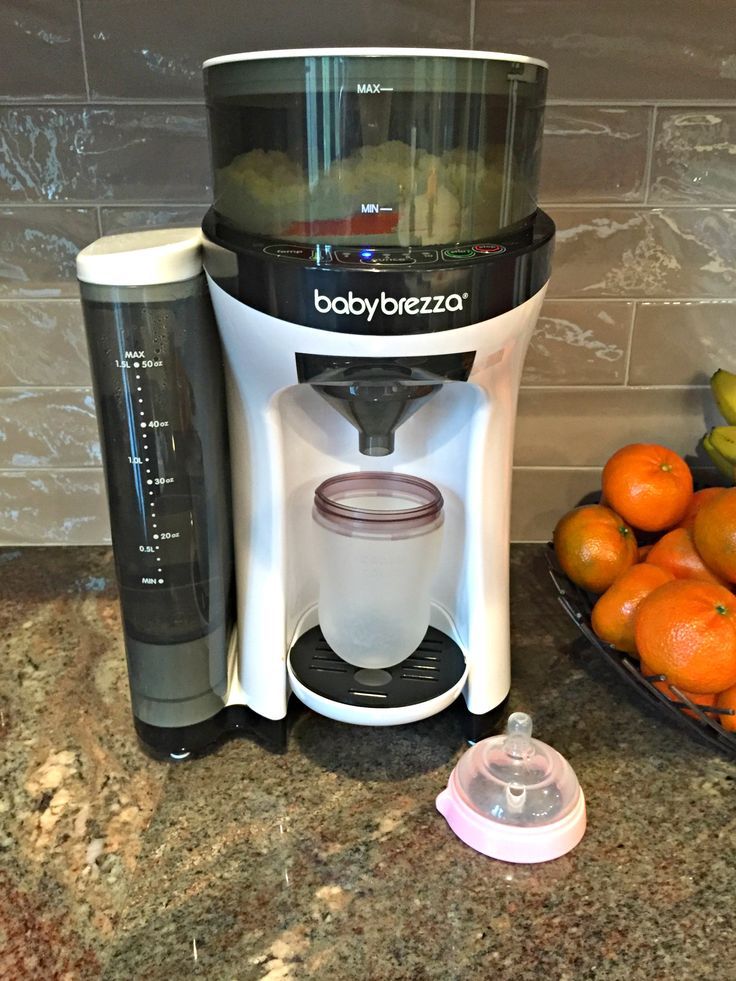
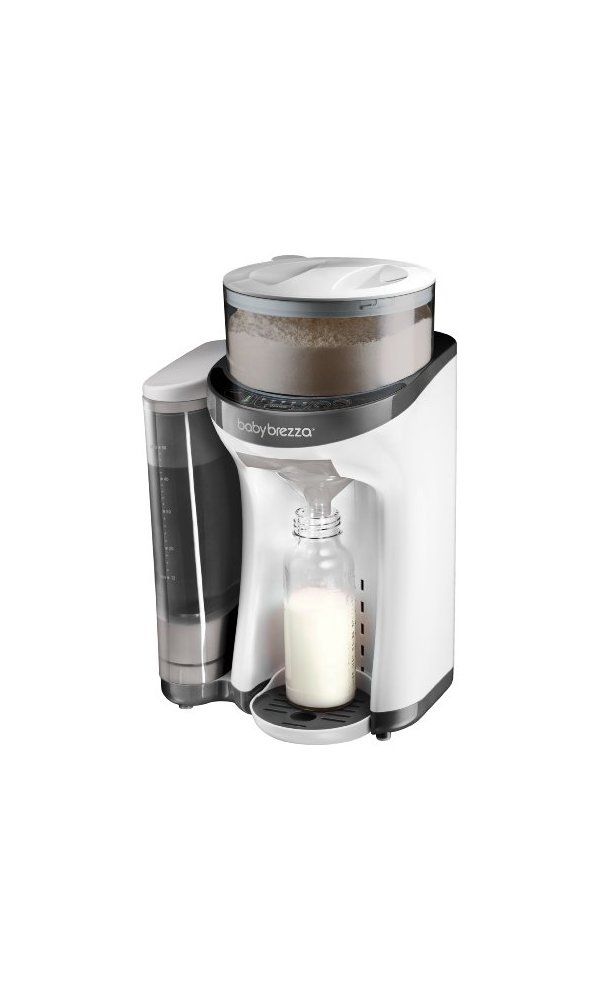
Baby brezza food maker manual
baby brezza 030-05-0137 One Step Food Maker Deluxe Instructions
030-05-0137 One Step Food Maker Deluxe
Instruction Manual
IMPORTANT SAFEGUARDS
When using electrical appliances, basic safety precautions should always be followed, including the following:
- Read all instructions before using.
- Do not touch hot surfaces. Use handles or knobs.
- To protect against electric shock do not immerse cord, plug or appliance in water or other liquid.
- This appliance is not intended for use by persons (including children) with reduced physical, sensory, or mental capabilities, or lack of experience and knowledge, unless they are closely supervised and instructed concerning use of the appliance by a person responsible for their safety. Close supervision is necessary when any appliance is used by or near children. Children should be supervised to ensure that they do not play with the appliance.
- Turn the appliance OFF, then unplug from the outlet when not in use, before assembling or disassembling parts & before cleaning.
To unplug, grasp the plug and pull from the outlet. Never pull from the power cord. Make sure appliance is OFF when not in use, before putting on or taking off parts, and before cleaning.
- Do not operate any appliance with a damaged cord or plug or after the appliance malfunctions, or is dropped or damaged in any manner. Contact the manufacturer at their customer service telephone number for information on examination, repair, or adjustment.
- The use of accessory attachments not recommended by the appliance manufacturer may cause fire, electric shock or injury.
- Use on level surface and be sure there is no debris under the unit and the rubber pads are touching the surface.
- Household use only. Do not use outdoors.
- Do not let cord hang over edge of table or counter, or touch hot surfaces.
- Do not place on or near hot gas or electric burner, or in a heated oven.
- Extreme caution must be used when moving an appliance containing hot liquids.
- Do not use appliance for other than intended use.
- Do not use the machine without food in the bowl.
- This appliance has a polarized plug. To reduce risk of electric shock, this plug is intended to fit into a polarized outlet only one way. If the plug does not fit fully into the outlet, reverse the plug. If it still does not fit, contact a qualified electrician.
Do not attempt to modify the plug in any way. - Make sure machine is turned off before unplugging.
- A short powder-supply cord should be used to reduce the risk of becoming entangled in or tripping over a longer cord.
Extension cords are available and may be used if care is exercised in their use. - If using the machine with an extension cord, make sure the cord is the proper electrical rating for the machine. The marked electrical rating of the cord set or extension cord should be at least as great as the electrical rating of the appliance.
The extension cord should be arranged so that it does not drape over countertop or tabletop where it can be pulled on by children or tripped over unintentionally.
- Take care when blending and do not place hands near the lid or top of machine in case hot liquid is accidentally ejected.
- The heating element surface is subject to residual heat after use.
- Before serving, be sure food is at safe temperature.
- Avoid contact with moving parts. Never remove lid while blade is moving.
- Blade has 4 cutting edges and is sharp. Handle carefully. Install and remove by handling top of plastic column. Bowl must be in place before replacing the blade.
- Do not disassemble or lubricate drive shaft.
- The appliance is intended for processing small quantities of food and is especially recommended for preparing baby food.
The appliance is not intended to prepare large quantities of food at a time. - Do not blend hard foods in this machine. Use the steam + blend function for hard foods such as carrots and potatoes.
Use the blend only function for soft foods such as bananas and berries - To disconnect from power source, press stop button to turn off any function and remove plug from wall outlet.
- Before serving, unplug cord from wall outlet. Do not leave cord within child’s reach.
In addition, instructions are also available in an alternative format such as on a website or on request from the user in a format such as a DVD or For an electronic copy of this manual, please contract our after sales support centre.
Correct Disposal of this product. This marking indicates that products should not be disposed of with other household wastes. To prevent possible harm to the environment or human health from uncontrolled waste disposal, recycle it responsibly to promote the sustainable reuse of material resources. To return your used device, please use the return and collection systems or contact the retailer where the product was purchased. They can take this product for environmentally safe recycling.
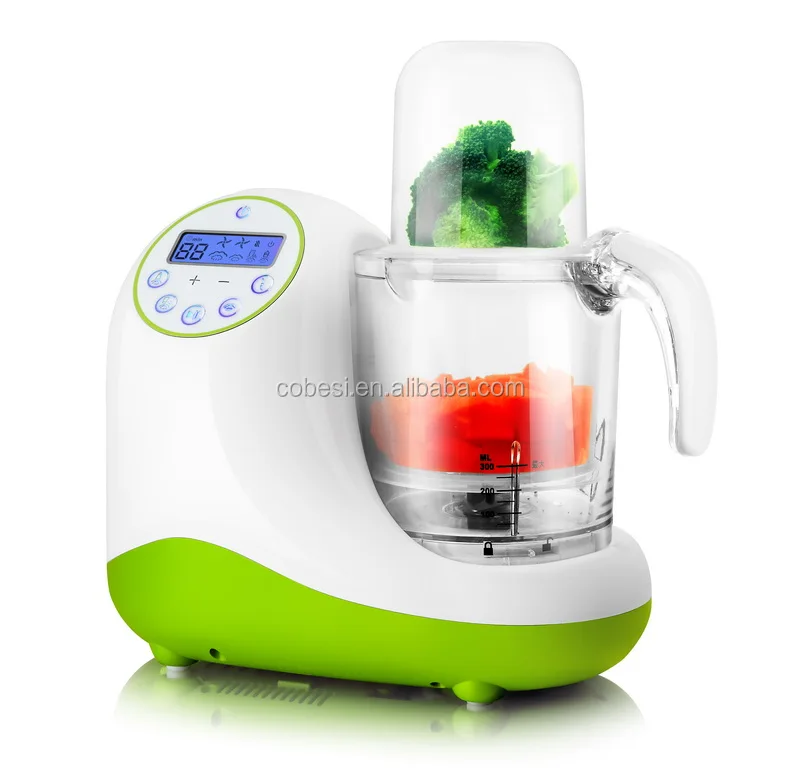
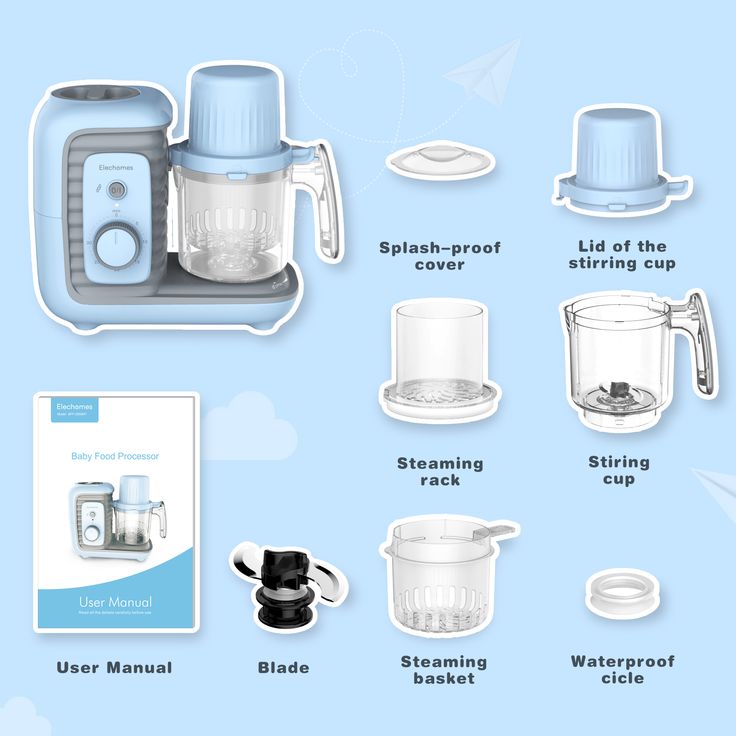
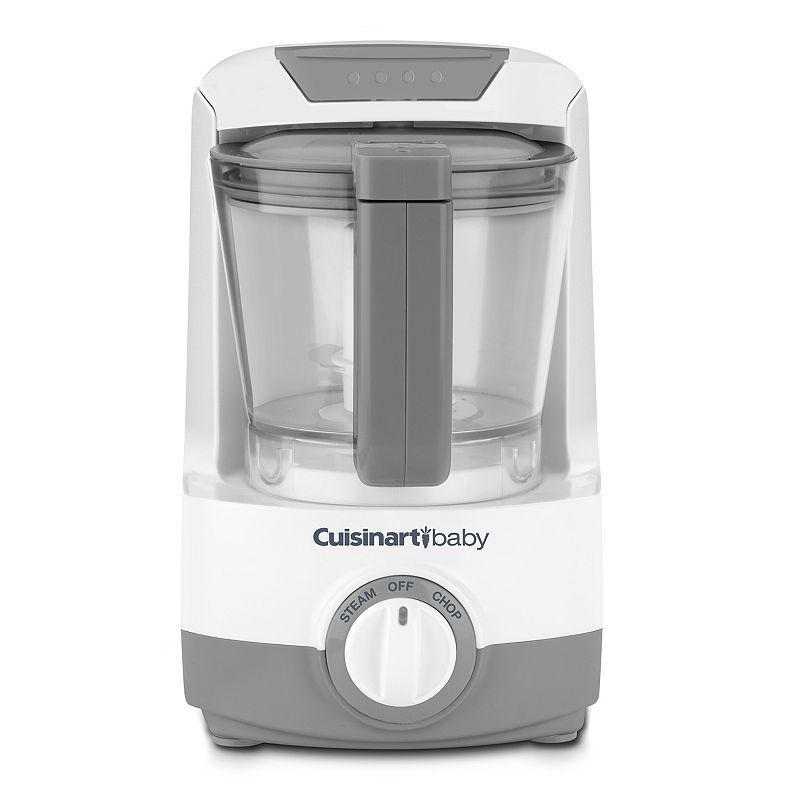
Get to know your Deluxe One Step Baby Food Maker
Safety Switch Function
If the Bowl Lid is opened or the Bowl is removed from the Base during operation, the machine will automatically shut off and beep rapidly.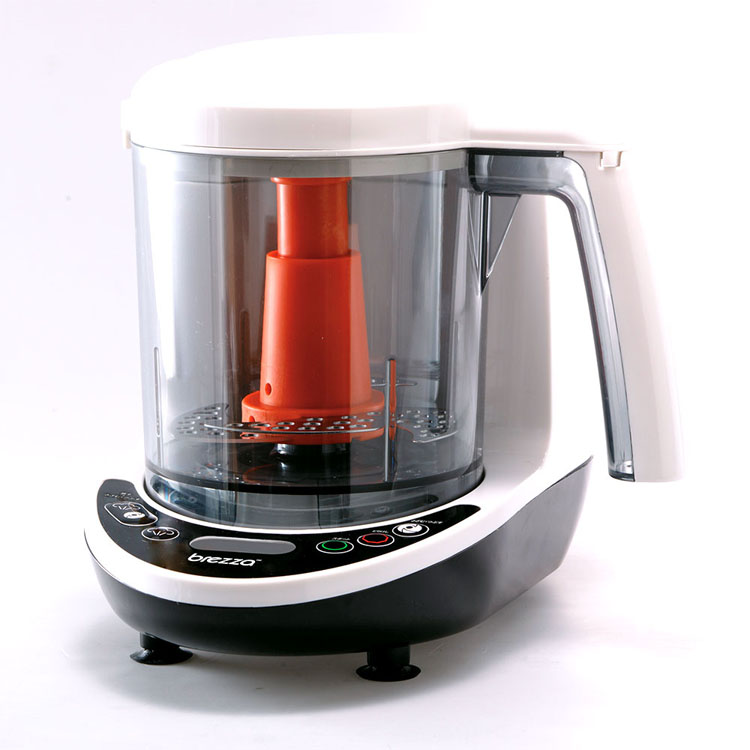 If the Lid and Bowl are replaced within 5 seconds after removal, the machine will resume operation, otherwise it will return to standby mode.
Overheating Protection
If the Steam Chamber runs dry during operation, the heater will shut off and the machine will beep rapidly 5 times. Add water to the Water Tank to resume operation.
TECHNICAL DATA
Model: BRZ00141
Motor Power: 150W
Supply voltage: 220-240V 50~60Hz
Current: 3.5A
Heater Power: 400W
How to Use-Clean all parts before first use
NOTE: Limit amount of chopped meat to 120 grams to ensure that all meat reaches safe internal emperature of 75°C. Always make sure meat is cooked through before serving.
CAUTION Do not lock in the Blade by turning it or pushing it down.
CAUTION Always make sure driveshaft & driveshaft gasket are properly inserted into bowl before steaming or blending.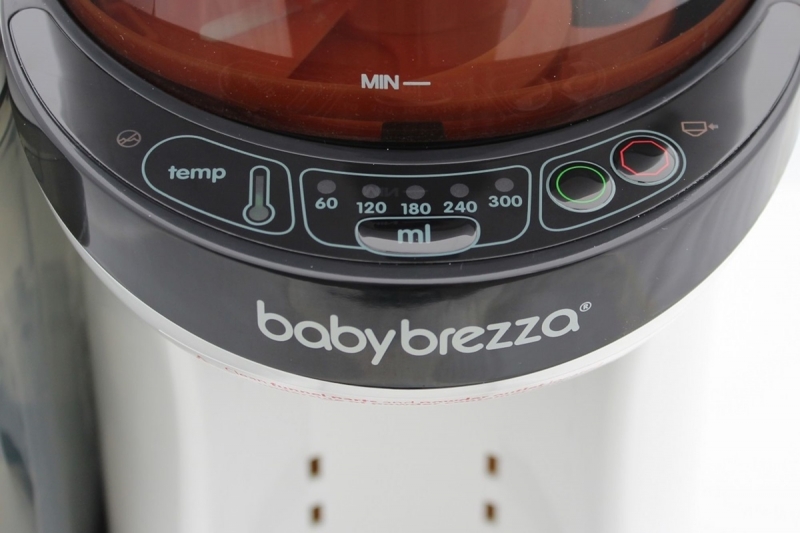 Using machine without the driveshaft & gasket will result in water damage to the base.
To place lid on bowl, position the lid as shown above, then rotate lid counter-clockwise. Make sure tabs on cover align with slots on front of bowl, handle and base of machine.
Attaching Lid and Bowl
Cooking & Controls
Steam + Blend – Automatically blend after steaming
Press repeatedly until desired cooking time is selected. Each press adds 5 minutes to the steam time. Max time is 30 minutes.
Press to begin the steam + blend cycle. Once the steam cycle is complete, the blend cycle will run for 30 seconds and the machine will shut off.
For a smoother consistency, press and hold to blend more. Make sure bowl lid is locked onto bowl. Do not remove lid when blade is moving.
Steam Only
If you would like to steam without the automatic blend cycle, press repeatedly until desired steam time is selected.
Press to begin steam cycle. Machine will beep 3 times and shut off when steam cycle is complete.
Blend Only
Make sure bowl lid is locked onto bowl. Press and hold until desired consistency is achieved.
Do not remove lid when blade is moving.
Reheat & Defrost
Use the steam function to reheat and defrost. See Steam Only instructions above.
Filling the Food Pouch
Cleaning
- Always unplug the appliance before cleaning.
- Clean the appliance, food pouches, and easy fill funnels before and after use.
- Bowl, Blade and Bowl Lid are top shelf dishwasher safe* and can also be hand washed with warm, soapy water. Never use abrasive pads to clean machine parts.
- Stainless steel heating plate can be scrubbed with abrasive pad to remove mineral scaling.
- Never put the Driveshaft in the dishwasher.
- Base and Driveshaft should be wiped with damp cloth only.
- We recommend regular cleaning of the Steam Tank to prevent damage to the machine from mineral deposits. The frequency of cleaning will depend on the type of water you are using and how much mineral deposit build up forms. Always unplug before cleaning. Put 1/3 cup white vinegar and 1/3 cup distilled water in machine and let sit overnight. Pour out vinegar and water solution following instructions below. Refill
- Steam Tank with purified water, plug in machine and run “Steam” cycle for 15 minutes. Rinse with purified water to eliminate any remaining vinegar taste. Empty any remaining water and refill with purified water before steaming new recipes.
- Never use a chemical descaler in the machine.
- Note: To remove unwanted water from the steam tank, water tank, or lid, see diagram below.
- Any other servicing should be performed by an authorized service representative.
Cleaning the Food Pouch
- The food pouch and easy-fill funnel are top rack, dishwasher safe.

- Thoroughly rinse out the food pouch with soap and water.
- Do not use harsh abrasives to clean the food pouch or easy-fill funnel.
- Allow parts to dry before storing away.
Removing and Replacing the Driveshaft
Remove driveshaft from bowl before cleaning in dishwasher. See illustration.
To remove Driveshaft, turn Knob on bottom of bowl counter-clockwise and pull out. Wipe drive shaft with damp cloth. Never put driveshaft in dishwasher. Do not misplace Driveshaft Gasket while leaning. To replace the Driveshaft after cleaning, insert into hole in bottom of bowl and turn clockwise to lock in place *.
Always make sure Driveshaft & Driveshaft Gaskets are properly inserted and locked into place to prevent damage to bowl & base.
Troubleshooting
| Condition | Possible Cause | Possible Remedy |
Steam Tank is dry. (Machine vAl beep rapidly 5 times to indicate that the Steam Talc is Dry) (Machine vAl beep rapidly 5 times to indicate that the Steam Talc is Dry) | Add water to Water Tank | |
| Safety tab on Bowl Ud is not fully Inserted into Bose | Mcie sure Bowl Lid is turned counter-clockwise as for os possible and safety tab on Bowl Lid is fully inserted into Base. | |
| Machine is unplugged. | Plug in Baby Brezza. | |
| Machine stops during operation | Steam Tank is dry Noche* will beep rapidly 5 times to indicate that the Steam Tank is Dry) | Add water to Water Tank. |
| Safety tab on Bowl Lid has been disengaged from Bose. | Mcie sure Bowl Lid is turned counter-clockwise as for os possible and safety tab on Bowl Lid is fully inserted into Base. | |
| Final puree consistency isn’t smooth | Row food isn’t aced finely enough before steaming | Dice food into smaller pieces, approximately 1/4″-1/2″ pcml, before placing in bowl. |
Low water content of raw food. | Add additional water, formula, breast milk or other liquid after steaming and blend longer. | |
| Can not remove Blade from Driveshafl | Blade is in dropped position with driveshaft pins locked in place. | Lock bowl back onto machine. Gently pull up on center blade column while twisting counter- clockwise. |
| Scohng In Steam Tank | Mineral rich water used persistently | Clean Steam Tank by following instructions on page 5. |
Controls + Indicator Icons
Limited 1-Year Warranty
Our goods come with guarantees that cannot be excluded under the Australian Consumer Law. You are entitled to a replacement or refund for a major failure and compensation for any other reasonably foreseeable loss or damage. You are also entitled to have the goods repaired or replaced if the goods fail to be of acceptable quality and the failure does not amount to a major failure.
The limited warranty is valid only on products bought through authorized resellers. Buying through an unauthorized reseller.
This warranty is available to consumers only. You are a consumer if you own a Baby Brezza Formula Pro that was purchased at retail for personal, family or household use. Except as otherwise required under applicable state law, this warranty is not available to retailers or other commercial purchasers or owners. We warrant that your Baby Brezza Formula Pro will be free of defects in material or workmanship under normal home use for one year from the date of original purchase. Customer will be required to present original proof of purchase in order to obtain the warranty benefits. In the event that you do not have proof of purchase date, the purchase date for purposes of this warranty will be the date of manufacture. If your Baby Brezza Formula Pro should prove to be defective within the warranty period, we will repair it or, if we consider it necessary, replace it.
To obtain warranty services, please contact Customer Service.
Customer Service
If you are experiencing problems with your BabyBrezza Formula Pro Advanced, visit babybrezza.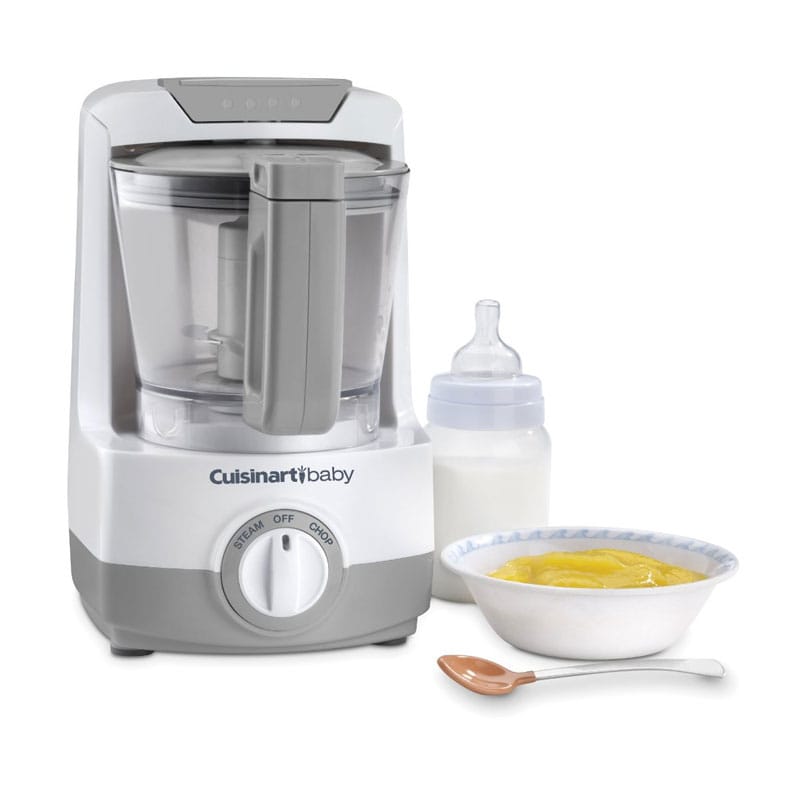 com/pages/international to locate your local customer service representative.
| Distributed in Australia by CNP Brands 82 Maribyrong Street, Footscray, VIC, 3011 Customer Service 1300 667 137 E: [email protected] W: www.cnpbrands.com.au | Distributed in New Zealand by Wainhouse Distribution 2-6 Argyle St. Morningside, PO Box 41-014 St Lukes, Auckland, New Zealand Customer Service 0800 567 5000 E: [email protected] |
This product may be covered under one or more of the following including U.S. Patent No. 8,584,901, Canada Patent No.
2,842,603, China Patent No. CN103874441, Australia Patent No. 2011374309,Spain Patent No. ES2473790B2 and pending patent application(s) in the U.S. and other countries.
babybrezza.com
© 2021 Baby Brezza Enterprises LLC
Documents / Resources
| baby brezza 030-05-0137 One Step Food Maker Deluxe [pdf] Instructions 030-05-0137, One Step Food Maker Deluxe, 030-05-0137 One Step Food Maker Deluxe |
baby brezza food maker deluxe Instructions
Document
baby brezza food maker deluxe
IMPORTANT SAFEGUARDS
When using electrical appliances, basic safety precautions should always be followed, including the following:
- Read all instructions before using.

- Do not touch hot surfaces. Use handles or knobs.
- To protect against electric shock do not immerse cord, plug or appliance in water or other liquid.
- This appliance is not intended for use by persons (including children) with reduced physical, sensory, or mental capabilities, or lack of experience and knowledge, unless they are closely supervised and instructed concerning use of the appliance by a person responsible for their safety. Close supervision is necessary when any appliance is used by or near children. Children should be supervised to ensure that they do not play with the appliance.
- Turn the appliance OFF, then unplug from the outlet when not in use, before assembling or disassembling parts and before cleaning. To unplug, grasp the plug and pull from the outlet. Never pull from the power cord. Permanently Installed Make sure appliance is OFF when not in use, before putting on or taking off parts, and before cleaning.
- Do not operate any appliance with a damaged cord or plug or after the appliance malfunctions, or is dropped or damaged in any manner.
 Contact the manufacturer at their customer service telephone number for information on examination, repair, or adjustment.
 - The use of accessory attachments not recommended by the appliance manufacturer may cause fire, electric shock or injury.
- se on level surface and be sure there is no debris under the unit and the rubber pads are touching the surface.
- Household use only. Do not use outdoors.
- Do not let cord hang over edge of table or counter, or touch hot surfaces.
- Do not place on or near hot gas or electric burner, or in a heated oven.
- Extreme caution must be used when moving an appliance containing hot liquids.
- Do not use appliance for other than intended use.
- Do not use the machine without food in the bowl.
- his appliance has a polarized plug (one blade wider than the other). To reduce risk of electric shock, this plug is intended to fit into a polarized outlet only one way. If the plug does not fit fully into the outlet, reverse the plug.
 If it still does not fit, contact a qualified electrician. Do not attempt to modify the plug in any way.
 - Make sure the machine is turned off before unplugging it.
- A short powder-supply cord should be used to reduce the risk of becoming entangled in or tripping over a longer cord. Extension cords are available and may be used if care is exercised in their use.
- If using the machine with an extension cord, make sure the cord is the proper electrical rating for the machine. The marked electrical rating of the cord set or extension cord should be at least as great as the electrical rating of the appliance. The extension cord should be arranged so that it does not drape over countertop or tabletop where it can be pulled on by children or tripped over unintentionally.
- Before serving, be sure food is at safe temperature.
- Avoid contact with moving parts. Never remove lid while blade is moving.
- Blade has 4 cutting edges and is sharp. Handle carefully.
 Install and remove by handling top of plastic column. Bowl must be in place before replacing the blade.
 - Do not disassemble or lubricate drive shaft.
- The appliance is intended for processing small quantities of food and is especially recommended for preparing baby food. The appliance is not intended to prepare large quantities of food at a time.
- Do not blend hard foods in this machine. Use the steam + blend function for hard foods such as carrots and potatoes. Use the blend only function for soft foods such as bananas and berries
- To disconnect from power source, press stop button to turn off any function and remove plug from wall outlet.
- Before serving, unplug cord from wall outlet. Do not leave cord within child’s reach.
Correct Disposal of this product. This marking indicates that products should not be disposed of with other household wastes. To prevent possible harm to the environment or human health from uncontrolled waste disposal, recycle it responsibly to promote the sustainable reuse of material resources. To return your used device, please use the return and collection systems or contact the retailer where the product was purchased. They can take this product for environmentally safe recycling.
SAVE THESE INSTRUCTIONS
Get to know your Deluxe One Step Baby Food Make
Safety Switch Function
If the Bowl Lid is opened or the Bowl is removed from the Base during operation, the machine will automatically shut off and beep rapidly. If the Lid and Bowl are replaced within 5 seconds after removal, the machine will resume operation, otherwise it will return to standby mode.
Overheating Protection
If the Steam Chamber runs dry during operation, the heater will shut off and the machine will beep rapidly 5 times. Add water to the Water Tank to resume operation.
TECHNICAL DATA
- Supply voltage: 220-240V 50~60Hz
- Model: BRZ00141
- Current: 3.
 5A
5A - Motor Power: 150W
- Heater Power: 400W
How to Use
Clean all parts before first use
- CAUTION Do not lock in the Blade by turning it or pushing it down.
CAUTION Always make sure driveshaft and driveshaft gasket are properly inserted into bowl before steaming or blending. Use of the machine without the driveshaft and gasket will result in water damage to the base.
Top View
- To place lid on bowl, position the lid as shown above, then rotate the lid counter-clockwise. Make sure the tabs on the cover align with the slots on front of the bowl, handle, and base of the machine.
Attaching Lid and Bowl
- Turn the bowl counter-clockwise to lock onto the base.
- Turn the bowl clockwise to release from base.
- Turn lid counter-clockwise to lock on to bowl.
- Turn lid counter-clockwise to lock on to bowl.
Cooking & Controls
- Steam + Blend – Automatically blend after steaming
- Press repeatedly until desired cooking time is selected. Each press adds 5 minutes to the steam time. Max time is 30 minutes.
- Press to begin the steam + blend cycle. Once the steam cycle is complete, the blend cycle will run for 30 seconds and the machine will shut off.
- For a smoother consistency, press and hold to blend more. Make sure bowl lid is locked onto bowl. Do not remove lid when blade is moving.
Steam Only
- If you would like to steam without the automatic blend cycle, press repeatedly until the desired steam time is selected.
- Press to begin steam cycle. Machine will beep 3 times and shut off when steam cycle is complete.
Blend Only
Make sure bowl lid is locked onto bowl. Press and hold until desired consistency is achieved. Do not remove the lid when the blade is moving.
Reheat & Defrost
Use the steam function to reheat and defrost.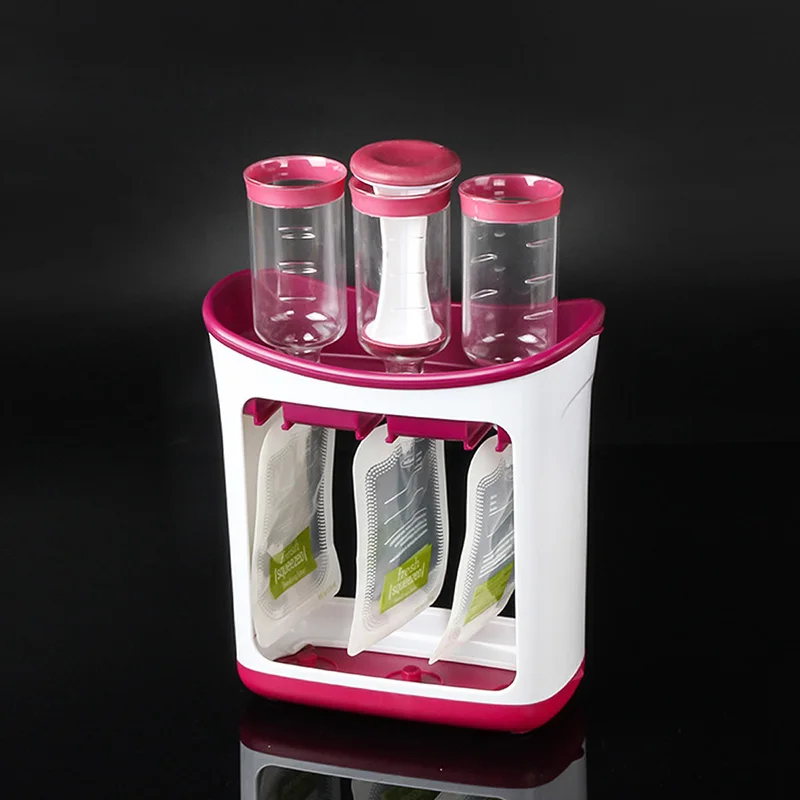 See Steam Only instructions above.
Filling the Food Pouch
Cleaning
- Always unplug the appliance before cleaning.
- Clean the appliance, food pouches, and easy fill funnels before and after use.
- Bowl, Blade and Bowl Lid are top shelf dishwasher safe* and can also be hand washed with warm, soapy water. Never use abrasive pads to clean machine parts.
- Stainless steel heating plate can be scrubbed with abrasive pad to remove mineral scaling.
- Never put the Driveshaft in the dishwasher.
- Base and Driveshaft should be wiped with damp cloth only.
- We recommend regular cleaning of the Steam Tank to prevent damage to the machine from mineral deposits. The frequency of cleaning will depend on the type of water you are using and how much mineral deposit build up forms. Always unplug before cleaning. Put 1/3 cup white vinegar and 1/3 cup distilled water in machine and let sit overnight. Pour out vinegar and water solution following instructions below.
 Refill
Steam Tank with purified water, plug in machine and run “Steam” cycle for 15 minutes. Rinse with purified water to eliminate any remaining vinegar taste. Empty any remaining water and refill with purified water before steaming new recipes. - Never use a chemical descaler in the machine.
- Note: To remove unwanted water from the steam tank, water tank, or lid, see diagram below.
- Any other servicing should be performed by an authorized service representative.
Cleaning the Food Pouch
- The food pouch and easy-fill funnel are top rack, dishwasher safe.
- Thoroughly rinse out the food pouch with soap and water.
- Do not use harsh abrasives to clean the food pouch or easy-fill funnel.
- Allow parts to dry before storing away.
Removing and Replacing the Driveshaft
Remove the driveshaft from the bowl before cleaning in the dishwasher. See illustration. To remove the Driveshaft, turn the Knob on the bottom of the bowl counter-clockwise and pull out.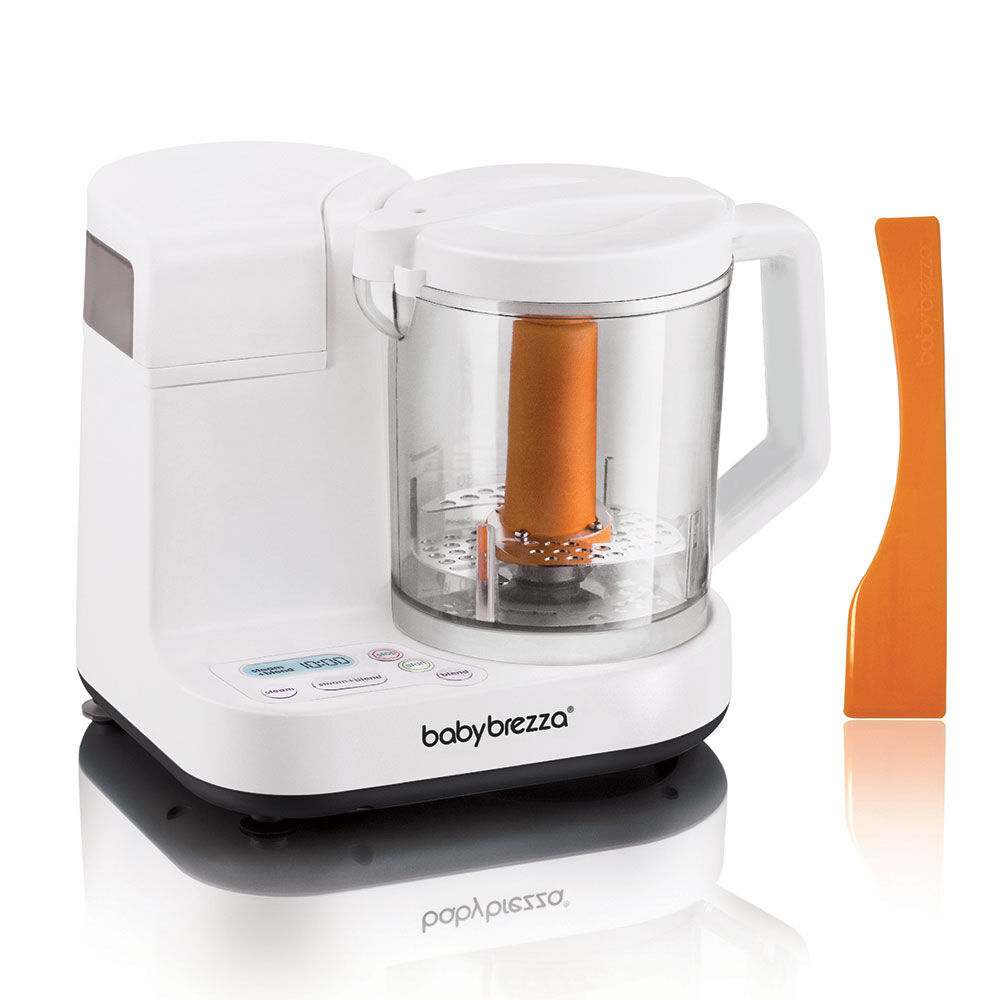 Wipe the drive shaft with a damp cloth. Never put the driveshaft in the dishwasher. Do not misplace the Driveshaft Gasket while cleaning. To replace the Driveshaft after cleaning, insert it into the hole in the bottom of the bowl and turn clockwise to lock in place.
- Always make sure the Driveshaft & Driveshaft Gaskets are properly inserted and locked into place to prevent damage to the bowl & base.
Troubleshooting
| Condition | Possible Cause | Possible Remedy |
| Machine will not start. | Steam Tank is dry. (Machine will beep rapidly 5 times to indicate that the Steam Tank is Dry) | Add water to Water Tank. |
| Safety tab on Bowl Lid is not fully inserted into Base. | Make sure Bowl Lid is turned counter-clockwise as far as possible and safety tab on Bowl Lid is fully inserted into Base. | |
| Machine is unplugged. | Plug in Baby Brezza. | |
| Machine stops during operation | Steam Tank is dry. (Machine will beep rapidly 5 times to indicate that the Steam Tank is Dry) (Machine will beep rapidly 5 times to indicate that the Steam Tank is Dry) | Add water to Water Tank. |
| Safety tab on Bowl Lid has been disengaged from Base. | Make sure Bowl Lid is turned counter-clockwise as far as possible and safety tab on Bowl Lid is fully inserted into Base. | |
| Final puree consistency isn’t smooth | Raw food isn’t diced finely enough before steaming. | Dice food into smaller pieces, approximately 1/4”-1/2” (1cm), before placing in bowl. |
| Low water content of raw food. | Add additional water, formula, breast milk or other liquid after steaming and blend longer. | |
| Can not remove Blade from Driveshaft | Blade is in dropped position with driveshaft pins locked in place. | Lock bowl back onto machine. Gently pull up on center blade column while twisting counter- clockwise. |
| Scaling in Steam Tank | Mineral rich water used persistently.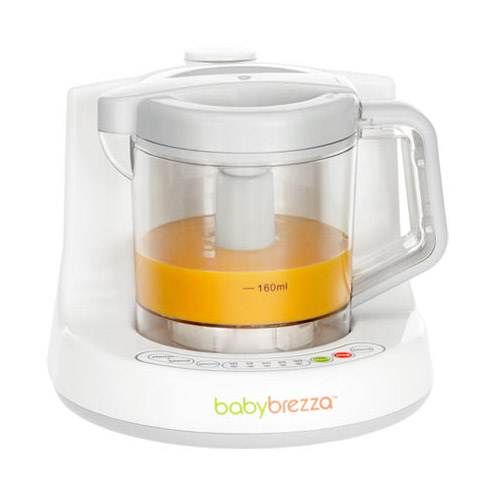 | Clean Steam Tank by following instructions on page 5. |
Controls + Indicator Icons
Customer Service
If you are experiencing problems with your Baby Brezza, visit babybrezza.com/pages/international to locate your local customer service representative.
Documents / Resources
| baby brezza food maker deluxe [pdf] Instructions food maker deluxe, food maker, deluxe, maker deluxe, deluxe food maker |
baby brezza Instructions / Datasheets / Instructions
baby brezza DELUXE one step Food Maker Please register your baby food machine at: babybrezza.com/register For product updates and safety information. Limited 1-Year Warranty This warranty is available to consumers only.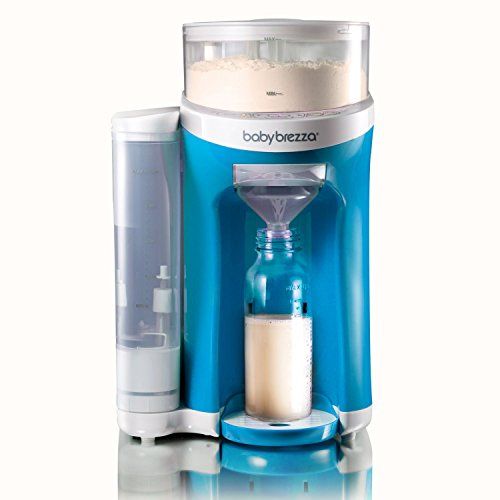 You are a consumer if you have a Baby Brezza One Step baby food maker that was purchased at retail for personal use, family or …
Continue reading "baby brezza DELUXE one step Food Cooking Instructions"
Posted in baby brezzaTags: baby brezza, Deluxe, luxury food maker, DELUXE One Step Food Maker, Food Maker, one step food makerLeave a comment on baby brezza DELUXE one step Cooking Instructionsbaby brezza food maker deluxe IMPORTANT SAFETY PRECAUTIONS Basic safety precautions should always be followed when using electrical appliances, including the following: Read all instructions before use. Do not touch hot surfaces. Use knobs or buttons. To avoid electric shock, do not immerse cord, plug or appliance in water or other liquid. This appliance…
Continue reading "Instructions for making baby food brezza food maker deluxe"
Posted in brezza food maker deluxe deluxeLeave a Comment Baby Cooking Instructions brezza food maker deluxe Safe + Smart Bottle Warmer Instructions Manualbabybrezza® App IMPORTANT SAFETY PRECAUTIONS Basic safety precautions should be followed when using electrical appliances, including the following: Read all instructions before use.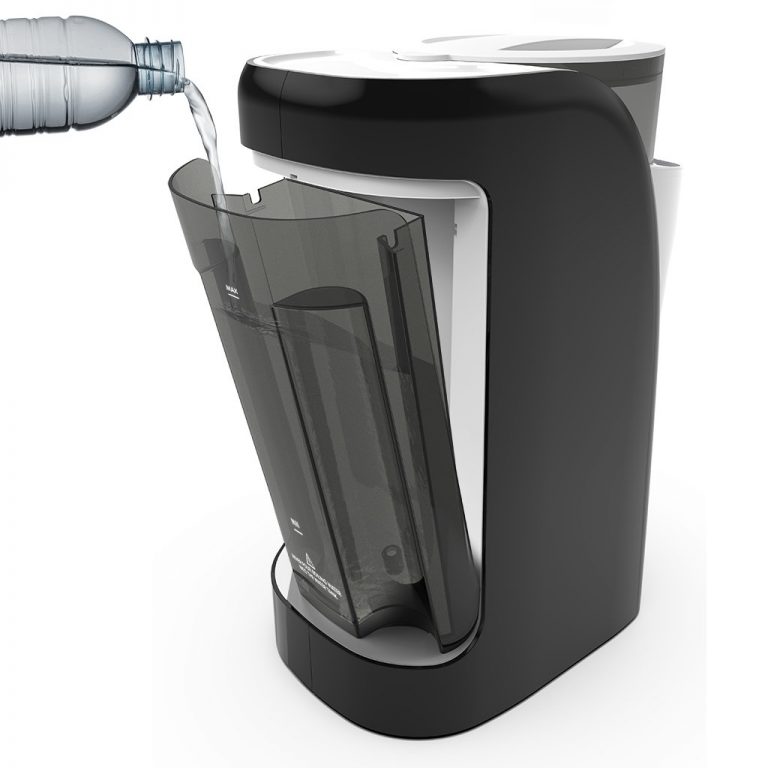 Do not touch hot surfaces. Use pens. To prevent electric shock or personal injury, do not immerse cord, plug, water tank, or appliance in water…
Continue reading “Instructions for a safe smart heater of Baby Brezza BRZA00139 bottles”
Published a tarpaulin, BRZ00139 heater, BRZ00139 Safe smart heating, safe, safe, safe, safe Bottle Warmer, WarmerLeave a comment on baby brezza BRZ00139 Safety Smart Bottle Warmer Instructionsbaby brezza BRZ0083 Super Fast Sterilizer Dryer IMPORTANT SAFETY PRECAUTIONS READ ALL INSTRUCTIONS Basic safety precautions should always be followed when using electrical appliances, including: Always use a steam sterilizer dryer on a flat surface. DO NOT expose the sterilizer-dryer to heat sources such as radiators or sunlight through a window. K ...
Continue Reading “Dry Sterilizer Brezza Brz0083 Superfast Instruction Manual”
Published a tarpaulin, BRZ0083, BRZ0083 Superfantine sterilizer, drying, sterility, sterils, sterils, sterility, steril comment on baby brezza BRZ0083 Super Fast Sterilizer Dryer Instructions BRZ0084 Bottle+Breast Milk Warmer Instruction Manual IMPORTANT SAFETY PRECAUTIONS Basic safety precautions should be followed when using electrical equipment, including the following: Read all instructions before use.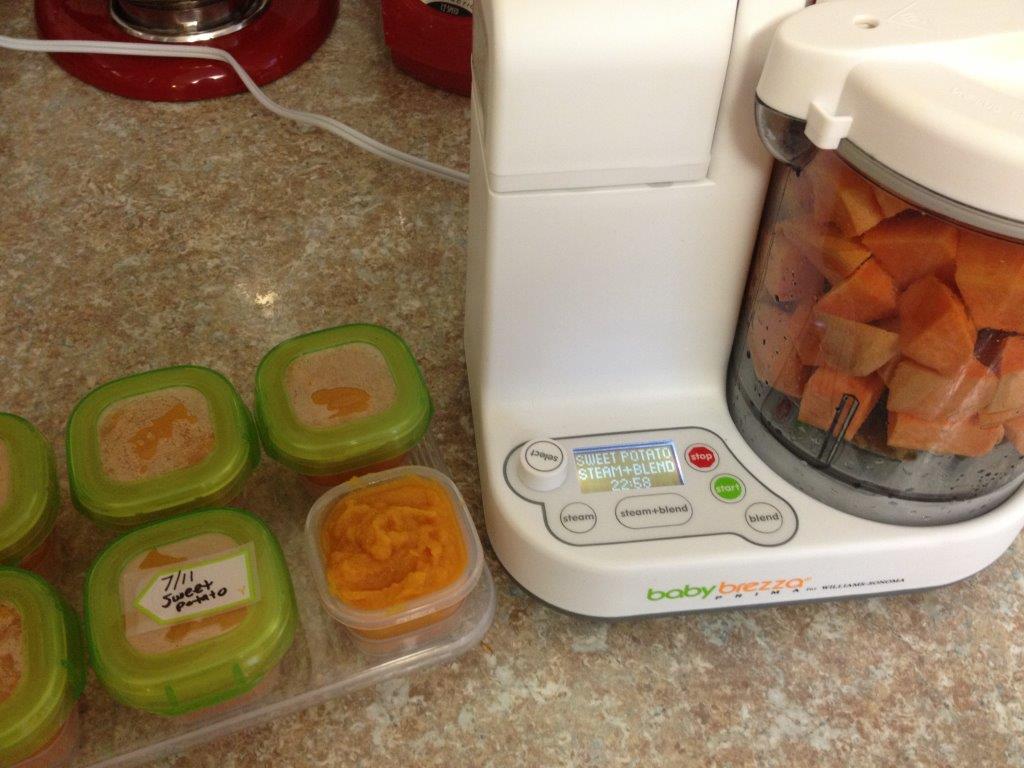 Do not touch hot surfaces. Use pens. To prevent electric shock or personal injury, do not immerse cord, plug, water tank, or appliance in water or other…
Continue reading “Baby Brezza BRZ0084 Bottle + Breast Milk Warmer Instructions”
on baby brezza BRZ0084 Bottle + Breastmilk Warmer InstructionsBaby Brezza One-Stage Sterilizer-Dryer BRZ0098 IMPORTANT SAFETY PRECAUTIONS Basic safety precautions should always be followed when using electrical appliances, including the following: Read all instructions carefully before use.tagThe e marking on the appliance matches your network. If there is any visible damage to the appliance, plug or …
Continue reading "Instruction of the single-stage Sushi Sushi Baby Brezza Brz0098"
Published a tarpaulin, BRZ0098, single-speed sterilizer BRZ0098, BRZ0098, BRZ0098, BRZ0098 BRZ0098 030-05-0137 One Step Food Maker Deluxe Instruction Manual IMPORTANT SAFETY PRECAUTIONS Basic safety precautions should always be followed when using electrical appliances, including the following: Read all instructions before use .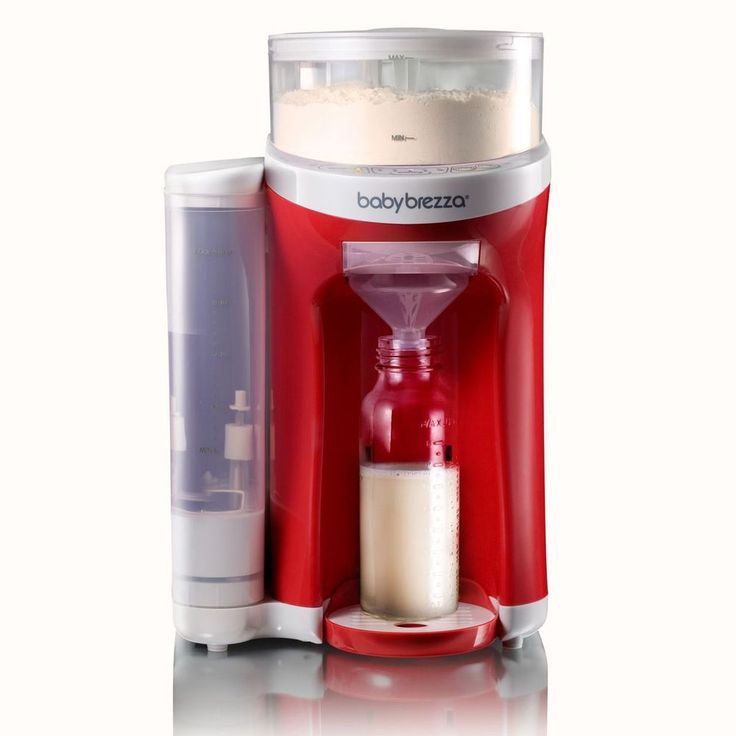 Do not touch hot surfaces. Use knobs or buttons. To avoid electric shock, do not immerse cord, plug or appliance in water or other liquid. …
Continue reading "Baby Brezza 030-05-0137 One Step Food Maker Deluxe Instructions"
, baby brezza, One Step Food Maker DeluxeLeave a comment on baby brezza 030-05-0137 One Step Food Maker Deluxe InstructionsBaby Brezza BRZ0069 Sterilizer Dryer Advanced Instruction Manual IMPORTANT SAFETY PRECAUTIONS Basic safety precautions should always be followed when using electrical appliances, including the following : Read all instructions carefully before using the sterilizer. Make sure that the amount of supply tag Marking e on the device corresponds to your power supply. If there is visible damage to the instrument,… 9
Baby Brezza Sterilizer Dryer BRZ0069 Advanced Instruction Manual
IMPORTANT SAFETY PRECAUTIONS
When using electrical appliances, basic safety precautions should always be followed, including the following:
- Read all instructions carefully before using the sterilizer.
- Make sure that the amount of power tag The e mark on the device matches your power supply.
- If there is any visible damage to the appliance, plug or power cord, unplug the appliance immediately and do not use it.
- If the power cord is damaged, it must be replaced by the manufacturer, its service agent or a similarly qualified person in order to avoid a hazard.
- Do not allow children to touch or use the appliance. The appliance gets very hot and the steam can cause severe burns.
- Do not move the instrument when it is in use or when it contains hot liquids.
- Do not touch hot surfaces.
- Do not place the appliance on or near hot surfaces, in a heated oven, or near gas or electric heaters.
- Disconnect the appliance from the mains before cleaning or storing.
- Do not immerse the power cord, plug, or base unit in water or any other liquid.
- This sterilizer base does not contain any user serviceable parts inside.
 Do not parse.
 - This appliance is intended for domestic indoor use only. Do not use outdoors.
- This device is not intended for use by persons (including children) with reduced physical, sensory or mental capabilities, or lack of experience and knowledge, unless they are supervised or instructed in the use of the device by a person responsible for their safety.
- a) The short power cord is designed to reduce the risk of entanglement or tripping over the longer cord.
b) Extensions are available and can be used if handled with care.
c) If an extension cord is used: the electrical rating of the extension cord must be at least equal to the electrical rating of the appliance; The long cord should be positioned so that it does not hang over the countertop where it can be tripped over, caught on, or inadvertently pulled (especially by children). - Children must be supervised to ensure that they do not play with the appliance. The user must not be supervised by children.
- Not for space heating.
- Always use on a flat, heat-resistant surface.
- Always keep the electric sterilizer and its plug out of the reach of small children.
- To disable, turn off any control, then remove the plug from the socket.
- Ensure that water has been added to the base unit before starting the sterilization cycle.
- Always add 165 ml of distilled water before use. If you pour too little or too much water into the sterilizer, sterilization efficiency may not be achieved.
- Always unplug the device when not in use. Let cool before putting on or taking off any parts.
- Do not use the appliance with a damaged cord or plug, or after the appliance has malfunctioned or been damaged in any way. Return the device to the nearest authorized service center for inspection, repair or adjustment.
- The manufacturer of the device does not recommend the use of accessories as this may cause injury.
- This sterilizer is intended for domestic and similar use, such as staff kitchen areas in shops, offices and other workplaces.
 b. farm houses. c. customers in hotels, motels and other residential areas. d. bed and breakfast.
 - Do not open during use as this product contains boiling water. Watch out for steam escaping from the ventilation holes in the lid.
- Wait at least 30 minutes between operations and make sure the device has cooled down before pressing the start button for successive use.
- Steam escaping from the unit can cause burns. Always allow 5 minutes to cool after completing a cycle before lifting the lid.
- To ensure continued protection against the risk of electric shock, connect only to properly grounded outlets.
- WARNING! Electric shock hazard, turn off power before servicing.
- Use only distilled water, bottled water or fresh running water for sterilization.
- Never use any additives.
- Do not let the cord hang over the edge of a table or counter or touch a hot surface.
- Any service other than cleaning must be performed by an authorized service representative.
- After heating or removing all water from the base of the sterilizer, the surface of the heater is exposed to residual heat after use.
- This appliance may be used by children aged 8 years and over, with reduced physical, sensory or mental capabilities, or lack of experience and knowledge, if they are supervised or instructed in the safe use of the appliance and understand the dangers involved.
- Avoid getting liquid on the connector.
- The instrument may cause injury due to incorrect use. For example, applying a liquid other than water to the base of a sterilizer. 39. This appliance is not intended for heating and cooking food or infant formula.
In addition, the instructions are also available in an alternative format, such as on the website or upon request by the user
in a format such as DVD or For an electronic copy of this manual, please contact our after-sales service center.
This marking indicates that the products must not be disposed of with other household waste.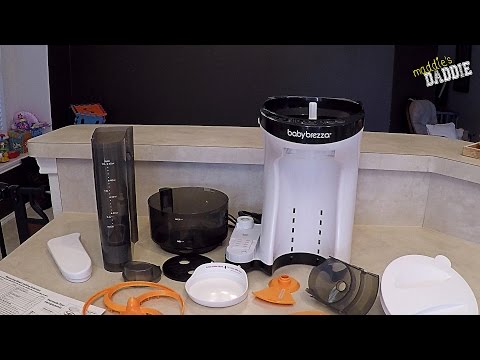 To prevent possible harm to the environment or human health from uncontrolled waste disposal, recycle it responsibly to promote the sustainable reuse of material resources. To return your used device, use the return and collection systems or contact the retailer where you purchased the product. They can hand over this product for environmentally friendly recycling. 9Ol000 instrument for sterilization it is important that all bottles, pump parts and accessories are EMPTY, CLEAN AND COMPLETE
RINSE BEFORE USE in this sterilizer
- Place the instrument on a level surface out of the reach of children and avoid shock or movement during operation.
- Remove the lid, baskets and accessory rack from the base of the sterilizer.
- Pour water over the surface of the base/heater up to the MAX mark (165 ml/5.5 oz).
Never fill the tank above the MAX line. We recommend using distilled water to avoid the formation of mineral scale on the heating plate. However, you can use bottled water or tap water, but you may need to descale more frequently.
- Place the lower basket on the base.
- Place clean bottles upside down on the bottle racks.
- Place the accessory tray in the lower basket (the tray is not suitable for tall bottles).
- Place the bottle accessories on the accessory rack (nipples, collars, caps, etc.)
- Place the upper basket on top of the lower basket, making sure it is securely fastened without any gaps.
- Place breast pump parts or other accessories in the upper basket.
- Press the on/off button once and the function icons will light up. Select the desired function by following the instructions below. If there is no function selection after pressing the on/o button,
the device will automatically turn off.
Automatic sterilization/drying function:
- Select the drying time (after steam sterilization): press the Sterilize/Dry button 1 time for 30 minutes drying, 2 times for 45 minutes drying, 3 times for 60 minutes drying.
 The sterilization/drying cycle will start 3 seconds after the last button press.
 - When the sterilization cycle starts, the timer will count seconds per second for the duration of the sterilization cycle.
- When the sterilization cycle is completed, the instrument will beep with a pause of
3 seconds and start the drying cycle for the time selected in
step 1. The timer on the timer will count down seconds by seconds until it reaches 00:00. - When the drying cycle is complete, the appliance will emit 5 beeps and switch off automatically.
Sterilization function only:
- Press the "Sterilize" button once, the timer will display "00:00" and the steam icon. The sterilization cycle will start 3 seconds after pressing the sterilization button and the timer will count down seconds per second for the duration of the sterilization cycle.
- At the end of the sterilization cycle, the device emits 5 beeps and switches off automatically.

Drying function only:
- Press the "Dry" button 1 time for a 30-minute dry, 2 times for a 45-minute dry, 3 times for a 60-minute dry. The drying cycle will start 3 seconds after the last button is pressed and the timer on the timer will count down second by second until it reaches 00:00.
- At the end of the drying cycle, the appliance emits 5 beeps and switches off automatically.
Warning: If it is necessary to remove water from the base, always DRAIN FROM THE FAN HOLE.
Pay attention to the water fill direction icon on the base and pour in the direction of the arrow.
Cleaning
- Always unplug the appliance before cleaning.
- Do not immerse the base, power cord or plug in water or other liquids.
- Do not wash the base under the tap.
- Use a soft damp cloth to clean the base and control console.
- Never use abrasive pads on the plastic parts of the machine.
- Lid and accessory shelf can be washed in hot soapy water.

- Mineral residues, especially in hard water areas, may settle on the heating plate after several sterilization cycles. To avoid scale build-up, wipe the surfaces with a soft, damp cloth after each operation.
- The deposits can be removed with a descaling agent or by leaving 60 ml of water and a vinegar solution (2/50 mixture of water and vinegar) on the heating plate for about 50 minutes. The plate should then be wiped with a clean, dry cloth. Some discoloration spots may remain after cleaning with vinegar solution, but they are harmless.
- Do not use abrasives or solvents for cleaning; they may damage the appliance and the heating plate surface.
Modular options
Upper and lower basket with accessory tray For use with short bottles, accessories and pump parts.
Upper and lower baskets WITHOUT accessory tray
For use with tall bottles and accessories.
Lower basket with accessory tray only For use with short bottles, accessories and pump parts.