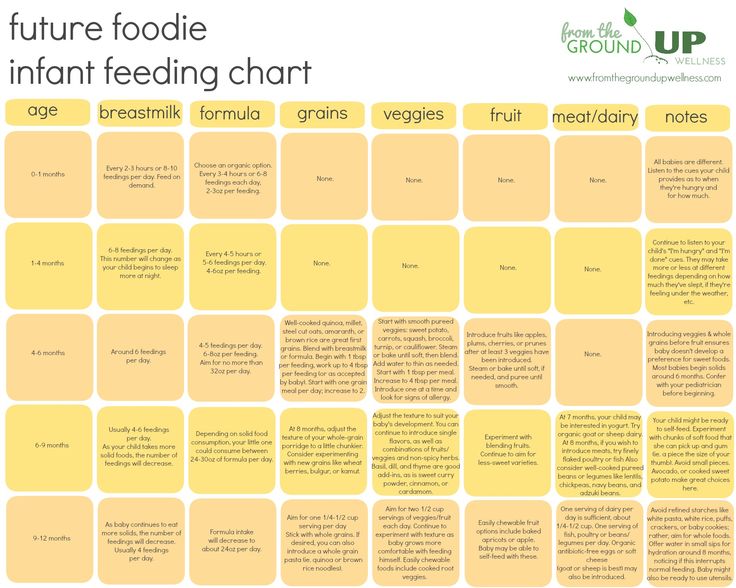
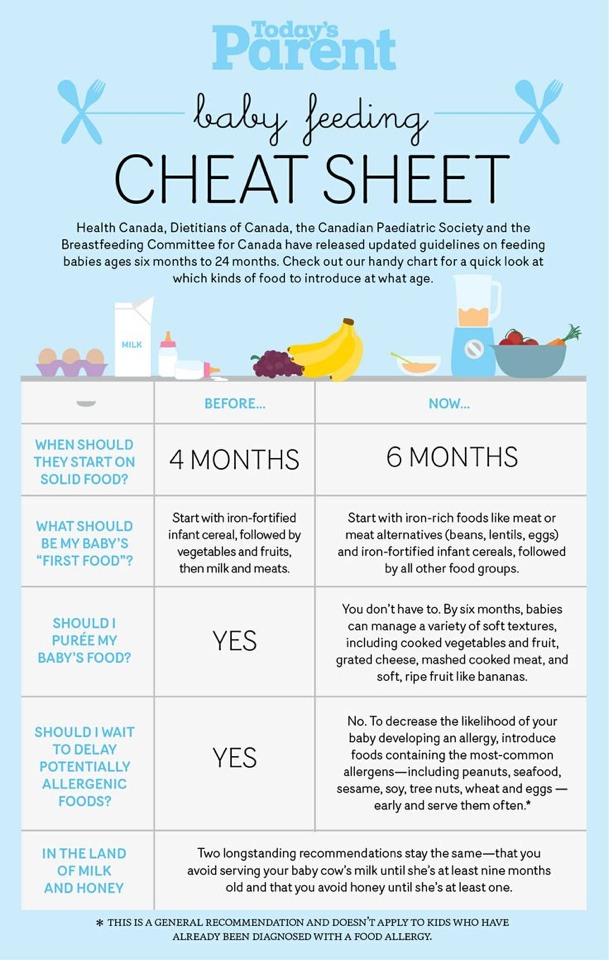
Baby bullet feeding schedule
Baby Bullet Vs Magic Bullet - A Complete Guide
Contents
Spread the love
Baby Bullet vs Magic Bullet
Baby bullet vs magic bullet baby food maker, which one is right for you? This perfect comparison of baby bullet vs magic bullet will tell you everything you need to know. Space is small, but efficiency is high. This review perfectly describes the difference between the Baby bullet & the Magic bullet.
If you are looking for a small blender to help you get the job done as quickly as possible, go for the baby bullet. But the magic bullet is more than just a small and efficient mixing machine; it offers a lot more than that – all of which I will show you off with this Blender review. Magic Bullet is a great personal blender that will ensure that you get a smoothie full of all your flavorful nutrients before leaving home to work outside.
The company gets older over the years, so they are developing some of both products’ features. In addition, they are advancing their technology over the year. Both blenders are designing to adopt advanced functionality and easy use at a higher level by the customers.
There are many reasons to get a personal bender. You may need a blander to start diet changes that your dietitian may be advised to stay smooth daily or for any other reason. Both the Magic Bullet and Baby Bullet can be suitable options for you to start your journey.
I like these mixers very much, they are thin and come from the same manufacturer and are very easy to use. They are easy to operate, making them comfortable to handle and place anywhere at your home. This is to evaluate the Magic Bullet vs Baby Bullet review to help you choose which one is better.
Now we are trying to discuss the difference between the Baby Bullet & the Magic Bullet.
Baby BulletCheck Price at Amazon
The selling price of the baby bullet comes to the market at an affordable price. In addition, the baby bullet has the ability to make your baby’s food delicious and usable daily.
Also, making your baby’s food is easy, and there are no preservatives that can harm your baby. So you can easily make your baby food recipes tasty every day. You keep in mind that for every baby food maker, you can use up to 2-3 years.
Baby Bullets is made by the nutribullet company that makes Magic Bullet and Baby Bullet Blenders and designs similarly. The main difference between Baby bullet vs magic Bullet is the accessories.
Pros & Cons
Pros
- Cheerful color and a small smile
- Practical accessories
- Two sizes for mixing
- Nutrient extraction blade
- It comes with a recipe book.
- In additional storage containers
- BPA free
Cons
- It is more limited in function than magic bullets
- Single-speed 200-watt blender base.
- Milling blades for seed, oats, and grain grind.
- Baby mix blade for mixing.
- 32 oz batch bowl for larger recipes.12 oz short cup for short recipes.
- 6 storage cups with a storage lid and date dial.
- Frozen storage container 12 serving (2 oz serving).
- All containers are BPA-free, and jars are dishwasher safe.
- Jars are not recommended to use in a microwave.
To defrost the ingredients, refrigerate the frozen serving or place it in a sealed container in mildly hot water until the elements are soft. The user manual provides a step-by-step guide to the recipes to follow and what foods to use at each stage. It also outlines the general feeding schedule and how to prepare and store baby food.
Making of Natural FoodBaby bullets come in a large mixing bowl and many smaller containers for storing prepared food. This blend allows parents to make natural foods for their babies to ensure no added preservatives. The base is stable and stands on four slightly circular protrusions. Though not as noisy as to treat enough baby food for the whole week, it shelters the powerful motor.
This blender is unique because its blades are designed to keep extract nutrients. Of course, you will want your baby to get the most nutrition from the food you make, and this system provides that benefit. In addition, the containers’ bodies are BPA-free and non-toxic, essential in all plastic containers involved with food.
Sometimes you need to make a full batch, and when the big bowl comes in handy other times, you only need to mix a small portion and luckily have a small cup. You can give your child the cup or leave the id icon on the cover when you are done.
Pop Freezer TrayA simple pop freezer tray allows you to store up to 6 portions of baby food that comes with this baby food maker. There’s also a great tray for easy handling, which is a new addition.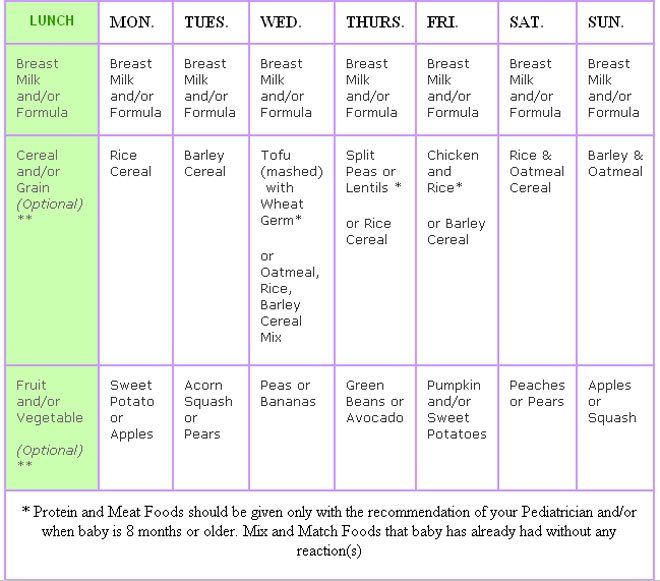 The whole package is well designed, and the baby food preparation flows admirably.
Check Price at Amazon
The name Magic Bullet of this device reflects its design brilliantly. The base is strong, the blades are useful, and the container’s ingredients keep natural nutrition. Also, it’s almost magical at the speed of mixing food and drinks. The package includes a 250-watt motor with a stable base housing, an assortment of mugs, variable ids, and a bonus recipe book.
The long cup is what you usually use to mix most foods and drinks. Also, there is a small mug and a party mug. The ids come in a form that seals the cup for a two-to-go drink and has a comfortable lip ring. BPA in plastic containers is free and very durable. The magic bullet provides a seal that helps keep your food and drink for a long time.
Additionally, it is a perfect blender for your baby as a food maker, with a comfortable lip ring on the id for drinking.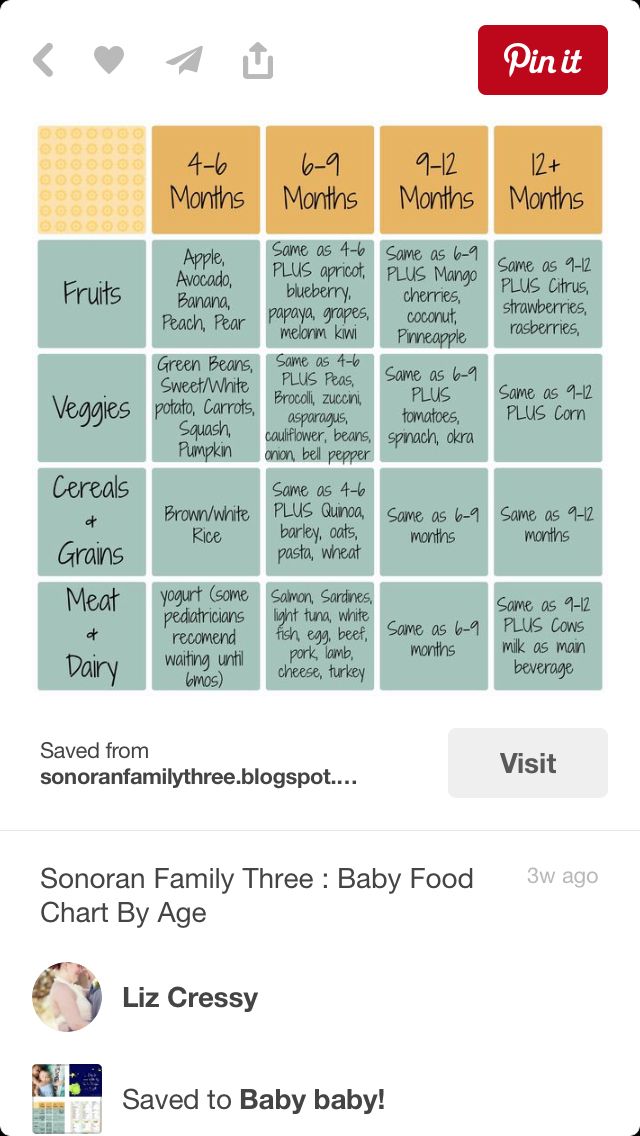 The 10-second recipe book that Magic Bullet brings is completely inspiring. You can slowly mix some great drinks, but you will find this guide in the recipe book. And the best part is that the blander takes less than a minute to make food for your baby.
Pros & Cons
Pros
- This is a light device
- Aesthetically pleasing design
- It is less price
- The set is easy to clean.
- It does not require too much space to store
- A fully portable two-go cup
- Make fresh & healthy food.
- The blander is BPA free
Cons
- It can only take a limited amount of ice cubes
Performance Test of Baby Bullet vs Magic Bullet
The baby bullet & magic bullet are best for making soft foods and mill grains. While Informatics really does a good job of selling this product, we wanted to see its performance in our own testing.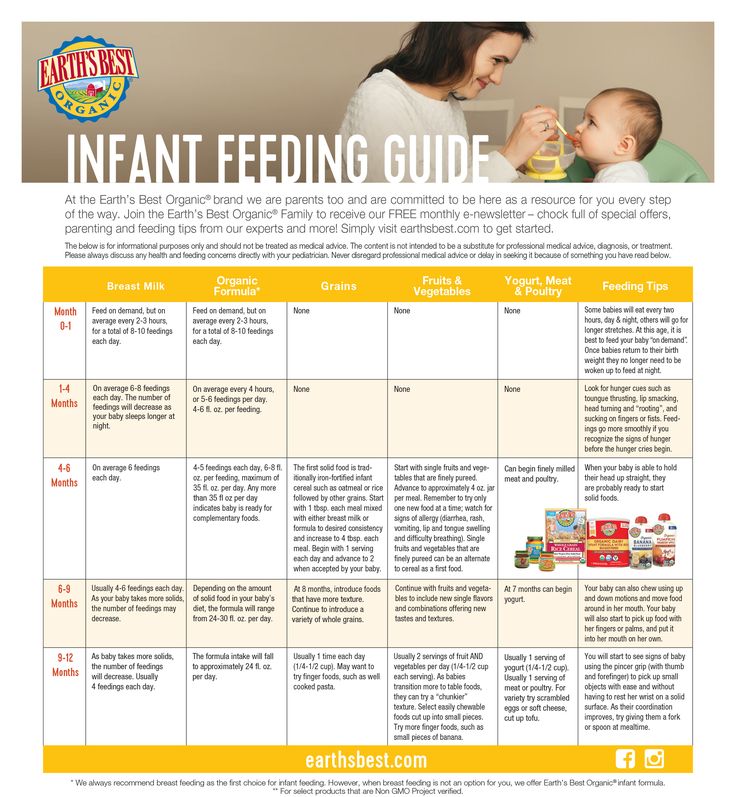 We tested multiple blends using two blades in two blending jars across multiple meals. Our tests looked like we did well on the tested components. We were surprised by the results because a 200-watt motor has enough power to mix the soft elements. We found both are easy to use and have no problem handling blades or jars.
The Magic Bullet is a versatile device. If you’re into smooth and healthy fruit juices, this is the perfect little helper for you. You can use it in your home, or use it. It doesn’t take up too much space, it’s clean and preservative, and you can clean it in a blink of an eye.
Baby Bullets are excellent for making healthy meals and snacks for your baby. It is designed to make your life easier with your small storage cup. Make a batch, freeze it, then pick it up and go.
Magic Bullet and Baby Bullet are both great tools for preparing food for your babies every day. If we choose one, we will go for the Magic Bullet. It is because you can use this blender to make your baby’s food delicious and healthy.
So we want to say baby bullet gives you the best service than the Magic Bullet. So here we are trying to discuss baby bullet vs magic bullet.
Frequently Asking QuestionsWhy will you buy the baby bullet?There are several different baby food manufacturers on the market, and really any blender can make baby food because you mix the soft ingredients. Baby Bullet has everything packaged together and is worth it if you are going to use it. Many people enjoyed using the device and mentioned in the review that it’s easy to use and placeable anywhere on the floor or table. If you need a homogeneous product every day at your home, you can use a basic blender and get a set of small food containers and mix food daily.
Why do you need magic bullets?The magic bullet will help you make fresh juices and foreign drinks in seconds, whether for your own use or even after some of your friends. For example, sauce, spice, and salad dressings are essential for BBQ, and magic bullets can help you get the whip in a few seconds.
Healthy eating often involves polishing fruits and vegetables. Using the magic bullet is perfect for making mixed food before or after your workout, breakfast, luncheon, or even a good night meal. The magic bullet is basically using more and more in the kitchen. This blender allows you to stay organized and healthy during a busy day.
Read More Related Articles- Best Baby Food Blender & Masher For 2021 | Reviews and Guide
- Top 10 Best baby food Containers for 2021 | Reviews & Guide
- Baby Brezza vs Beaba Babycook | Reviews & Guide
- Nutribullet Baby Bullet Blender and Food Processor Review
- Nutribullet vs Magic bullet | Getting the Best Blender
- Author
- Recent Posts
Saif Nobel
Author at Best Baby Food Maker
Hi, I am Saif Nobel. I’m a Professional Review Blogger. I research various products for clients and my blog visitors. Through my review, I want to help users to select the right product before buying it.
Latest posts by Saif Nobel (see all)
10 Easy Homemade Baby Food Ideas (No-Cook, Super Fast, Stage 1)
Learn how to make the EASIEST homemade baby food recipes (stage 1) for your little one with these super simple no-cook ideas. Plus: I have the best tips for making them ahead and freezing them so you can batch cook and simplify your days!
Homemade Baby Food
As a mom to three kids, I know firsthand how the urge to make homemade baby food can be both exciting and a little daunting. And if you have a busy schedule or other kids in the house, finding the time to actually do it can seem impossible. But, there are so many healthy foods that you can transform into stage 1 baby food purees with hardly any work or special equipment at all!
TIP: I use a regular blender for all of these recipes, so you don’t need to buy a special baby food maker unless you want to.
Baby Food Recipes for 6, 7, and 8 Month Old Babies
These homemade baby food ideas are designed for younger babies who are still eating thinner purees, but you can of course use them for older babies and toddlers too. Each can be served as is, or you can combine more than one together to create new flavors if you’re feeling creative!
TIP: If you want to add fat or protein to any of these fruit or veggie purees, simply stir in a little whole milk yogurt, coconut cream, or Avocado Puree.
Best Way to Make Baby Food
I’ve found that the easiest and most approachable way to make baby food is to simply use a blender. With fresh ingredients and a little water, breastmilk, or formula to thin it as needed, you can easily make your baby meals without investing in equipment you may not use very long.
TIP: You’ll want to start with at least 1 cup of any base ingredient to ensure that there’s enough in the blender to fully blend up.
Tools You Need to Make Homemade Baby Food
To make these baby food recipes you’ll need:
- Blender (you could also use an immersion blender if yours is very strong)
- Water, formula, or breastmilk to thin as needed
- Knife for chopping produce
- Spoon
- Bowls
- Ice cube tray
- Freezer bags for storage
- Baby food storage containers
Stage 1 Baby Food
These baby foods are meant for early eaters as they are typically very thin and easy for a baby to move around in their mouths. I follow the recommendations to wait until 6 months to start solids, so I personally don’t worry excessively about this distinction as I like babies to experience some texture in their purees. (The ones you find at the store are low allergenic foods and are meant for 4+ months.)
Stage 2 Baby Food
These baby foods are typically a little bit thicker, sometimes include more than one ingredient, and offer a wider variety of ingredients.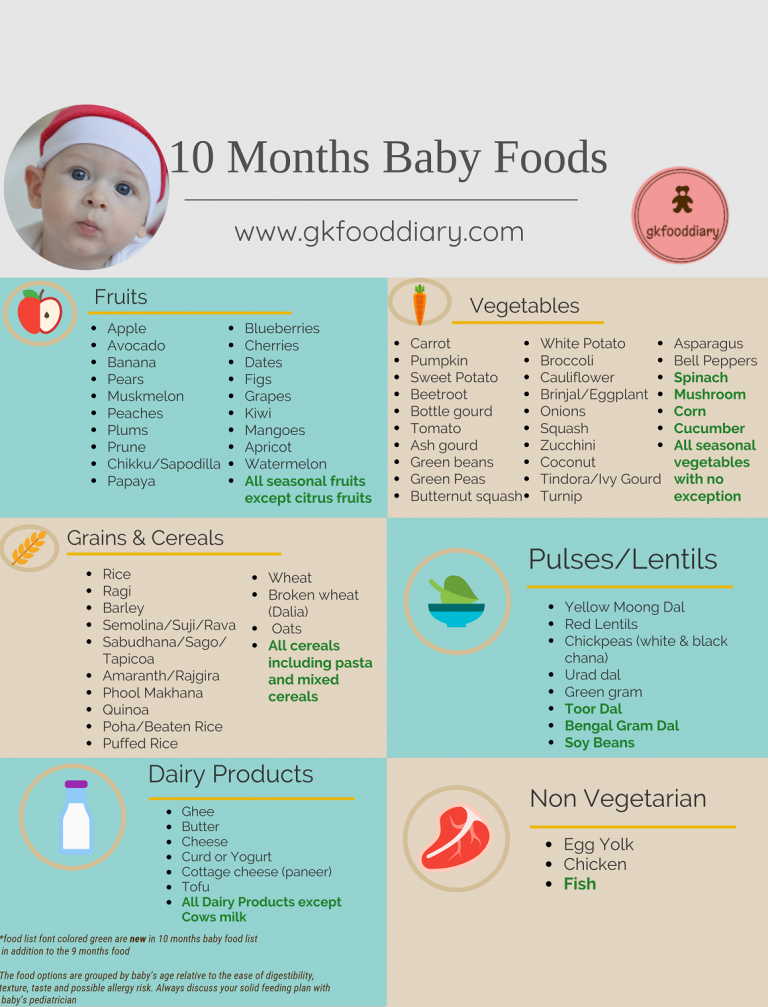 Most babies are ready for these sorts of purees around 7-8 months, or once they’ve mastered thinner purees. (Again, since I like to do a combined baby feeding approach with both baby led weaning and purees, I don’t worry too much about following the calendar to decide when to introduce these.)
TIP: As a backup to my homemade baby foods, I love the options from Amara Organic Baby Food (paid affiliate link) since you simply need to stir it together with breast milk, formula, or water and it’s ready to serve.
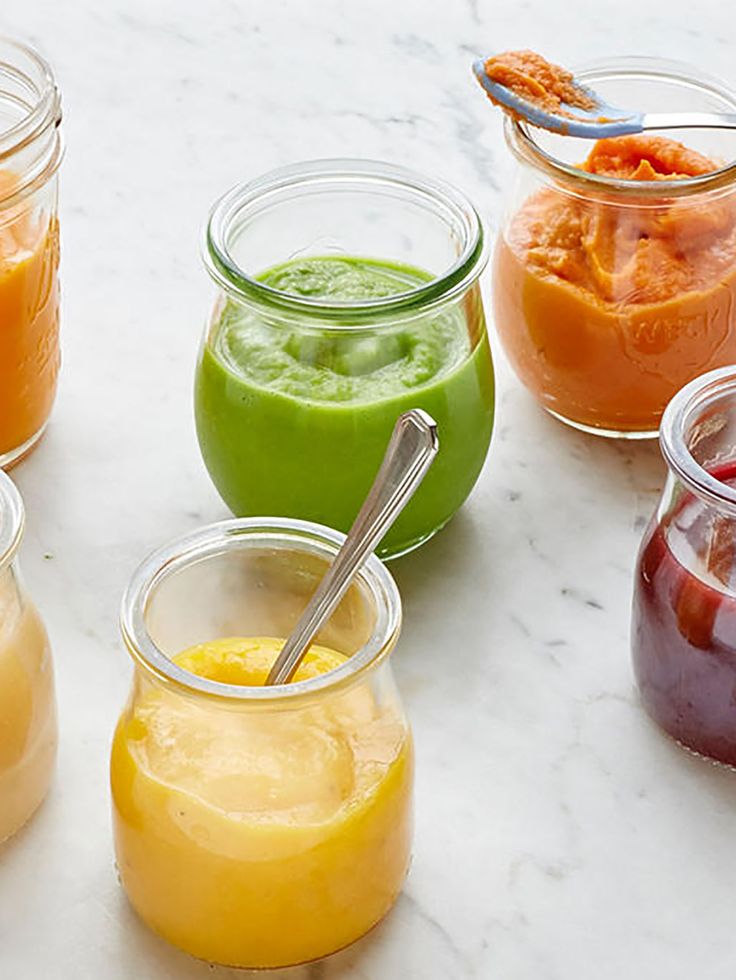
And now, for my ten go-to homemade baby food purees that you don’t even need to cook!
1. Avocado Puree
To make avocado puree for a baby, you just need a fresh avocado, a blender, and some lemon juice if you plan to store it for later. I sometimes even do this with just a fork if the avocado is super soft! It’s a perfect way to introduce a low allergenic food that’s rich in healthy fats.
TIP: Get the full recipe for Avocado Puree here.
2. Bean Puree
Baby’s early foods don’t have to be all one food group and beans are a great food to have in the mix. You can do this easy bean puree with chickpeas, pinto beans, black beans, or even white beans, thinning it as needed with water, formula, or breastmilk. This is a great puree to mix with a little sweet potato or butternut squash.
TIP: Get the full recipe for Bean Puree here.
3. Blueberry Puree
Using fresh or frozen blueberries, this easy berry puree is loaded with fresh flavor and antioxidants. It’s delicious on its own or stirred into plain whole milk yogurt or baby oatmeal. (Note that it thickens up as it sits in the fridge, so you’ll need to stir it well to serve.)
TIP: Get the full recipe for Blueberry Puree here.
4. Kiwi Puree
With a bright flavor, this puree is great for babies who seem to love flavor—and it’s a fun one to make and store for later. You’ll want to make sure that you choose very ripe and sweet kiwi and taste it before you make the puree to ensure that it’s not too tart. (If it seems tart, you can mix with banana or applesauce.)
TIP: Get the full recipe for Kiwi Puree here.
5. Mango Puree
Using fresh or thawed frozen mango, this baby puree blends up in seconds. It’s bright, flavorful, and a great source of immune-boosting vitamins. Taste your mango to be sure that it’s sweet and not too tart. (If it’s tart, you can add Applesauce or ripe Banana Puree.)
TIP: Get the full recipe for Mango Puree here.
6. Peach Puree
Turn fresh or frozen and thawed peach slices into a super smooth Stage 1 baby food with this easy blender method. You’ll want to strain out the skin since it’s hard to blend up smooth, even with a high powered blender, but that’s so easy to do! This baby food recipe is a nice alternative to applesauce.
TIP: Get the full recipe for Peach Puree here.
7. Whipped Peanut Butter
This may not have occurred to you, but whipped peanut butter is a great baby food! This is a perfect way to introduce baby to peanut butter and to offer it safely there after. You just need to stir water into unsweetened creamy peanut butter until it forms a whipped consistency like yogurt. It’s smooth, not too sticky, and packed with protein.
TIP: Get the full scoop on introducing peanuts to baby here.
8. Pineapple Puree
Blend up fresh or frozen pineapple chunks into a tropical baby food puree that’s smooth and creamy. This is yummy on its own or paired with whole milk plain yogurt. Taste your pineapple to ensure that it’s not too tart. (If it’s tart, you can add Applesauce or ripe Banana Puree.)
TIP: Get the full recipe for Pineapple Puree here.
9. Strawberry Puree
Fresh strawberries blend up into a perfectly smooth homemade puree without the need for any additional liquid. You can serve this as is, or mix with applesauce if desired. The flavor of your berries will determine the flavor of your puree, so be sure to taste them for sweetness.
TIP: Get the full recipe for Strawberry Puree here.
10. Banana Puree
Ripe bananas make great homemade baby food with the help of just a blender. This is a super simple baby food to make at home and it’s easy to digest as a Stage 1 baby food. Use ripe bananas with brown spots to ensure that the puree tastes sweet and is easy for baby to digest.
TIP: Get the full recipe for Banana Puree here.
Homemade Baby Food Storage
The easiest way to store homemade baby food is to add fresh purees to an ice cube tray and freeze. Once frozen, simply pop out the cubes and store in labeled freezer bags for up to 3 months. These are a perfect way to make it easy to send homemade baby food to daycare or to simply get ahead for the coming week.
TIP: Find more information about storing baby food—including the best small food storage containers—here.
]
Tips for Making the Best Homemade Baby Food
- Use at least 1 cup base ingredient to ensure that a blender has enough volume to blend well.
- Thin any homemade puree with water, formula, or breast milk.
- Freeze any baby food you won’t use within 3 days in an ice cube tray. Transfer frozen cubes into freezer storage bags for up to 3 months. Thaw these frozen baby food recipes in an airtight container in the fridge overnight before you plan to serve.
- Taste all fresh foods for sweetness and to ensure that your puree isn’t too tart. To tame tartness, mix any puree with Banana Puree , Avocado Puree, Applesauce, or Mashed Sweet Potato.
- If you want to add fat or protein to any of these fruit or veggie purees, simply stir in a little whole milk yogurt, coconut cream, or Avocado Puree.
- Use breastmilk or formula in place of the water if desired.
- Mix two purees together for more complex flavors.
- Add texture to any puree by stirring in baby oatmeal or hemp seeds.
- For more details on each of these, find them here: Avocado Puree; Banana Puree, Bean Puree; Blueberry Puree, Kiwi Puree, Mango Puree, Pineapple Puree, Peanut Butter Puree, Peach Puree, Strawberry Puree
I’d love to hear your feedback on this way of making simple baby food, so please comment below.
 I so appreciate hearing your experience with my recipes!
Prep Time 5 minutes
Cook Time 0 minutes
Total Time 5 minutes
Author Amy Palanjian
Cuisine American
Course Baby Food
Calories 42kcal
Servings 4
- ▢ 1 cup blueberries, diced strawberries, diced peaches (peeled), diced kiwi (peeled), diced pineapple (peeled), diced banana (peeled), diced mango (peeled), diced avocado (peeled), OR beans (rinsed and drained)
- ▢ water, formula, or breast milk (as needed)
Choose one fruit, the avocado, or beans and add to a blender.
If making the puree with blueberries, strawberries, peaches, kiwi, pineapple, mango, or beans, add ¼ cup water and blend, adding more water as desired to make a thin, very smooth puree. If making avocado or banana, just blend (without water) until very smooth.
Serve or store in an airtight container for 3-5 days in the fridge, or up to 3 months in the freezer.
Vitamix Blender
Storage Containers
Silicone Ice Cube Tray
- Use at least 1 cup base ingredient to ensure that a blender has enough volume to blend well.
- Thin any homemade puree with water, formula, or breast milk.
- Freeze any baby food you won't use within 3 days in an ice cube tray. Transfer frozen cubes into freezer storage bags for up to 3 months. Thaw these frozen baby food recipes in an airtight container in the fridge overnight before you plan to serve.
- Taste all fresh foods for sweetness and to ensure that your puree isn't too tart. To tame tartness, mix any puree with Banana Puree , Avocado Puree, Applesauce, or Mashed Sweet Potato.
- If you want to add fat or protein to any of these fruit or veggie purees, simply stir in a little whole milk yogurt, coconut cream, or Avocado Puree.
- Use breastmilk or formula in place of the water if desired.
- Mix two purees together for more complex flavors.
- Add texture to any puree by stirring in baby oatmeal or hemp seeds.
- For more details on each of these, find them here: Avocado Puree; Banana Puree, Bean Puree; Blueberry Puree, Kiwi Puree, Mango Puree, Pineapple Puree, Peanut Butter Puree, Peach Puree, Strawberry Puree
Serving: 0. 25cup, Calories: 42kcal, Carbohydrates: 11g, Protein: 1g, Fat: 1g, Saturated Fat: 1g, Polyunsaturated Fat: 1g, Monounsaturated Fat: 1g, Sodium: 1mg, Potassium: 57mg, Fiber: 2g, Sugar: 7g, Vitamin A: 40IU, Vitamin C: 7mg, Calcium: 4mg, Iron: 1mg
Tried this recipe?Rate in the comments and tag @yummytoddlerfood on IG!
WHO recommendations for the introduction of complementary foods
08.08.2019
Readiness of the child to complementary foods According to the WHO recommendation, existing for 2018, it is optimal to introduce complementary foods to an infant at 6-8 months. Until six months, the baby's gastrointestinal tract is still not sufficiently formed, all the necessary enzymes are not produced for the assimilation of food other than mother's milk or formula. And by 9-10 months, the child can already form stable stereotypes of eating only liquid food, and overcoming them will be painful and difficult for the baby.
Thus, WHO defines the following signs of a child's readiness for the introduction of complementary foods: the maturity of the digestive system; extinction of the solid food ejection reflex; the appearance of the first teeth, making it possible to chew; the readiness of the baby to be stable in an upright position; emotional readiness for new tastes and sensations.
Complementary feeding system WHO has developed recommendations for three complementary feeding options: cereals, vegetables, and meat.
Fruit complementary foods are not recommended for cereals and vegetables. This is due to the fact that up to 8-9 months the gastrointestinal tract of the baby is not ready for the absorption of raw fruits and fruit juices. It is vegetables and cereals that will populate the intestines with the necessary bacteria for the absorption of fruits.
Kefir, according to the WHO, is not considered complementary foods because it is not a solid food. The WHO complementary feeding scheme includes kefir only as an additional food from 8 months. The introduction of cow's milk is recommended by WHO only from 12 months.
Any complementary feeding scheme assumes that portions of complementary foods will systematically increase from half a teaspoon to 100-200 g. The first dishes for complementary foods are prepared exclusively with one-component. Each next component is introduced only after complete addiction to the previous one (6-7 days).
Product sequence
The following sequence of introduction of complementary foods is proposed.
- Vegetables at 6 months.
- Porridges on the water (oatmeal, buckwheat, corn) at 6.5 - 7 months.
- Fruit puree, yolk at 8 months.
- Milk porridge at 8-9 months.
- Meat puree at 9 months.
- Meat by-products at 9-10 months.
- Kefir, cottage cheese, yogurt at 9-10 months.
- Fish at 10 months.
- Juice at 10-12 months.
- Berry puree at 12 months.
- Meat broths at 12 months.
The introduction of vegetable oil (olive, sunflower) in puree and porridge is allowed from 6 months: a scheme with 1 drop with a gradual increase to a volume of 1 teaspoon. The introduction of butter begins at 7 months: the scheme is from 1 g to 10 g in porridge.
For formula-fed babies, the first feeding schedule is similar, with a few exceptions. For these babies, it is better to introduce complementary foods from 5 months, because the milk mixture does not give the small body all the “building material”. The introduction of complementary foods differs only in terms: vegetable purees and cereals are introduced a month earlier.
First cereals
If the child's weight is significantly less than normal, WHO recommends starting complementary foods with non-dairy cereals. For babies, cereals are prepared only with non-dairy, unsalted, semi-liquid, absolutely homogeneous in consistency. The first cereals are prepared from cereal flour (the sorted and washed cereals are carefully ground and crushed).
The following sequence of introduction of cereals is proposed: buckwheat, rice, corn, oatmeal, semolina. It is recommended to cook semolina porridge only once a week, because it contains practically no nutrients, but it is rich in gluten, which can cause problems in the intestines. Proportion for the preparation of the first porridge: 5 g of cereal flour per 100 ml of water. After slightly cooling the finished porridge, chop again. In the finished porridge, you can add 1-2 drops of vegetable oil or a little expressed breast milk.
From 9 months, the baby's nutrition system involves multicomponent cereals, from products already well known to the child. You can already add vegetables and fruits familiar to the baby to cereals. At 9 months, it is allowed to cook barley and millet porridge for babies. And by 10-11 months, cereals on the water will be a great addition to meat and fish meatballs and steam cutlets.
Vegetable food
The first purees are made from one vegetable.
The sequence of introducing vegetables into complementary foods for babies suggests the following order: zucchini, cauliflower, pumpkin, potatoes, carrots, green peas, beets. These vegetables are introduced within 6-9baby months. After 1 year, you can give your child cucumbers, eggplants, tomatoes, sweet peppers, white cabbage. After preparing the puree, make sure that the mass is completely homogeneous, there are no fibers and small particles, the consistency is semi-liquid. Don't salt. Add 1-2 drops of vegetable oil or expressed milk.
If the child refuses vegetable complementary foods, cancel this product for 1-2 weeks. Try to temporarily replace it with another and return to it after a while.
Meat supplements
From 9 months old, the first meat purees are recommended for babies.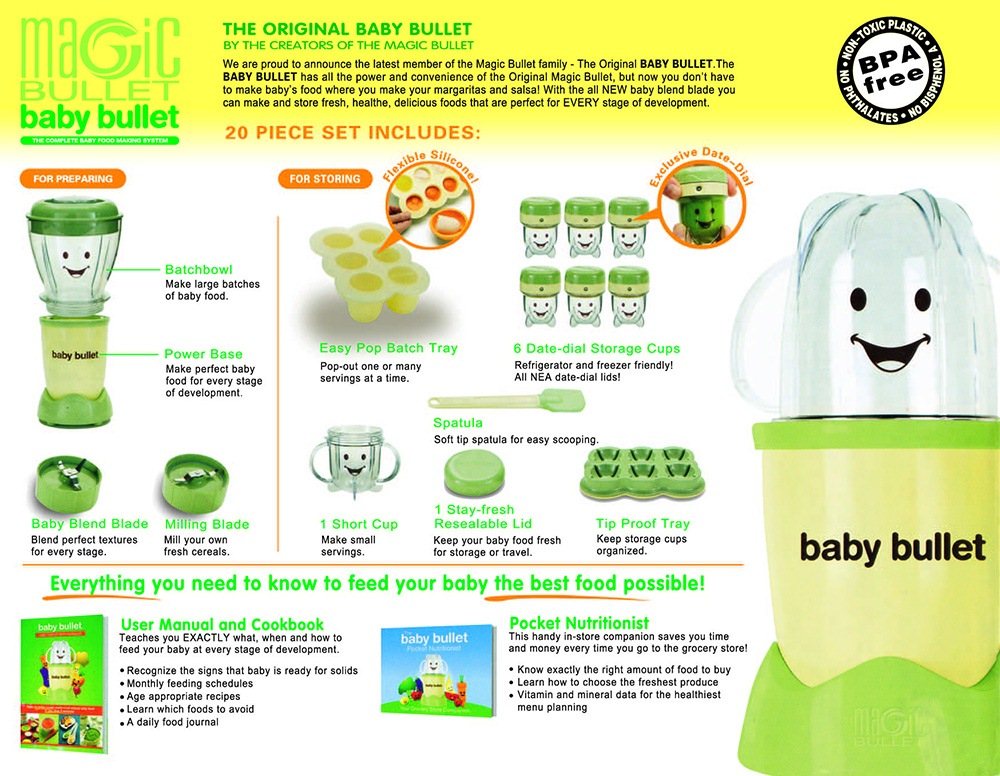 The first courses are recommended to be prepared from lean meats: rabbit; quail; turkey; chicken.
Complementary foods for a 6-month-old baby are recommended to be introduced in the morning. This will allow you to track the child's reaction to an unfamiliar product before a night's sleep: is there a rash, intestinal disorders, anxiety in the baby, profuse regurgitation. It is better to give vegetables or porridge first, and then saturate with breast milk or formula. Gradually, porridge and a vegetable dish will replace one full meal. The dish must be warm and freshly cooked. Gradually, by the age of 1, your baby will develop taste preferences. You will know what dishes he eats with pleasure. In the meantime, try to fully expand the child's diet with products necessary for growth and development.
Be healthy!!!
Complementary feeding schedule | Nutriclub
Regardless of whether your child is receiving breast milk or infant formula, at about six months of age, according to WHO* recommendations, the first complementary foods should be introduced. But where to start feeding? And how to do it right? Let's talk in order.
It is at the age of 6 months that the baby's body responds best to new foods. The first complementary foods in combination with breast milk should provide the child with all the useful substances necessary for his growth and development. Also, the timely introduction of complementary foods contributes to the development of the chewing skills of the baby. Russian pediatric practice also allows for earlier introduction of complementary foods - from 4-5 months **.
How many months to introduce complementary foods?
To know when it's time to consider introducing food other than milk or formula, watch for signs of complementary feeding. It's time to start complementary foods if:
- The baby sits with support, does not roll over on its side
- The child shows food interest: follows the spoon with his eyes when you eat, tries to steal something from your plate
- Ejection reflex faded, child opens mouth when offered food
Consult your paediatrician before introducing complementary foods. And in order to introduce complementary foods correctly, read the complementary feeding scheme below.
Rules for the introduction of complementary foods
- All new products are introduced with ½ teaspoon and then gradually adjusted to the age norm.
- New products are best given in the morning or afternoon to be able to track the reaction throughout the day.
- Do not introduce a new product until the previous one has been brought to the age norm.
- Complementary foods are offered before feeding with breast milk or its substitute.
- Until the volume of the product per feeding is brought to the age norm, you should continue to supplement the baby with breast milk or infant formula. Thus, the volume of the complementary food product will gradually increase, and the volume of milk or formula, on the contrary, will decrease until it completely disappears.
Complementary feeding scheme
| Age | Foods and portion sizes |
| 4-5 months | Complementary foods at this early age should be introduced if the child is not gaining weight well or is at risk of developing iron deficiency anemia. What foods can we start with:
|
| 6 months | What foods should be in the baby's diet if you introduced complementary foods at 5 months:
What new products are introduced into the diet:
|
| 7 months | What foods should be in the baby's diet by the end of the 7th month:
What new products are introduced into the diet:
|
| 8 months | What foods should be in the baby's diet by the end of the 7th month:
What new products are introduced into the diet:
|
| 9-12 months | What foods should be in the diet of a child at this age:
What new products are introduced into the diet:
|
 Complementary foods are introduced to healthy children from 5 months. There are a number of contraindications for an early start of complementary foods, consult your pediatrician!

After 9-12 months volumes of previously introduced products will continue to increase, but remember that the older the child, the more pronounced the individual characteristics, therefore, the food needs of children at this age may differ.
Focus on your baby's weight gain, appetite, and your own common sense.
If you think your child is malnourished or is not gaining weight well, consult a pediatrician.