Christmas tree made from baby food jars
Baby Food Jar Christmas Tree Tutorial
Want to make an unusual Christmas decoration from something as surprising as baby food jars? A beautiful holiday tree and recycled craft! Create something amazing with this step by step tutorial.
This is an idea that I first saw in a craft show. Yep, I’m one of those irritating individuals that goes through craft shows taking notes. Looking at things that catch my eye and thinking, “I can do that”. Then I go home and try it out. Sometimes it works out, sometimes it doesn’t so much. But the great thing about being a crafter is that there are so many ideas out there to inspire and inspiration is always right around the next corner.
The one pictured above was made for me by my sister-in-law. She is rather crafty herself. In fact, she has a craft room bigger than my living room and enough supplies to make the average craft store hang its head in shame. She made them for the Ornament Club one year. That meant that she made 20 of them. I’m thinking she was totally baby fooded out.
Baby Food Jar Christmas Trees made by Sitcom reader, Sophie Werner!
I made three of them myself and getting the baby food jars was sort of a challenge. Not having any small children or grandchildren or even friends with small children, I was forced to justify purchasing 51 jars of baby food. I fortunately came up with a plan. It seems that banana baby food is great for making banana bread. So there you go. My famous banana bread:
Okay, you can quit your laughing now. How, you ask? Well, I promise I stood right by that oven the whole time. I didn’t go anywhere. My husband monitors me now, keeps the batteries fresh in the smoke detectors and the fire extinguisher handy. He was fully prepared if needed. He knows the drill.
I finally did manage to get four batches of banana bread completed. But I had to learn a few lessons in the process. Don’t bake four loaves at a time, be sure that the baking powder hasn’t expired, flour is difficult to get out of your hair and off the dog.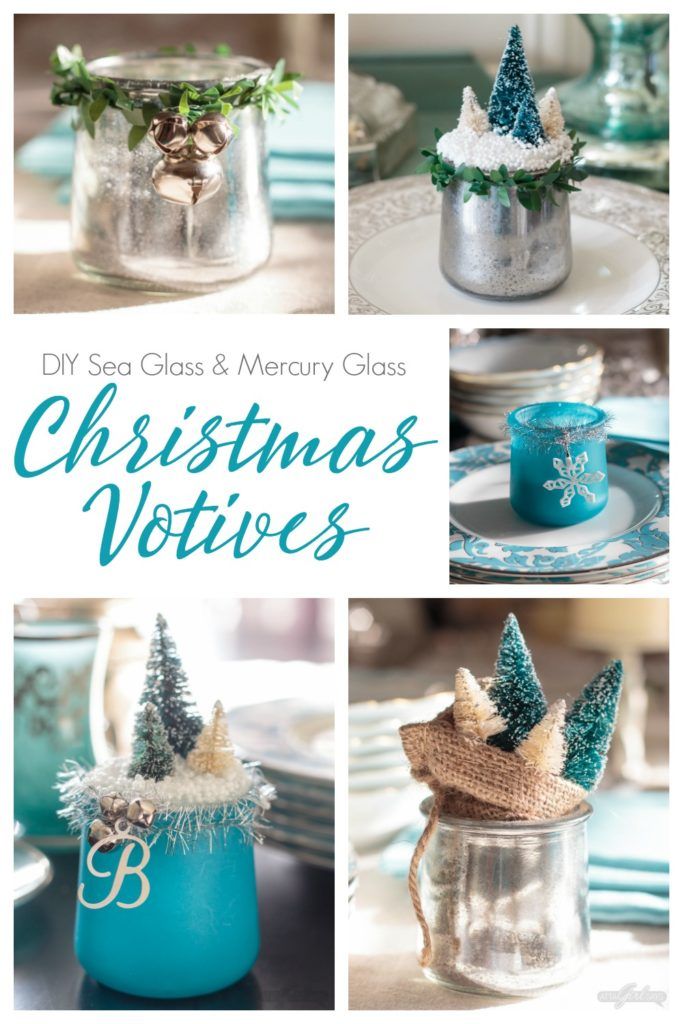 And did you know that one full minute in the microwave is way too long to melt a stick of butter? Just saying.
Anyway, I finally had my supplies.
For this project I used:
17 Glass Baby Food Jars
Gorilla Glue Epoxy
12″ x 4″ Wood base (Any wood base will work)
Assorted Garland
Strand of 35 miniature Christmas lights
Assorted miniature Christmas decorations
String of bead garland
3″ wide ribbon
Bow for top of tree
Awl and hammer
Begin by punching holes in each of the lids using your awl and hammer. The hole needs to be big enough to push your miniature lights through.
Choose what color of garland you would like to put inside the jars and cut about 2″ pieces to add to the jar. Remember that there are so many options here. All silver garland with blue lights is awesome, so is gold with white lights. I used silver garland and red stars garland and multi-colored lights. The possibilities here are endless. Just remember not to fill up the jar entirely. You want to be able to see the lights.
Because I do not have an unassembled tree, you’ll have to work with me here. The next step is putting the lids on all the jars and then using the epoxy to glue the jars into a tree shape as below.
It is important here to use epoxy or glass glue. Not hot glue. You see one of the properties of hot glue is that when it gets hot, it melts. Plug in that sucker when it is glued together with hot glue and I’m betting that within a half hour, you have a floor full of baby food jars. Ask me how I know…
Once the glue has set, you can push the miniature lights into the holes in the lids. Then stand it up on your base and use the epoxy to glue it down. Let it dry well before you go to the next step.
Cut your wide ribbon long enough to cover all the sides of the tree and glue it on with gorilla glue, pushing it into the crevices between the jars.
Take your beaded garland and glue it on the front in a garland-like fashion. You know, my youngest daughter always called it “garlic”. So that is actually how we refer to it in our house. I remember her coming home one day from middle school totally furious with me because one of her classmates had corrected her. I guess by the age of twelve, we probably should have corrected her ourselves, but it was cute! And embarrassing my kids is kind of a hobby of mine. So there.
Take your miniature Christmas decorations and glue them around the bottom of the tree.
Finally, add a bow to the top. I used a pre-made fabric bow and a couple of Christmas “picks”.
Then light that sucker up.
Pretty, huh? Makes me all Christmassy happy inside. And it’s only September! So you have several months to hurry up and consume some baby food for this project. I recommend the Blueberry Buckle… it’s kinda awesome.
Want to try your hand at quilting? My newest quilt Pattern- Batiks Gone Wild!
Are you new to the Sitcom? Be sure to check out my Frequently Asked Questions Page!
You can keep up with the Sitcom on Facebook for daily updates!
For over 100 crafty tutorials for all ages, be sure to visit my Tutorial Page!
Baby Food Jar Crafts: Light Up Christmas Tree
This post and photos may contain Amazon or other affiliate links. If you purchase something through any link, I may receive a small commission at no extra charge to you.
DIY + Crafts
When you’ve got a baby in the house eating solids, you inevitably end up with a plethora of baby food jars.
What do you do with all those jars?!
You could just recycle them. But what if you made some super cool baby food jar crafts?
I can’t say that I came up with this idea on my own, my mom actually made one “before being crafty was cool.” She’s the ultimate craft hipster.
I’ve always wanted one of my own, so when my little Bean was in the baby food stage I saved every single jar with the intentions of using them for crafty goodness.
Here’s how you can make your own baby food jar light up Christmas tree!
Repurposed Baby Food Jar Crafts Idea: Light Up Christmas Tree
SUPPLIES
- String of 50 LED Christmas lights (this one is battery operated!)
- 17 long baby food jars
- 15 feet of tinsel garland
- Hot glue gun + hot glue
- Scissors
Step One: Clean up the baby food jars
Start by making sure the jars are washed and dry, and that most of the residue is cleaned from the outside of the jars. If you don’t get it all off, no big deal. It will be covered later.
Step Two: Start inserting the Christmas lights into the base jars
Start at the end of the lights that you plug in. Attach 2 lights to the inside of the jar with hot glue.
Step Three: Finish assembling the base
Attach 3 lights to the inside of the one more jar with hot glue. This jar and the jar from step 2 will make up the base of the tree.
Using hot glue, attach the tinsel garland around the bottom and between the 2 jars.
Glue the jars together and finish off the base by attaching garland all the way around the top of the 2 jars. Cut the remaining garland off and secure loose end with more hot glue.
Step Four: Start assembling the bottom layer of the tree
Glue 3 lights to the inside of two more jars starting with a jar that will go on the outside of the layer. Make sure you are working up the tree in a weaving pattern with the lights (right to left then left to right).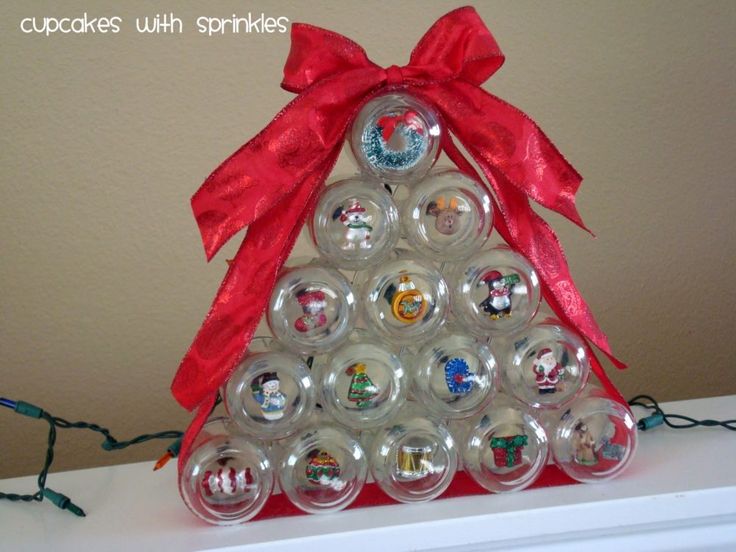
These jars will be hanging off the side of the base and will make up part of the bottom tier of the tree (which will have 5 jars total).
Attach tinsel around each jar individually with hot glue.
Glue the jars together.
Attach this section of three jars to the base with hot glue. The 2nd jar should be slightly hanging off the edge of the base.
Glue 3 more lights to the inside of the next jar. Attach to the middle of the base with hot glue.
Repeat the steps to make the 2nd edge of the bottom tier as you did before. Finish off the row by gluing tinsel to the top of the middle jar.
Step Five: Finish making the rest of the layers of the tree
Work through the next 4 rows by gluing 3 lights to the inside of a jar, attaching to the previous row in a pyramid shape.
Repeat that step until you finish out the row, then attach tinsel garland to the sides, between, and top of the row with hot glue.
Here is the amount of jars each row should have (starting from the bottom):
Base (2), Row 1 or bottom (5), Row 2 (4) Row 3 (3) Row 4 (2) Row 1 or top (1).
Finish off the tree by making sure all the jars are securely glued to each another.
Attach an additional row of tinsel garland with hot glue around the entire tree to cover up the sides of the jars.
And here she is in all her shiny glory, just waiting to be plugged in 🙂
As you can see, the back isn’t the prettiest. You could pretty it up a bit by squeezing the extra cord into each jar better. I didn’t mind because when I display the tree you can’t see the back.
I wouldn’t cover the back with fabric because yes, these are LED lights that don’t put off a bunch of heat, but I think that could still be a fire hazard.
Better safe than sorry 😉
I love the groovy effect the jars give to the lights!
There you have it. Now go make our own kitsch-tastic baby food jar light up Christmas tree! 🙂
What other things should I make out of my leftover baby food jars? Let me know in the comments!
Related Upcycled and Repurposed Tutorials:
- Thrift Store Cookies for Santa Plate Tutorial
- How to Dye Upholstery with Latex Paint
- Coffee Mug Candle Tutorial
Similar Posts
New Year's workshop: crafts from baby food jars.
 Baby food jars: crafts for the New Year
 What is the most pleasant thing about celebrating the New Year? For me, as for many - the preparation and expectation of the holiday. Of course, you can devote the evening of December 31 to decorating the Christmas tree and preparing treats, but how much more pleasant it is to take care of some kind of surprise for the household in advance, show your imagination, decorate the house and table in a slightly new way.
If there are children in the family, the expectation of the New Year and Christmas takes on a special character. Long before the winter holidays, letters are written to Santa Claus, garlands and colored paper lanterns are glued. After some paper Christmas decorations are done, you can take a close look around. You may be interested in a less traditional, but no less attractive material for making New Year's crafts. nine0003
Using baby food jars
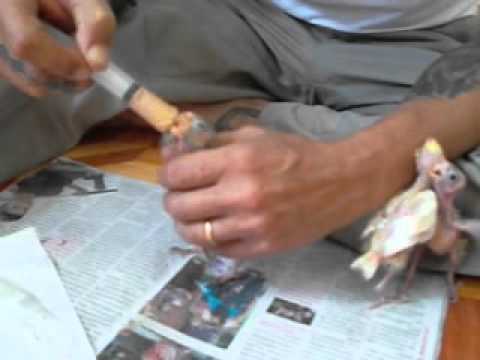
Today we are going to talk about glass baby food jars. It is possible that you have a lot of them in your house. If you're used to throwing away jars immediately after use, it's not too late to fix the situation. Let's say in your family a child eats one serving of prepared food from a day. In this case, a month and a half before the New Year is just enough to collect as many empty jars as you need for all the crafts described here. Of course, before starting work, they must be thoroughly washed and dried. nine0003
Homemade candle holders from jars
Firstly, children can make original candle holders for small candles from a couple of such jars. For work, kids will need brushes, paints, a ribbon, a candle in a metal case, and, of course, the jar itself. Instead of paints, you can use multi-colored markers with indelible ink. The technology is simple and transparent, like the product itself. We tie a ribbon around the neck of the jar with a bow, retreating slightly down from the edge so that the flame of the candle cannot accidentally set it on fire.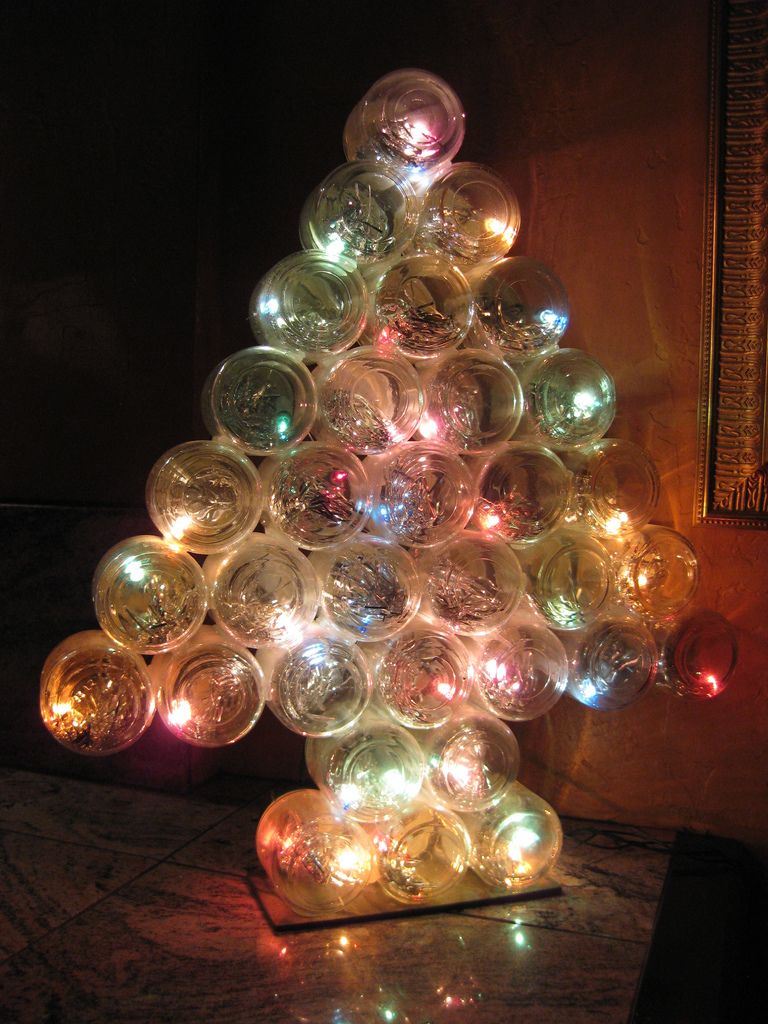 On the glass we draw something New Year's (Christmas tree, snowflakes, snowman). We put a candle inside, set fire to it under the control of the parents, and the job is done. nine0003
Now let's see what can be done if you have glitter glue and flat-backed artificial gems (rhinestones). You can simply paint the jar with beautiful glue and let it dry. It is very easy to depict a Christmas tree by moving the brush in a zigzag pattern from top to bottom, as in the picture. With another jar, you can do differently. On its surface you need to squeeze out a little glue with sparkles and press the "precious stone" to this place. Do the same a few more times around the perimeter of the jar. Let dry. Then cover with glitter glue with a brush the entire surface of the jar around the stones, stepping back a little from the neck. If desired, you can decorate the finished product with a bow. nine0003
"Snowball"
Now let's work harder, create a composition with falling snow.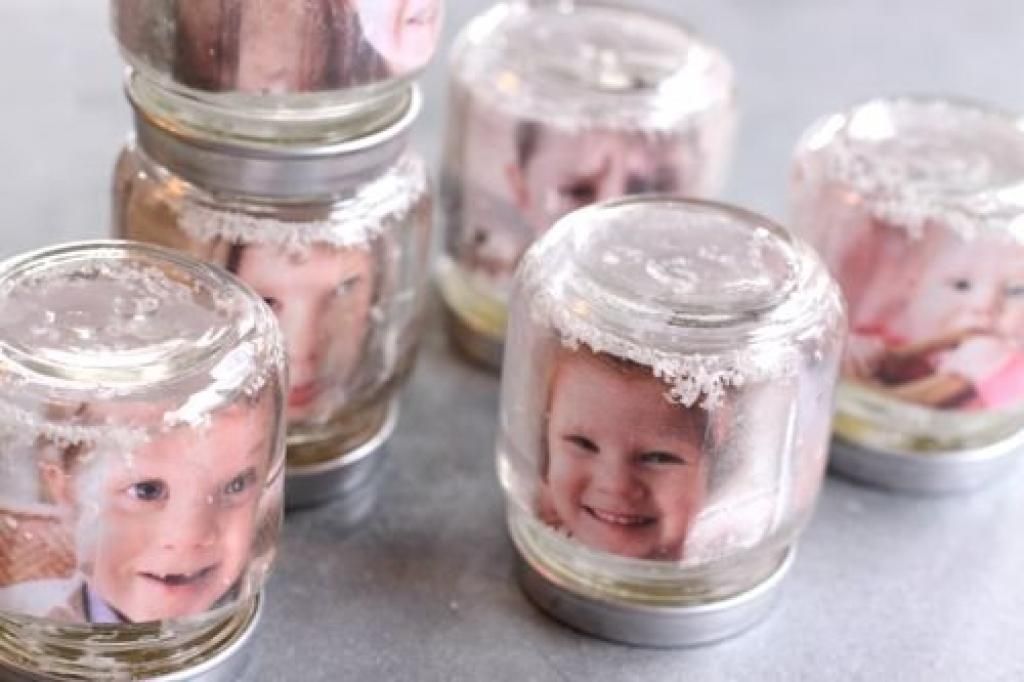 This time we need a jar of medium or large size. In addition to it, you need to prepare some clay, a small figure (for example, from Kinder Surprise), silver sparkles or artificial snow (you can buy it ready-made or cut foil). You also need a waterproof glue like those used in aquariums. Small plastic Christmas decorations and garlands will come in handy. nine0003
First you need to fix the toy on the inside of the lid with clay. If the figurine is small, it is better to mold a stand for it so that it looks taller. Then attach to the clay "foundation" everything that you would like to see in the composition (artificial greenery, berries, etc.). You can use glue. One condition: all items must be waterproof. Fill the jar with cold water 1 cm below the lid. Pour in a tablespoon of sparkles or artificial snow. Make sure this amount is enough for the desired effect. Immerse the figurine in water, tightly wrap the lid. Leave overnight - lid up. Then coat the junction of the lid with the jar with glue for complete waterproofing and attach a decorative ribbon to the lid.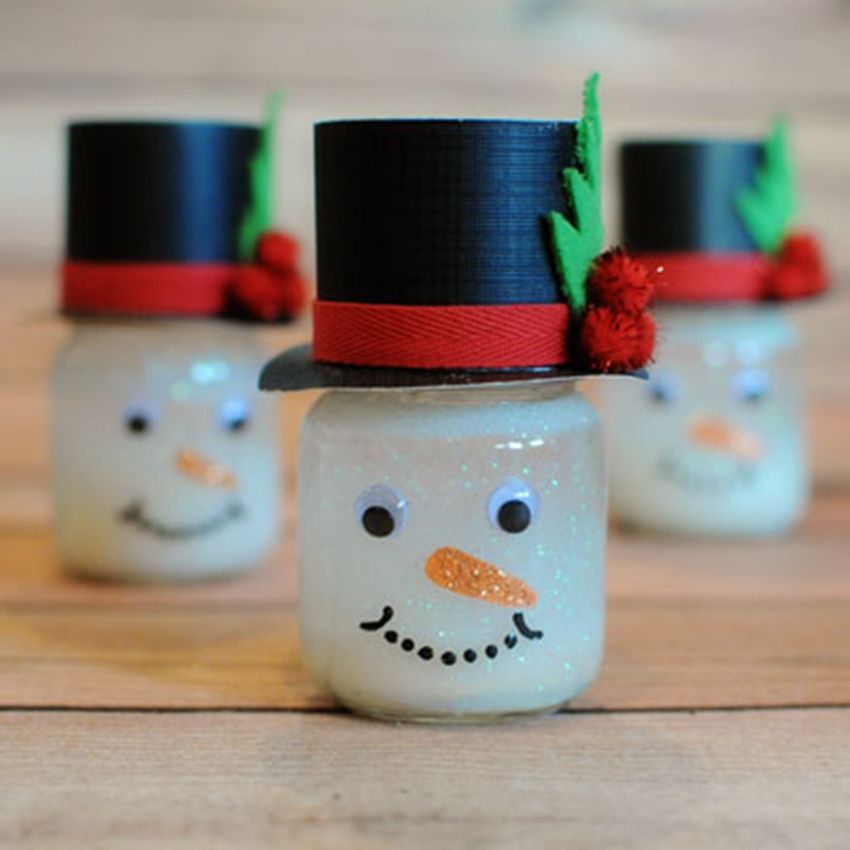 Ready! nine0003
There are ways to improve such a "snow sphere". For example, you can add small floating objects to the water, droplets of tinted oil to watch them move, you can change the color of the water with food coloring, use colorful glitter, and so on. This will allow you to create a thing that is one of a kind. The dimensions of the glass jar are also determined only by your imagination. Give yourself and children pleasure!
Luminous tree made of cans
In conclusion, let me offer you something special. Take a look at this extraordinary glass luminous Christmas tree! From the side it is almost impossible to guess what served as material for it. Of course, these are baby food jars again. To create such a miracle, parents will have to work hard, kids can’t do it. But the result is worth the effort. nine0003
So, we will need 33 jars with lids (113 g), 2 skeins of wire garland with gold stars, an electric garland with 35 small bulbs, a bottle of gold or silver paint (spray, you can find it in auto shops), glass glue, wire cutters, sharp knife.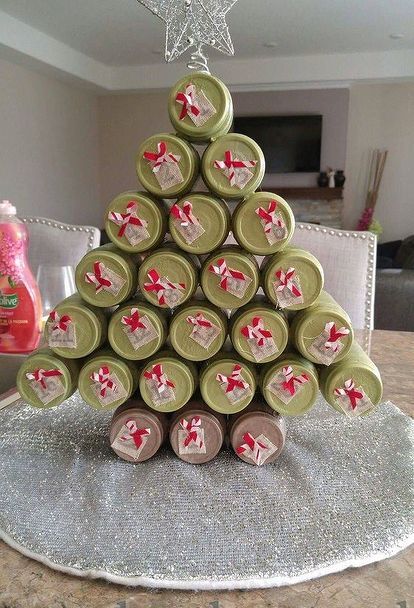
First paint the outside of the caps. Leave them to dry. Glue the jars together, placing them as in the photo. Cut the wire garlands with stars into 33 fragments of 15-18 cm with wire cutters. Twist each piece of the garland into a ring so that it can freely enter the jar. Place one of these on the bottom of each jar. Unscrew the caps and make a large V-shaped incision on each with a knife (see photo). Carefully! Lids are now very sharp! nine0003
Replace all caps. Insert the first bulb of the garland through the hole in the lid into the topmost jar. Place the rest of the bulbs alternately, lacing the rows back and forth. When you get to the last row of the Christmas tree in front of the trunk, you will have to place 2 bulbs in 2 jars in order to get to the next empty cell. Now you can plug the garland into an outlet and admire what happened!
Continued...
Anna Kurskaya (Emily)
Tell me p-please. I ordered two children. ticket -only today 20/12/01
1) not late
2) will 1 adult with children pass?
3) when to expect the courier approximately?
2001-12-20, feet
Wonderful! I just made a candlestick-jar with a snowman and a Christmas tree according to the description. I'm sitting here happy as a child. :-) To celebrate, I came up with Christmas trees from snowflakes. In the evening we will do all this beauty with my daughter. nine0003
2001-12-11, Mary Poppins
Great, but it's a pity that everything is made from jars, I would like to expand the list of improvised items for such nice little things a little more!!!
2003-12-27 hope
Oh, how cool! I myself terribly love all sorts of crafts from objects that "get in the way" at hand, but I would not have thought of this! Thanks for the ideas!
2001-11-22, Annie
Great tips, thanks!
I would like to see 9 on this site0045 some tips for making
DIY GIFTS.
2003-12-05
Everything is very good, but unfortunately I am not able to do this, maybe by the approach of 2005 I will find waterproof glue? ;)
2004-11-07, Tramp
Instead of water, I poured baby oil into the "snow hemisphere".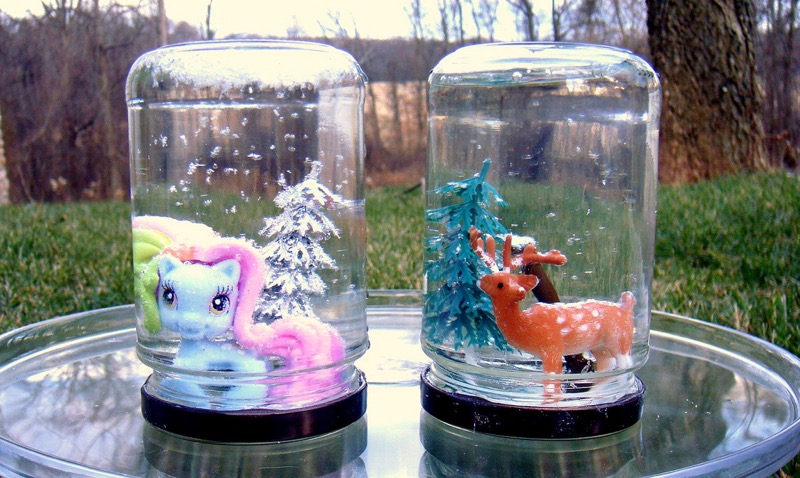 Then the sparkles float slowly, as if the snowflakes are flying.
2005-12-14 Baby
Total 25 reviews Read all reviews. nine0003
New Year's hand-made with children December 22, 2014 17:01
PROJECTS
As well as lanterns and a winter fairy tale in a jar.
mung.pp.uaWe involve the preparation of New Year's souvenirs and decoration of the house of the little ones! The Izhlife.ru portal has collected simple, but at the same time original crafts from what is always at hand. Not only children, but even the most distant from creativity adults can easily cope with them. nine0003
Christmas palm wreath
Making a Christmas wreath is not easy. But everyone can handle this wreath. We need green cardboard, preferably several shades. We put our palm on a sheet of cardboard on the reverse side and circle it with a pencil. We make more painted palms. You can make both children's and adults - in the finished wreath they can be alternated. Then we glue the palms in a circle so that the fingers of one are glued to the base of the next. We glue decorations to the finished wreath - circles of colored paper of bright colors and a bow of satin ribbon. nine0003
Paper Christmas balls
Cut colored paper into strips of the same length. Paper can be taken as one color or different. You will also need a thick thread - you will need to thread it into the needle and tie a knot at the end. Fold the strips together and pierce by threading first through one end of the strips and then through the other. Pull the thread so that the strips of paper take a curved position, and tighten the knot. Now straighten the strips so that they take the shape of a ball. From the remaining thread, make a loop so that the ball can be hung on the Christmas tree. It will be nice if the colored stripes on the ball alternate. nine0003
Winter fairy tale in a glass jar
Take any small glass jar with a screw cap. It's great if the jar has a non-standard shape, but, by the way, any will do. Depending on the size of the jar, we cut out any New Year's figurines from thick paper - a Christmas tree, a deer, Santa Claus, a snowman - so that they can be glued to the lid and fit freely into the jar. If you have ready-made figures - great. We glue the figures to the lid - one or more (for example, a Christmas tree and a deer nearby). Pour a little artificial snow into the jar itself (if it is not there, you can cut thin white paper into small squares). We twist the lid and turn the jar over - now our figures are sprinkled with snow. The winter fairy tale is ready. nine0003
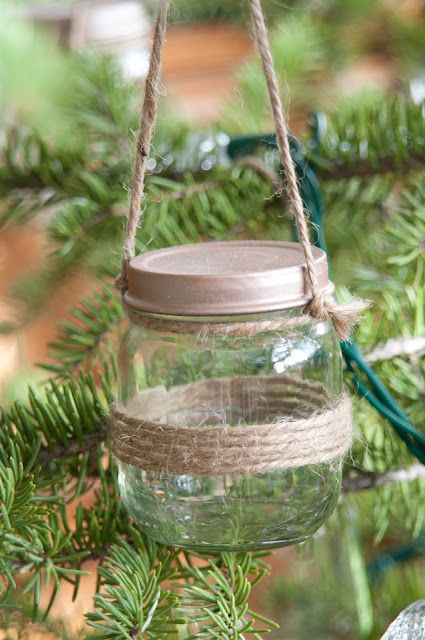
P.S.: small jars of baby food are perfect for flashlights - paint them with paint as you like (preferably translucent, on glass), and put a pill candle inside.
Lamb from paper strips
The symbol of the coming year is easy to make using the now fashionable quilling technique.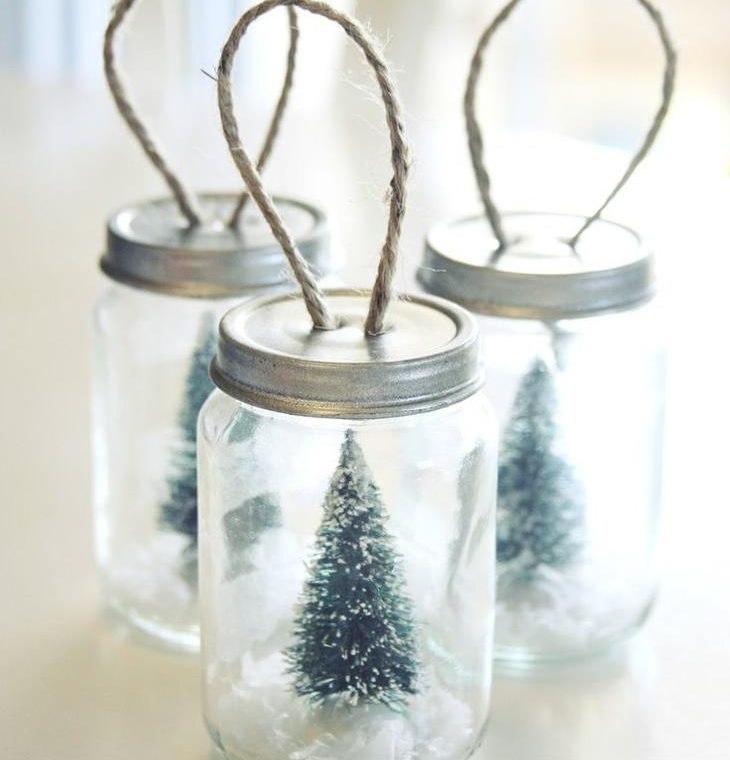 The bottom line is that all the figures are made up of strips of paper twisted into a spiral. The lamb is curly, so quilling is especially suitable for him. Cut out the base of the lamb: two cardboard ovals - a larger one for the body and a smaller one for the head, as well as four rectangles for the legs. We glue everything together. Then you need to cut more thin paper strips. We fold them, as shown in the photo, and glue them to the base. On the "head" draw a muzzle and glue the ears. nine0003
Cotton swab lamb
This lamb will look like a soft toy. Just as in the previous version, you need to prepare a cardboard base for it. And now we take more cotton buds, which girls usually have on the farm. We cut off the cotton ends from them - this will be the wool of our lamb. Glue them tightly to the base. We glue a few pieces for the bangs and two for the ears to the “head”. We draw a muzzle, and our lamb is ready!
Clothespin Santa Claus
Everything is even simpler here - we paint an ordinary clothespin (preferably a straight shape and wooden one) in red or blue color - depending on what kind of fur coat your Santa Claus will have.