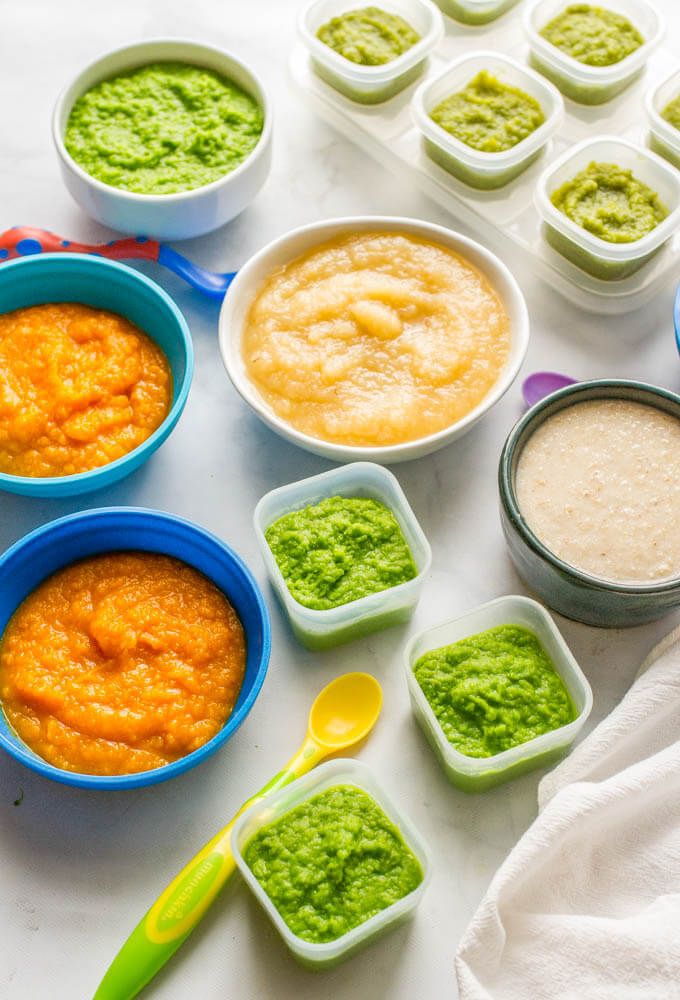
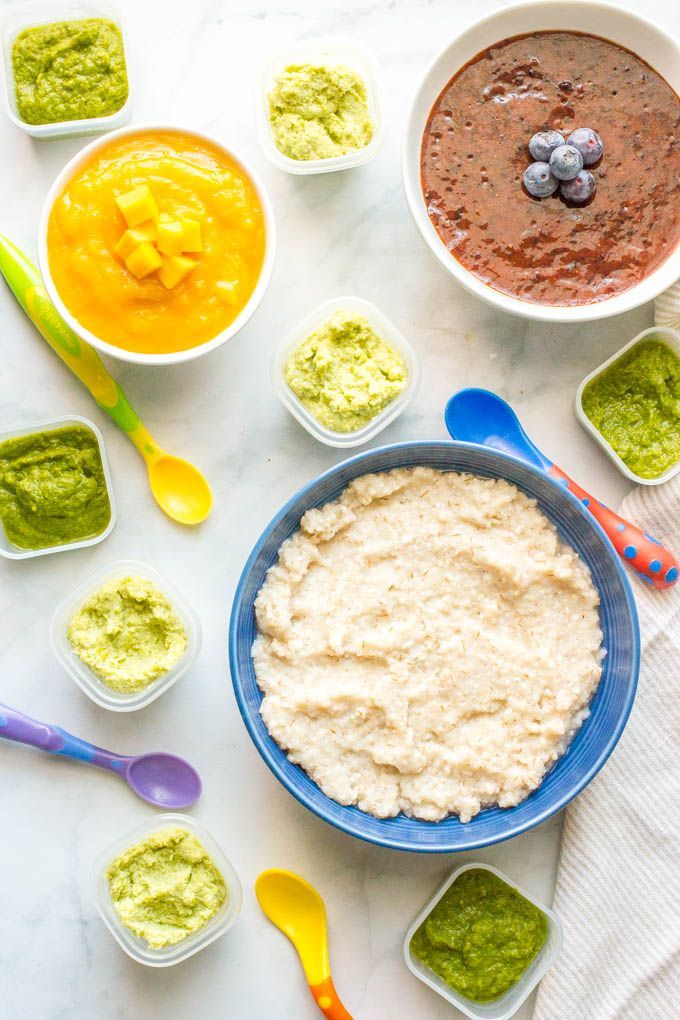
Homemade baby food station
Best Baby Food Pouches (Easy Homemade Ideas)
Learn how to make homemade Baby Food Pouches, no muss, no fuss, with these 15 easy recipe ideas. These are a great way to save money, share lots of flavors with babies and toddlers, and have convenient foods ready to go!
Baby Food Pouches
I always made my own baby food pouches because I like how affordable they are and how once you have a set of reusable pouches, there are so many options! Plus, you can feed many things you’re making for the rest of the family in a pouch, which means you can share flavors with the little ones even if they aren’t quite up to finger foods yet.
I view baby food pouches as one component of feeding a baby and like to mix purees with baby led weaning as a way to expose baby to a wide variety of flavors and textures from an early age.
I also find them very convenient for offering smoothies well into the toddler years!
Ingredients in You Need
What you need for your pouch adventure will depend on what you want to feed your baby! Basically you need something pureed (or a food like yogurt or applesauce that has a very pouch-friendly texture already) and a reusable pouch.
Step-by-Step Instructions
Here’s the general gist of how to make a baby food pouch. Scroll down to the bottom of the post for recipe ideas and best tips!
- Choose your puree and prepare it. Let it cool as needed. (Or pull out the yogurt or applesauce.)
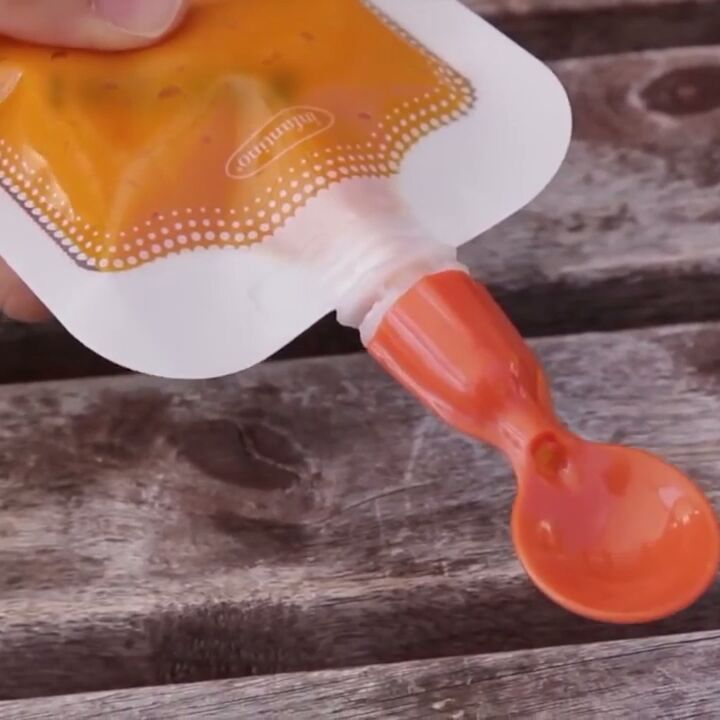
- Fill the pouch, making sure that the cap is on if using the kind with the zipper opening on the bottom. (Otherwise it will all run right out the top!)
- Store in the fridge or serve to baby.
TIP: As a quick an easy snack option, I like to mix half yogurt and half applesauce right in the pouch.
What can I put into a baby food pouch?
You just need the food to be smooth enough that it easily passes through the opening of the pouch, so anything that’s pureed or the consistency of pureed soup or yogurt will work. Generally speaking you can do:
- Applesauce
- Fruit purees
- Vegetable purees
- Baby food combinations
- Pureed meats
- Pureed soups
- Smoothies
- Yogurt
TIP: You can also use any of my go-to Baby Food Combinations too!
Making apple yogurt in a bowlFlavor Ideas for Baby Food Pouches
These are some of my favorite recipe ideas to add to a pouch.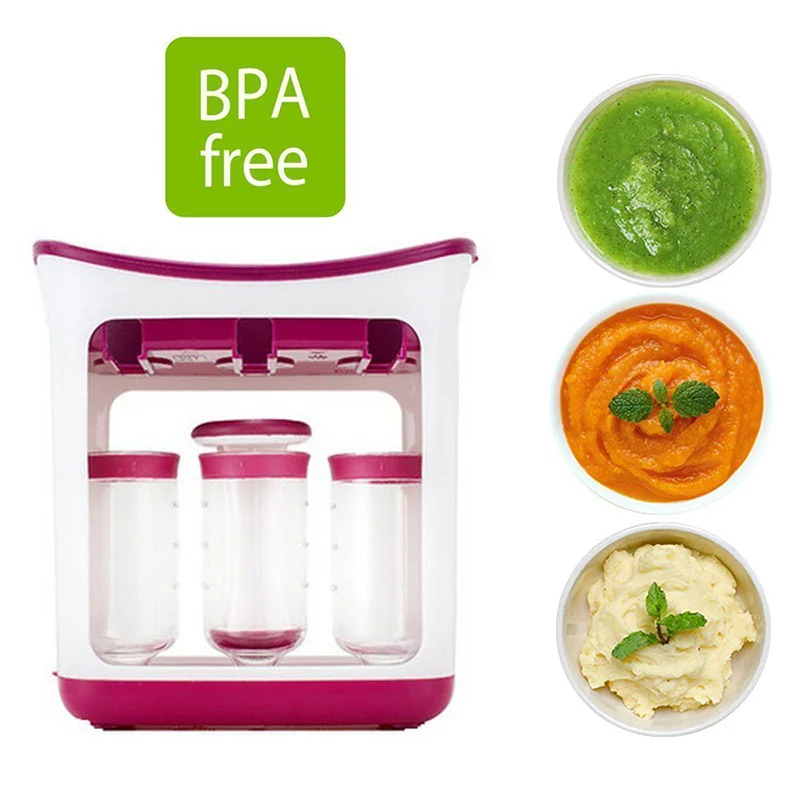
- Applesauce
- Apple Flax Yogurt: Equal parts Apple Puree and plain yogurt, plus a sprinkle of ground flax.
- Baby Oatmeal with Applesauce mixed in for flavor.
- Banana Yogurt
- Pear Coconut Puree: Pear Puree with full-fat coconut milk mixed in.
- Pear Yogurt: Equal parts Pear Puree and plain yogurt.
- Red Lentil Coconut Soup
- Sweet Potato Tomato Soup
- Mango Smoothie
- Mashed Butternut Squash
- Mashed Roasted Sweet Potato
- Spinach-Pea Puree (alone or with Applesauce)
- Simple Green Smoothie
- Strawberry Smoothie
- Veggie Chili, pureed smooth
TIP: For the foods, like soup, that you’d usually serve warm, you can serve them warm in a pouch too. Just be sure they are warm and not hot. Test on your wrist like you would a baby bottle.
How long can I store baby food pouches?
I recommend making them 24 hours ahead or less so they are as fresh as possible. But you can make batches of purees and stash them in the freezer, so the pouch assembly part is quick and easy.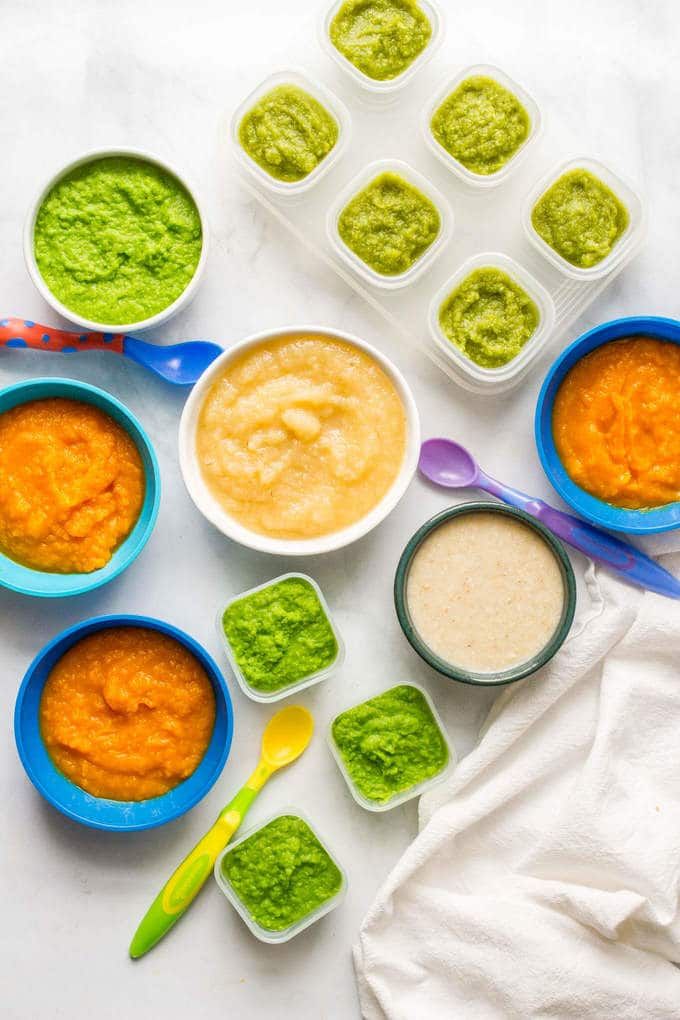
Do I need a baby food pouch maker?
Honestly? No. I tried one and didn’t like it because it took up space in my cabinets and the pouches themselves weren’t reusable, which seemed like a waste and a lot of money. Using reusable pouches is easy and more affordable.
What are the best reusable pouches?
I prefer the silicone Squeasy Gear pouch, which comes in a few sizes (I start with the 3.5 ounce size for babies). It’s easy to learn from as early as 6 or 7 months and the kids can use them for smoothies and applesauce well through toddlerhood as they are very durable. You may want to remove the lid when serving to kids so they don’t play with it.
I also like this set of 3.4 ounce Weesprouts reusable pouches a lot, which are a nice size for babies (there is a larger size too!) and they are easy to clean and use.
Favorite Store-bought Baby Food
There are so many great store bought options! I like the Amara Organic Baby Food (paid affiliate link), which locks in the nutrients, texture, and taste of fresh foods.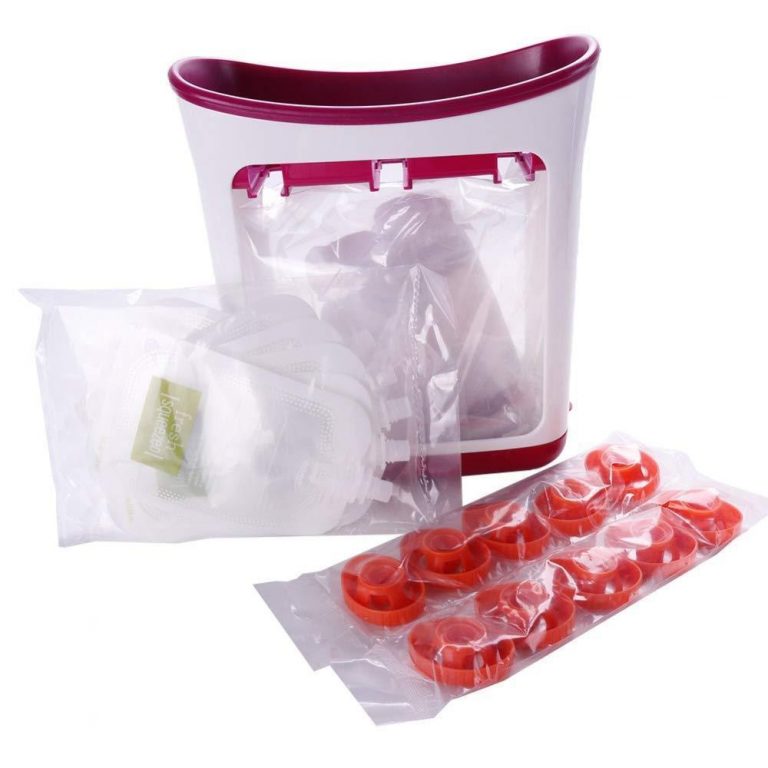 You just add breastmilk, formula, or water— and the flavors are delicious with straight forward ingredients.
I also like Happy Family Organics Clearly Crafted and Plum Organics. Those are just a few options—there is a lot to choose from as you well know from the baby food aisle!
TIP: I recommend serving pouches occasionally along with regular solids from a spoon and baby led weaning style so baby has a chance to learn how to suck, swallow, move all sorts of textures around in their mouths, and gain the skills needed to be ready for finger foods around 9 months.
How to Store
Store pre-made pouches in the fridge for up to 5 days. Store leftover pouches in the fridge for up to 24 hours and serve again. You can also freeze pouches for up to 6 months. Thaw in the fridge overnight or at room temperature.
Best Tips for Success
- If using a pouch with a zipper bottom, like this one from Wee Sprout, avoid overfilling to prevent difficulty sealing the pouch.
- Be sure the mixture is totally smooth to avoid it becoming stuck in the opening of the pouch.
- Add ½ teaspoon hemp seeds to any mixture for extra healthy fats.
- Add 2 tablespoons full fat coconut cream or plain yogurt to the mashed sweet potato or squash for healthy fats.
- Try any other Baby Food Combination or my No-Cook Baby Foods in a pouch.
- Serve foods you’d usually serve warm (like soups) just warm, not hot. Test on your wrist to be sure the temperature is not hot.
- Omit any added salt or sweeteners as needed.
- Combine pouches with baby led weaning foods for a wide range of texture exposure.
Related Recipes
I’d love to hear your feedback if you try these ideas out, so please comment below to share—I love hearing from you guys!
Prep Time 5 minutes
Cook Time 10 minutes
Total Time 15 minutes
Author Amy Palanjian
Cuisine American
Course Baby Food
Calories 46kcal
Servings 1
- ▢ 1½ ounces Apple Puree
- ▢ 1½ ounces plain whole milk yogurt (regular or Greek)
- ▢ ½ ground flaxseeds (or hemp seeds)
Add the ingredients to a small bowl.
 Stir to combine well.
Add to the pouch, avoiding overfilling. If using a zip bottom style of pouch, be sure the cap is on to prevent the puree from coming out.
Serve or store for up to 5 days. (If storing leftovers in a pouch, store in the fridge and serve within 24 hours.)
- If using a pouch with a zipper bottom, like this one from Wee Sprout, avoid overfilling to prevent difficulty sealing the pouch.
- Pouch flavor ideas:
- Be sure the mixture is totally smooth to avoid it becoming stuck in the opening of the pouch.
- Add ½ teaspoon hemp seeds or 2 tablespoons full fat coconut cream or plain yogurt to any mixture for extra healthy fats.
- Try any other Baby Food Combination or my No-Cook Baby Foods in a pouch.
- Serve foods you’d usually serve warm (like soups) just warm, not hot. Test on your wrist to be sure the temperature is not hot.
- Omit any added salt or sweeteners as needed.
- Combine pouches with baby led weaning foods for a wide range of texture exposure.
- Store leftover pouches in the fridge for up to 24 hours and serve again.
Calories: 46kcal, Carbohydrates: 7g, Protein: 2g, Fat: 2g, Saturated Fat: 1g, Polyunsaturated Fat: 0.2g, Monounsaturated Fat: 0.4g, Cholesterol: 6mg, Sodium: 21mg, Potassium: 101mg, Fiber: 1g, Sugar: 6g, Vitamin A: 54IU, Vitamin C: 1mg, Calcium: 54mg, Iron: 0.2mg
Tried this recipe?Rate in the comments and tag @yummytoddlerfood on IG!
Homemade baby food pouches {how-to and 5 recipes}
Portable, squeezable and with lots of flavor options, homemade baby food pouches are easy to make and a great way to serve healthy fruits, vegetables and whole grains to your little ones!
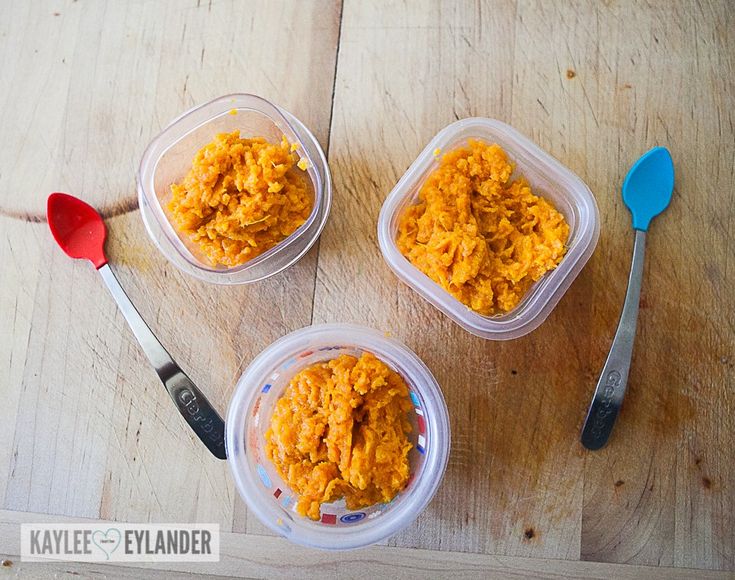
I made ALL of the baby food for both of my little ones. Which was no small feat because they were very hearty eaters. A good thing, but whew, kept me busy in the kitchen!
I always made big batches of purees, to knock out a bunch at a time, and inevitably, I’d be left with extras when they were moving onto finger foods and self-feeding.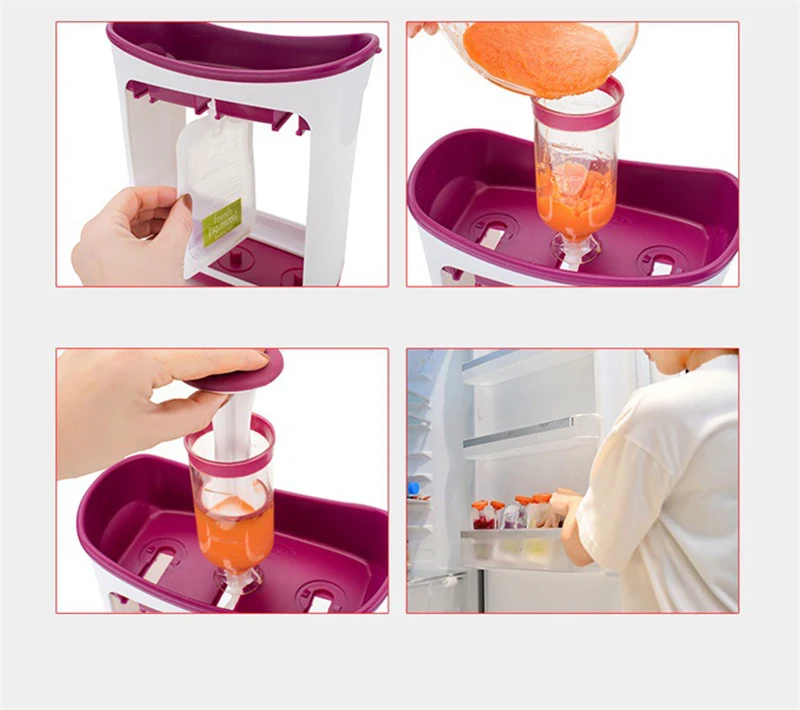
So I started turning those purees into homemade baby food pouches.
(I also have tons of other ideas of ways to use leftover baby food – I didn’t want to waste a bit!)
You can of course buy squeeze pouches in the store.
They have lots of different kinds of applesauce mixes, yogurt squeezies, and fruit and veggie combinations.
But you can make your own so quickly, easily and for much less money. Plus, you can customize them to your little one’s liking and feel good that you’re controlling the ingredients.
My kids are older now – M is 5 next week (yikes!) and J is coming up on 3 – but they still love these squeezies. M says she has lots of friends who bring them for lunch, so she’s always asking for me to send them to school.
And I’m happy to.
I love that it’s an easy way to ensure they are eating their veggies. They will take down one of these pouches in a matter of minutes but they don’t always dig into a big bowl of peas or a plate full of broccoli. #yet #Iwontgiveup
So today I’m giving you the run-down on what I use, how it works and five easy homemade squeezie combinations to get you started. (Check out these 5 additional homemade baby food pouches for more ideas!)
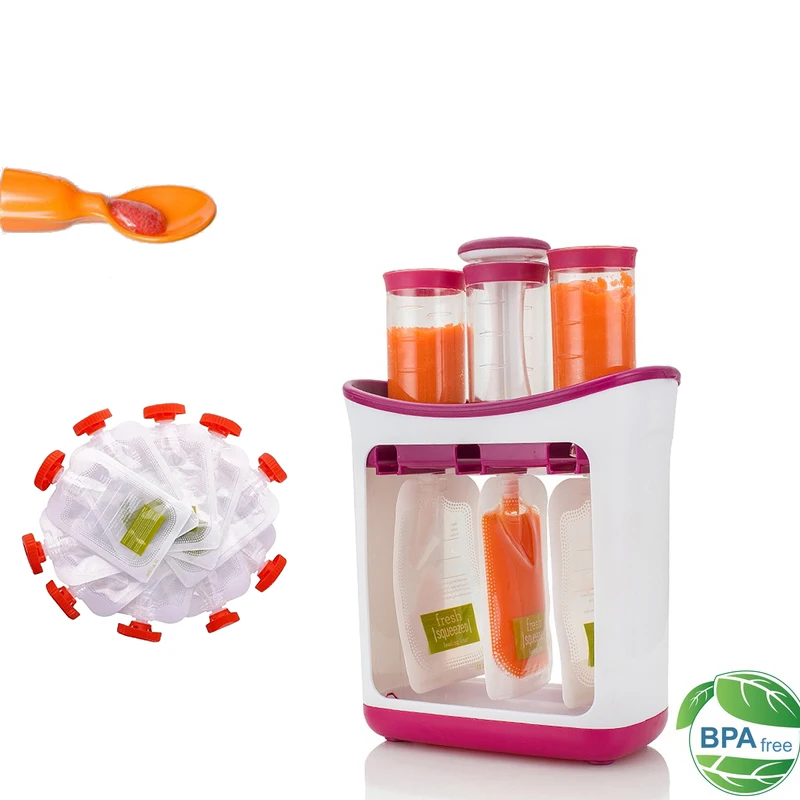
Equipment for baby food pouches
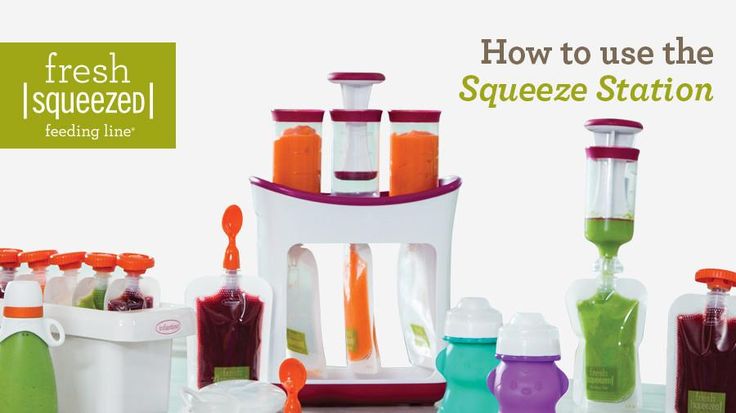
I have the Infantino Squeeze Station and it’s been great. It’s the only specific baby food equipment I’ve bought and was definitely worth it.
You’ll also need to buy refill pouches (they come in batches of 50 and you will go through them!)
They have other accessories, but I’ve stuck to these basics so far.
You’ll also need an immersion/hand blender or regular blender to make the purees to put into the squeeze pouches.
How to make baby food squeeze pouches
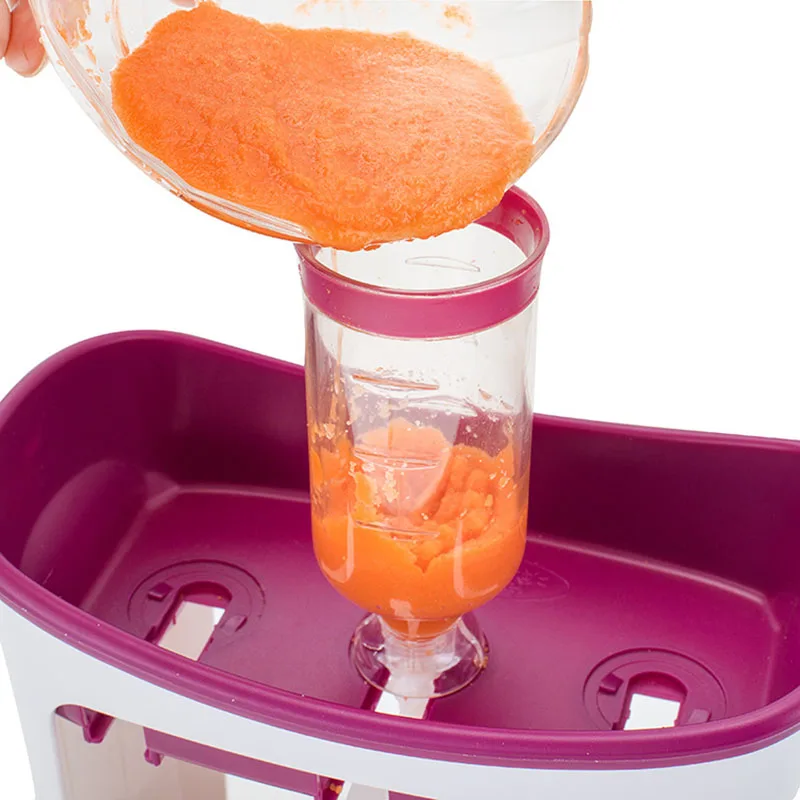
You set up the squeeze station by inserting three pouches into the bottom (they fit through some grooves and sort of snap in.) Then you put the empty containers on top and screw them onto the bags.
Note: Be sure to write the contents and date on your bags before you start to fill them. Much easier than after they’re done.
Next, you spoon your puree mix into each container, filling it almost to the top. You use the press tool and push the puree down into the pouch. It’s a weirdly gratifying feeling.
If the mixture gets stuck or won’t push, you probably have a small chunk in your puree that got caught in the hole. Just unscrew your tube, dump the contents back into your blender and reblend (or pick out the offending piece if you see it).
After the bags are filled, unscrew the tubes and carefully pull the bags out. Twist on the orange top and voila!
You can keep them in the fridge for a couple of days or pop them straight into the freezer to have on hand later.
It’s really easy and actually, really fun!
Notes about baby food pouch combinations:
- Add 1 tablespoon lemon juice to all of these to help preserve them. The only exception is the pineapple-broccoli mixture. The citrus from the pineapple is enough on its own.
- You can keep the peels on the pears and apples, just be sure to puree them very well so pieces don’t get stuck and prevent the mixture from going into the squeezie bags.
- The vegetables and grains need to be cooked and soft, so plan ahead. Or use leftovers. These can be a great way to use up scraps and reduce food waste.
- If any of your mixtures seem too thick (because the water content of fruits and veggies can vary), just add a bit of applesauce or a splash of water to the blender until its thin enough.
- Each pouch holds about 4 ounces. Most of these batches for me make about 3 squeezies worth. You can of course always double up if you want to knock out a bunch. They freeze great, so you might as well!
Check out the recipes below and get to making some baby food pouches. I hope your little one enjoys!
(And let me know if you want to see another round-up like this – we have lots of other flavor combinations we’ve made over the years that I can share!)
XO,
Kathryn
Prep Time 15 minutes
Total Time 15 minutes
Ingredients
For the apple-brown rice-spinach pouches:
- 1 apple, core removed and roughly chopped
- 1/2 cup cooked brown rice
- 1 cup packed fresh spinach leaves (raw)
- Juice of 1/2 lemon
For the pineapple-broccoli pouches:
- 1 cup cut pineapple (thawed if frozen)
- 2/3 cup cooked broccoli florets
For the mango-sweet potato-quinoa pouches:
- 1 ripe mango, peeled, seed removed and roughly chopped
- 1/2 cup cooked sweet potato
- 1/2 cup cooked quinoa
- Juice of 1/2 lemon
For the banana-barley-zucchini pouches:
- 1 ripe banana
- 1/2 cup cooked barley
- 1/2 cooked chopped zucchini
- Juice of 1/2 lemon
For the pear-peas-spinach pouches:
- 1 ripe pear
- 1/2 cup cooked peas
- 1 cup raw spinach
- Juice of 1/2 lemon
Instructions
- Make sure all of your grains and veggies are cooked, if indicated.
- Combine all ingredients for each pouch combination in a blender or immersion blender and blend until it’s a smooth, pourable consistency. (See notes.)
- Label your bags, set up your station and add the mixture to the squeeze station containers, filled to the indicated line. Push down with the press tool and fill each bag. Remove the bags from the station and twist on the tops.
- Store pouches in the refrigerator for 2-3 days or in the freezer for up to 3 months. To defrost, simply move the pouch to the refrigerator - it thaws in less than a day.
Notes
Add 1 tablespoon lemon juice to all of these to help preserve them. The only exception is the pineapple-broccoli mixture. The citrus from the pineapple is enough on its own.
You can keep the peels on the pears and apples, just be sure to puree them very well so pieces don’t get stuck and prevent the mixture from going into the squeezie bags.
The vegetables and grains need to be cooked and soft, so plan ahead.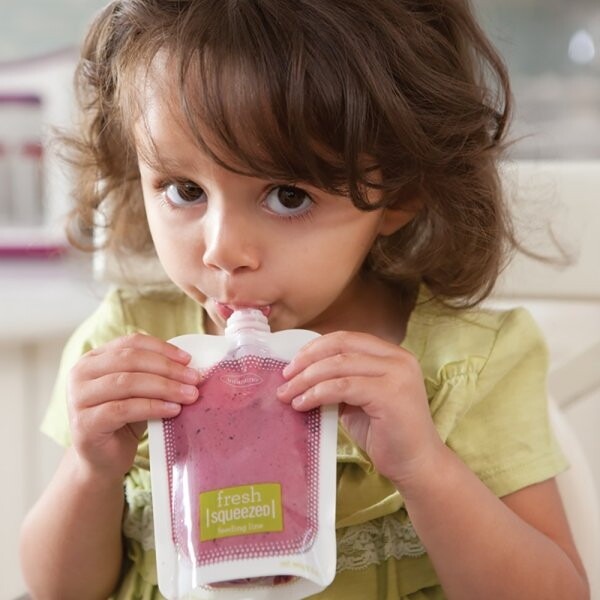 Or use leftovers. These can be a great way to use up scraps and reduce food waste.
If any of your mixtures seem too thick (because the water content of fruits and veggies can vary), just add a bit of applesauce or a splash of water to the blender until it's thin enough.
Each pouch holds about 4 ounces. Most of these batches for me make about 3 squeezies worth. You can of course always double up if you want to knock out a bunch. They freeze great, so you might as well!
Here are 5 more homemade baby food pouches if you want more flavor/combination ideas!
Nutrition Information:
Yield:
3Serving Size:
1 pouchAmount Per Serving: Calories: 50
The different varieties will yield different nutrition information.
Water purification systems for a country house, cottage, dacha - water treatment and water treatment AQUAPHOR
- home
- Catalog
- Water purification systems for cottages
We design, install and maintain water purification systems for country houses, cottages and dachas.
System kit water purification is selected individually and depends on the quality water, number of consumers, complexity installation and special requirements.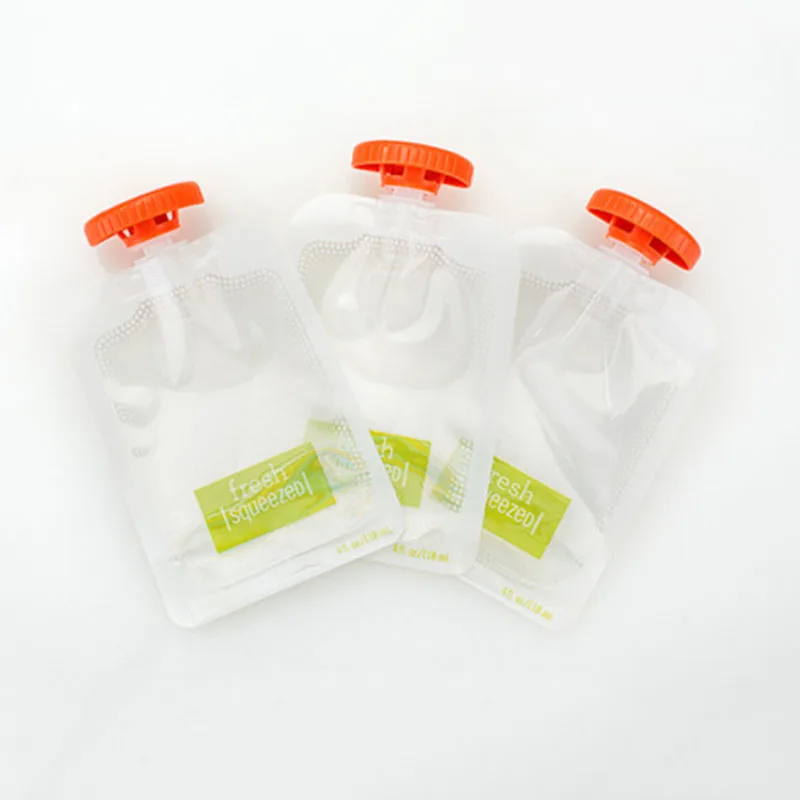
Clean water at home: how to live comfortably and spend less
Saving 24,000 ₽ per year on house maintenance Preservation of health and protection of immunity Beauty and comfort for years to come Long life of pipes and equipment
Select room
Kitchen
Pet bowl
Drinking water tap
Dishwasher
Coffee machine
Kettle
Cooking
Bedroom
Wet cleaning
Humidifier
Owner block
Boiler
Washing machine
Garage
Car wash
Bathroom
Shower
Jacuzzi
Washing water
Baby bath
Garage
Bathroom
Bedroom
Owner block
Kitchen
Selection of a water system for a house or apartment
Find out how to reduce your water bills and improve your quality of life with AQUAPHOR water treatment.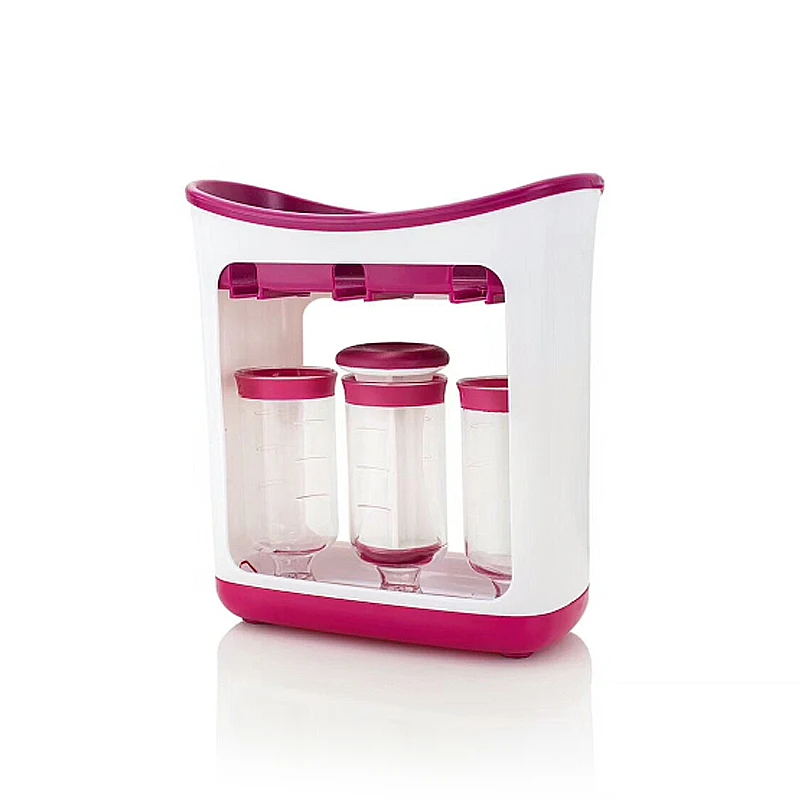
choose a system choose a system
How we design and install water treatment systems
1Determine the quality of inlet water
2Determine the requirements for the filter system
3Select and design a water purification system for a cottage
4Install and launch a water treatment system
50011 We will answer all questions and help
choose a water treatment system
Online
choose a system
or
Call
8 800 555-30-35
Information about water treatment Well water treatment Well water purification Water softening Water iron removalWhat makes the best water treatment system
Compact water softener systems are best suited for water treatment in a cottage.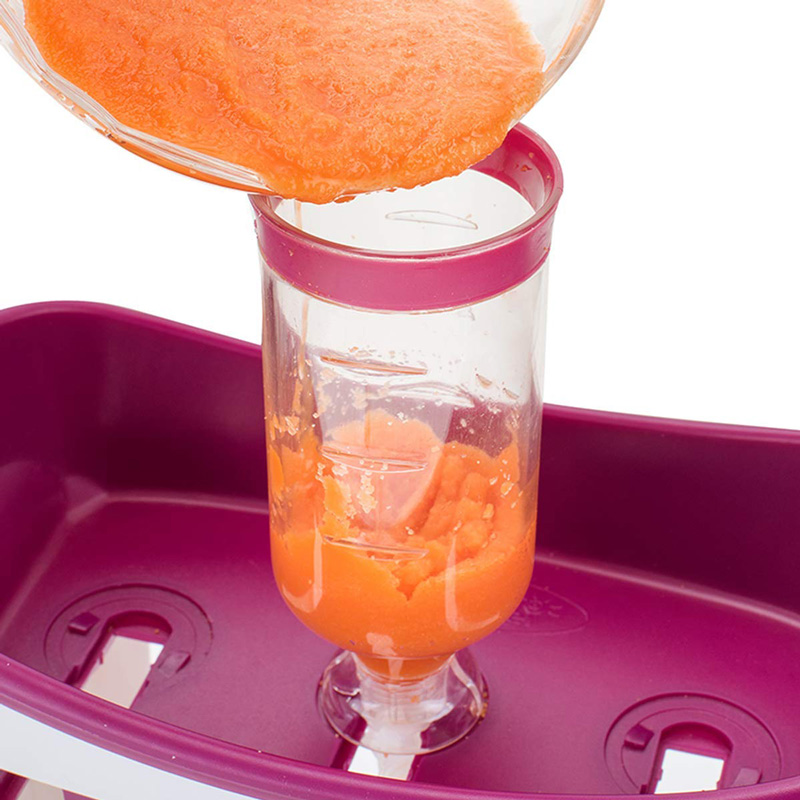
1
Coarse filter
Removes sand, rust and other mechanical impurities
Significantly extends the life of the main filter
2
Softener and iron remover
Purifies water from wells, wells, open reservoirs
Purifies water from iron, manganese and hardness salts, with any content of organic substances
3
Fine filter
Purifies water from color, odor, heavy metal ions, organic compounds, retains even microimpurities
4
Drinking water machine
Makes water drinkable without boiling
Provides special water purification for allergy sufferers and for preparing baby food
Restores the natural mineral balance of water
Comparison of
compact water treatment systems and traditional column type systems Comparison of WaterBoss softeners and column systems
| Modern compact systems based on softeners | Traditional column systems | |
|---|---|---|
| Basic |
|
| data-mobile="Traditional column systems">
| Height cm | to 98 | from 158 |
| Weight kg | to 51 | over 160 |
| 10 year operating cost | ≈ 130 000 ₽ | ≈ 330 000 ₽ |
| Required pressure in the water supply system to operate the filter | 1. 4-2 bar 4-2 bar | 3.0-4.0 bar |
| Salt consumption per 1 regeneration | 1-3 kg Lowest consumption of any system! | from 5 kg |
| Additional salt container | not required | required |
| Water discharge during regeneration | 62-95 l | from 200 l |
| Heavy Duty Drain System | not required | required |
| Maximum capacity | 5 m3/h | unlimited (when using larger columns) |
| Self-dismantling (for example, in winter, if the room is not heated) | simple and takes a few minutes | not possible |
| Filter media | UltraFine ion exchange resin for deeper cleaning | mixed ion exchange resin |
| Backfill life | is regenerated and does not require replacement | is regenerated but needs to be replaced every 5 years |
| Bakteristat© technology that eliminates the development of bacteria in the filter | yes | no |
all the differences
We will answer all questions and help you
choose a water treatment system
Online
choose a system
or
Call
8 800 555-30-35
Catalog of water treatment systems for private houses
Water softeners CHOOSE Prefilters CHOOSE Expendable materials CHOOSE columns CHOOSE
Filters
for drinking water CHOOSE UV lamps CHOOSE
211-382
Sweetened condensed milk, mass fraction of fat 8.
 5%, Dairy Station
 When evaluating products, we use only expert opinions, which are based on laboratory tests. We do not collect user reviews as they are easy to manipulate. However, you can leave feedback about our study.
Whole milk condensed with sugar, mass fraction of fat 8.5%, under the brand name "Dairy Station" produced by JSC "Verkhovsky Milk Canning Plant" in Russia. The sample was purchased at the Pyaterochka store at the address: Moscow, st. Kerchenskaya, 1 B.
According to the results of laboratory tests in 2022, it was not found in quantities hazardous to health, heavy metals and radionuclides (strontium and cesium), pesticides, as well as aflatoxins, which can get into the composition of feed for animals. Melamine, which can be used in dairy products to increase protein concentration, is not available. Antibiotics were not found in the composition. Microbiological indicators meet the established requirements.
Condensed milk of purity group I, which means that it is well filtered and has no mechanical impurities (for example, hairs, feed particles, sand).
The results of the study of the composition of sterols showed that there are no vegetable fats in the composition of the product. Proteins of plant origin were also not identified. However, deviations in fatty acid composition were found. Presumably, this may be due to the addition of animal fat to the composition.
The content of fat in the product, as well as protein in the dry skimmed milk residue, is lower than the state standard.
Condensed milk contains no synthetic dyes. The content of ascorbic acid, which can be used as an antioxidant, does not exceed the permissible level. Pectin, which acts as a stabilizer and thickener, as well as starch and carrageenan, are absent. However, a preservative sorbic acid, not declared in the labeling, was found.
Sweeteners and sweeteners (saccharin, acesulfame potassium, aspartame, cyclamic acid and sucralose) were not detected. Sucrose content (43.93%) meets the established requirements. However, the share of lactose (milk sugar) is higher than the standards set by the advanced standard of Roskachestvo and amounts to 13.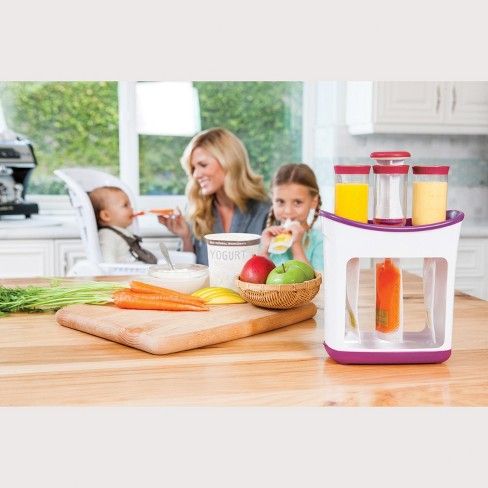 83%. The size of milk sugar crystals complies with the standards set by the leading standard.
The acidity level indicates that the product is fresh. The proportion of dry milk residue and dry skimmed milk residue (SOMO) complies with the standards established for condensed milk. This suggests that high-quality milk was used to produce the product.
However, the moisture content exceeds the allowable level set for condensed milk in the state standard, which means that such a product can become a favorable environment for the growth of bacteria and deteriorate before the expiration date.
The color of the product is light cream, uniform throughout the mass. The consistency is homogeneous, viscous throughout the mass, without the presence of perceptible milk sugar crystals. The viscosity of the product complies with the advanced standard of Roskachestvo. The taste is sweet, with a taste of pasteurized milk.
The product is packed in a tin; There are no visible external damage or contamination.
The actual net weight corresponds to that stated in the marking.
-
Manufacturer
JSC "VERKHOVSKY DAIRY CANNERY"
-
Country of origin
RUSSIA
-
Manufacturer
JSC "VERKHOVSKY DAIRY CANNERY"
-
Year of manufacture
2021
-
Weight
360 g
-
Composition
whole cow's milk, sugar (sucrose)
-
Additional information
Nutritional value per 100 g of product (average values): fats 8.