How to make snow globes out of baby food jars
Craftaholics Anonymous® | Baby Food Jar Snow Globes Tutorial
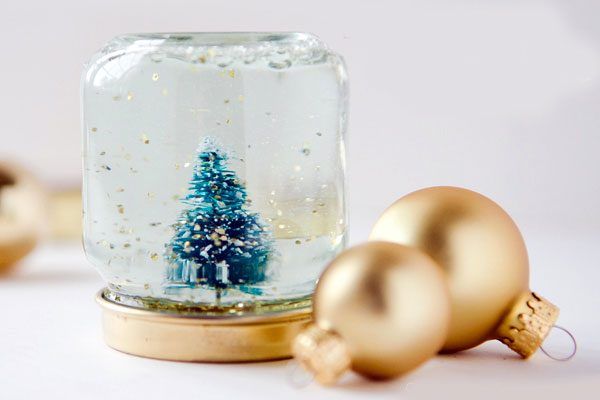
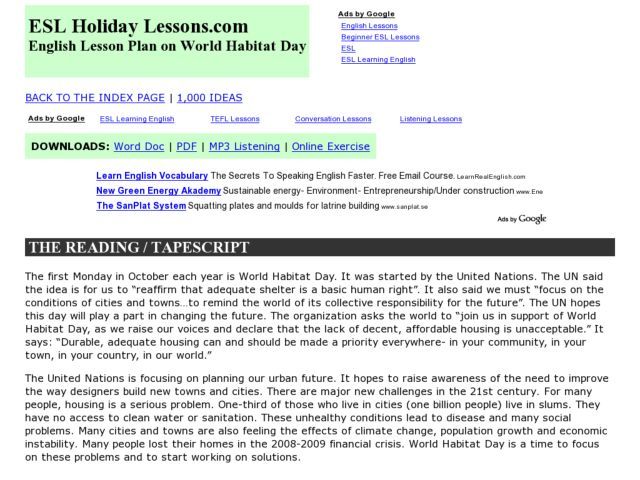
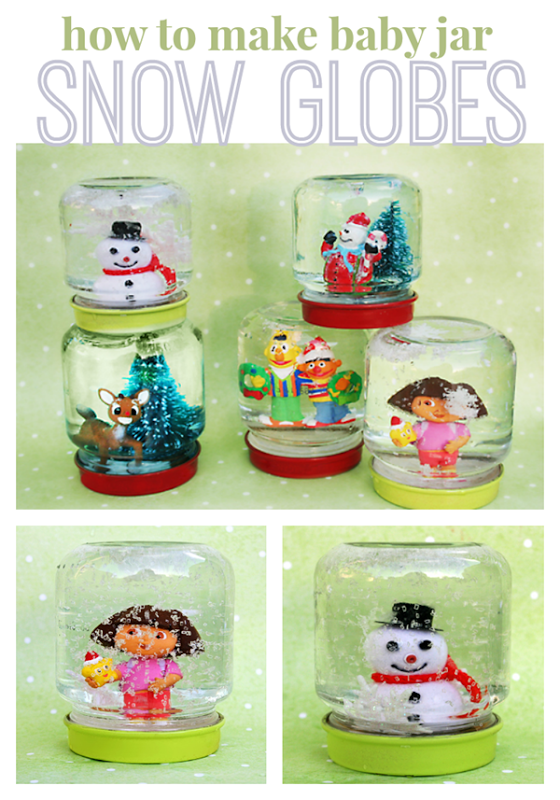
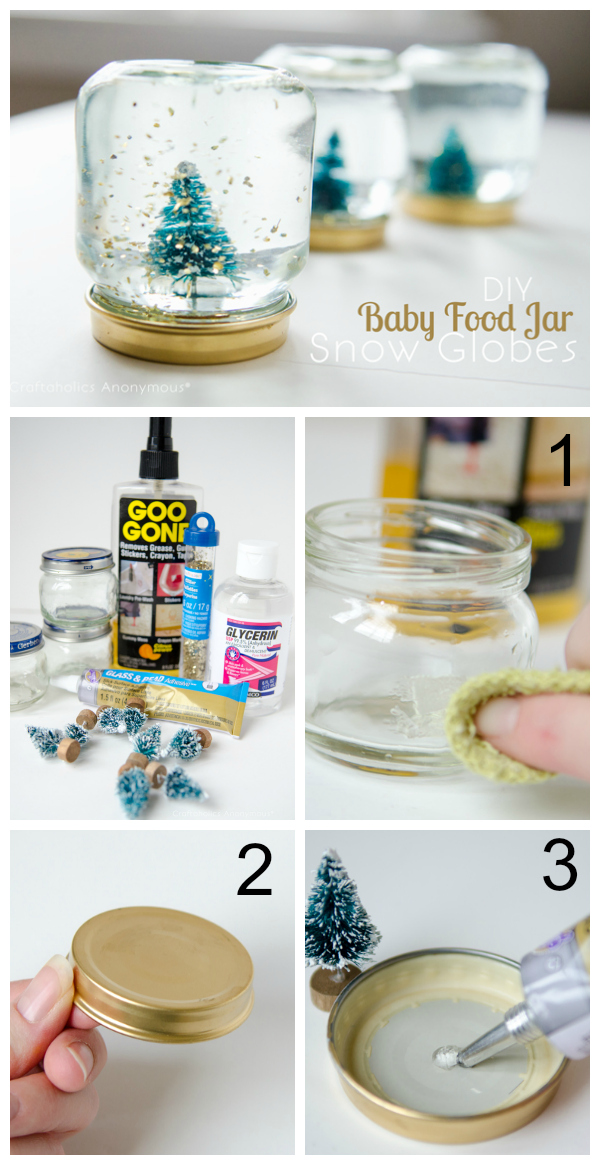
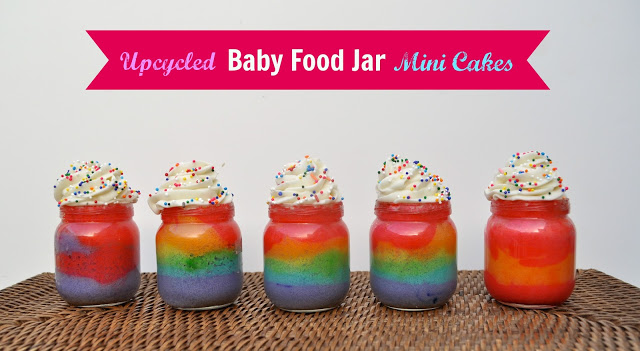
Have a bunch of baby food jars hanging around? Here’s a great upcycle for all those cute little jars! Turn them into mini snow globes with a few household items. Baby Food Jar Snow Globes are easy to create and make a fantastic gift idea!
This is Part 3 in the #JustAddMichaels promotion! Check out Part 1 {announcement} and Part 2 {Dream Christmas tree reveal}.
My baby girl is just starting to eat solids, so I have a bunch of baby food jars hanging out. So I turned a bunch of them into mini snow globes and they turned out so stinkin cute!! I’m seriously in love with them! Oh, and I might just be handing these out to neighbors and friends. They make such a cute little Christmas gift!
I love it when I find a way to reuse and make it beautiful!
How to Make Snow Globes TutorialSupplies:
- empty baby food jars {Stage 2 size is the cutest, in my opinion, but all sizes work just fine!}
- mini fake trees
- Goo Gone
- Glycerin {I found it at the Walmart pharmacy}
- Glass & Bead glue OR Epoxy
- Glitter {colored chunkier glitter works best.
Don’t use clear or fine glitter}
- Gold spray paint
- distilled water
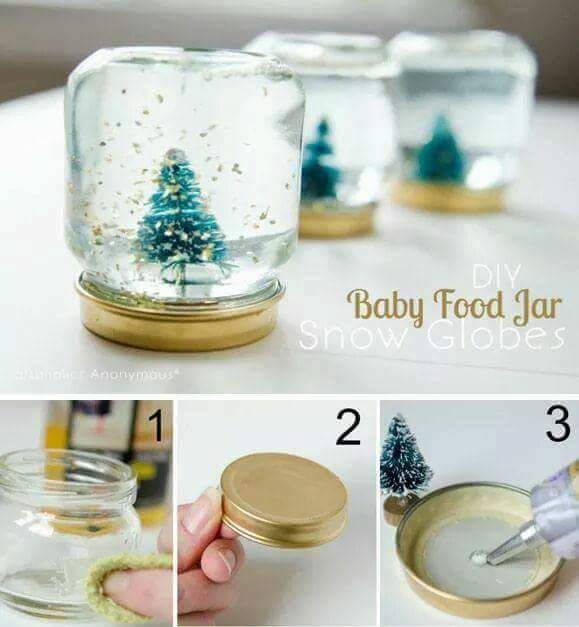
- Remove the labels off the jars and clean off the glue with Goo Gone.
- Spray paint the lids gold {or desired color}.
- Put a little glue on both the inside of the lid and the bottom of the fake tree. Allow to dry for 1-2 minutes and then press the tree onto the lid. Allow to dry for 24 hours.
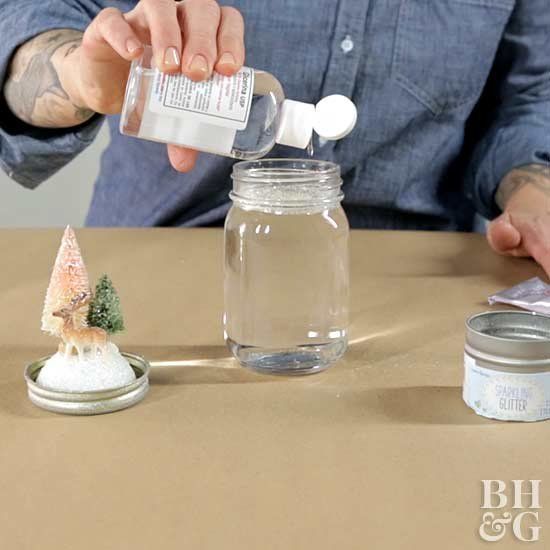
4. Add about 1 teaspoon of glitter into each jar.
5. Fill with distilled water and add 5 drops of Glycerin. {5 drops seemed to work the best.} Screw the lid {with the tree} onto the top and you’ve got yourself the cutest mini snow globe ever!
And that is how you make Baby Food Jar Snow Globes!
Mini Snow Globes
What could you do with this tiny snow globes?
Disclosure: This post is brought to you by Michaels. I received free product{s} featured in this post. All opinions are 100% mine!
Check out my Gold Ombre Christmas Tree! It turned out gorgeous! {and yes, I can’t believe I already have my tree up this year! haha}
Follow on Pinterest for craft ideas from around the web!
- Bio
- Google+
- Latest Posts
Hi! I'm Linda, the craft addict behind Craftaholics Anonymous®, a craft blog. Crafting is cheaper than therapy, right? When I'm not DIYing something, I can be found taxiing around our 4 crazy kids or working out. Or shoe shopping... because you can never have too many shoes! Happy crafting! ♥
15 Best DIY Snow Globes
Every item on this page was chosen by The Pioneer Woman team. The site may earn a commission on some products.
All you need is a jar with glitter, glue, and water!
By Micaela Bahn
Mint ImagesGetty Images
Rumor has it that the winter forecast for this year is looking pretty cold and snowy. That's great if you're big on skiing, sledding, or other winter activities in the great outdoors. Some of us, though, would rather cozy up inside, bake Christmas cookies, and decorate all season long. If that sounds like you, we have the best way to enjoy the snow without getting chilly outside: DIY snow globes!
The holiday season just lends itself to crafty ideas.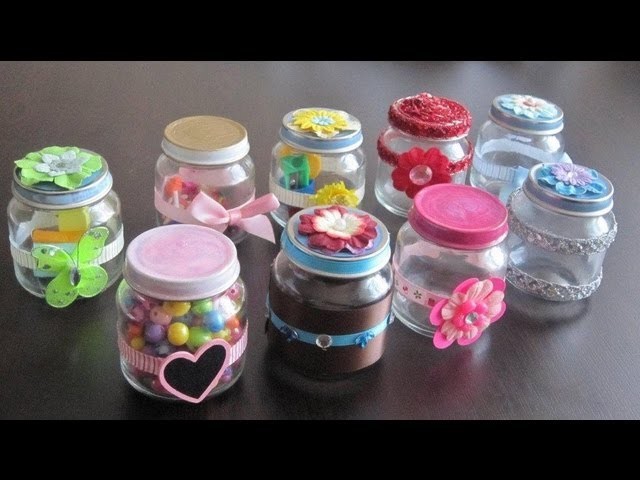 Granted, not everyone is an expert crafter—Ree Drummond is the first to admit it about herself! That's why DIY snow globes are the best: supplies are inexpensive, instructions are easy to follow, and most projects can be accomplished in less than 30 minutes. (That means they're kid-friendly!) Plus, you can "upcycle" items you already have at home for the globe, like jars and containers.
We've found snow globes you can make at home with bottle brush trees, Christmas village miniatures, and pinecone crafts. There are also unique DIY Christmas gifts like snow globe picture frames and soap dispensers. Some are more decorative, featuring winter scenes with faux snow but no liquid for shaking. Others are full of liquid and are meant to be shaken. Many of these add a few drops of glycerin to the water, which allows the snow flurries to stay suspended for longer before falling to the bottom. So shake up your décor by making these DIY Christmas decorations yourself.
Mason Jar Crafts Love
1 of 15
Traditional Mason Jar Snow Globe
Mason jars are a classic container for DIY snow globes, and what's more "Christmas" than bottlebrush trees? This easy craft combines those traditional elements into one beautiful, vintage-inspired decoration.
Get the tutorial at Mason Jar Crafts Love.
SHOP MASON JARS
Mason Jar Crafts Love
2 of 15
Vintage Car Snow Globe
This globe will elicit memories of Christmas tree farms from years past! Here, tinsel trees are tied to the roofs of mini vintage cars to be brought home.
Get the tutorial at Mason Jar Crafts Love.
Aww Sam
3 of 15
Novelty Snow Globe
We're not all into the traditional green and red holiday decorations. So, these globes put an adorable, modern twist on the classic décor! With a bit of clay, you can fill your snow globe with hotdogs, cacti, and other quirky showstoppers.
Get the tutorial at Aww Sam.
Home Made Lovely
4 of 15
Gift Card Snow Globe
Gift cards are a great idea since they let the person choose something they really want and will use. Still, you can make the presentation a little more personal by placing it in a DIY globe! They'll cherish the homemade aspect and enjoy using up the card.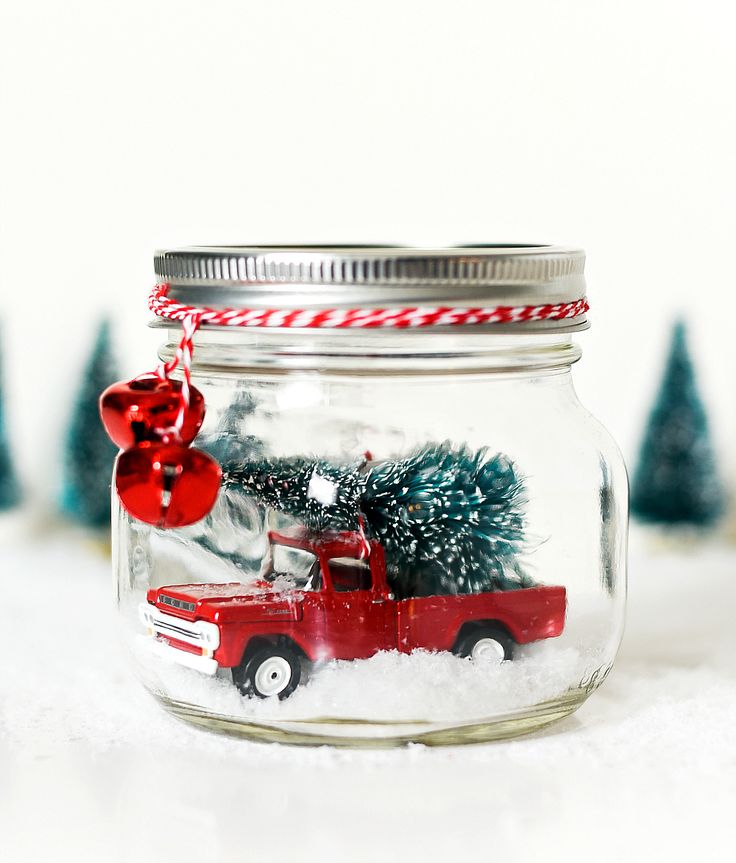
Get the tutorial at Home Made Lovely.
Craftaholics Anonymous
5 of 15
Mini Jar Snow Globe
Who knew you could use baby food jars for such a cute craft? You can really use any type of jar for this, but the gold cap makes these especially festive. Simply glue a bottle brush tree to the inside of the lid, and fill the jar with water and glitter!
Get the tutorial at Craftaholics Anonymous.
SHOP BOTTLE BRUSH TREES
A Pumpkin and a Princess
6 of 15
Frozen Olaf Snow Globe
There's really no better character to place in a snow globe than the beloved Olaf from Frozen. The kids will love seeing this sweet snowman’s smiling face surrounded by flurries every day.
Get the tutorial at A Pumpkin and A Princess.
The Best Ideas For Kids
7 of 15
Snow Globe Christmas Sensory Bottles
The point of this pretty bottle is to fill it with odd items that will delight the senses. Here, you have tinsel pom moms, glitter, fabric snowflakes—the works!
Get the tutorial at The Best Ideas for Kids.
Artsy Fartsy Mama
8 of 15
Upcycled Snow Globe
Everyone loves a craft that recycles everyday household items! Clean a used-up plastic peanut butter jar, and create a scene with your favorite holiday figurines. Not only does the plastic not go to waste, but you can be sure the little ones won’t break this if they drop it!
Get the tutorial at Artsy Fartsy Mama.
Mad in Crafts
9 of 15
Snow Globe Soap Dispenser
Don't leave your sinks out of the holiday decorating! Turn a mason jar into a snow globe soap dispenser! Every time you go to wash your hands, you'll get to admire the pretty Christmas scene inside.
Get the tutorial at Mad In Crafts.
The Best Ideas For Kids
10 of 15
Snow Globe Keepsake Ornament
Use clear glass ornaments to make a keepsake snow globe with cute drawings from everyone in the family. These will be way more meaningful than any set you could find in the store.
Get the tutorial at The Best Ideas for Kids.
SHOP CLEAR ORNAMENTS
Dream a Little Bigger
11 of 15
Snow Globe Hot Cocoa Mason Jars
Homemade hot cocoa mix is such a fun gift, but putting a snow globe on top makes it even better! This unique giveaway is very easy to make and perfect for teachers, holiday parties, or care packages.
Get the tutorial at Dream a Little Bigger.
Polkadot Chair
12 of 15
Gingerbread House Snow Globe
This is one of the most beautiful DIY snow globes we’ve seen, and it's edible! Fill the bottom of a large jar with marshmallows as your base, then place baked gingerbread cakes on top and dust with sugar. While these are as gorgeous as boats in a bottle, the jars have wide openings making the actual structure easy to assemble.
Get the tutorial at Polkadot Chair.
Easy Peasy and Fun
13 of 15
Paper Photo Snow Globe
This may not be the snow globe you're used to, but it's a super fun craft for the kids! Show off everyone in your family by putting their photo in the center.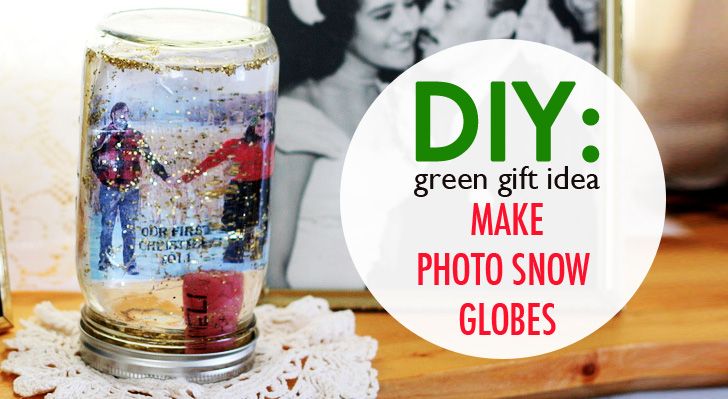 The globes can be used as decorations or as ornaments for your tree!
Get the tutorial at Easy Peasy and Fun.
TK
14 of 15
Vintage Truck Snow Globe
Bottle brush trees, a small vintage truck, ribbon, and glorious glittery white flurries—what more could you ask for from a Christmas scene? The best part of this globe is you can likely find all the components right at your local dollar store.
Get the tutorial at Mad in Crafts.
Artsy Fartsy Mama
15 of 15
Mandalorian Baby Yoda Snow Globe
Any Star Wars or Baby Yoda fans in your house? You can make this sweet globe by gluing a little Yoda figurine to the bottom of the globe cap and filling it with water and glitter.
Get the tutorial at Artsy Fartsy Mama.
SHOP DIY SNOW GLOBES
Deck the Halls With These Lovely Christmas Plants
Micaela Bahn Micaela Bahn is a freelance editorial assistant and recent graduate from Carleton College, where she majored in English literature.
How to make snow in a jar. DIY glass ball with snow - a step-by-step master class with photo
WikiHow is a wiki, which means that many of our articles are written by multiple authors. When creating this article, 10 people worked on editing and improving it, including anonymously.
Do you want to have fun next weekend with your kids (or parents) doing something together? Then you can make a snow globe! The snow globe looks cute and interesting and can be made using common items that are in every home. Alternatively, you can buy a ready-made kit online or at a craft store to make your snow globe look truly professional and enjoy year after year. Whatever you choose, read step 1 to get started. nine0003
Steps
Making a snow globe from household items
-
Find a glass jar with a tight-fitting lid. Any size will do, as long as you have the right figures to fit inside the jar.
- Olive, mushroom or baby food jars are good - as long as there is a tight-fitting lid; just look in the fridge.

- Wash the jar inside and out. To clean the label if it doesn't come off easily, try rubbing it under hot soapy water using a plastic card or knife. Dry the jar thoroughly. nine0018
- Olive, mushroom or baby food jars are good - as long as there is a tight-fitting lid; just look in the fridge.
-
Think about what you want to put inside. Anything can be placed in a snow globe. Cake figurines or small winter-themed children's toys (such as a snowman, Santa Claus, and a Christmas tree) that can be purchased at craft or gift shops are good.
- Make sure the figurines are made of plastic or ceramic, as other materials (eg metal) may start to rust or turn over funny when submerged in water. nine0018
- If you want to get creative, you can make your own clay figurines. You can buy clay from a craft store, shape it into any shape you want (snowmans are easy to make), and bake them in the oven. Paint them with water-repellent paint and they're done.
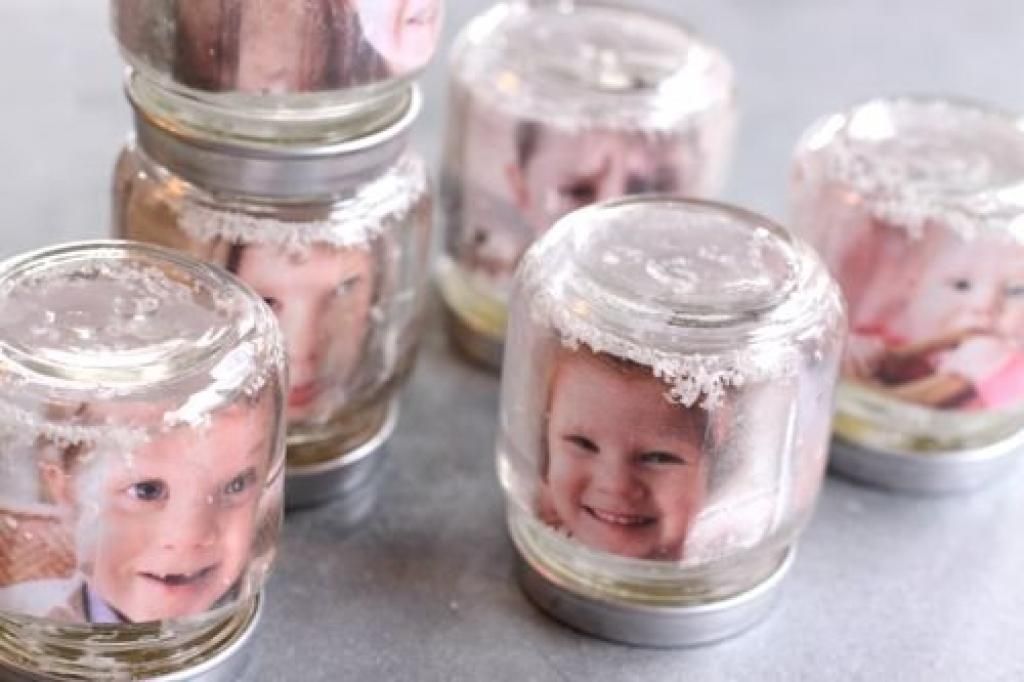
- Another suggestion: take a photo of yourself, your family or pets and laminate them. Then you can cut out each person along the contour and put their photo in a snow globe, it will turn out very realistic! nine0018
- Even if it's called snowy balloon, you don't have to limit yourself to creating only winter landscapes.
 You can create a beach scene using seashells and sand, or something playful and fun like a dinosaur or a ballerina.
-
Decorate the inside of the lid. Apply hot glue, super glue, or epoxy to the inside of the jar lid. You can first rub the cover with sandpaper - thanks to this, the surface will become rougher and the glue will hold better. nine0003
- Place your decorations on the inside of the lid while the glue is still wet. Glue your figurines, laminated photographs, clay sculptures, or whatever else you want to put on there.
- If your piece's base is narrow (such as laminated photographs, a piece of garland, or a plastic Christmas tree), it's best to glue a few colored pebbles to the inside of the lid. Then you can simply clamp the object between the pebbles.
- Keep in mind that the decoration you are making will need to fit in the neck of the jar, so don't make it too wide. Place the figurines in the center of the lid.
 nine0018
 - After you have created your plot, set the lid aside for a while to dry. The glue must dry completely before you can submerge it in water.
-
Fill the jar with water, glycerine and glitter. Fill a jar almost to the brim with water and add 2-3 teaspoons of glycerin (found in the bakery section of the supermarket). Glycerin "compacts" the water, which will allow the glitter to fall more slowly. The same effect can be achieved with baby oil. nine0003
- Then add glitter. The amount depends on the size of the jar and your tastes. Just add just enough glitter to compensate for the fact that some of it will get stuck in the bottom of the jar, but not too much or it will completely obscure your decoration.
- Silver and gold sequins are great for a winter or Christmas theme, but you can choose any color you like. It is also possible to buy special "snow" for the snow globe online and in craft stores. nine0018
- If you don't have glitter on hand, you can make pretty realistic snow out of crushed eggshells.
 Use a rolling pin to crush the shell well.
-
Carefully put on the cover. Take the lid and fasten it firmly to the jar. Close it as tightly as you can and wipe off the displaced water with a paper towel.
- If you are unsure if the lid will close properly, you can make a ring of glue around the rim of the jar before closing it. You can also wrap some colored ribbon around the lid. nine0018
- In any case, it will sometimes be necessary to open the jar in order to touch up loose parts or add fresh water or glitter, so think about this before sealing the jar.
-
Decorate the lid (optional). If you wish, you can finish your snow globe by decorating the lid.
- You can paint it in bright colors, wrap it around with decorative ribbon, cover with felt or stick on holiday berries, holly or bluebells. nine0018
- Once you're done, all that's left to do is give the snow globe a good shake and watch the glitter gently fall around the beautiful decoration you've created!
Create a snow globe from a store-bought kit
- Add glitter, beads or other small particles to the water.
 Anything will do, the main thing is that they do not obscure the main decoration.
 - For a wild effect, try adding a few drops of food coloring to water before adding glitter, beads, etc. nine0018
- An object inside a snow globe can look more fun with glitter or artificial snow. This can be achieved by first painting the object with clear varnish or glue, and then pouring glitter or artificial snow on top of the wet glue. Note: This must be done before the item is placed in water, and the glue must dry completely. Otherwise, this effect will not work!
- Small plastic dolls, plastic animals and/or elements from board games such as Monopoly and a set of model trains can be used as the main item. nine0018
There are many holidays ahead, and you want to somehow surprise your loved ones with unusual gifts. Consider how to make a snow globe with your own hands at home.
With your own hands, with a strong desire, you can make a beautiful and stylish New Year's snow globe from a jar with your own hands.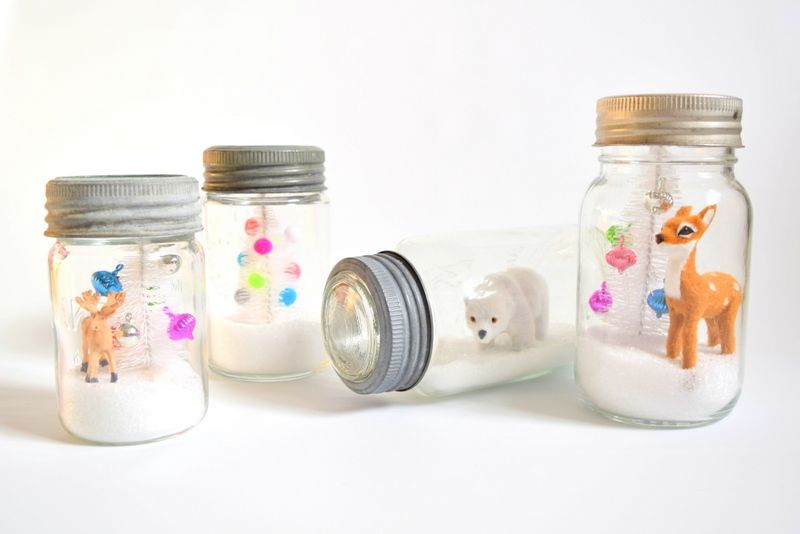 In this material, we will give several master classes, after which there will be no more questions about how to make a snow globe without glycerin with your own hands or using glycerin. nine0003
Separately, I would like to emphasize the fact that many people think that it is difficult to make a ball with snow inside with their own hands. In fact, there are not only no difficulties, but the whole process of crafts is quite simple and understandable. The presence of glycerin in the composition of the original components should not confuse you. This substance can be bought at any pharmacy without a prescription for a penny, it is not difficult to work with this substance.
Simple and easy
To create such a ball, you will need a jar with a well-twisted lid, that is, the vessel must be airtight after closing and not lose this tightness during use. Additionally, to protect against leakage, it is recommended to glue the thread of the finished craft. nine0003
Christmas decorations, figurines of Santa Claus, Snow Maiden or an angel can be used as decorations inside the jar.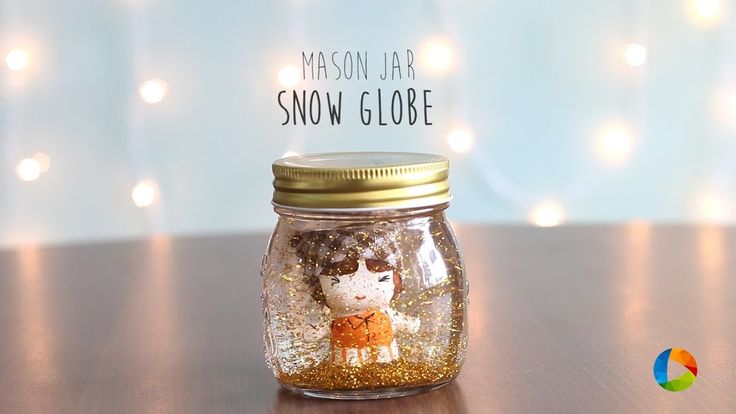 Houses and trees look especially beautiful with falling snow. The glue needs to be waterproof, they will need to glue the selected figures to the lid of the jar.
As for snow, without which it is impossible to imagine a New Year's ball with your own hands from a can, then to simulate it, you can simply take artificial snow, sparkles or even crushed white plastic. Glycerin in this craft is needed so that the snow falls slowly, and not all at once. The more glycerin is diluted in the water, the higher the viscosity of the water will be and the snow will fall more slowly. nine0003
Tip! If the snowflakes in your craft are large, then you need to take a large amount of glycerin. For a 400 ml jar, 100 ml of glycerin will be enough. But it is recommended to add glycerin slowly and each time check how much this amount of this substance changes precisely the speed of your snow fall.
As for craft water, it is best to use distilled water if the ball is being given as a gift or if you plan to keep it for a long time.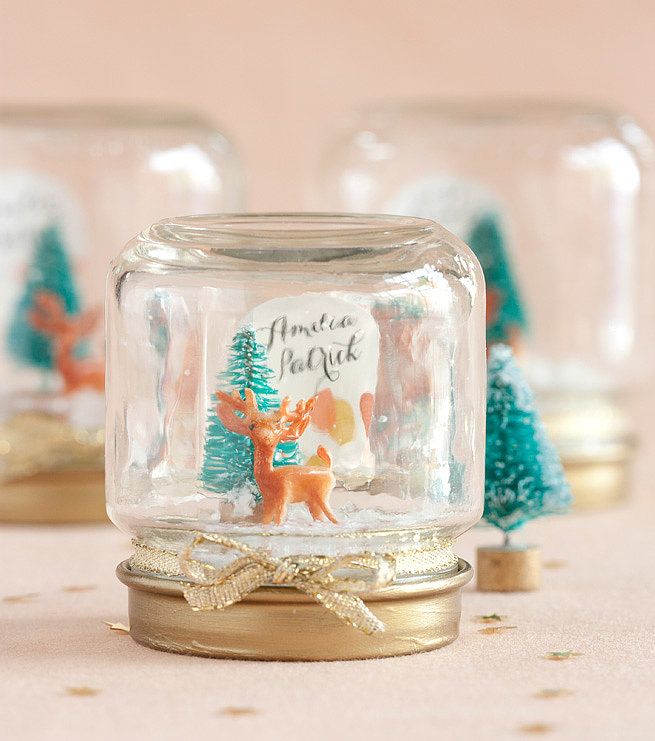 Otherwise, just tap water will do, the main thing is that there is no excess sediment in it (for this, water should be additionally defended). Work is recommended to be carried out in disposable gloves. nine0003
How to make a snow globe, a specific assembly process and step by step photos, we will tell later in this material. You need to take about an hour to work, try to do everything according to the instructions, so that the craft turns out beautiful the first time.
I propose to make a version of the snow globe, which you probably saw on the shelves of the store.
A small glass jar (100-300 ml) with a rounded shape is well suited for such a ball. Depending on what kind of holiday you have ahead, you can pick up small figurines or figurines. The figures from under the eggs in Kinder look good. My daughter always selects figures that are repeated for this. And especially for the New Year, you can do it yourself. nine0003
An integral part of this craft is glycerin, it will help to keep small sequins in the water. You can buy glycerin at a pharmacy.
Well, of course, many different sequins or glitter are needed in this work.
Take some time, call your kids and start collecting all the elements to make a snow globe.
What is the snow globe "Angel" made of:
- water;
- glycerin;
- glass jar with lid; nine0116 - glass pebbles for decoration;
- figurine;
- acrylic paint;
- sequins;
- cosmetic glitter;
- glue gun.
How to make a snow globe out of a can
When choosing a figurine for a jar, take one that is clearly visible and occupies at least half of the future ball. In my case, this is an angel, well suited for a gift to a loved one.
When making a snow globe from a jar with your own hands, always use clean water, passed through a filter, mix it with glycerin (in a proportional ratio, the amount of water to glycerin will be 2:1). nine0116 Combine water with glycerine in a container, mix well.
The lid of the jar can be painted with a brush lubricated in acrylic paint if you don't like the color. Take only acrylic paint, it dries quickly and smears your hands. To make the figurine a little higher, you can glue glass pebbles or something else on the lid to help elevate it.
Glue the angel figurine onto the stones with a glue gun or other glue that is strong after drying.
Pour different sequins and glitter into a clean jar, you can also use very small beads.
Pour the liquid into the jar almost to the top, stir the glitter.
Now take the next step responsibly. Lubricate the neck of the jar with glue, and tighten the lid tightly.
Let the glue dry well for 15-25 minutes and you are ready to shake and flip your snow globe from the Angel Can. You can also decorate the lid, paint it and glue a beautiful fabric. nine0003
And together with the children you can do
Fascinating and magical holiday. At this time of the year, everyone wants to give and receive gifts. In this article, you will read how to make a "snow globe" with your own hands to please loved ones.
Why make a "snowball"?
Before embarking on any work, a person asks himself: "Why am I taking on this particular job?" In the case of this craft, the answer to this question is simple. Firstly, everyone loves to receive handmade gifts, especially in the modern world it is also very fashionable. Secondly, even children can make such an original gift, which is even more appreciated. nine0003
Thirdly, the New Year's "snow globe" looks beautiful, symbolic, suitable for a person of any age. And if you turn on your imagination, then you can create a unique and memorable surprise! And for its manufacture it will take quite a bit of time and a minimum of financial costs.
What do you need to work?
In 1889, the New Year's "snow globe" was made for the first time. It was presented in Paris and had a small size (could fit in the palm of your hand).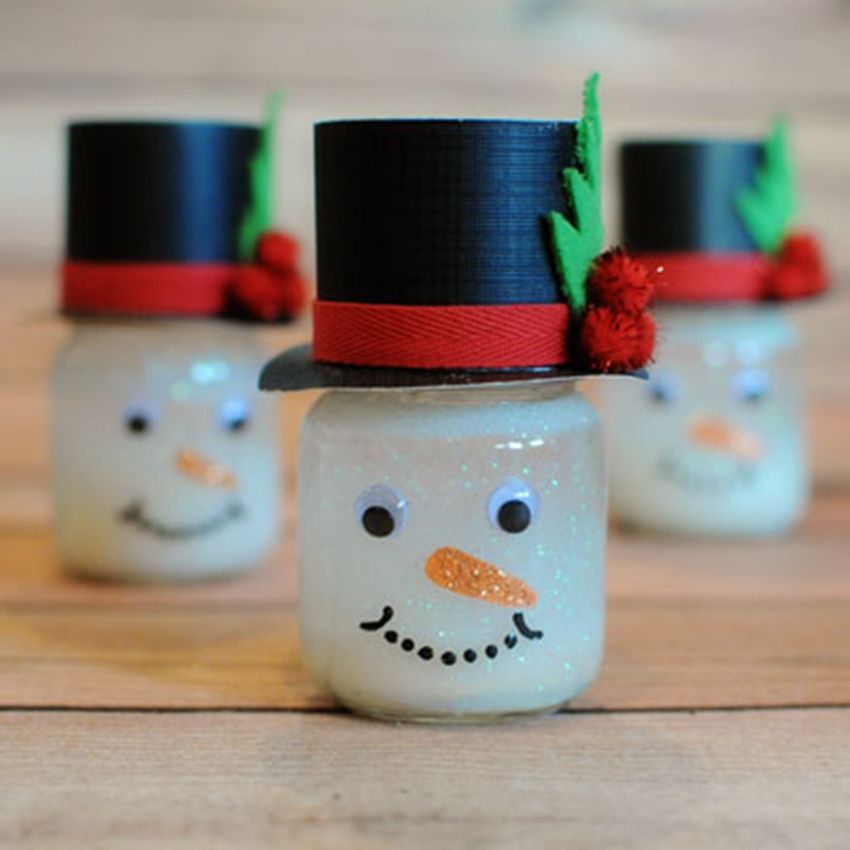 A copy of the famous Eiffel Tower was installed in it, and fine sifted porcelain and sand played the role of snow. Today, anyone can create a "snow globe" with their own hands. How to make such a miracle? Let's start by preparing the necessary things. So you need:
- Glass jar with resealable lid. It is better that the container is airtight, otherwise you will have to strengthen the place of screwing in order to prevent the craft from leaking;
- Figures for creating the main composition - these can be houses, animals, Christmas trees and so on.
- Glue gun or good super glue.
- Distilled water. If you take an unpurified liquid, it will darken over time, spoiling the appearance of the craft.
- Artificial snow - sequins, finely chopped tinsel can act as its role. Some even use cut disposable utensils or styrofoam. nine0018
- Glycerin - for thickening water. It is he who will help you see how the snow falls in your ball.
- Decorations for the lid.
Getting Started
When all the necessary preparations are completed, you can proceed directly to the creation of the ball. First, thoroughly wash the jar and figurines to create an exposure. You can even pour boiling water over them. This is done to better preserve the snow globe from the can. If any bacteria remain on the figurines, the craft will quickly become cloudy. nine0003
Now start creating a decorative composition on the lid. Wipe the underside of the cover with sandpaper, so the glue will lie better. Then treat the surface with glue and install the figure of your choice. Work quickly before the compound dries.
If the base of your figure is very narrow (for example, like a Christmas tree), place a couple of pebbles on the lid, and already place a fir tree between them.
Place the shapes in the center of the lid and don't make them too wide or they won't fit into your glycerine snowball. When the plot is ready, set the lid aside. Glue must be completely dry! nine0003
You can also place your figurine on a snowdrift. Cut it out of styrofoam, glue it to the lid and paint it with white paint.
Treat the snowdrift with glue and sprinkle with glitter. A wonderful platform for fairy-tale characters is ready! Now you can place any hero on it. You can also create a unique figurine if you mold it yourself from polymer clay.
Preparing mortar and artificial snow
When it comes to making a "snow ball" with your own hands, the nuance of preparing a mortar of the desired consistency is very important. Take a jar and fill it three-quarters full with water. Then pour in 2-3 teaspoons of glycerin (you can buy it at a pharmacy and it is quite inexpensive). How slowly the snow falls in the composition depends on the amount of glycerin. When the solution is ready, the children's favorite stage begins - loading "snow" into a jar. Gently place the glitter in your balloon.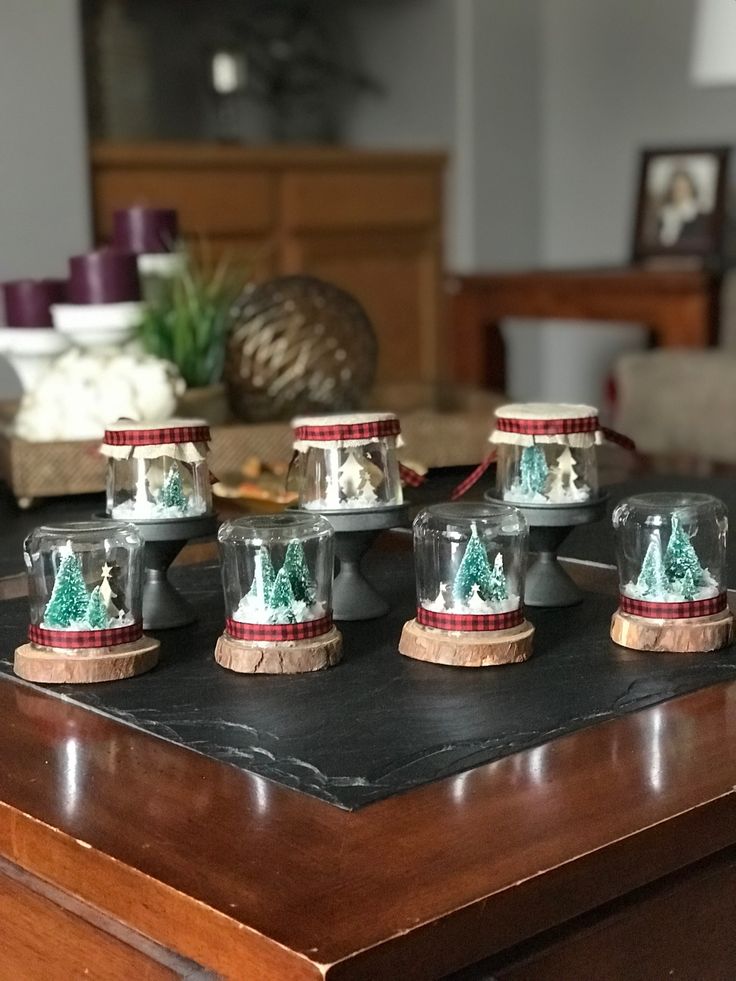 Their number depends only on your desires, but you should not put too many sparkles, otherwise they will block the entire view of the composition. Gold and silver glitter works best, but any shade can be used. nine0003
If there is no glitter on hand, a white eggshell will save the situation, it needs to be crushed well, and it will perfectly cope with the role of snow in a New Year's craft.
Mix the glitter gently with a clean spoon and observe how it behaves. If you see particles that do not settle to the bottom, carefully remove them. They will float on top of the composition, spoiling its appearance.
Now proceed to the crucial moment - immersing the figurine in water and screwing on the lid. Turn the compositions over and lower them into the water. nine0003
Screw the lid on tightly, removing any water that has leaked out with a towel. For insurance, it is better to once again go through the glue along the junction of the can and the lid.
Decorating the lid
The lid is also worth thinking about.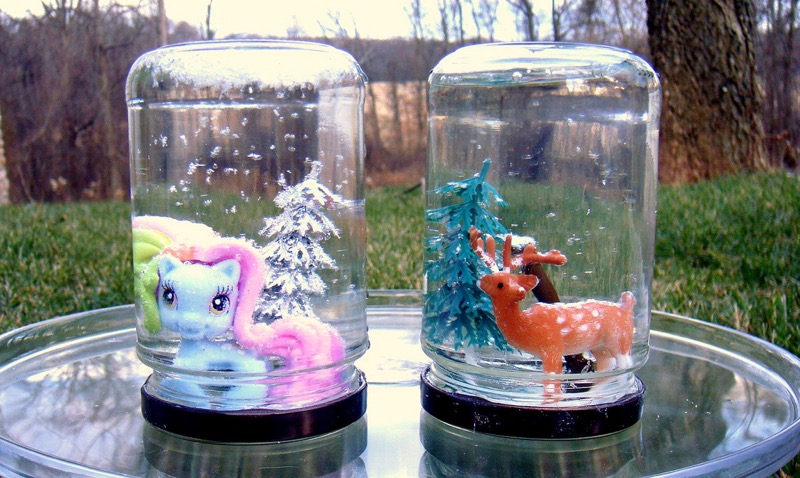 Before you make a "snow globe" with your own hands, prepare everything you need for decoration.
Decorating the lid is optional, but it will make the ball look complete. The decoration will help hide the joint between the lid and the jar.
Cut out a couple of strips from cardboard and glue them into a circle. Cover the stand with gold self-adhesive paper and place the jar in it. This stand can be decorated as you wish. nine0003
You can cover the lid with nail polish, wrap it in a bright decorative ribbon, decorate with felt or glue on small decorative elements: bells, swirls. The ball is ready! Shake it and watch the fabulous snowfall.
Create a snow globe from a set purchased at the store
If you don't feel like looking for the right items to create a snowy New Year's gift, you can create a snow globe from a ready-made set. They can be found in many stores. The kits can be different: some already have grooves for photographs, others - clay for creating ceramic figurines. Most importantly, follow the instructions exactly! There are kits in which children have to paint and color some details on their own. Most often, the decoration is installed on the lid and glued to the plastic or glass dome. Then, through a special hole, a solution and artificial snow are poured into the ball. The cork from the kit will allow it to be tightly closed. nine0003
"Snow globe" without glycerin
Is it possible to create a New Year's surprise without glycerin? And what can replace the glycerin in the "snow globe"?
It is not bad to replace the substance with baby oil, it is also capable of thickening water. And you can create a ball only with water. There is an option to create crafts without a solution at all. Take round Christmas balls with transparent walls. Remove the rope holder, insert a small figurine and pour snow. Set the toy on a stand or decorate a Christmas tree with it. nine0003
A magical surprise will please both children and adults. Everyone will follow the snowfall of sparkles swirling behind the glass. A handmade gift keeps a piece of the soul, and it is very expensive!
How to make a "Snowball" with your own hands step by step with a photo
Yunusova Alsu Rifkhatovna, teacher, Kindergarten No. 177, Kazan, Republic of Tatarstan
Description: Master class of a simple "snow globe". A great option for Christmas crafts. Suitable for making by older preschool children. Useful use of baby food jars. nine0116 Purpose of the workshop: Do-it-yourself creation of a New Year's "snow" globe.
Tasks: to acquaint teachers and parents with the method of making a wonderful "snow globe". Show the steps and suggest the secrets of manufacturing.
New Year - a time of miracles and magic! Waiting for the New Year and preparing for it is probably even more interesting than the holiday itself. In kindergartens, teachers and children, in homes, children and parents are immersed in the process of creating a New Year's mood. They decorate rooms, watch movies and cartoons, buy gifts and toys, interior decorations such as snow globes... Snow globes have long been one of the main symbols of the New Year. And do-it-yourself snow globes are symbols of creativity, magic and New Year's mood at the same time! nine0003
To make a "snow globe" you need:
baby food jar, glitter and sequins, toy (this time my daughter and I chose Olaf the snowman), super glue, glycerin, water, rhinestones and ribbon or ribbon to decorate the jar, hot glue gun.
Ball manufacturing progress
First of all, you need to see how the toy will look inside the jar, whether it is too small.
The photo shows that the toy is less than half of the can, so I placed a lid from the hand cream under the toy, thereby lifting the snowman above the middle. You can choose toys higher, there will be less hassle. nine0002
Next, I glued the stand and the toy with super glue. Glue used a lot, one might say, flooded the edges.
 I left the lid with the toy to dry overnight. Hint: Even though it's super glue, when it's thick it takes a long time to dry.
The next step is to prepare a liquid where sparkles and sequins will float. The proportion of water and glycerin is about 50% to 50%. I always pour by eye. Keeping the proportion exactly in milliliters is not so important. Sequins are light, they fall for some time even in water. nine0002
Before adding glycerine to the water, I added sparkles, sequins and stirred well so that they were saturated with water.
The turn of glycerin has come. When adding it, you need to take into account the volume of the toy and the stand (in my case).
I did a couple of fittings.
The main thing is that when the lid of the jar with a toy is tightly closed, the liquid should be exactly along the edge so that there is no air left in the jar.
It remains to decorate the edges of the jar. I used golden braid and rhinestones to match the color of the braid.
 They were glued on with hot glue. nine0002
The snow globe is ready))
Such snow globes can be not only snow, but also so glamorous with princesses))))
Last year my kids and I made these funny souvenirs.
It is customary to give gifts to each other on New Year's Eve. Usually valuable things are given to relatives, and inexpensive but nice souvenirs are given to friends and acquaintances. Such a present may well be a glass ball. It is filled with a transparent liquid, and inside it is a New Year or winter composition. When the ball is shaken, snow rises from below. Sometimes it magically shimmers in the light with different lights. Such a souvenir is nice to give. And yes, it's easy to do it yourself. nine0003
Materials and tools for work
To work on a souvenir in the form of a glass ball with snow, you will not need so many materials, if you wish, you can find everything in your home:
- It is necessary to choose directly a container made of transparent material, preferably rounded.
 Usually they use jars with lids or wine glasses, as in the case shown in the master class.
 - To create a tight seal, you can take a cap from a jar of cosmetic cream that is suitable in size. nine0018
- Waterproof glue or silicone sealant - for fixing the composition and processing the joint between the lid and the edge of the container.
- Figures for the composition are chosen by the master according to his own desire and taste.
- White plasticine can be used to simulate snow underfoot.
Glitter plays the role of snowflakes flying from the sky. However, you do not have to buy them - you can make sparkles from Christmas tree rain, ordinary foil or candy wrappers. They also decorate the bottom of the lid with sparkles - remember how fabulously the snow flickers under your feet on New Year's Eve? nine0003
You will need scissors to cut the glitter.
Note. Fill the container with distilled water. Experts recommend adding glycerin to the water - then the snow will settle smoothly down. Although the latter is not necessary.
Selection of figurines for composition
Usually for glass balls they use houses, Christmas trees, toy Santa Claus, a snowman. Such figures can be found in a box with Christmas decorations. Only before use, close the hole in the toy. To do this, you can use plasticine or polymer clay. nine0003
You can also make your own figurines. Polymer clay is perfect for this. By the way, the bag with gifts in this composition is just made by hand.
The bag itself is molded first. Then a tie is made from a thin sausage. If a one-color mass is used, then after the figure dries, it is painted. Paints need to be taken waterproof - such will be stained glass paints or nail polish.
Someone uses miniature toys from kinder surprises for composition. This is also an option! Such a souvenir will be especially romantic if the figurine (albeit not New Year's) is associated with some kind of memory. nine0003
And the figurine can also be a symbol of the year, as in this proposed case, for example, a dog. True, the poodle in the original had a circus yellow cap. But as soon as it was painted red with nail polish, a simple toy figurine turned into a New Year's one.
And this is how an interesting composition turned out: instead of Santa Claus - a cute poodle with a whole bag of gifts!
Let's start making a snow globe nine0008 Step 1:
Glue our poodle to the bottom of the lid.
Step 2:
Glue the bag next to it.
This blank should be dried well so that trouble does not happen during assembly.
Step 3:
Spangles can be prepared at this time. This is a rather painstaking and boring business - you need to cut the foil very finely.
nine0008 Step 4:
When the dog and the bag are glued to the bottom of the lid, you can imitate snow with clay by sprinkling it with sparkles.
Step 5:
Pour water into the container (if desired - with the addition of a tablespoon of glycerin), pour sparkles and artificial snow.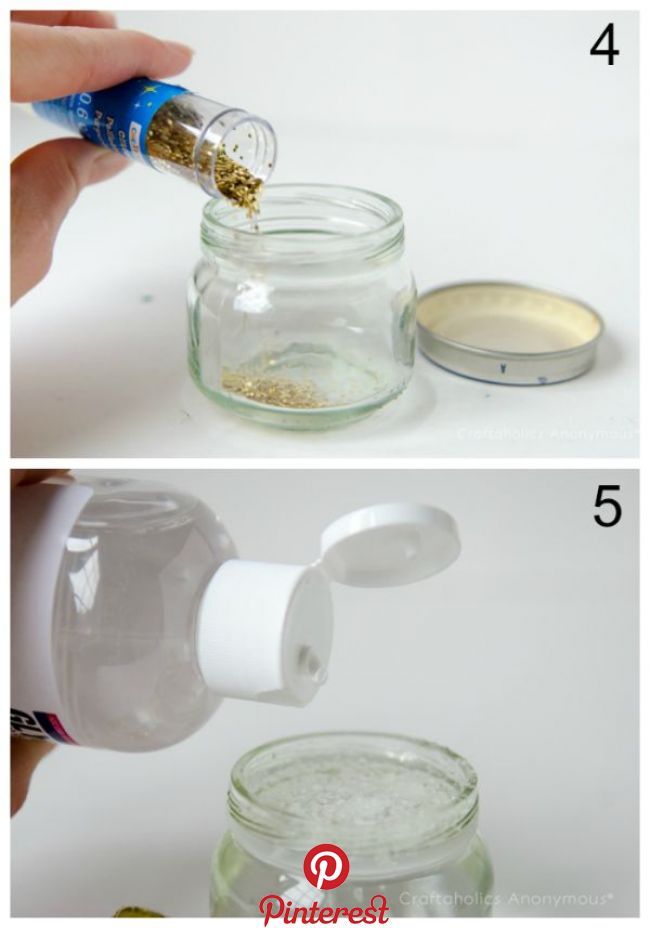
Step 6:
We cover the filled container with a lid with the composition. Keeping in mind the law of Archimedes, it is better to perform this procedure in a bowl or over a sink, since the liquid displaced by the composition will spill out. nine0003
Step 7:
The junction of the lid and container must be smeared with glue or sealant.
DIY snow globe
Snow globe is one of the most popular Christmas gifts in the world. Inside a glass toy, there are usually some figures - snowmen, small Christmas trees, elegant houses or other traditional characters. It is worth shaking this unpretentious composition, as a fairy tale comes to life: artificial snow or sparkles slowly swirl and gradually settle. Such an interesting craft and a memorable gift can be easily made with your own hands and at home. nine0003
How to make a snow globe?
To make snow globe bright, add sparkles, but not too small. If you are not sure about the quality of the sequins, which may contain gold dust instead of small grains, then you can use ordinary tinsel, which is finely cut with ordinary scissors. You can also use artificial snow or beads.
You will also need:
- figurine (any suitable size and which does not dissolve in water, you can even laminated a photo or picture),
- beautiful jar with a well-closing lid (I used half a liter, but even baby food jars can be used, the main thing is to find a figurine of the right size),
- universal adhesive moment,
- liquid glycerin at least 1/3 of the volume of the jar (the amount also depends on how slowly you want the “snow” to fall, the more glycerin, the slower. The main thing is not to overdo it, otherwise the “snow” will hang in the air all the time time), nine0011 water (either filtered, or boiled, or distilled. If you take plain tap water, your snow globe will become cloudy over time),
- glue gun.
If you are decorating a jar or making a decorative coaster, as I did, additionally prepare:
- satin ribbons, decorative twigs, flowers, etc. for decorating a jar,
- cardboard (but not rigid),
- tape,
- scissors, nine0011 self-adhesive film - gold,
- PVA glue,
- dry glitter - gold,
- fine brush,
- and, already listed, a hot glue gun.
So let's get started!
Wash the jar, lid, figurine, and any additional decorations well to prevent the water from becoming cloudy over time. I processed everything with boiling water, as for conservation.
We fix all the decorative elements to the lid with hot glue.
I have already used tinsel, sparkles and beads as an imitation of snow.
I'll tell you how to make a snow globe with sparkles, as there are some subtleties. There are no such problems with tinsel and beads.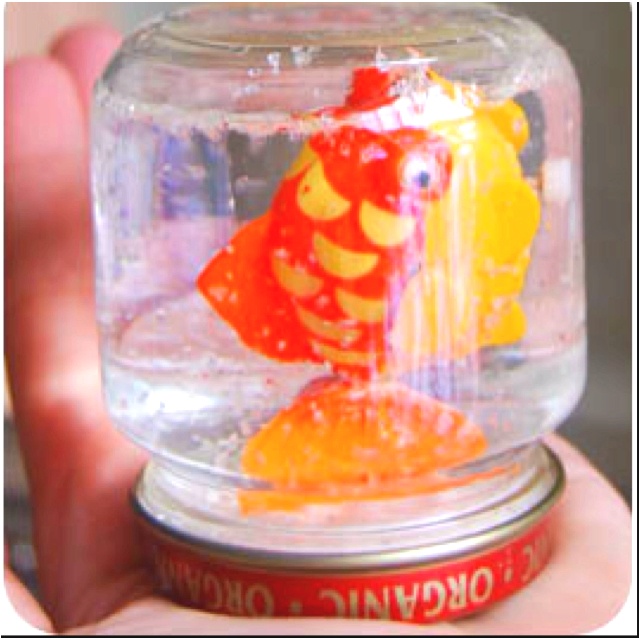
We take a clean jar, in my case half a liter, pour 150-250 ml of glycerin.
Fill the rest with water (we don’t fill the jar to the brim, because we still have room for a figure that will displace a certain amount of water).
Add glitter and mix with a clean spoon. nine0003
Even if the glitter is large, there are particles that do not settle to the bottom of the jar. We must definitely collect them, otherwise they will always float on top, and this, frankly, does not look very good. You can do this with a small spoon or the tip of a clean waffle towel.
Now, very carefully, preferably over a plate, we immerse our composition in a jar, twisting it a little so that there are no air bubbles anywhere. Screw on the lid tightly. You need to try to close so that there are no air bubbles left in the jar. Since we did not glue the lid inside, if necessary, it will be possible to redo it. nine0003
When the cap is screwed on, for insurance, you can go over the joint from above with all-purpose glue (if available, it can be waterproof). There have never been problems with such jars, so the glue, in principle, serves only to fix the lid so that no one accidentally opens it.
Our snow globe is ready! Let's decorate it a little to hide all traces of the lid and jar.
A few strips of cardboard can be used to make a sturdy coaster and cover it with a gold self-adhesive film. The diameter is equal to the diameter of the cap. We decorate with all kinds of ribbons, twigs, it all depends on your desire and imagination! nine0003
I added a little curls of sequins, with their help I hid the thread on the bottom of the jar and all sorts of unnecessary numbers. To do this, dilute 1: 1 water and PVA glue, generously add dry sparkles to this mixture. Curls painted with a regular thin brush.
And here's what I got!
And with flying sparkles…
This magical gift is sure to please both children and adults. Everyone will be mesmerized by the magic behind the glass.