How to make solid food for 4 month baby
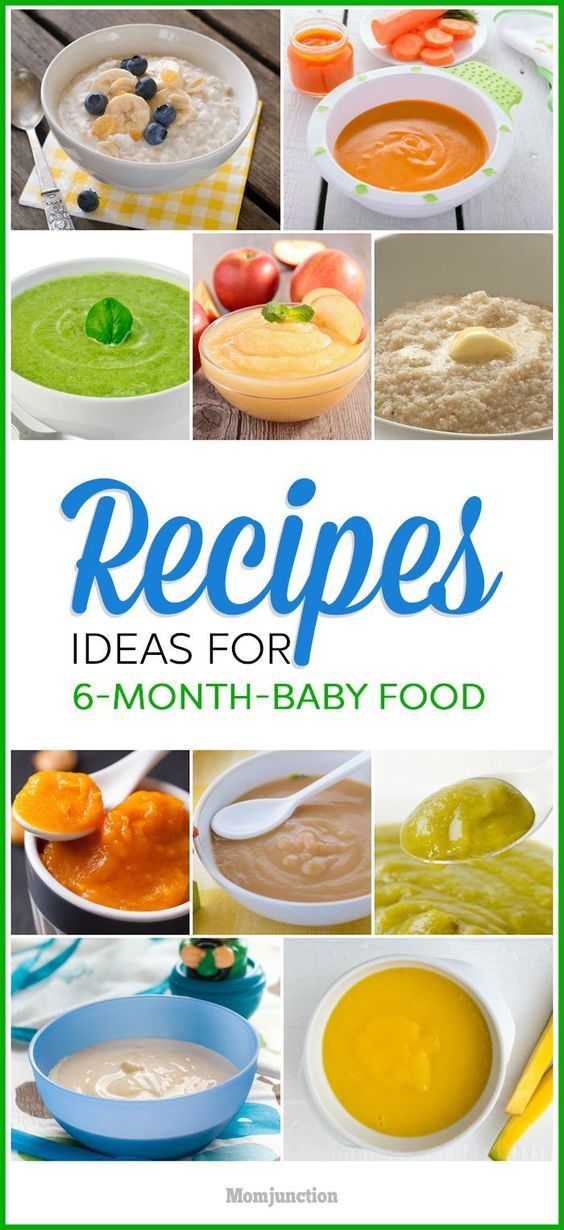
15 Stage One Baby Food Purees (4-6 Months)
Home » Feeding Style » Baby Food Purees » Stage One » 15 Stage One Baby Food Purees
These 15 Stage One Baby Food Recipes will tempt your baby’s taste buds! These simple, homemade baby food recipes are made with nutrient-dense fruits and vegetables with an added pinch of spice that makes these purees out-of-this-world delicious! They’re great for babies 4-6+ months of age!
Medically reviewed and co-written by Jamie Johnson, Registered Dietitian Nutritionist (RDN), and Lauren Braaten, Pediatric Occupational Therapist (OT).
Stage One Baby Food PureesAre you looking to make your baby homemade purees, but don’t know where to start? Does the process intimidate you?
Then you have come to the right place! Here you will find 15 of my all-time favorite starter baby food purees that have been viewed (and made) millions of times by my readers and combined have over 400 5-star reviews!
I would also like to personally welcome you to the wonderful world of baby food, this is a fun (and yummy) club to be in.
Does your baby’s first bite need to be boring?
Of course not!
Baby’s food can (and should be) delicious from the very start!
While it may seem daunting at first, making your own baby food is super easy once you get the hang of it.
And I’m here to walk you through it every step of the way.
First time making homemade baby food? Then I suggest you start this journey by reading my in-depth Guide on How to Make Homemade Baby Food. The detailed guide goes over all the important information such as the best cooking tools to have on hand, safe storage, how to know when baby is ready for solids, how to introduce purees, the best first foods for baby, and so much more! You can also check out my best-selling cookbook for even more information and recipes!
15 Stage One Baby Puree Video
While the recipes themselves are simple, in this video I will show you how to add in a pinch of cinnamon, rosemary, curry, or mint to quickly roasted or steamed fruits and vegetables that enhance their natural flavors.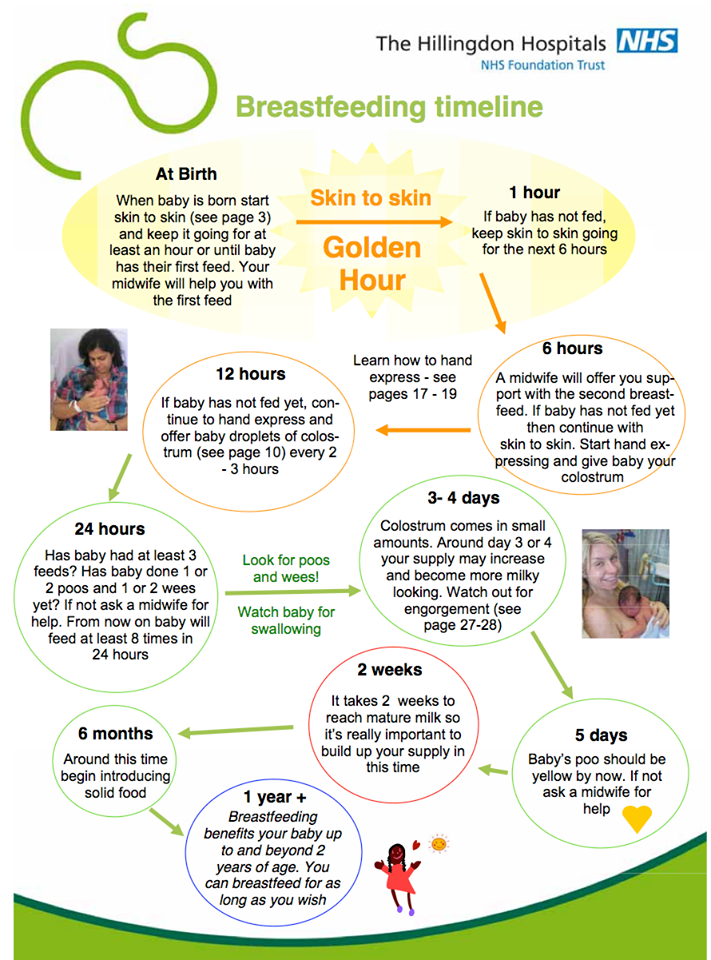 In other words, these are simple purees that I am pretty sure you will want to eat as well!
What is In Each Puree Recipe
After going through this guide, you will want to check out some (or all!) of the homemade baby food recipes below. Each recipe goes into detail about the:
- produce that is in the puree
- benefits of that produce for your baby
- recipe cooking options
- detailed photos and videos with step-by-step instructions
Reminder: The homemade baby food recipes below are made for babies that want to try the most delicious food from the very first bite! 😋
Helpful ToolsLet’s start with a few of my favorite kitchen essentials to make the best homemade baby food purees! These kitchen tools will help make the process of cooking, blending, and freezing baby food hassle-free. You can find a full list of my favorite baby and toddler food making tools in my online Shop.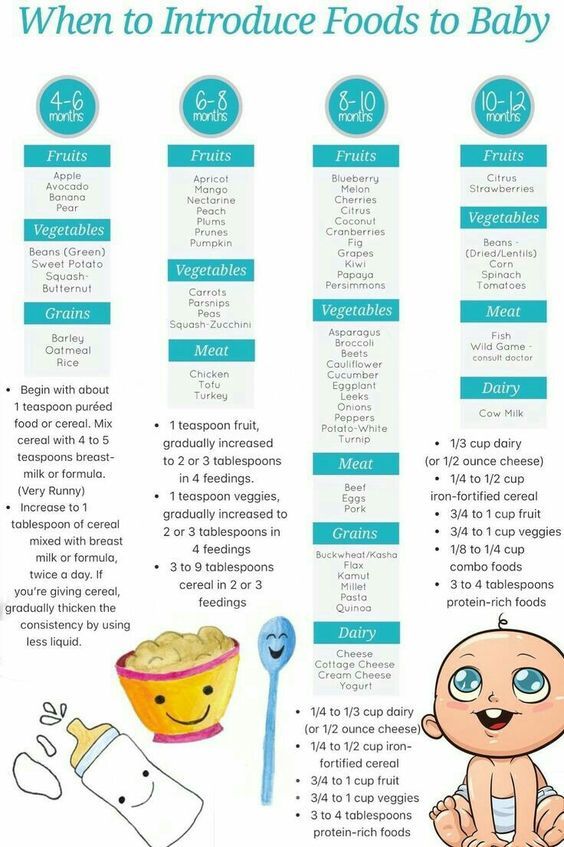
- Blender or Food Processor
- Freezer Storage Tray
- Fridge Storage Containers
- Stasher Bag
- Baking Sheet
- Steamer Basket
- Medium Saucepan
- Reusable Pouches
- High Chair
- Suction Bowl and Spoon Set
- Bib with Food Catcher
Learning Resources: looking for the best high chair, cups or spoons for your baby? Then we’ve got you covered! Here you will find How to Find the Best High Chair for Baby, an easy guide on Best First Open Cups for Baby (plus 4 tips when introducing a cup) as well as 3 Tips on How To Spoon Feed Baby (plus – our favorite spoons for purees or BLW).
Frequently Asked QuestionsCan babies have spices in their food?
Yes, yes, yes! Babies can absolutely have spices mixed into their purees from the very first bite.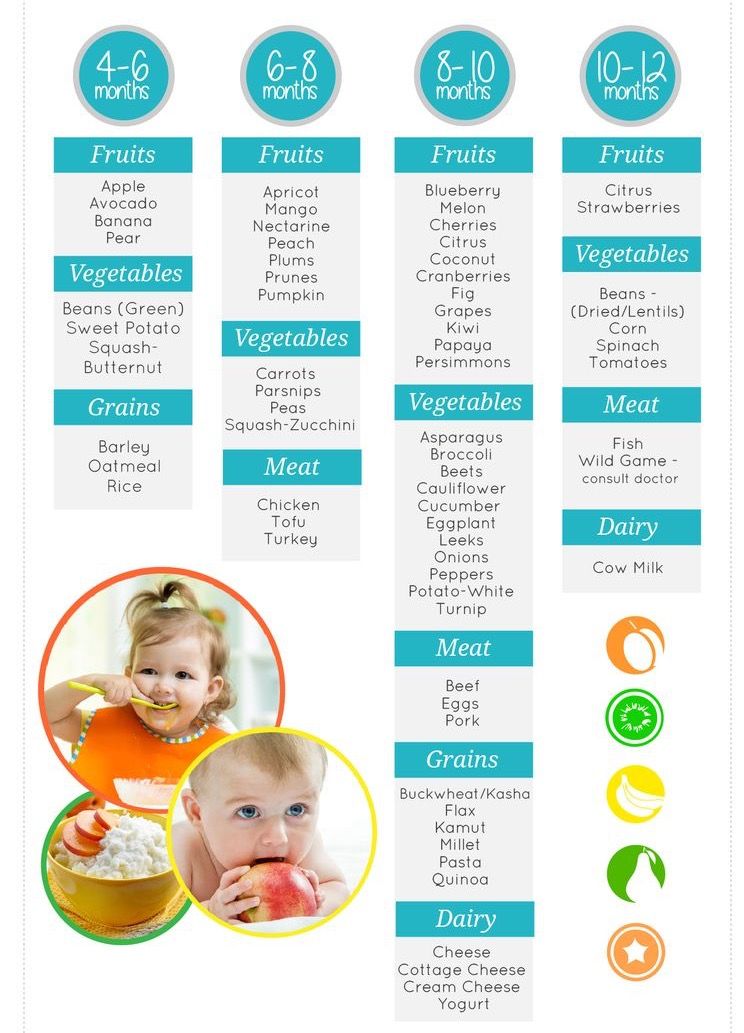 Adding a pinch of spice or herbs to a baby’s food makes it taste better and gives the food additional medicinal properties. Read more here. But as I always say — you do you! If you don’t want to add spices to your baby’s food, you can certainly leave them out. Don’t worry, I give instructions on each recipe card for both.
What about allergies? Can spices cause an allergic reaction?
My rule of thumb is that unless there is an immediate family member that has a true allergy to a certain spice or food, then introducing your baby to spices at the same time as new food is completely acceptable. Spice and herb allergies in babies and adults are very rare. But remember, it’s always recommended to keep an eye on your baby when introducing any new food or spices.
At what age should I start my baby on baby food purees?
When a baby can start on solid foods is determined by their own rate of development, which generally comes between 4-6 months of age. Some of the developmental milestones babies need to reach to start solids include: if your baby has solid control of their head and neck, if your baby has doubled in weight, and if your baby is reaching for or opening their mouth when you eat (see my guide here). Before you start your baby on purees, you should consult with your pediatrician to make sure your child is developmentally ready for solids.
All of our baby food recipes are designed to enhance the natural taste of the fruits and veggies while keeping as many nutrients intact as possible. In other words, the goal is to make a puree that’s both healthy and delectable.
There are several ways you can cook baby food purees, but the main techniques I use are:
- Steaming
- Roasting
- Simmering
- Raw
Keep in mind, that as long as the produce is cooked until soft, that there isn’t a right or wrong way to cook it for baby food.
If a recipe for broccoli calls for steaming but you want to roast it because you will already be roasting some broccoli for yourself for dinner, then go ahead and roast the broccoli for your baby’s puree. Play around and have some fun with it!
Adding Spices to Baby PureesIt’s encouraged that you can serve your baby a homemade puree with a pinch of spices or herbs from the very first bite.
Benefits of Spices
- boost and compliment any fruit or vegetable puree
- broaden baby’s emerging palate
- add more flavor and depth into their foods
- decrease picky eating in the years to come
- have medicinal properties in them — they can help with digestive issues, boost brain functions, repair muscle tissues, and so on.
While each puree recipe on this site has a selection of spices or herbs that complement the flavors of the fruit or vegetable in the puree, it’s up to you if you want to add them. You do you! Either way, the puree recipes on this site will be delicious.
Top Spices to Add to Baby’s Puree
- Cinnamon
- Cloves
- Nutmeg
- Basil
- Mint
- Parsley
- Mild Curry Powder
- Fresh Lemon Juice
- Garlic
- Rosemary
Every recipe below has specific instructions on how to store that particular puree, but these are the general guidelines.
How to Freeze Baby FoodYour freezer is about to become your new best friend, allowing you to keep several weeks’ worth of baby purees at the ready. Whenever you make a puree, put several ounces in the fridge for your little one to enjoy that week, then freeze the rest of the batch for your baby to eat at a later date. Please make sure you get it in the puree into the fridge or freezer within 1 hour of cooking to prevent bacteria growth.
- Make a puree.
- Let it cool slightly.
- Transfer the puree to freezer trays or freezer jars.
- Cover the freezer trays with a lid or plastic wrap.
- Label with date and name of puree.
- Place the tray in the freezer.
- Let it freeze for at least 5 hours.
- Take the tray out of the freezer.
- Crack the purees out of the trays.
- Place the frozen purees into zip-lock baggies or stasher bags.
How to Store Baby Food
Purees can be stored for up to four days in an airtight container in the fridge or 4 months in the freezer.
How to Thaw Baby Food
Thawing may seem like a no-brainer, but it never hurts to know your options. There are three different ways to thaw purees.
Microwave- Take the frozen puree cubes that you want to serve out of your freezer.
- Place them in a glass microwave-safe container.
- Microwave in 20-second increments, stirring every time.
- The puree is ready when it is just warm to your touch.

- Grab two clean spoons, one for you and one for your baby, and test your puree before serving.
Heating Tip: To prevent the microwave from unevenly heating the puree, which can leave it with cold and really hot spots and can burn your baby’s mouth, make sure you stir between each interval and taste test it before serving to your baby.
Refrigerator
This one takes the longest time, but it is an excellent alternative to using a microwave.
- Take the frozen puree cubes you want to serve out of your freezer.
- Place the cubes in an air-tight glass container.
- Place the container in the fridge and let the cubes thaw for 8 to 12 hours, usually overnight.
- Do not leave the puree in the container to thaw on the counter or anywhere out of the fridge, as bacteria will start to grow at a rapid rate — which is definitely not recommended.
- Note that the puree will be cold but thawed. So if your baby likes their puree warmed, you’ll have to finish the job using the microwave or stovetop method.
- In a small saucepan, add the frozen puree cubes you want to serve to your baby.
- Over medium-low heat, gently cook the puree until warm, stirring occasionally.
Thawing Tip: Some infants like their puree cold, warm, or really warm, and some will eat it no matter the temperature. You will get to know your baby’s personal preferences as the two of you bond over food.
Feeding Tips
- Make sure baby is showing readiness signs for eating – good control of their head and trunk, sitting with minimal assistance, bringing hands or toys to their mouth, and appearing interested in your food when you’re eating.
- Follow your baby’s lead – when feeding purees from a spoon, sometimes there’s a tendency to keep offering bites past the point of your baby being full. Always follow your baby’s cues for when they are done eating. Turning away from the spoon, closing her mouth, or pushing food away are all signs that your baby is finished with the meal.
- Throwing spoons – is a common phase that all babies go through at one point or another. One of the best ways to handle spoon throwing is to ignore it and keep feeding your baby as usual (with an extra spoon you already have at the table). If your baby ends up also throwing back up spoons #2 AND #3, simply encourage your baby to eat with their hands until they appear to be finished with the meal.
Top Rated Baby Food Purees
Pea Baby Puree (Stage One)
4.91 stars (84 ratings)
A delicious way to introduce peas to baby. Mild peas paired with a fresh hint of mint – a mouth-watering combo!
Get the recipe
Apples Baby Food Puree
4.76 stars (57 ratings)
This Apple Baby Puree recipe is a wonderful first food for baby! A delicious nutrient-dense puree that baby will go gaga over!
Get the recipe
The Best Sweet Potato Baby Food
5 stars (56 ratings)
This Homemade Sweet Potato with Curry Baby Food Puree is a fun and exotic first puree for baby! Great for 4+ months and is completely freezer-friendly!
Get the recipe
Broccoli Baby Food
4. 81 stars (72 ratings)
This Broccoli Baby Food with olive oil recipe is a great way to introduce healthy green vegetables into your baby's diet. A delicious puree full of essential vitamins and healthy fats for growing baby
Get the recipe
Oatmeal for Babies (Stage One)
5 stars (40 ratings)
This Oatmeal Recipe for Baby is made with simple nutrient-dense ingredients in less than 10 minutes, and it's perfect for baby's first bite or added into their favorite fruit or veggie puree. Great for 4+ months and up.
Get the recipe
Avocado for Baby – Puree & BLW
5 stars (16 ratings)
Avocados are a superfood and great first food for babies 6 months and up. Serve them pureed, smashed, or as a finger food for baby-led weaning.
Get the recipe
WeeSprout Baby Food Freezer Tray
My all-time favorite freezer tray! Individual servings pop out easily. The hard plastic lid snaps on with ease and allows for convenient stacking of freezer trays. Dishwasher safe!
View Product
Butternut Squash Baby Food
5 stars (30 ratings)
This homemade Roasted Butternut Squash Baby Food Puree not only contains calcium, folate, vitamins A and C and fiber but it is also a deliciously smooth way to introduce butternut squash to your baby!
Get the recipe
Green Bean Baby Food
5 stars (35 ratings)
Green beans are steamed until just tender, this puree has a mild taste for baby's palette.
Get the recipe
Creamy Mango-licious Baby Food Puree
4.87 stars (29 ratings)
This 5-minute Mango Baby Food Puree is a great way to introduce baby to the magical taste of one of the world's healthiest fruits – MANGOS!
Get the recipe
Pear Baby Puree (Stage One)
5 stars (19 ratings)
This smooth and creamy homemade Pear Baby Puree is a wonderful first puree for baby – easy on the taste buds and great for their growing bodies!
Get the recipe
Peach Baby Puree (Stage One)
5 stars (16 ratings)
Smooth and creamy, this homemade Peach Baby Puree delivers big on taste with naturally sweetened peaches and flecks of vanilla bean.
Get the recipe
Basic Chicken Baby Food
4.42 stars (198 ratings)
This homemade Basic Chicken Baby Food is a great puree to add to any of your baby’s favorite fruit or veggie purees. Great for extra protein and flavor!
Get the recipe
Homemade Baby Rice Cereal
4.88 stars (49 ratings)
Using only 1-ingredient, this Homemade Baby Rice Cereal is a simple and easy recipe to make baby!
Get the recipe
Red Pepper Baby Puree
4.88 stars (33 ratings)
This Red Pepper Baby Puree recipe is a smooth, creamy and naturally sweet puree that is loaded with vitamin A, B6 and C. Great for 4+ months and older (or stage 1 puree).
Get the recipe
More Baby Fooe Purees
- Strawberry Baby Puree
- Blueberry Baby Puree
- Pumpkin Baby Puree
- Rasberry Baby Food
- Banana Puree
- Homemade Quinoa Baby Cereal
Or watch the shortened video here.
Pea Baby Food Puree
- 2 cups peas, fresh or frozen
- 1 medium zucchini, roughly chopped (optional)
- 4 mint leaves, roughly chopped (optional)
Sweet Potato Baby Food Puree
- 2 large sweet potatoes
- 1/4 tsp mild curry powder (optional)
- 1/4-1 cup liquid, (water, fresh breast milk, formula or sodium-free chicken stock) for pureeing
Roasted Banana Puree
- 4 bananas, cut lengthwise
- 1/8 tsp fresh rosemary, finely chopped (optional)
Carrot Baby Food Puree
- 2 pounds carrots, trimmed, peeled and roughly chopped
- 1/4 tsp nutmeg (optional)
- 1/2-1 cup liquid, (water, reserved water, fresh breast milk, formula or low-sodium stock) for pureeing
Apples Baby Food Puree
- 6 apples, peeled, cored and chopped
- 1/2 cup water
- 1/4 tsp cinnamon (optional)
Broccoli Baby Food Puree
- 2 cups broccoli, chopped into small florets
- 1 small white potato, apple or pear, peeled and roughly chopped, roughly 1/2 cup (optional)
- 1 tbsp good quality olive oil (optional)
Butternut Squash Baby Puree
- 1 butternut squash
- 1 tsp fresh thyme, roughly chopped (optional)
- 1-2 tsp olive oil (optional)
- 1/2-1 cup liquid (water, fresh breast milk, formula, low or no-sodium stock or bone broth), for pureeing
Green Bean Baby Food Puree
- 1 pound green beans, fresh or frozen, trimmed
- 1 big pinch fresh basil, cilantro or parsley, finely chopped (optional)
Creamy Mango-licious Baby Food Puree
- 2 cups fresh or frozen mango, deseed, peeled and roughly chopped.
 If using frozen mangos, thaw first
 - 1 medium banana (optional)
- 1 pinch nutmeg (optional)
Pear Baby Food Puree
- 6 pears, peeled and roughly chopped
- 1/8 tsp cardamom or cinnamon (optional)
- 1/4 cup water
Peach Baby Puree
- 3 fresh peaches or 12oz frozen peaches, do not thaw frozen peaches – use frozen
- 1/4 cup water
- 1/2 tsp vanilla bean pod (optional)
- 1 pinch pinch nutmeg (optional)
Basic Chicken Baby Puree
- 1 8-ounce boneless skinless chicken breast or thighs, cubed
- 1 cups chicken or veggie stock, low-sodium or sodium-free
- 1 tsp dried parsley (optional)
Homemade Baby Rice Cereal
- 1 cup brown rice, I prefer organic short grain
- 2 cups water for cooking
- 1-2 cups of liquid for blending, (water, fresh breastmilk or formula)
Red Pepper Baby Puree
- 2 red bell peppers, deseeded and roughly chopped
- 1/2 cup white potato, apple or pear, peeled and roughly chopped
Oatmeal for Babies
- 2 cup water
- 1 cup old fashioned oats
- 1/2 tsp chia seeds (optional)
- 1/2 tsp hemp seeds (optional)
Avocado for Baby
- 1/4 avocado
- 1 tsp breast milk, formula or water
Pea Baby Food Puree
In a medium saucepan, bring 2″ of water to a boil over medium heat.
 Place the zucchini in a steamer basket, and place over boiling water. Cover and steam for 5 minutes.
Add in the peas, and steam for an additional 3-5 minutes. Reserve steamer water. Let cool slightly.
Add the zucchini, peas and mint leaves to a blender or food processor and puree for 1 minute or until you have achieved the desired texture. If the puree is too thick, add in 1/4 cup of the reserved steamer water until you have the right consistency.
Note on Zucchini: while this is a 2 vegetable starter puree, zucchini allergies are very low, so I added it to this recipe to give the peas a mild taste and smoother texture. You can completely leave them out if you prefer. Just steam the peas as directed.
Sweet Potato Baby Food Puree
Heat oven to 400°. Line baking sheet with tin foil, parchment paper or a silicone mat.
Wash and dry the sweet potatoes.
 Prick with a fork in several places and then place the sweet potatoes on the baking sheet. Bake for 45 minutes – 1 hour or until a fork can easily prick the sweet potato. Let sit until cool to touch.
Make a cut into the skin of the potato lengthwise and peel away the skin of the potato. Scoop out the sweet potato meat and place into a blender or food processor, adding in the mild curry powder and water.
Puree on high for 1-2 minutes or until smooth, adding in additional liquid in 1/4 cup increments if needed. I had to add in 1 cup of water to the puree pictured. Serve or freeze for a later meal.
Additional Spices: Feel free to use the following spices instead of the curry – 1/2 tsp of cumin, 1/4 tsp of nutmeg, 1/2 tsp of cloves, 1 fresh garlic clove, 1/2 tsp of chopped fresh thyme, 3-4 basil leaves, 1/2 tsp chopped rosemary or even a big pinch of fresh ginger or 1/2 tsp ginger powder.
 Or you can leave out the spices altogether.
Roasted Banana Baby Puree
Heat oven to 325 degrees F. Line baking sheet with parchment paper.
Place bananas on a baking sheet and roast for 10-12 minutes or until golden brown. Let cool slightly.
Place bananas and rosemary into a blender or food processor and puree for 1-2 minutes or until completely smooth. You may need to add additional water, so start by adding in 1/4 cup increments until you get the desired consistency.
Additional Spices: This recipe is also great with 1 tsp cinnamon, 1/2 tsp cloves, 1/2 tsp nutmeg, or for a fun twist, 1/2 tsp mild curry.
Note on Bananas: while any ripeness of bananas will work, I have found that the bananas that are ripe to very ripe tend to work best in this recipe.
Carrot Baby Food Puree
In a medium saucepan, bring 2″ of water to a boil over medium heat.
Place the carrots into a steamer basket, cover and cook for 9-11 minutes or until tender. Reserve steamer water. Let cool slightly.
Place the carrots, nutmeg and 1/2 cup of liquid into a blender or food processor and puree for 1-2 minutes on high, adding 1/4 cup liquid at a time until you achieve the desired consistency. Serve and enjoy, or freeze for later.
Notes on Nutmeg: adding in spices to babies first purees are completely optional, but totally safe. Nutmeg rounds out the acidic taste carrots sometimes have and make this puree taste grounded and full-bodied.
Additional Spices: Feel free to substitute 1/2 tsp ginger powder or 1/4 fresh ginger, 1/2 tsp mild curry powder, 1/4 tsp cloves, 1/2 tsp finely minced fresh chives or 1/2 garlic clove instead of the nutmeg.
Apples Baby Food Puree
In a medium saucepan, place the apples, water and cinnamon.
 Cover and heat on medium-low for 15-20 minutes or until apples are tender. Let cool slightly.
Transfer all of the ingredients into a blender or food processor and blend for 1-2 minutes or until completely smooth. For a chunky puree, quickly pulse the ingredients 10-15 times or until you receive your desired consistency. Serve or freeze for later.
Additional Spices: Feel free to sub in these spices instead of the cinnamon for this recipe – 1/8 tsp of cloves, 1/8 tsp of nutmeg, 1-2 leaves of fresh mint, 1-2 leaves of fresh basil, a pinch of fresh or 1/4 tsp of ginger powder or even 1/4 of coriander for a fun twist.
Apples: you can use any sweet apple in this recipe – Gala, Honeycrisp, Fuji, McIntosh, etc.
Broccoli Baby Food Puree
In a medium saucepan, bring 2 inches of water to a boil over medium heat. Place the broccoli and potato (or apple/pear) into a steamer basket and place over boiling water, cover and steam for 10-12 minutes or until the broccoli and potato are tender.
 Reserve water from the steamer. Let cool slightly.
Add the broccoli, potato and olive oil into a blender or food processor and puree until smooth, adding the reserved water from the steamer basket in 1/4 cup increments if needed.
Adding In Spices: Feel free to add in 1 tsp of chopped chives, 2-3 mint leaves, 1 tsp of chopped cilantro, 1/2 tsp cumin or a squeeze of fresh lemon juice.
Butternut Squash Baby Puree
Heat oven to 450 degrees F. Line baking sheet with a silicone mat, tin foil or parchment paper.
Cut butternut squash in half, deseed and place flesh side up, skin side down. Optional – Feel free to drizzle the squash with 1-2 teaspoons of olive oil for some added healthy fat.
Bake for 45 minutes or until you can easily prick the squash with a fork. Let cool until you can handle the squash with your hands.
Scrape off the skin and discard. Place the butternut squash into a blender or food processor. Add thyme and puree for 1-2 minutes, adding water in 1/4 cup increments until you have your desired consistency. I had to add 3/4 cup of water to my puree shown below.
Additional Spices: Feel free to sub the thyme for 4 basil leaves, 1 tsp chopped rosemary, 1 tsp ginger powder, or 1 big pinch of fresh ginger, 1/2 teaspoon nutmeg, or even 1/2 tsp of coriander.
Green Bean Baby Food Puree
Fill a medium saucepan with 2” of water and bring to boil over medium heat. Place the green beans (fresh or frozen) into a steamer basket over the boiling water, cover, and cook for 10 minutes or until tender. Let cool slightly. Reserve steamer water.
Transfer the green beans and herb to a blender or food processor and puree for 1-2 minutes or until smooth, adding reserved steamer water in 1/4 cup increments if needed until you reach your desired consistency.
Adding Spices: you can add a big pinch of roughly chopped basil, cilantro, mint, parsley, or chives to this puree before blending.
Creamy Mango-licious Baby Food Puree
Place the mango, banana and nutmeg (if using) into a blender or food processor. Puree for 1 minute or until completely smooth. If your mango is not ripe enough, you might need to add in up to 1/4 cup of water while blending to get the right consistency. Serve or freeze for later.
Mango Tip: I usually find that organic frozen mangos are easier and cheaper to find than fresh organic mangos, but if mangos are in season when you are making this recipe, by all means, you can use fresh over frozen. For fresh mangos, simply peel and chop.
Pear Baby Food Puree
In a medium saucepan, place the pears, cardamon and water, cover and heat on medium-low heat for 10-15 minutes, or until tender.
 Let cool slightly.
Using a slotted spoon, scoop the pears out of the saucepan, leaving water behind, and into a blender or food processor. Blend for 1-2 minutes until you have your desired consistency. If your pear puree is too thick, add the leftover cooking water in 1/4 cup increments.
Peach Baby Puree
If using fresh peaches, peel, pit and slice the peaches. If using the fresh vanilla bean pod, cut in half and then slice open lengthwise. Take the back of your knife or spoon and scrape out all of the vanilla bean, reserve.
In a medium saucepan, add the peaches and water, cook over medium-low heat for 5 minutes (fresh peaches) – 10 minutes (frozen peaches). Right before the peaches are done cooking, add in the vanilla and nutmeg (or any other spices you prefer) and stir until incorporated—Cook for 1 more minute.
Using a slotted spoon, transfer the peaches to a blender or food processor, leaving all excess water in the saucepan.
 You do not want to add any additional liquids, or the puree might be too thin. Starting on low and increasing to high speed, puree the peaches until smooth and creamy. Serve to baby or freeze for later.
Basic Chicken Baby Puree
In a medium saucepan, bring the cubed chicken, broth, and parsley to a boil over medium heat. Turn the heat down to low and simmer, covered, for 15 minutes or until chicken is just cooked through. Let cool slightly.
Using a slotted spoon, transfer the chicken to a blender or food processor, leaving the broth in the saucepan. Reserve the broth.
Starting on low and working your way up to high-speed, puree the chicken until you reach your desired consistency, adding in broth in 1/4 cup increments if needed. I had to add in just 1/4 cup of broth to get the consistency seen in this photo.
Extra Healthy Fat: For some extra healthy fat, this puree is also wonderful, with a teaspoon of grass-fed butter (salt-free) added to the blender right before pureeing.
Homemade Baby Rice Cereal
IMPORTANT STEP: Place the rice in a fine-mesh colander and rinse with water until the water runs clear.
Transfer the rice to a medium saucepan and add 2 cups of water. Bring to a boil over high heat, then reduce heat to low, cover with a lid and simmer for 35-45 minutes or until the rice is tender and the water is evaporated. Each batch of rice cooks a little differently, so taste at 35 minutes to see if the rice is tender. Remove the saucepan from the heat and let rest for 10 minutes, covered. If using fresh breast milk or formula for blending, I would remove the lid and let the rice cool for 15 minutes.
Place the rice into a blender or food processor and add 1/2 cup of liquid of choice. Blend for 1-2 minutes on medium-high speed until completely smooth and creamy, adding in the additional liquid in 1/4 cup increments, if needed, until you have your desired consistency.
Red Pepper Baby Puree
In a medium saucepan, bring 2″ of water to a boil.
If using a potato: place it in a steamer basket and steam for 10 minutes before adding peppers, and cooking for another 5-7 minutes.
If using pear or apple: add in the red peppers and apple or pear and steam for 5-7 minutes or until tender. Reserve steamer water. Let cool slightly.
Add in all of the ingredients into a blender or food processor and puree for 1 minute or until completely smooth, adding in a tablespoon of water at a time if needed.
Oatmeal for Babies
In a medium saucepan, bring 2 cups of water to a boil. Add in 1 cup of old-fashioned oats along with the chia seeds, hemp seeds and any spices you are using. Turn down the heat to medium-low and cook the oats for 5 minutes, stirring occasionally, or until all of the water is gone and the oats are soft. Let cool slightly.
Transfer the oats to a blender or food processor and puree for 1-2 minutes, adding water in 1/4 cup increments if needed, until completely smooth.
 I had to add 1/2 cup of water to my oatmeal. You will want the oat cereal to be on the thinner side, so it doesn't become sticky. The oats will continue to absorb liquid as they cool, so you can add more water, fresh breast milk, or formula as needed. Serve to baby or freeze for later.
 Type of Oats: This recipe is for old-fashioned oats: for steel-cut or instant oats, read the full post.
Adding Spices: you can add a big pinch of cinnamon or pumpkin pie spice mix or a smaller pinch of nutmeg or cloves to these oats before blending.
Chia and Hemp Seeds: are added for a nutritional boost, but you can add or omit them if you prefer. You can get both of these at any health food store or online here (chia/hemp).
Avocado for Baby
Age: 4-6 months and up
Yield: roughly 15-25 ounces, depending on the recipe
Freezer Tray
Bumkins Baby Bowl
Blender
Saucepan
Did you make this recipe?
Tag @babyfoode on Instagram and hashtag it #babyfoode!
Pin <em>Recipe</em> Email <em>a Friend</em>
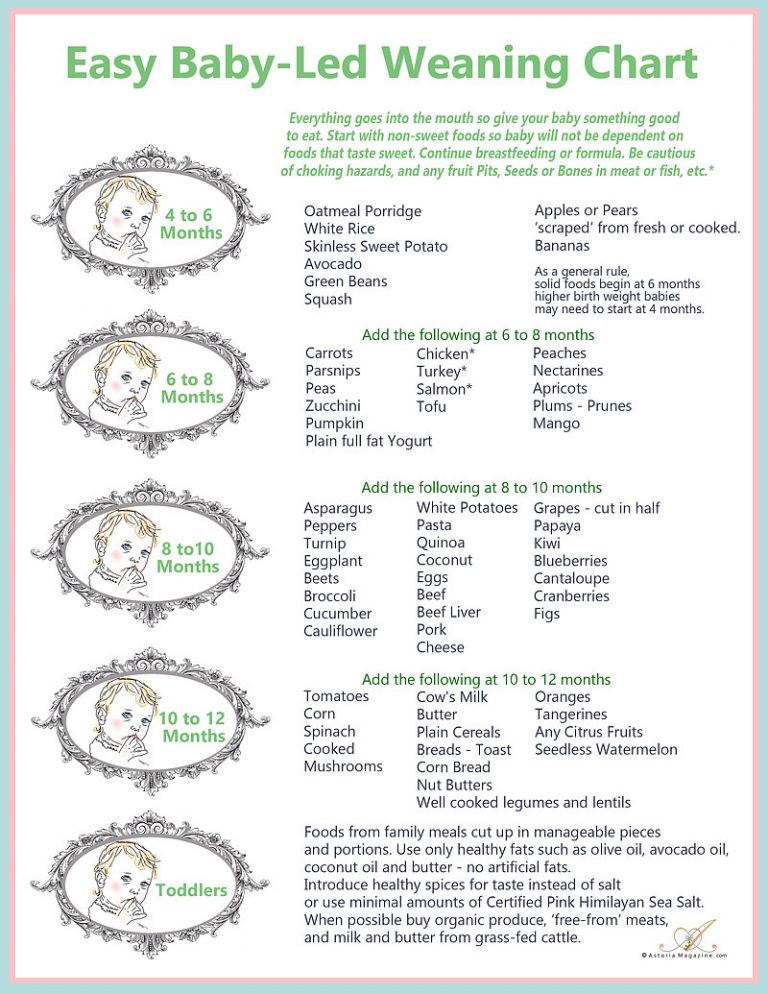
Stage 1 Homemade Baby Food Recipes for Baby 4 to 6 Months and older.
Stage One Baby Foods – Commonly Offered Stage 1 Baby Foods:
Stage 1 Fruits:
Apples | Avocados | Apricots | Bananas | Mango | Nectarines & Peaches | Papaya | Pears | Plums & Prunes | Pumpkin
Stage 1 Veggies:
Beans (Green) | Carrots | Peas | Sweet Potato | Squash
Stage 1 Grains:
Rice | Oatmeal | Barley
What is a “Stage 1” baby food?
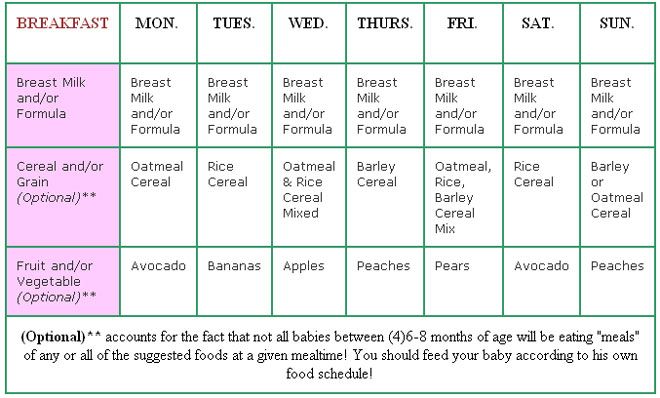
(4) 6-8 Months –
Baby Let’s Begin to Eat“Baby” cereal and soft cooked thinly pureed fruits and veggies should be baby’s first solid food experiences. Single ingredients only and at a space of 4 days apart with introducing each new food. You may skip the cereal and begin with a fruit like avocado or begin with a veggie like butternut squash or sweet potato.
Stage 1 Baby Food is a term that applies to baby foods that are highly pureed and strained. These foods are appropriate for babies who are just being introduced to solid foods. The foods in this range are targeted to babies who are between the ages of (4) 6 to 8 months old.
Stage 1 baby foods are thin and runny and are foods that are the lowest on the allergy scale. Stage 1 baby foods are typically those foods that are also more easily digested by a tiny tummy. Some of these foods include, sweet potatoes, butternut or winter squash and carrots. The term “Stage 1” was introduced by the Beechnut Baby Food Company to let parents know that these foods are appropriate for their infants who are just being introduced to solid foods.
There is a growing trend of parents skipping “stage 1” foods that are thin and runny purees. Many parents are turning to a more baby-led weaning approach and are offering soft cooked small bits of age-appropriate foods as they begin to introduce solid foods. Your baby might just be interested in this feeding approach!
Stage 1 Homemade Baby Food Recipes – Cereal, Fruits & Veggies
Rice Cereal- 1/4 c. rice powder (brown rice ground in blender or food processor)
- 1 cup water
Step 1: Bring liquid to boil in saucepan. Add the rice powder while stirring constantly.
Step 2: Simmer for 10 minutes, whisking constantly, mix in formula or breast milk and fruits if desired
Step 3: Serve warm.
Oatmeal Cereal
- 1/4 c. of ground oats (do NOT use instant or Quick Cook), ground in blender or food processor
- 3/4 c.
 water
water
Step 1: Bring liquid to boil in saucepan. Add the rice powder while stirring constantly.
Step 2: Simmer for 10 minutes, whisking constantly, mix in formula or breast milk and fruits if desired
Step 3: Serve warm.
Barley Cereal
- 1/4 c. ground barley (barley ground in blender or food processor)
- 1 cup water
Step 1: Bring liquid to a boil. Add the barley and simmer for 10 minutes, whisking constantly
Step 2: Mix in formula or breast milk or juice and add fruits if desired
Step 3: Serve warm
Did you know that baby’s first food does not have to be a commercial infant rice cereal? Many pediatric resources are acknowledging the fact that avocado, banana and sweet potato make great first foods for baby. For More Information About Homemade Baby Cereal, visit Our Homemade Baby Cereal FAQ
Feeding Baby Stage 1 Baby Foods
Start out slowly, preparing a tablespoon sized portion of whatever food you have chosen to begin with. Some parents begin offering their babies solid foods by using their (clean and washed) finger as a spoon. They say that this helps their babies take to solid foods because the “new” spoon and the “new” food all at once seem to confuse baby.
You will probably only manage to have baby eat 1/2 of the tablespoon sized portion the very first times you begin solids. Don’t fret if your baby does not “finish” a meal.
Apricot Puree 6-8 months+ (using dried un-sulphured apricots)
Vitamins: A, C, Folate
Minerals: Potassium, Phosphorus, Calcium
- 1 pound dried apricots
- 2 cups of white grape juice, pear or apple juice. Plain water is ok but the puree may be a bit bitter.
Step 1: Bring liquid and fruit to a boil and simmer for 15 minutes.
Step 2: Reserve any left over liquid to use for the puree
Step 3: Place into your choice of appliance for pureeing and begin pureeing.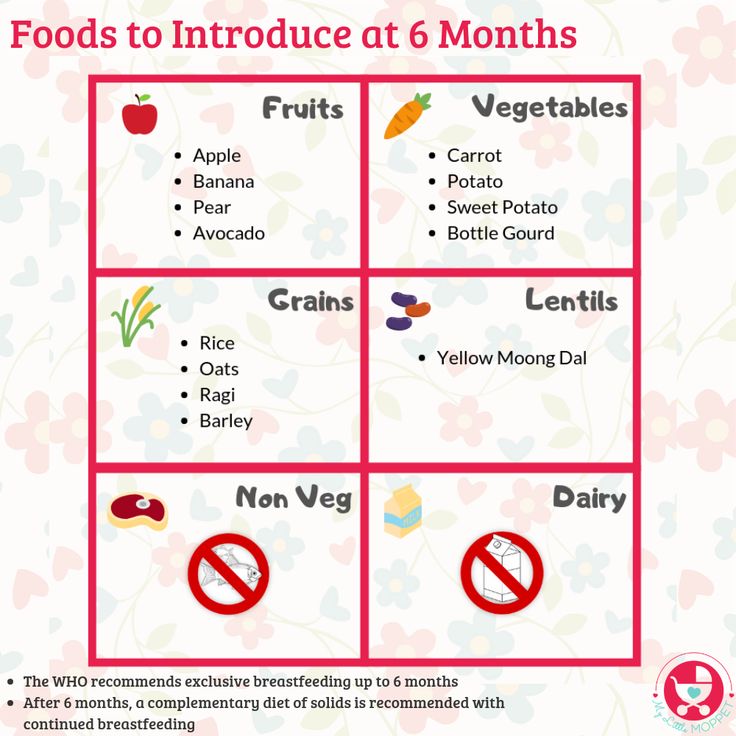
Step 4: Add the reserved liquid as necessary to achieve a smooth, thin puree or
Step 5: Add cereal (if desired) to thicken up
Step 6: Note: puree will not freeze solid, but into slightly soft/slightly frozen cubes.
Have you ever Baked Fruits? If not, I highly recommend it. Baked fruits are naturally sweet, soft and oh so very yummy.
Apples/Applesauce (4)6 months+ Try Gala, Braeburn, Rome or Macs)
Vitamins: A, C, Folate
Minerals: Potassium, Magnesium, Calcium
This recipe is written so that you may use any amount of apples you wish.
Step 1: Peel, core and cut apple into slices/chunks
Step 2: Place slices or chunks into a pan with just enough water to slightly cover apples
Step 3: Boil/steam until tender; be sure to check on the water level and stir, T hat’s It. Easy Peasy.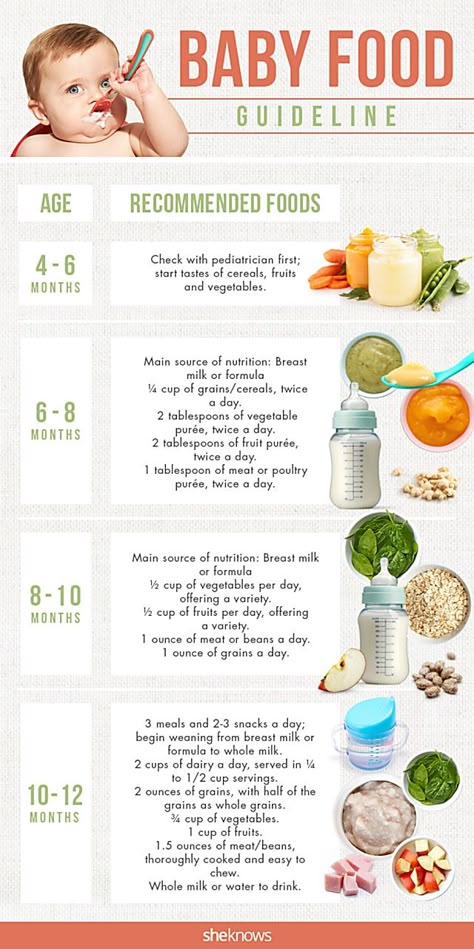
Step 4: Apples may be mashed with a potato masher to achieve a smooth applesauce consistency. If your masher will not achieve a puree type of consistency, then follow steps 5 – 7
Step 5: Reserve any left over water to use for thinning out the apples
Step 6: Place into your choice of appliance for pureeing and begin pureeing.
Step 7: Add the reserved water as necessary to achieve a smooth, thin puree
Step 8: Add cereal (if desired) to thicken up the
Step 9: Ask your pediatrician about adding some cinnamon for new tastes.
You may also buy an “Adult” jar of Natural applesauce from your local grocers. Make sure you buy Natural Applesauce however. Read the labels if you are unsure. The only ingredients should be apples and water or just apples. A few companies may add ascorbic acid (vitamin C) or citric acid to their Natural Applesauce; this is fine.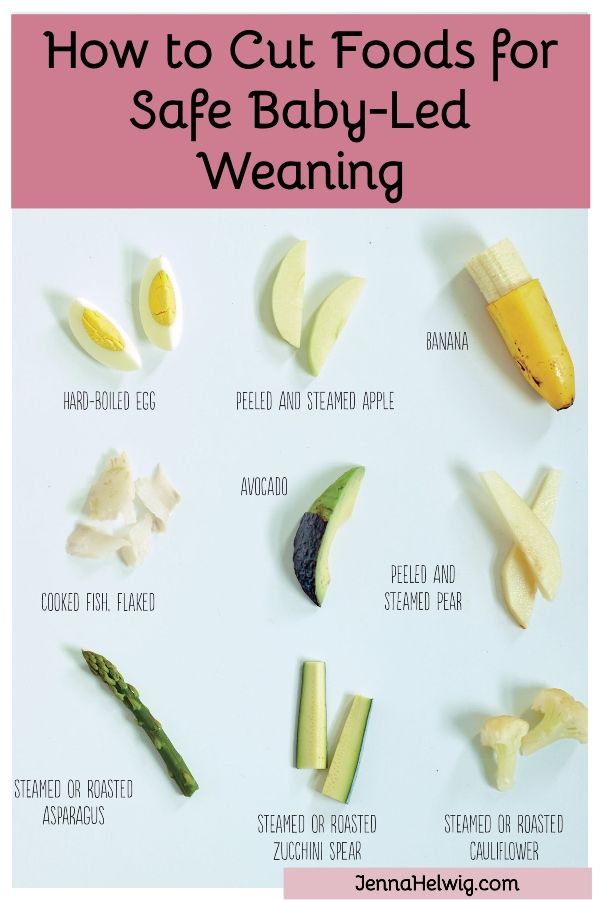
Avocado (yes, avocado is a fruit.) (4)6 months+
Vitamins: A, C, Niacin, Folate
Minerals: Potassium, Phosphorus, Iron, Magnesium, Calcium
Step 1: Peel and take out the pit of a ripe avocado – do not cook
Step 2: Cut “meat” out and mash with a fork
Step 3: There should be no need to use a machine as just like bananas, avocados have a very soft consistency and texture. Avocados do not need to be cooked.
Visit the Avocado Baby Food page for more recipes and Information
Baked Apples 6-8 months+
Step 1: Core apple and leave peel on
Step 2: Place a wee bit of butter (if baby is ready for or has had dairy) on the inside of the cored apple (sprinkle a bit of cinnamon in the apple if your desire and if baby is ready for or has had cinnamon)
Step 3: Place in a pan with just enough water to slightly cover apples – about an inch of water
Step 4: Bake in a 400-degree oven for 30 minutes or until tender; be sure to check on the water level.
Step 5: Once baked, either cut apple into little bits and serve as a finger food or mash as directed above in the Apples/Applesauce recipe.
Banana Applesauce Mush (4)6 months+
- 1 apple
- 1 ripe banana
Step 1: Peel, core and cut apple into slices/chunks
Step 2: Place slices or chunks into a pan with just enough water to slightly cover apples
Step 3: Boil until tender; be sure to check on the water level.
Step 4: Apples may be mashed with a potato masher to achieve a smooth applesauce consistency or you can puree in an appliance as shown above
Step 5: Peel a ripe banana and mash in a bowl with a fork (heating in the microwave for approximately 20 seconds will soften the banana up if needed)
Step 6: Add applesauce to the banana and sprinkle with wheat germ* or crushed cheerios*
Step 7: Puree if necessary but mashing with a potato masher will typically get this mix smooth
*8 months+
Back to Top
Bananas (4)6 months+
Vitamins: A, C, Folate
Minerals: Potassium, Phosphorus, Selenium, Magnesium, Calcium
- 1 Banana or however many you wish
Step 1: Peel ripe banana – do not cook
Step 2: Place banana in a food processor/food mill or blender and puree
Step 3: You can also mash the banana in a bowl using a regular fork – heat in microwave for 25 seconds prior to mashing for extra softness
Step 4: Add formula/breast milk or water to thin or add cereal (if desired) to thicken up.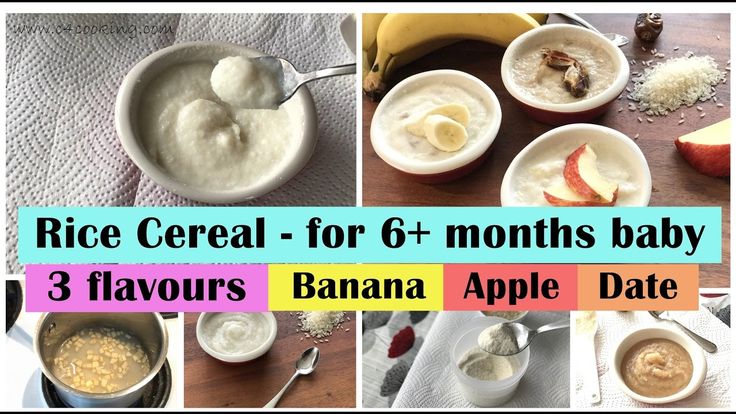
Mango Madness 6-8months+
Vitamins: A (1262 IU in one cup), C, E, K, Folate
Minerals: Potassium, Phosphorus, Magnesium, Calcium, Sodium
- 1 Ripe Mango
Step 1: Peel, de- seed and chunk the mango
Step 2: Place mango chunks in a blender or food processor
Step 3: Add Formula, Breast Milk, or Water and blend or mash until the proper consistency for your Infant is achieved.
How to Cut A Mango:
Cut the mango lengthwise, along the side of the mango pit. You will be cutting off its flesh from one side then repeating the same process on the other side. You will then cut the ends off the mango pit.
Cut the remaining flesh from the pit. Use a small sharp knife peel the skin from the flesh. Dice or cube as desired. It is easier to make your cubes/dices prior to removing the skin. Make sure you don’t cut through it. Once you have made your cube/dice “pattern” simply turn the skin skin inside out and slice the pieces away.
*Mango does not need to be cooked as it is typically introduced at an age where baby can tolerate raw fruits. Mango may be steamed to tender and then mashed if you prefer without harming it.
You may use mango as a great Baby Finger Foods. Simply peel, de-seed and then cut into dices or chunks that are manageable for your baby. You may wish to coat the mango pieces with “cheerio dust”, wheat germ or another cereal “dust” to help baby easily pick up the bits.
Papaya 6-8months+
Vitamins: A, C, Folate
Minerals: Potassium, Calcium
- 1 ripe papaya
Step 1: Peel, de-seed and chunk the papaya
Step 2: Place papaya chunks in a blender or food processor
Step 3: Add formula, breast milk, or water and blend or mash until the proper consistency for your Infant is achieved.
Some parents who have infants with sensitive tummies will give fruits a gentle steaming to help break down the sugars and fibers for easier digestion.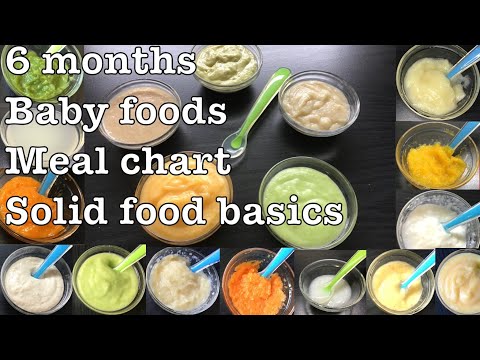 If you feel this is the case for your infant, chunk the papaya and then steam for 5-10 minutes until very soft.
Pears, Plums, Peaches and Nectarines too
Pear (Great for Constipation.) (4)6 months+Vitamins: A, C, Folate
Minerals: Potassium, Phosphorus, Magnesium, Calcium
Step 1: Peel and cut into chunks so as to avoid the little seed portion.
Step 2: Steam gently until tender if baby is under 6 months.
Step 3: Place in a blender/food processor and puree until smooth; you may be able to just use a fork!
Step 4: Use the leftover cooking water if needed but Pears tend to be very runny and watery without adding liquid.
Step 5: Add some baby cereal to thicken if needed.
Plums (4)6-8 months+
Vitamins: A, C, Folate
Minerals: Potassium, Phosphorus, Magnesium, Calcium
- 2-3 ripe plums
Step 1: Peel and pit the plums
Step 2: Cut into chunks
Step 3: Steam until tender in a scant amount of water if baby is under 6 months.
Step 4: Puree using the leftover cooking liquid.
You may need to mix in another fruit as plum purée has a tendency to be rather tart and/or bitter
Peaches (4)6-8 months+
Vitamins: A, C, Folate
Minerals: Potassium, Phosphorus, Magnesium, Calcium
You may steam or bake peaches; these methods work for nectarines, plums and pears as well. I HIGHLY recommend giving baked peaches a try at least once. You will find they are more tasty when baked.
Steam Peaches – Method 1
Step 1: Scrub fruit clean and carve an X into 1 side of the fruit
Step 2: Place X side down in a pan with an inch of water
Step 3: Bring water to a boil and steam until soft and tender
Step 4: Peel skin from fruit and remove pits and/or seeds
Step 5: Move to step #6 below
Steam Peaches – Method 2
Step 1: Peel fruit
Step 2: Pit the peach
Step 3: Cut the peach into dices
Step 4: Steam until soft and tender then
Step 5: Move to step #6 below
Bake
Step 1: Halve the fruit and place “open” side down in a pan filled with 1 inch of water
Step 2: Bake at 400F until soft and tender and/or puckering of the skin appears.
Step 3: Peel skin from fruit and remove pits and/or seeds then
Step 4: move to step #6
Step 5: Reserve any left over water to use for thinning out the fruits
Step 6: Peel off skin then place into your choice of appliance for pureeing and begin pureeing.
Step 7: Add the reserved water as necessary to achieve a smooth, thin puree
Step 8: Add cereal (if desired) to thicken up.
Back to Top
Prunes 6-8 months+
Vitamins: A, C, Folate
Minerals: Potassium, Phosphorus, Magnesium, Calcium
- 1 small bag of dried prunes (try to use unsulphured dried fruits whenever possible!)
Step 1: Soak dried prunes in warm water until they plump up or steam gently.
Step 2: Once plump and tender, toss into food processor or blender and begin to puree.
Step 3: Add liquid without sparing any. Prunes tend to become a pasty gluey consistency when pureed and the more water you add, the easier it is to puree to a texture your baby will tolerate.
Pumpkin (4)6-8months+
Read more about Pumpkin on the Pumpkin Baby Food page
Vitamins: A (12230 IU in 1 cup.), C, K, Folate, Niacin
Minerals: Potassium, Phosphorus, Magnesium, Calcium, Iron
- 1 medium sugar pumpkin, no heavier than 5 pounds
Step 1: Cut sugar pumpkin (the kind meant to be baked and eaten.) in half, scoop out seeds
Step 2: Place an inch of water in a baking pan, then place the halves “face” down in the pan. Check on water level while baking
Step 3: Bake in a 400 degree oven for 40 minutes or until the “shell/skin” puckers and halves feel soft then scoop squash “meat” out of the shell
Step 4: Place pumpkin “meat” into your choice of appliance for pureeing and begin pureeing.
Step 5: Add water as necessary to achieve a smooth, thin consistency.
Step 6: You can also peel the pumpkin, scoop out the seeds and then cut into chunks and boil/steam until tender (like when boiling potatoes for mashed potatoes) then follow steps 4 and 5.
You may also buy a can of pumpkin from your local grocers. Make sure you buy Pumpkin and NOT Pumpkin Pie mix however. Read the labels if you are unsure. The only ingredients should be pumpkin and water or just pumpkin. You do not need to cook canned pumpkin. You may thin the pumpkin with whatever liquid you prefer and then serve or warm and serve. You may also freeze canned pumpkin in ice cube trays if you wish.
Green Beans (4) 6 months+
(this method may be used for Peas as well)*
Vitamins A, C, K, Niacin, Folate
Minerals:Potassium, Sodium, Phosphorus, Iron, Magnesium, Calcium
Step 1: If using Fresh Beans, snap the ends off the beans and wash the beans. If using Fresh Peas, open the pods and scrape out the peas from the pod. If using frozen of either Peas or Green Beans, cook according to package directions.
Step 2: Place fresh beans into a steamer basket in a pan with a just enough water to slightly show through in the basket.
Step 3: Steam until very tender; be sure to check on the water level.
Step 4: Reserve any left over water to use for thinning out the beans.
Step 5: Place into your choice of appliance for pureeing and begin pureeing. It is best to use the setting that makes the finest liquid purees – green bean and pea skins are rather difficult to completely puree.
***Using a blender rather than a food processor or stick mixer might be better as well. ***
6. Add the reserved water as necessary to achieve a smooth, thin consistency
7. You may wish to push the green beans (or peas) through a sieve or mesh strainer to get rid of any remaining skins.
Carrots* 6-8 months+
Vitamins A (19,152 IU), C, Folate
Minerals:Potassium, Sodium, Phosphorous, Iron, Magnesium, Calcium
Step 1: Peel carrots and cut into small chunks
Step 2: Place chunks into a steamer pan with just enough water visible through the steamer basket
Step 3: Steam until tender
Step 4: Do not reserve any left over water to use for thinning out the carrots if baby is under 8 months old as Nitrates may seep into the cooking water
Step 5: Place into your choice of appliance for pureeing and begin pureeing.
Step 6: Add water as necessary to achieve a smooth, thin consistency
*(See Our article on Nitrates)
Garden Vegetable Combo
6-8 months+ after all vegetables have been introduced following the 4 Day Wait Rule
Green Beans, Summer Squash, Peas and Carrots
Step 1: Combine fresh or frozen green beans and peas, summer and/or zucchini squash and small pieces of chopped carrots.
Step 2: Add enough water to just cover the vegetables.
Step 3: Cook until tender, reserving water.
Step 4: Puree vegetables in blender or food processor,
Step 5: Adding reserved water from the vegetables until mixture is of the desired consistency.
Peas
Vitamins A (4533 IU), C, Niacin, Folate
Minerals: Potassium, Sodium, Selenium, Phosphorous, Iron, Magnesium, Calcium, Zinc
Step 1: If using Fresh Peas, open the pods and scrape out the peas from the pod. If using frozen type of either Peas or Green Beans, cook according to package directions.
Step 2: Place fresh peas into a steamer basket in a pan with a just enough water to slightly show through in the basket.
Step 3: Steam until very tender; be sure to check on the water level.
Step 4: Reserve any left over water to use for thinning out the peas.
Step 5: Place into your choice of appliance for pureeing and begin pureeing. It is best to use the setting that makes the finest liquid purees – green bean and pea skins are rather difficult to completely puree. Using a blender rather than a food processor or stick mixer might be better as well.
Step 6: Add the reserved water as necessary to achieve a smooth, thin consistency
Step 7: You may wish to push the peas (or green beans) through a sieve or mesh strainer to get rid of any remaining skins
Why can’t I get peas and green beans to puree smooth?
If you are using a Food Processor, try the Blender. The Blender seems to work the best for getting Peas into a more fine puree. Peas and green beans are very hard to get pureed into a very fine, smooth consistency. You can put them in a strainer and work out the “skins” if using fresh or you can use frozen for a smoother consistency and minimal effort to work out the “skins”.
Another method for getting beans and peas smoother is to immediately plunge them into ice cold water once you remove them from the stove top. Once cooled, puree as usual.
You may also use beans/legumes (kidney beans, lentils, split peas etc..) if your doctor says it is OK for baby’s age.
Please keep in mind that you will never be able to achieve the consistency equal to that of the baby food that comes in jars. Some parents choose to leave green beans and peas for later introduction, when baby enjoys texture and is able to eat them as Baby Finger Foods
Squash (Winter – Butternut, Acorn, Hubbard) (4) 6 months+
(nutrient info for squash of all types may be found at the Squash for Baby page)
- 1 medium sized butternut or acorn squash
Step 1: Cut acorn, hubbard, or butternut squash in half, scoop out seeds
Step 2: Place an inch of water in a baking pan, then place squash halves “face” down
in the pan. Check on water level while baking
Step 3: Bake in a 400 degree oven for 40 minutes or until the “shell/skin” puckers and halves feel soft then scoop squash “meat” out of the shell
Step 4: Place squash “meat” into your choice of appliance for pureeing and begin pureeing.
Step 5: Add water as necessary to achieve a smooth, thin consistency.
Step 6: You can also peel the squash, scoop out the seeds and then cut into chunks and boil/steam until tender (like when boiling potatoes for mashed potatoes) then follow steps 4 and 5
Squash (Summer/Zucchini) 6-8 months+
nutrient info for squash of all types may be found at the “Tips on Squash” page
- 3-4 small to medium sized yellow squash or zucchini
Step 1: Choose yellow squash or zucchini that are somewhat small in diameter, as these are the most tender.
Step 2: Wash squash thoroughly and cut into small slices or chunks. Do not remove skins.
*You may remove skins however an infant over the age of 8 months old should be able to digest squash puree with skins on
Step 3: Steam until tender then place into your choice of appliance for pureeing and begin pureeing.
Step 4: Add water as necessary to achieve a smooth, thin consistency
Yams/Sweet Potato (4)6 months+
Learn why a Yam really is NOT a Yam
Vitamins A (24,877 mg ), C, Folate
Minerals:Potassium, Sodium, Selenium, Phosphorous, Magnesium, Calcium
Step 1: Wash and poke holes in sweet potato with fork then wrap sweet potatoes in tin foil – do not peel for baking/microwaving (you can also do this in the microwave – only use plastic wrap and cook for 8 minutes on high or until tender).
Step 2: Place in a 400 degree oven and bake for 30 minutes or until soft
OR
Step 1: Peel sweet potatoes and cut into small chunks
Step 2: Place chunks into a pan with just enough water to slightly cover potato
Step 3: “Steam” boil until tender, be sure to check on the water level.
Step 4: Reserve any left over water to use for thinning out the sweet potatoes
Step 5: If you have baked your sweet potato, remove skins and use liquid from your preferred source
Step 6: Place sweet potato into your choice of appliance for pureeing and begin pureeing.
Step 7: Add the reserved water or other liquid as necessary to achieve a smooth, thin consistency
Remember, always consult with your pediatrician regarding introducing solid foods to your baby and specifically discuss any foods that may pose allergy risks for your baby.
These Stage 1 Homemade Baby Food Recipes are age appropriate for those babies who are between 4 and 6 months of age. Many babies start solid foods between 4 months and 6 months. Stage One fruits and veggies we have included are foods that your 4 month old baby who is a beginning eater will be able to tolerate. Of course, these recipes are also just yummy for babies who are older as well!
SHARE ON FACEBOOK SHARE ON PINTEREST
Diet for a 4-6 month old baby
Your baby is already 4 months old. He has noticeably grown up, become more active, is interested in objects that fall into his field of vision, carefully examines and reaches for them. The emotional reactions of the child have become much richer: he joyfully smiles at all the people whom he often sees more and more often, makes various sounds.
You are still breastfeeding your baby or have had to switch to mixed or formula feeding. The child is actively growing, and only with breast milk or infant formula, he can no longer always get all the necessary nutrients. And that means it's time to think about complementary foods. nine0003
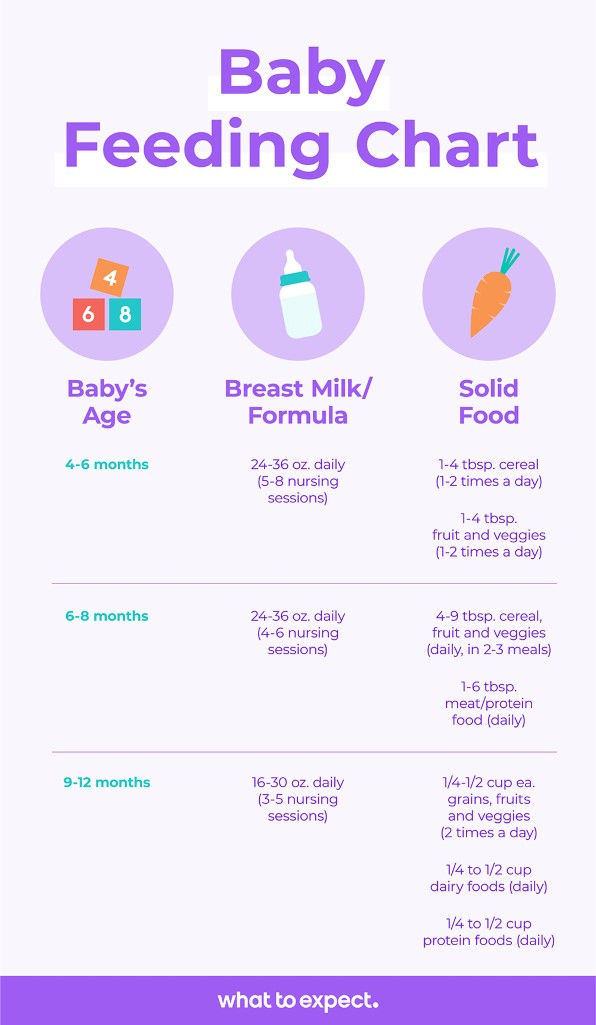
The optimal time to start its introduction is between 4 and 6 months, regardless of whether the baby is receiving breast milk or formula. This is the time when children respond best to new foods. Up to 4 months, the child is not yet ready to perceive and digest any other food. And with the late introduction of complementary foods - after 6 months, children already have significant deficiencies of individual nutrients and, first of all, micronutrients (minerals, vitamins, long-chain polyunsaturated fatty acids, etc.). In addition, toddlers at this age often refuse new foods, they have delayed development of chewing skills for thick foods, and inadequate eating habits are formed. It is important to know that, no matter how strange it may seem at first glance, with a delayed appointment of complementary foods, allergic reactions more often occur on them. nine0003
When is it advisable to introduce complementary foods as early as 4 months, and when can you wait until 5.5 or even 6 months? To resolve this issue, be sure to consult a pediatrician.
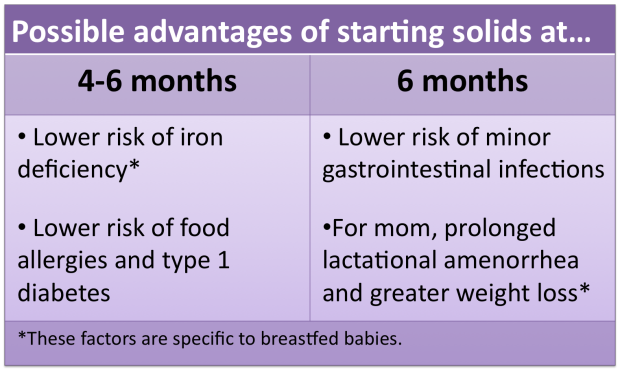
As a rule, at an earlier age (4 - 4.5 months), complementary foods are introduced to children at risk of developing iron deficiency anemia, as well as children with insufficient weight gain and with functional digestive disorders.
The optimal time to start complementary foods for a healthy baby is between 5 and 5.5 months of age. nine0003
The World Health Organization recommends that breastfed babies should be introduced to complementary foods from 6 months of age. From the point of view of domestic pediatricians, which is based on extensive practical experience and scientific research, this is possible only in cases where the child was born on time, without malnutrition (since in these cases the mineral reserves are very small), he is healthy, grows well and develops. In addition, the mother should also be healthy, eat well and use either specialized enriched foods for pregnant and lactating women, or vitamin and mineral complexes in courses. Such restrictions are associated with the depletion of iron stores even in a completely healthy child by 5-5.5 months of age and a significant increase in the risk of anemia in the absence of complementary foods rich or fortified with iron. There are other deficits as well.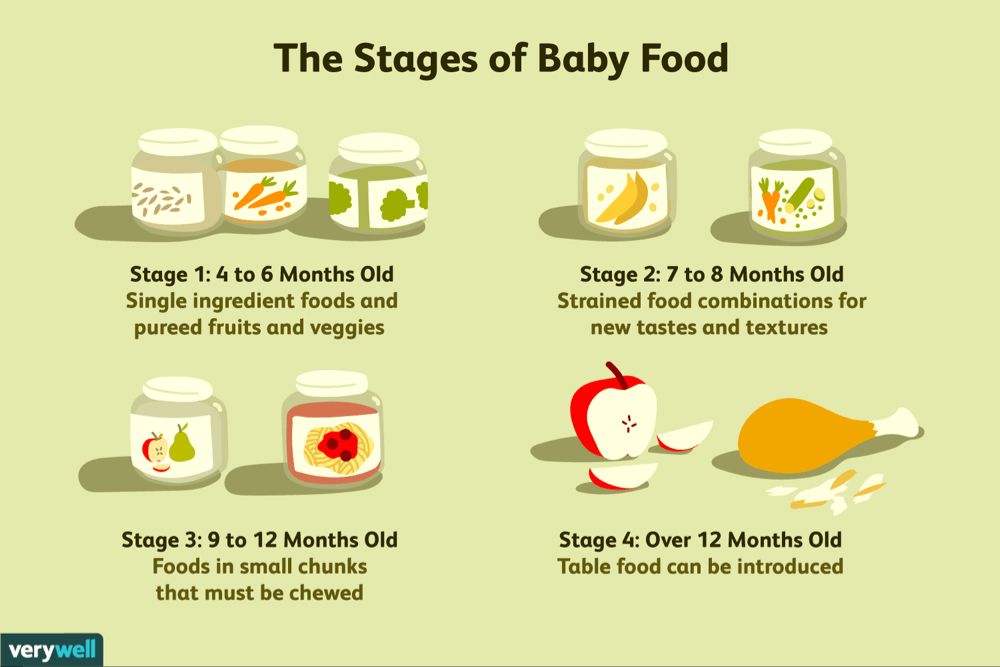 nine0003
The first complementary food can be vegetable puree or porridge, fruit puree is better to give the baby later - after tasty sweet fruits, children usually eat vegetable puree and cereals worse, often refuse them altogether.
Where is the best place to start? In cases where the child has a tendency to constipation or he puts on weight too quickly, preference should be given to vegetables. With a high probability of developing anemia, unstable stools and small weight gains - from baby cereals enriched with micronutrients. And if you started introducing complementary foods with cereals, then the second product will be vegetables and vice versa. nine0003
If the first complementary food is introduced at 6 months, it must be baby porridge enriched with iron and other minerals and vitamins, the intake of which with breast milk is no longer enough.
Another important complementary food product is mashed meat. It contains iron, which is easily absorbed. And adding meat to vegetables improves the absorption of iron from them. It is advisable to introduce meat puree to a child at the age of 6 months. Only the daily use of children's enriched porridge and meat puree can satisfy the needs of babies in iron, zinc and other micronutrients. nine0003
But it is better to introduce juices later, when the child already receives the main complementary foods - vegetables, cereals, meat and fruits. After all, complementary foods are needed so that the baby receives all the substances necessary for growth and development, and there are very few in their juices, including vitamins and minerals.
Juices should not be given between feedings, but after the child has eaten porridge or vegetables with meat puree, as well as for an afternoon snack. The habit of drinking juice between meals leads to frequent snacking in the future, a love of sweets is instilled, children have more tooth decay and an increased risk of obesity. nine0003
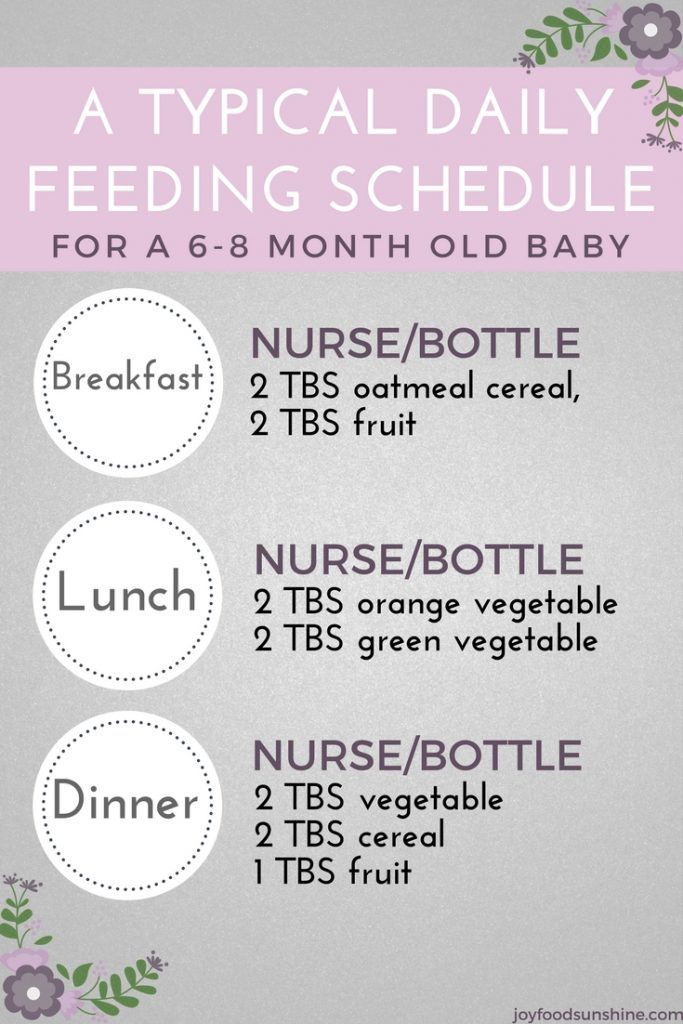
With the start of the introduction of complementary foods, the child is gradually transferred to a 5-time feeding regimen.
Rules for the introduction of complementary foods:
- preference should be given to baby products of industrial production, they are made from environmentally friendly raw materials, have a guaranteed composition and degree of grinding
- Complementary foods should be offered to the baby by spoon at the start of feeding, before breastfeeding (formula feeding)
- the volume of the product increases gradually, starting with ½ - 1 spoon, and in 7 - 10 days we bring it to the age norm, subsequent products within the same group (cereals from other cereals or new vegetables)
- can be entered faster, in 5 - 7 days
- start introduction with monocomponent products
- it is undesirable to give a new product in the afternoon, it is important to follow how the child reacts to it
- do not introduce new products in the event of acute illnesses, as well as before and immediately after prophylactic vaccination (should be abstained for several days)
When introducing a new type of complementary food, first try one product, gradually increasing its amount, and then gradually “dilute” this product with a new one. For example, vegetable complementary foods can be started with a teaspoon of zucchini puree. During the week, give the baby only this product, gradually increasing its volume. After a week, add a teaspoon of mashed broccoli or cauliflower to the zucchini puree and continue to increase the total volume every day. Vegetable puree from three types of vegetables will be optimal. The portion should correspond to the age norm. Over time, you can replace the introduced vegetables with others faster. nine0003
After the introduction of one vegetable (bringing its volume to the required amount), you can proceed to the intake of porridge, and diversify the vegetable diet later.
If the child did not like the dish, for example, broccoli, do not give up and continue to offer this vegetable in a small amount - 1-2 spoons daily, you can not even once, but 2-3 times before meals, and after 7 - 10, and sometimes 15 days, the baby will get used to the new taste. This diversifies the diet, will help to form the right taste habits in the baby. nine0003
Spoon-feeding should be done with patience and care. Forced feeding is unacceptable!
In the diet of healthy children, porridge is usually introduced after vegetables (with the exception of healthy breastfed children, when complementary foods are introduced from 6 months). It is better to start with dairy-free gluten-free cereals - buckwheat, corn, rice. At the same time, it is important to use porridge for baby food of industrial production, which contains a complex of vitamins and minerals. In addition, it is already ready for use, you just need to dilute it with breast milk or the mixture that the baby receives. nine0003
Children suffering from food allergies are introduced complementary foods at 5-5.5 months. The rules for the introduction of products are the same as for healthy children, in all cases it is introduced slowly and begins with hypoallergenic products. Be sure to take into account individual tolerance. The difference is only in the correction of the diet, taking into account the identified allergens. From meat products, preference should first be given to mashed turkey and rabbit.
Diets for different age periods
Explain how you can make a diet, it is better to use a few examples that will help you navigate in compiling a menu specifically for your child.
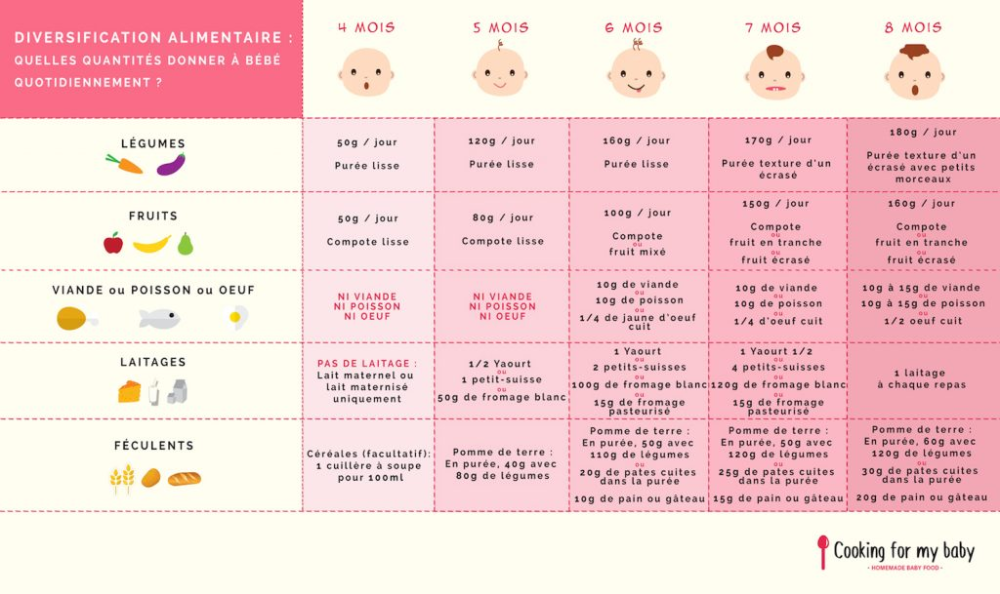
From 5 months, the volume of one feeding is on average 200 ml.
Option 1.
If your baby started receiving complementary foods from 4-5 months, then at 6 months his diet should look like this:
| I feeding 6 hours | Breast milk or VHI* | 200 ml |
| II feeding 10 hours | Dairy-free porridge** Supplementation with breast milk or VHI* | 150 g 50 ml |
| III feeding 14 hours | Vegetable puree Meat puree Vegetable oil Supplemental breast milk or VHI* | 150 g 5 - 30 g 1 tsp 30 ml |
| IV feeding 18 hours | Fruit puree Breast milk or VHI* | 60 g 140 ml |
| V feeding 22 hours | Breast milk or VHI* | 200 ml |
* - infant formula
** - diluted with breast milk or VHI
Option 2.
* - infant formula Option 3. : ** - diluted with breast milk Up to 7 months, increase the volume of porridge and vegetable puree to 150 g and introduce fruit puree. The materials were prepared by the staff of the Healthy and Sick Child Nutrition Laboratory of the National Research Center for Children's Health of the Ministry of Health of Russia and are based on the recommendations given in the National Program for Optimizing the Feeding of Children in the First Year of Life in the Russian Federation, approved at the XV Congress of Pediatricians of Russia (02.2009d.) It is well known that the ideal time to introduce complementary foods is between 4 and 6 months of age. The presence of a child's teeth or the ability to sit are not signs of a child's readiness for complementary foods. It is important that the baby does not have a reflex of pushing the spoon with his tongue, and he can swallow food thicker than breast milk or formula well. The pediatrician will help determine the exact start date for complementary foods, and in most cases this is the golden mean of 5-5. The first product of complementary foods, regardless of the age and type of feeding of the baby (breast or artificial), should be energy-intensive foods: either porridge or vegetable puree. Mashed vegetables can be the first meal of the day if a child is prone to constipation, when it is better to choose zucchini, which can have a mild laxative effect on the child's stool. Starting from the 4-5th day of the introduction of vegetable puree, vegetable oil can be gradually added to it (up to 5 g per serving of vegetables in 150 g). Of the first cereals, it is better to give preference to buckwheat or rice. They must be dairy-free and can be diluted with water or breast milk, or the mixture that the baby eats. Later, you can introduce corn and oatmeal. nine0003 The first vegetable puree can be zucchini, broccoli, or cauliflower. The third type of complementary food can be fruit puree from apples or pears. Later, you can introduce mashed banana or apricot. At first, fruit puree can not be given to the child separately, but it is better to mix it with cereal or vegetables so that the child does not begin to prefer the sweet taste of fruits. When the amount of fruit puree reaches 50 g or more, it can also be given separately, for example, after the child has eaten porridge or for an afternoon snack. nine0003 Juices should not be the first feeding, in addition, they can not be introduced into the baby's first year of life at all, given their sweet taste and low nutritional value. You can prepare the first complementary foods yourself, but it is safer to use hypoallergenic monocomponent cereals or commercially produced purees prepared to high quality standards for baby food. In addition, it is important to consider that industrially produced baby cereals are often fortified with vitamins and minerals, which makes them especially useful for the first feeding. Complementary foods are introduced before breastfeeding or formula. The introduction of a new product should be gradual. But how is it? Please note that if complementary foods are introduced from 4 months, then the introduction of 1 new product may take longer than the introduction of complementary foods from 5 or 6 months, namely up to 10 days or more, depending on the reaction of the baby. Important! If on the 8-10th day of the introduction of a new product, the baby still cannot eat 100-150 ml of porridge or puree at once, then this amount can be divided into 2 or even 3 doses, for example, give 50 ml of porridge in the morning, 50 ml in the afternoon and 50 ml in the evening. I feeding
6 hours Breast milk or VHI* 200 ml II feeding
10 hours Dairy-free porridge**
Fruit puree 150 g
20 g III feeding
14 hours Vegetable puree
Meat puree Vegetable oil
Fruit juice 150 g
5 - 30 g
1 tsp
60 ml IV feeding
18 hours Fruit puree
Breast milk or VHI* 40 g
140 ml V feeding
22 hours Breast milk or VHI* 200 ml
** - diluted with breast milk or VMS 
I feeding
6 hours Breast milk II feeding
10 hours Dairy-free porridge**
Breast milk supplement 100 g III feeding
14 hours Vegetable puree
Meat puree Vegetable oil
Breast milk supplement 100 g
5 - 30 g
1 tsp IV feeding
18 hours Breast milk V feeding nine0079 Breast milk
22 hours 
Complementary foods at 4 months | Useful tips from the Tyoma brand
 5 months. But there are situations when complementary foods need to be started from 4 months, including even a child who is exclusively breastfed. nine0003
 In what cases are complementary foods introduced from 4 months?
How to start complementary foods at 4 months?
 Porridge can be chosen first if the child has loose or unstable stools, and also if the child is underweight. After 4-5 days from the beginning of the introduction of porridge, butter can be gradually added to it (up to 5 g per serving of porridge in 150 g) nine0003
 What foods can be introduced into the diet of a child at 4 months?
Kashi
Vegetables
Fruit
Juices
Can you make your own first meal?
 nine0003
 How to start the introduction of a new product?