How to start baby on finger food
Giving Baby Finger Foods at 7-8 Months
Written by Rebecca Felsenthal Stewart
In this Article
- Month 7, Week 3
- Month 7 Week 3 Tips
Month 7, Week 3
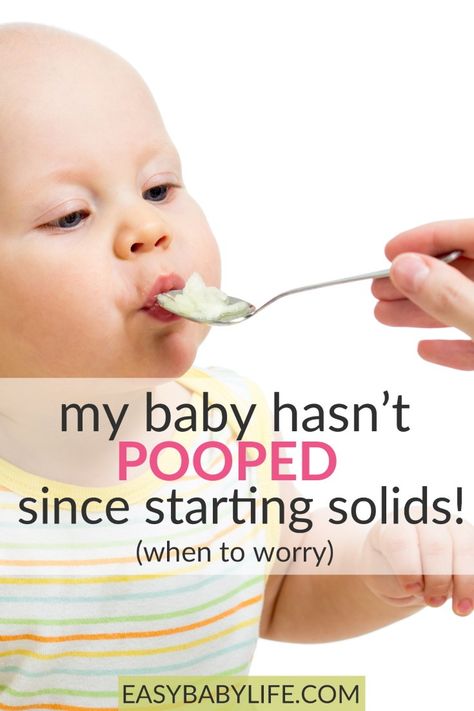
Once your baby is a pro at eating soft mashed foods, they may be ready to move on to finger foods around 8 months. They have the dexterity to pick the food up and release it or mash it, and will become more efficient and independent as they master the pincer grip around 9 months. At that point they'll be able to use their thumb and forefinger to pick up the small chunks of food.
Your baby may grab at everything on your plate, but follow these guidelines for healthy and safe feedings.
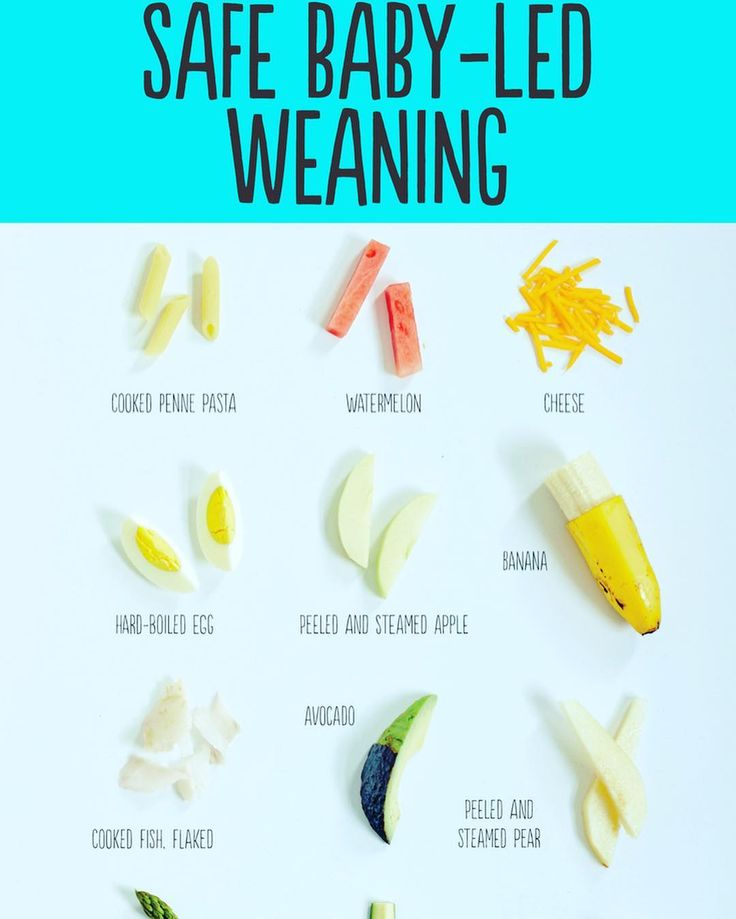
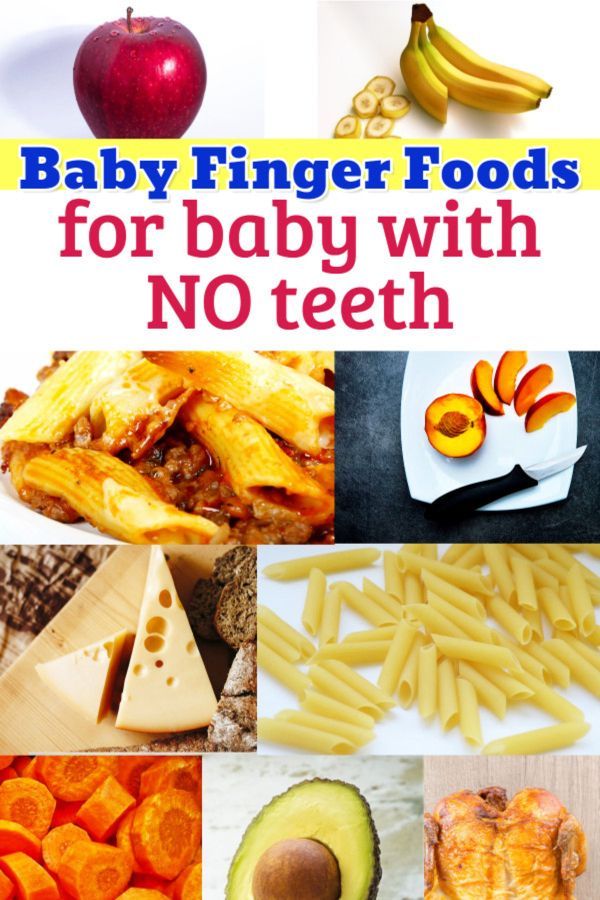
- Start with menu items like pieces of soft cheese; small pieces of pasta or bread; finely chopped soft vegetables; and fruits like bananas, avocado, and ripe peaches or nectarines. These foods should require minimal chewing, as your baby may not yet have teeth. Do NOT let them have hot dogs, raw vegetables, nuts, meats, hard candy, or sticky textures such as nut butters that have increased choking risks at this stage.
- Introduce new foods one at a time in case there are any concers about allergies.
- Chop all foods into soft, bite-sized pieces, 1/2 inch or smaller.
- Watch out for choking hazards: Avoid round, firm foods like carrots, grapes, and hot dogs and skip anything like raw veggies and peanuts. Raisins and popcorn are dangerous for babies.
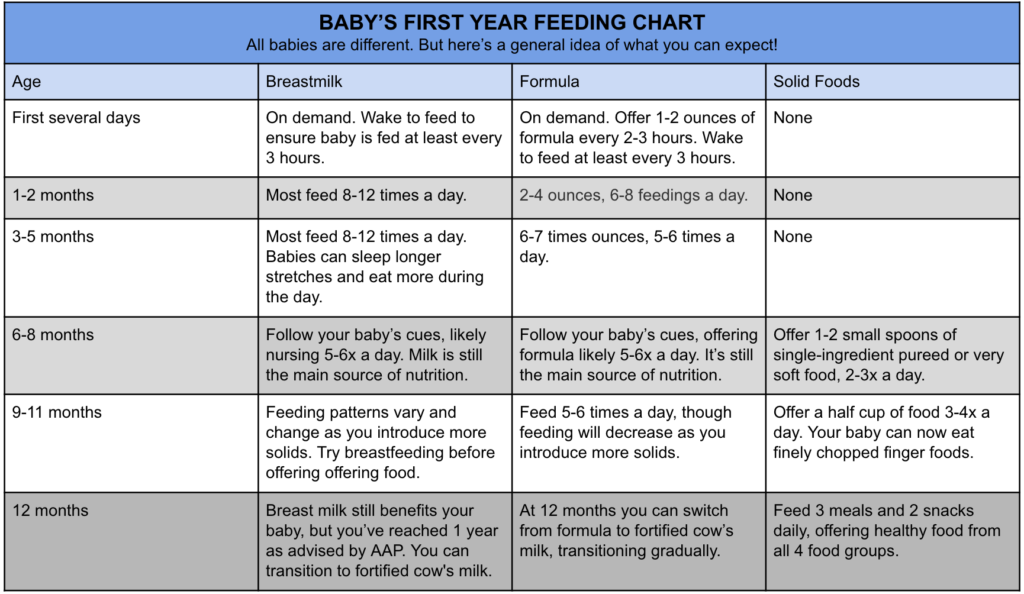
- Keep up your formula or breastfeeding schedule, but as your baby eats more solids, they’ll naturally start to take less milk. Your baby needs to start eating more solids and drinking less milk for the nutritional value at this stage.
Your Baby's Development This Week
Your baby is getting stronger and may even be moving around, whether they are sliding around on their belly in reverse, scooting on their behind, or actually crawling forward. If you haven’t childproofed your house already, don’t wait any longer!
You may notice these growing signs of motor development:
- Your baby is probably now able to sit on their own for several minutes, without using their hands for support and they may be able to get up into a sitting position all by themselves.
- While you offer them support, they should be able to bounce up and down, and possibly even pull up to a stand.
- Their little hands are increasingly agile -- they are getting better at passing a toy back and forth from one to the other.
You might wonder about:
- Their vision. Your baby should be able to see nearly as far as an adult by now and can track moving objects with their eyes.
- Stranger anxiety. You’re not imagining it: They may fear new people and situations. So give them time to warm up and reassure them if they are upset.
- What they can understand. Your baby might comprehend more than you realize, so it’s important to keep talking to them about everything you’re doing and try to be consistent about the words you use for familiar objects.
Month 7 Week 3 Tips
- If food allergies run in the family, talk to your pediatrician about introducing highly allergenic foods like peanuts and eggs.
- Fried foods are not good choices for babies. If you offer them at all, do so rarely.
- Avoid feeding your baby juice unless it is fresh-squeezed.
- By now, your baby’s diet should include grains, fruits, vegetables, and meats, and they should be eating two to three meals a day.
- In addition to rice, barley, or oat cereal, you can introduce grain products your baby can grab, such as toast, crackers, and dry cereal. Avoid any colorful, sugary cereals.
- Sit baby in their high-chair for feeding time. If they eat finger foods while crawling around, they are more likely to choke.
- You’re not done with breast feeding or bottle feeding. Your baby is starting the transition, but breast milk and formula are still key.
- Pureeing or mashing vegetables may make them easier for your baby to eat when they are first transitioning from a liquid diet to solids.
Best Early Finger Foods for Baby (With Tips, Visuals, and Recipes)
Use this list of safe, nutritious, and easy to eat finger foods for baby to help you know exactly what (and how) to offer at meals and snacks.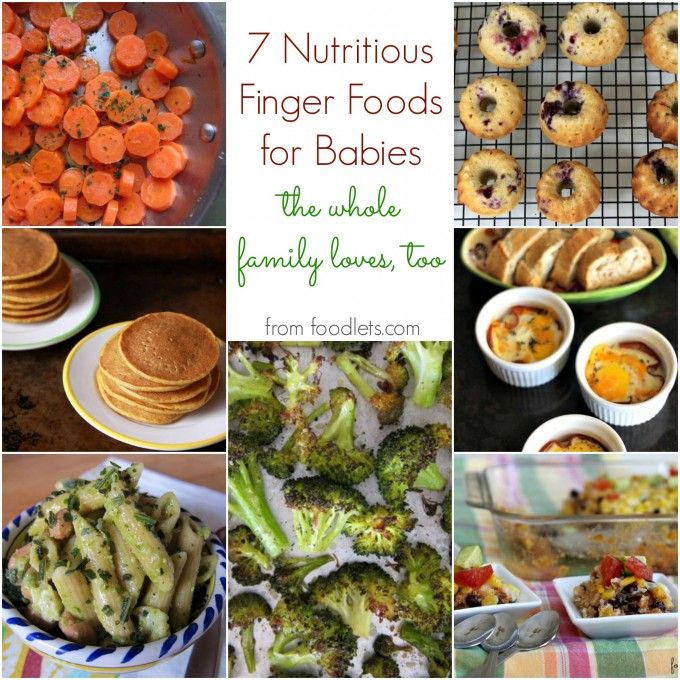 Plus, find the best first finger foods, troubleshooting tips, and visuals of foods broken down by food group to keep things easy!
Finger Foods for Baby
After baby starts solids and is ready to move onto finger foods, you may feel a little confused by exactly what to serve and how to serve it. Which is totally normal because it can be scary to let baby feed themselves this way and we may not have any experience doing this—or we may have totally forgotten from our last kiddo!
This list of finger foods for baby will cover some great first finger foods to start with, then set you up with plenty of healthy options from each food group.
TIP: Find more info on starting solids here and the best foods to start with if doing baby led weaning or purees with baby.
Healthy Baby Food
I love sharing these ideas for baby food since they are easy to prepare and serve and because I know how hard it can be to continue to come up with flavorful and healthy meals and snacks for our little ones.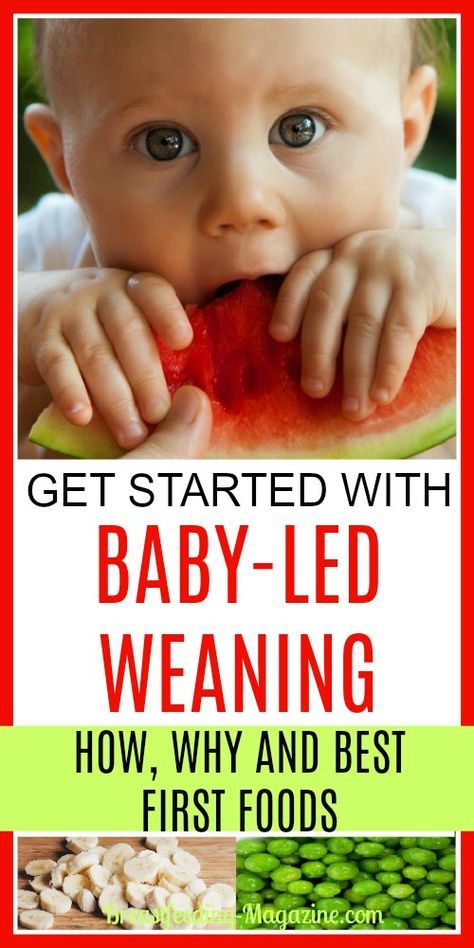 Let me tell you, I’m on my third kiddo and it can be such a challenge to feed him during the chaos of parenting the rest of my crew! These foods are wholesome and nutritious—perfect for your baby.
TIP: I’m a big fan of SpoonfulONE, a company that offers the most complete way to introduce food allergens to our kids. They make mix-ins, puffs, and crackers that are yummy and easy for babies and toddlers to eat. Learn more about their pediatrician-approved baby foods here. (sponsored link)
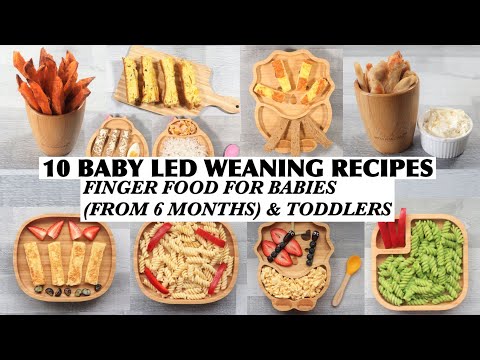
Best First Finger Foods
When baby is around 9 months, you’ll notice that they’re able to pick up smaller pieces of food with two fingers. This is known as the “pincer grasp” and is a sign that they’re ready to start finger foods. To be clear, when I say “finger foods” I mean small pieces of food that a baby (or toddler) can feed themselves.
Here are some of my favorite ones to start with that are all super soft, safe to eat, and easy to pick up.
- Scrambled egg, broken up into small pieces
- Roasted sweet potato mashed and broken up into small pieces
- Fresh raspberries, broken up into smaller pieces
- Oatmeal, cooked according to package directions and allowed to cool
- Tofu, diced and sauteed lightly or steamed
- Ground beef, chicken, or turkey, broken up into small pieces or lightly mashed meatballs
- Shredded cheese or crumbled goat cheese
- Mashed sweet potato, in little pieces
- Peanut butter puffs
TIP: You can serve the tofu, ground meat, or meatballs in veggie puree from a pouch or a simple marinara sauce for extra moisture and flavor.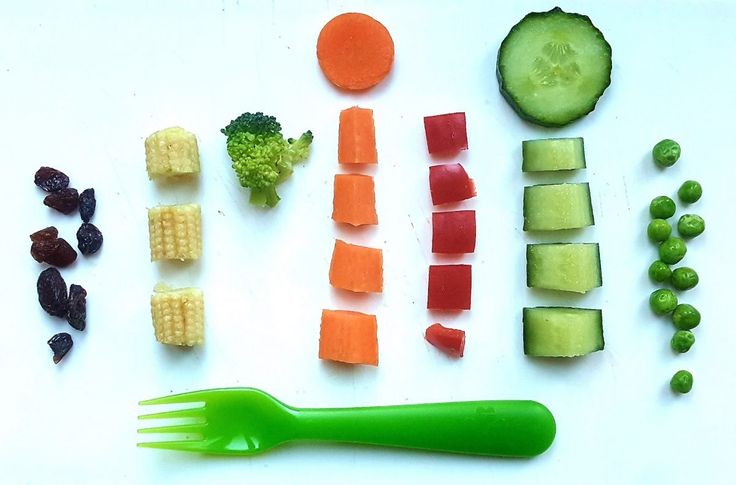 Learn more about how and why to introduce peanut butter.
Finger Foods for Baby: Fruits and Veggies
Some of my favorite early fruits and veggies to serve babies are:
- Mashed roasted sweet potato, broken up into small pieces
- Warmed frozen peas, slightly mashed if desired
- Roasted Zucchini
- Diced Roasted Sweet Potato or Butternut Squash
- Fresh blueberries, cut in half or quarters
- Fresh raspberries, broken into small pieces
- Banana, broken into small segments (they are less slippery this way versus slicing them)
- Avocado, diced and mashed slightly (be sure it’s ripe and very soft)
TIP: A good rule of thumb is to serve pieces of food that are about the size of a pea to start and soft enough that they are easy to squish between your fingers. This will be easy for baby to pick up and eat and will also reduce chances of choking.
Finger Food Ideas: Carbohydrates
Offering complex carbohydrates can provide fiber, a variety of textures, B vitamins, and more.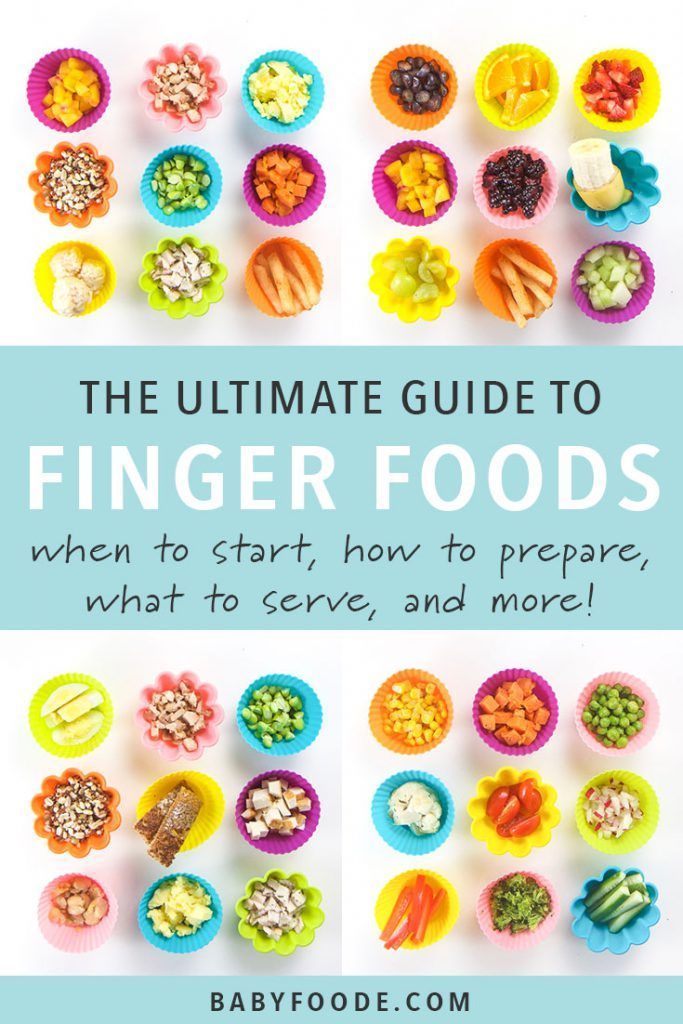 Try these with your baby.
- Spinach pancakes (moisten with applesauce or plain yogurt if needed; this recipe is particularly moist and great for babies)
- Oatmeal, cooked according to package directions and allowed to cool
- Baby Puffs
- Peanut Butter Puffs
- Rice (it’s easiest if it’s in little clumps so baby can pick it up; this Coconut Rice or this Cheesy Rice are both good options)
- Baby Banana Muffin
- O cereal (soften in nondairy unsweetened milk or yogurt as needed)
- Baked Oatmeal, diced
Finger Food Ideas: Proteins
Offering proteins will continue to expose baby to a range of nutrients. These are my go-tos for babies newer to finger foods—and toddlers too.
- Shredded cheese (thicker cuts are a little easier to pick up)
- Tofu, diced and sauteed lightly or steamed
- Flaked cooked wild salmon
- Lightly mashed meatballs
- Shredded chicken, cut up finely (we love this Butter Chicken to share with baby)
- Ground beef, turkey, or chicken, broken into smaller pieces
- Lightly mashed beans
- Scrambled eggs, broken up into small pieces
- Diced egg muffins
I’d love to hear any questions you may have, or if you have foods that your babies enjoy that I didn’t include here.
 Chime in below in the comments!
Prep Time 5 minutes
Cook Time 5 minutes
Total Time 10 minutes
Author Amy Palanjian
Cuisine American
Course Baby Food
Calories 124kcal
Servings 1
First Finger Foods (choose 1-3 per meal)
- ▢ 1 Scrambled egg (broken up into small pieces)
- ▢ 1/4 cup Roasted sweet potato, mashed and broken up into small pieces
- ▢ 1/4 cup Fresh raspberries (broken up into smaller pieces)
- ▢ 1/4 cup Oatmeal (cooked according to package directions and allowed to cool)
- ▢ 2 tbsp Tofu (diced and sauteed lightly or steamed)
- ▢ 2 tbsp ground beef, chicken, or turkey, broken up into small pieces or lightly mashed meatballs
- ▢ 2 tbsp shredded cheese or crumbled goat cheese
- ▢ 1/4 cup Mashed sweet potato (broken into little pieces)
- ▢ 1/4 cup Peanut butter puffs
Fruits and Veggies
- ▢ 1/4 cup mashed roasted sweet potato (broken up into small pieces)
- ▢ 1/4 cup warmed frozen peas
- ▢ 1/4 cup Roasted Zucchini
- ▢ 1/4 cup diced Roasted Sweet Potato or Butternut Squash
- ▢ 1/4 cup blueberries (cut in half or quarters)
- ▢ 1/4 cup raspberries (broken into small pieces)
- ▢ 1/4 cup banana slices (broken into small segments—they are less slippery this way versus slicing them)
- ▢ 2 tbsp avocado (diced and mashed slightly—be sure it's ripe and very soft)
Whole Grains and Carbohydrates
- ▢ 1 Spinach pancakes (moisten with applesauce or plain yogurt if needed; this recipe is particularly moist and great for babies)
- ▢ 1/4 cup Oatmeal (cooked according to package directions and allowed to cool)
- ▢ 1/4 cup Baby Puffs
- ▢ 1/4 cup Peanut Butter Puffs
- ▢ 1/4 cup fully cooked rice (it's easiest if it's in little clumps so baby can pick it up; this Coconut Rice or this Cheesy Rice are both good options)
- ▢ 1 Baby Banana Muffin
- ▢ 1/4 cup O cereal (soften in nondairy unsweetened milk or yogurt as needed)
- ▢ 1/4 cup Baked Oatmeal (diced or regular oatmeal broken into little pieces)
Dairy
- ▢ 2 tbsp Shredded cheese (such as mozzarella)
- ▢ 2 tbsp Tofu (diced and sauteed lightly or steamed)
- ▢ 2 tbsp flaked cooked wild salmon
- ▢ 1 lightly mashed meatballs
- ▢ 2 tbsp finely shredded chicken (we love this Butter Chicken to share with baby)
- ▢ 2 tbsp ground beef, turkey, or chicken (broken into smaller pieces)
- ▢ 2 tbsp lightly mashed beans
- ▢ 1 Scrambled egg (broken up into small pieces)
- ▢ 1 Diced Egg muffins
For each meal or snack, choose 2-3 foods from a mix of food groups.
 Aim to include some fat in most meals and protein in many too.
Prepare the food, cutting into small pieces and/or mashing as needed to make the food easy to eat.
Start with small portions and allow more as baby indicates according to their hunger.
- Store leftovers in an airtight container for 3-5 days in the fridge.
- Many foods you cook for your family will work as baby finger foods—just be sure they are easy to squish between your fingers and the pieces are small and easy to chew.
- Babies very normally make a lot of faces when they eat, so don't assume they don't like something just because they scrunch their nose!
- Flavors and textures can take time to learn to eat, so continue offering foods in small portions even if baby hasn't liked them in the past—and make sure they taste good to you!
Calories: 124kcal, Carbohydrates: 14g, Protein: 7g, Fat: 4g, Saturated Fat: 1g, Polyunsaturated Fat: 1g, Monounsaturated Fat: 2g, Trans Fat: 1g, Cholesterol: 164mg, Sodium: 81mg, Potassium: 344mg, Fiber: 4g, Sugar: 5g, Vitamin A: 9857IU, Vitamin C: 18mg, Calcium: 51mg, Iron: 1mg
Tried this recipe?Rate in the comments and tag @yummytoddlerfood on IG!
All by myself: how to teach a child to eat on his own?
Family and children
Some children deftly use a spoon already at the age of one, others do not want to give up their mother's help even at three. Everyone has their own age to start self-feeding, but it is never too early to teach a child to hold appliances in his hands. Pediatricians advise starting lessons from seven months. ELLE - about techniques that will help the baby quickly get used to the table.
Start with hints
Introduce the spoon first. He can turn it in his hands and try it on the tooth, studying how it works. Then put the cutlery next to his plate and do other things in the kitchen - sooner or later the baby will show curiosity and try to scoop up food for them. At the same time, be sure to consider the consistency of the dish: viscous porridge is really more convenient to eat with a spoon, but meatballs are much easier to take with your hands, so such a dish will nullify the entire lesson. It usually takes two to three weeks for a baby to learn how to bring a spoonful of food to his mouth.
Learn with ease
You can also learn how a spoon “works” outside the kitchen and dining room, because the main thing in this matter is to develop a skill.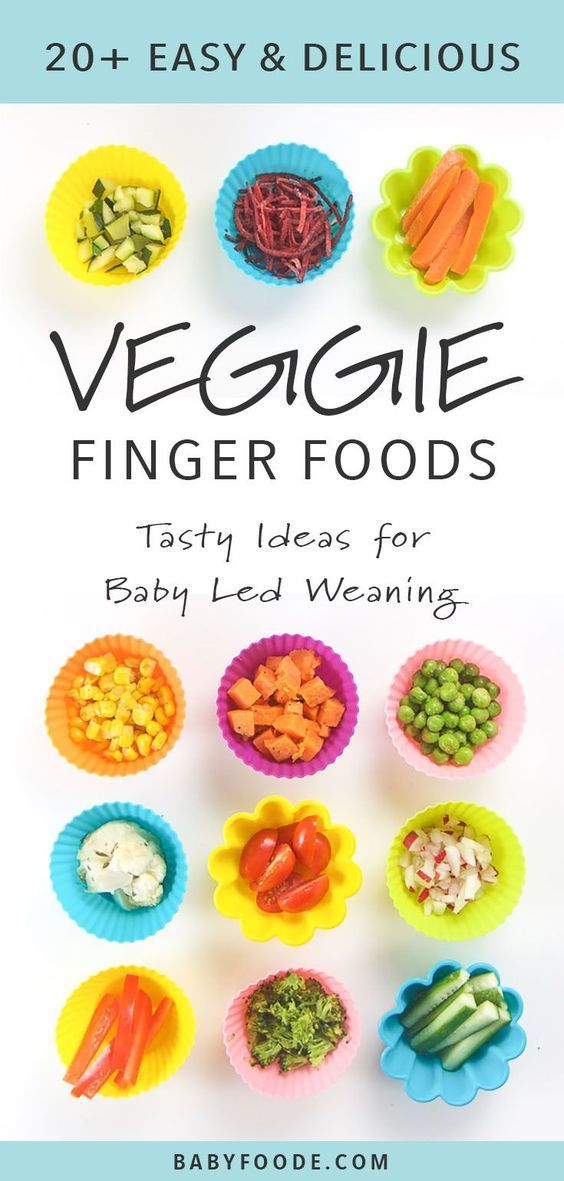 For example, a child's spatula is very similar to a spoon, which means playing in the sandbox can be a great workout. Together with your child, scoop up the sand as carefully as possible and arrange it in molds, as if baking cakes. A dinner party at the toys will also not be in vain: using the example of toy dishes, explain why each cutlery is needed, and then feed the “guests” with a spoon together with the baby.
Get interested in food
Every time you force your child to finish eating something or rush him, you lower his concentration, causing negative associations with the process of eating, and besides, you risk causing digestive problems for the baby. Food should be fun and interesting, so the best way to learn how to use appliances is on your favorite dishes, be it fruit puree, meat casserole or cottage cheese dessert. Treat serving with imagination: fried eggs can easily be turned into a funny face, broccoli and cauliflower into a bouquet of flowers, and porridge can be decorated with a pattern of berry sauce.
Avoid persuasion
We used to be taught to eat a spoonful of porridge for mom, a spoonful for dad, and so on for all relatives in order, until the plate is empty. Today, psychologists do not recommend persuading a child to eat, as well as praising him for the portion he has eaten, because this interferes with the natural perception of food. Let food become for him a means of satisfying hunger, a certain element of the daily routine, but not a way to earn parental attention and affection. Praise and encouragement stands for more substantial accomplishments than a regular breakfast.
Be patient
Children are very inquisitive and want to feel and taste food. Be prepared for the fact that the porridge during the first "practice" will be on the floor, walls and curtains - this is not a reason to stop trying. Many mothers, wanting to keep cleanliness, cannot stand it and take the spoon in their hands again, but in vain. Yes, the child will not immediately begin to hold bread in his left hand, but a spoon in his right.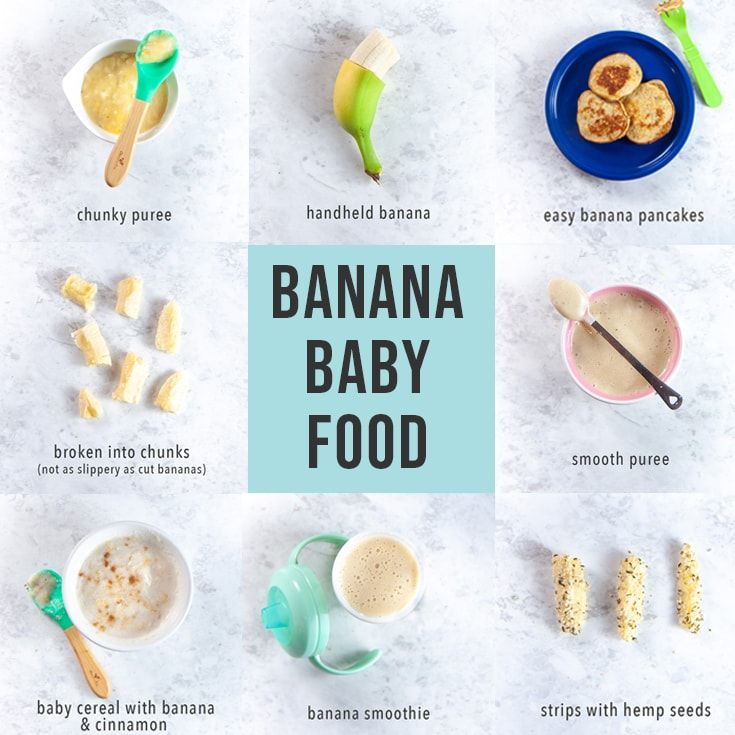 He will spill the porridge as he brings it to his mouth, but gradually he will start to get it right. Be patient, because it is the key to success in the difficult task of education and will definitely come in handy in the future.
Invite the child to the table
By copying the behavior of adults, we learn faster, so when the baby is together with everyone at the common table, he will involuntarily repeat your movements - at first awkwardly, then more confidently. In order for him to feel free, it is important to provide a comfortable "seat". In Scandinavia, generations of children have mastered self-catering at a common table on the Tripp Trapp® highchair from the Norwegian children's brand Stokke®. The original design was invented by Peter Opsvik back in the 70s - the designer wanted to create a chair that would grow with the child. The Tripp Trapp® Baby Set insert and highchair cushion with bright patterns will help even the smallest to feel like a full-fledged member of the family at the “adult” table.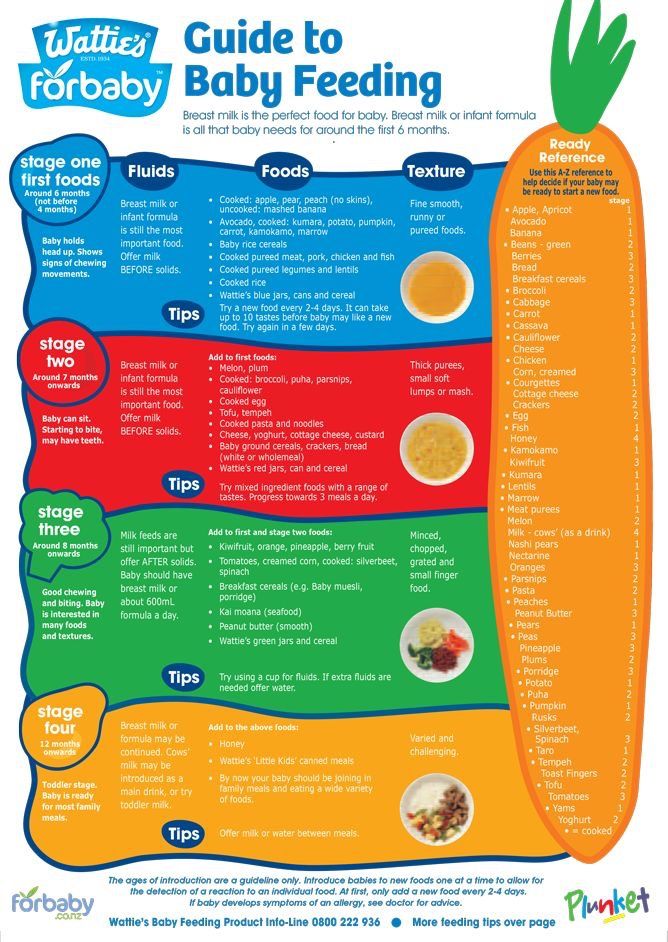 The stable support of the highchair protects against accidental falls, which is important for fidgets, and the high seat ensures constant eye contact with mom. An important advantage: becoming closer to you during lunch, the child will not be capricious and require attention. In addition, the seat and footrest are adjustable in height to "grow" with the child. The Tripp Trapp® chair can withstand weights up to 80 kg, which means it will serve its owner for many years.
At Stokke®, great attention is paid to the materials from which strollers and children's furniture are made. So, premium quality wood was chosen for the famous chair. At the factory, the chairs are painted in different colors, and you can choose the shade that best suits your child: rich red for energetic toddlers, soft pink for young ladies, or a versatile natural wood shade. Thanks to its unique design, Tripp Trapp® will fit perfectly into any interior.
Surround your child with personal items
Your own set of dishes will also provide comfort during the first independent meals: a colorful non-spill cup, a plate with a beautiful pattern on the bottom to make it more interesting to finish eating porridge to the end, your own cutlery (sometimes they are released with a special handle - its curved shape "tells you how to properly hold a fork or spoon") or a Tripp Trapp® Table Top with interchangeable patterns. When playing with dishes, the baby does not think that he can break it and get hurt, so make sure that his cups and plates are made of food-grade plastic. It is best to choose dishes together with the child so that he can express his preferences through it. In addition, a cheerful design will allow you to form an attitude towards food as an exciting process.
The Tripp Trapp® Highchair, one of your baby's first personal items, can also be customized with a name or nickname laser engraved on one of the backrest slats. This will show your child that his chair is special and was made just for him. The engraved inscription is treated with special oil, and the wood retains its color for years. Just imagine how in 10-15 years a son or daughter will remember moments of childhood using a personalized ergonomic chair. Engraving can be done free of charge at the Stokke® Flagship Store at the Central Children's Store on Lubyanka (3rd floor) in Moscow.
As an advertisement.
Tags
- Children
How to teach a child to eat independently
A spoon for mom, a spoon for dad - this is what any loving parent probably says while feeding their baby. However, the introduction of complementary foods and similar feeding is only an intermediate step in the development of a child: from breastfeeding to full self-feeding. How to make the process of learning food “on your own” as simple and easy as possible?
Everyone will learn this
The most important and basic rule when a small child learns to use a spoon, plate, cup, bottle, fork and knife correctly is to have maximum patience. Understand: shouting, rushing or irritating you will not help the baby in any way. On the contrary, the process will slow down for him, and with constant abuse from his parents, almost a reflex may even develop - nutrition for him will automatically mean a scandal, which, of course, does not contribute to the development of a healthy appetite and, accordingly, the whole body. Agree, in the end, at some point, absolutely all people master the wisdom of self-catering - such as the ability to use the potty or sleep in a separate bed away from mom and dad.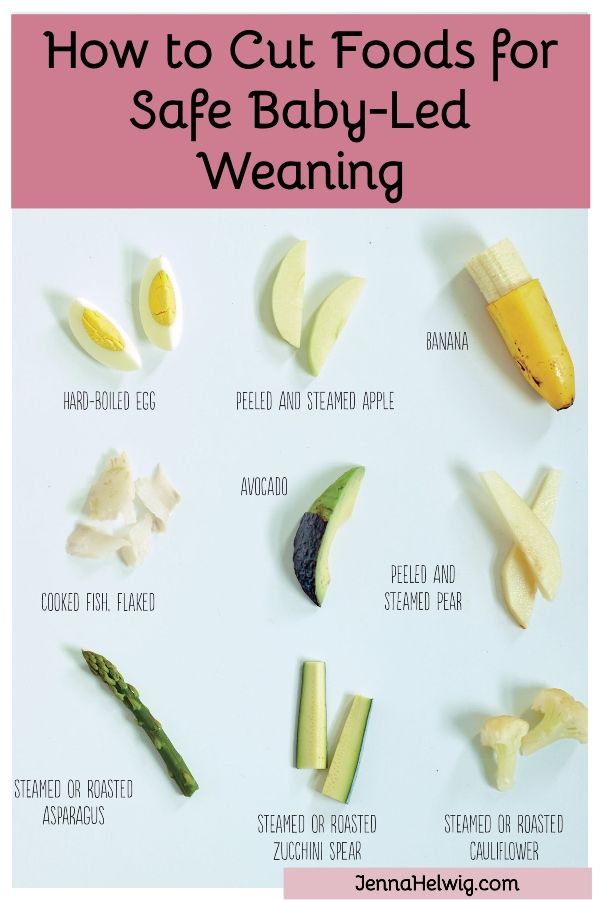 Therefore, just carefully clean the kitchen or dining room after the next "lesson", wash clothes and the child - and continue all over again after a few hours ...
When to start training, at what age? Here everything is strictly individual. Some children are already ready by 7-8 months, others at 1.5-2 years persistently ask to be spoon-fed. But usually, on average, around the year, the development of a little man already allows you to confidently try to hold the same spoon and direct it into your mouth. It is hardly worth forcing to do this, but if the baby, on the contrary, takes the initiative, reaches out to grab it himself in order to scoop porridge from the plate, lick it, “feed” the mother, of course, you shouldn’t interfere - such interest is only a plus, it can to a noticeable extent help you. Therefore, watch your child - he himself is the best indicator when it's time to start!
How to organize training directly?
In order for a child to learn to eat on his own faster and with fewer problems, it is worth learning a number of certain rules and techniques, an approximate list of which includes the following points:
Introduce your baby to the spoon as early as possible, even before the introduction of complementary foods.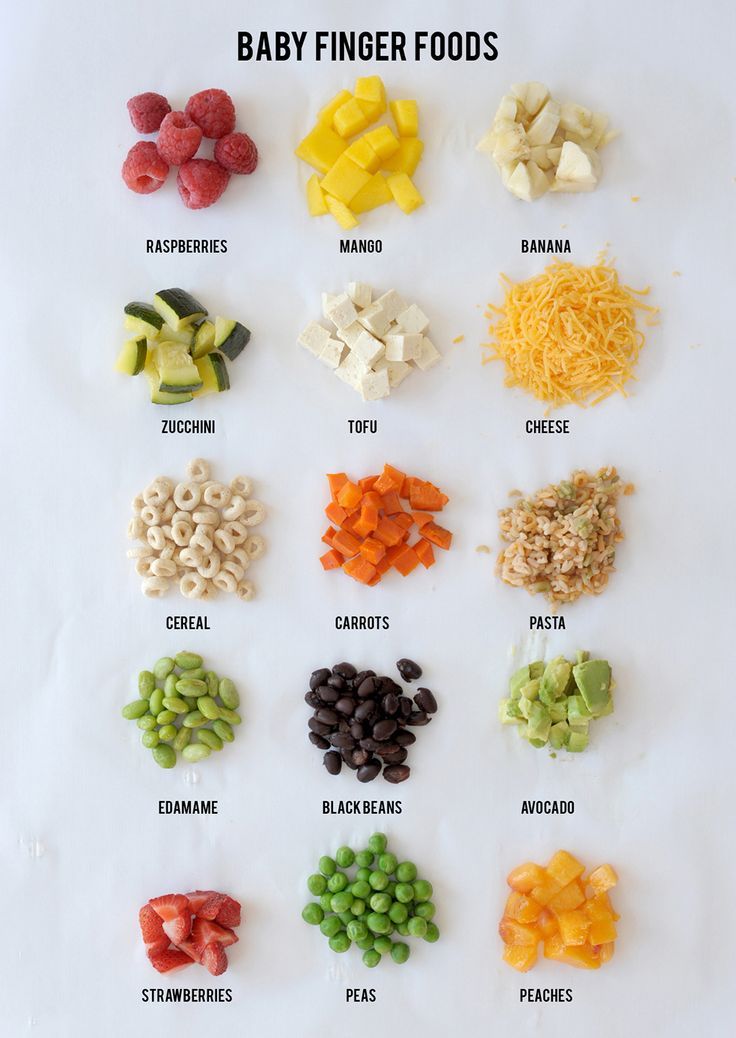 This object should be familiar to him: it is better that he turn it in his hands, like a rattle or a cube, try it by touch and taste, knock on it - in general, he completely mastered and got used to it. Then she will not frighten him and will not cause rejection either at the moment of weaning from her mother's breast, or later, when she will need to wield it on her own.
Buy plastic utensils. You can also use the standard: metal, ceramic or gift silver. But for a very young child, they are not very suitable: such spoons and plates may seem unpleasant to the touch, cold, hard for delicate gums, and heavy. It is important that the plastic is unbreakable, food-grade and free of harmful dyes - the quality certificates from the seller will tell about this.
Choose a children's set. Such dishes are most adapted for a small child: the spoon has a special grip for children's fingers, the plate has high edges (and sometimes even suction cups so that it cannot be knocked over from the table!), The mug has two handles, and the fork and knife are not sharp, so as not get hurt. Well, of course, such dishes are usually made bright, with attractive patterns and designs to interest the child.
Prepare a place. Not a single child manages to bring soup or mashed potatoes from a bowl to their mouths whole, either from the first, or from the second, or even from the tenth time. Therefore, be prepared that at first they will be literally everywhere! And it’s better to immediately prepare the feeding area for subsequent cleaning: cover the table, children’s chair and the floor with oilcloth, remove everything valuable and afraid of moisture, move away from the wallpaper, grab a set of napkins.
Prepare your child. During such “lessons”, of course, the baby himself gets dirty. Therefore, at least a bib or an apron is required - and the larger it is, the better. Sometimes on sale there are special oilcloth jackets for teaching self-catering, but if the room is warm, you can do without clothes, leaving panties or a diaper. It’s easier to wash a child than to wash his clothes every day.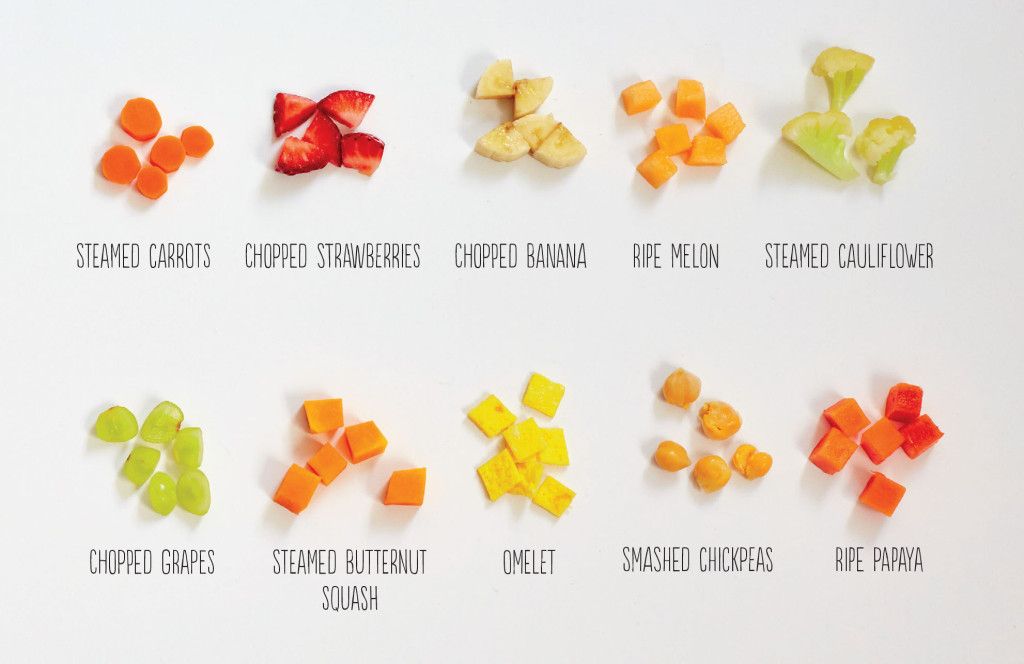
Pick a moment. Although parents should try to accustom their child to a certain daily routine, it is not worth forcing him to eat when he has no desire. This is especially critical for learning to use dishes. If the child is not hungry, he will not take this process seriously: it will either become a game for him, or simply cause a negative reaction. Therefore, teach when he really wants to eat, is not sick and is ready for a new one.
Show an example. Take a spoon, scoop up food with it, bring it to the baby’s mouth or your own, commenting on each of your actions (even if the baby is not talking yet). Then invite the child to try to repeat all this himself. Support is very welcome: help his fingers grab and hold the spoon, point the child's hand to his mouth - and after a dozen or two or three repetitions, he will understand what they want from him.
Pay attention to food. For the first attempts, the baby should like it and be moderately liquid (but not too much, the soup will spill).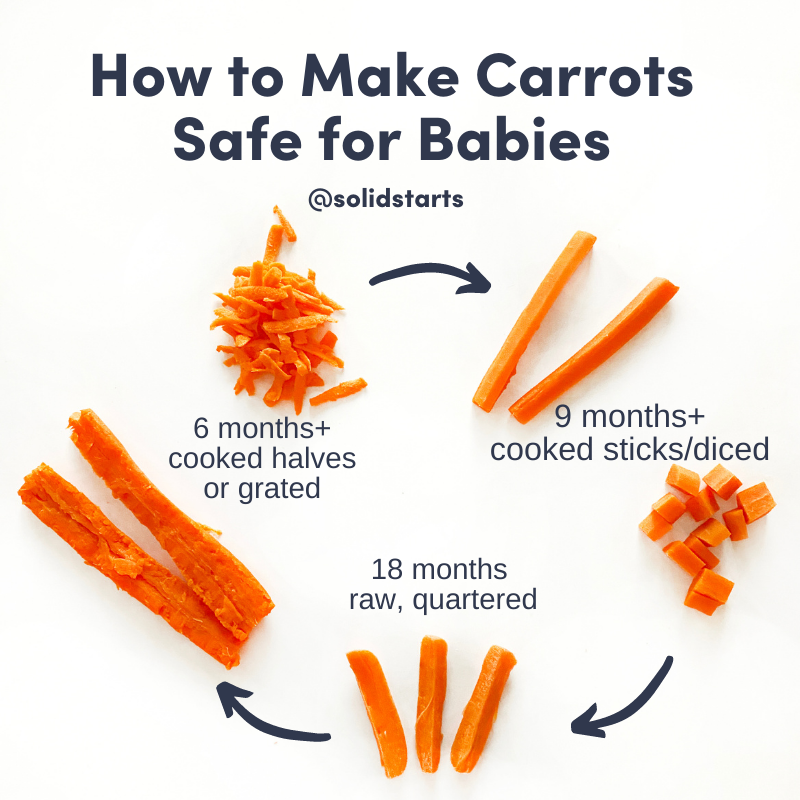 Also, do not put on a full plate, adding parts of the portion gradually - it is easier for the child to scoop up, and there is less risk of splashing, and the food itself will be warm (the learning process may be delayed). And one more thing: cook with a margin so that the baby, having “lost” part of the food, probably does not remain hungry.
Stop games. It was possible to play with a spoon during the acquaintance, but not now - the child must learn this rule ironically. Therefore, gently, but very persistently, stop when he tries to knock over a spoon, plop it on the soup, spill everything on the floor, or throw it at mom and dad. And also watch when he is full to stop learning - it is at this moment that food for him can turn into a game, and he himself can be capricious.
Supplement. At first, there is nothing wrong with the fact that the child abandoned what he started right in the middle of the process. He could get tired, lose interest if he didn’t succeed, be afraid of spilled food on himself or the fact that he choked or choked on it.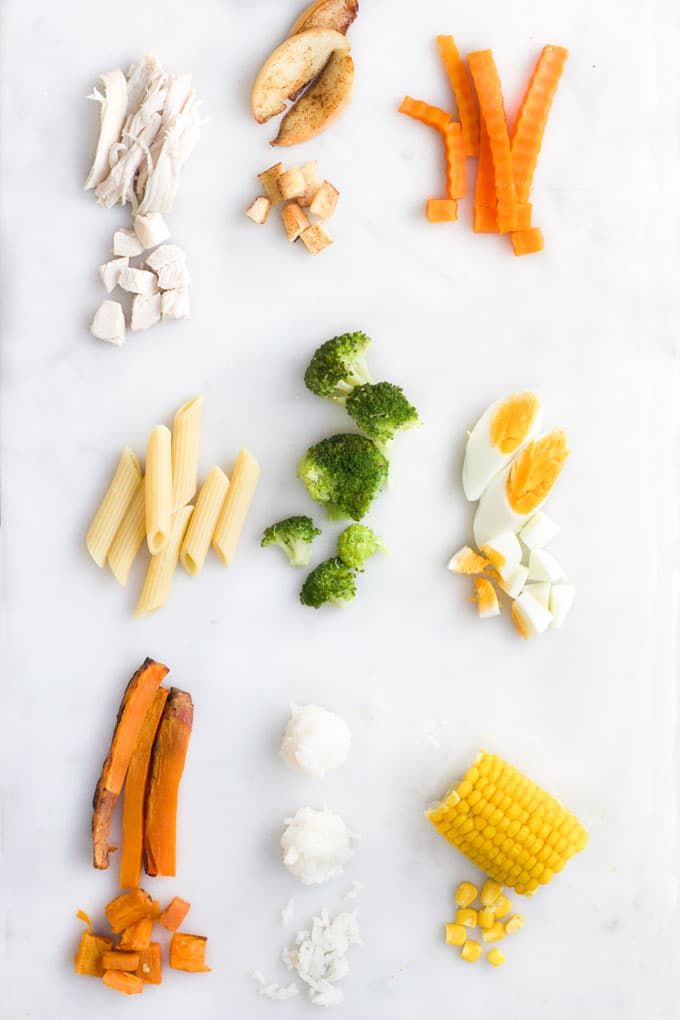 Therefore, in reserve, keep "your" spoon nearby so that you can finish your meal the old fashioned way, feeding him yourself.
Create a ritual. In order for the baby to take the rules of nutrition seriously, turn food into a ritual. To do this, you can decorate food (put on a plate of it, for example, funny faces), gather the whole family at the dinner table, set and clean the table together (including spilled ones) - this will increase the child's level of responsibility for their actions. And, of course, learn to wash your hands before eating and wipe your mouth after.
Discuss learning with your family. Everyone who has access to feeding the baby (mother, father, grandparents, older brothers and sisters) must be aware of the ongoing training. Otherwise, at some point, the child will simply begin to be lazy: after all, why learn to eat with your mother yourself, if the same beloved grandmother feeds him from a spoon herself, without requiring him to repeat complex procedures?
Don't rush things.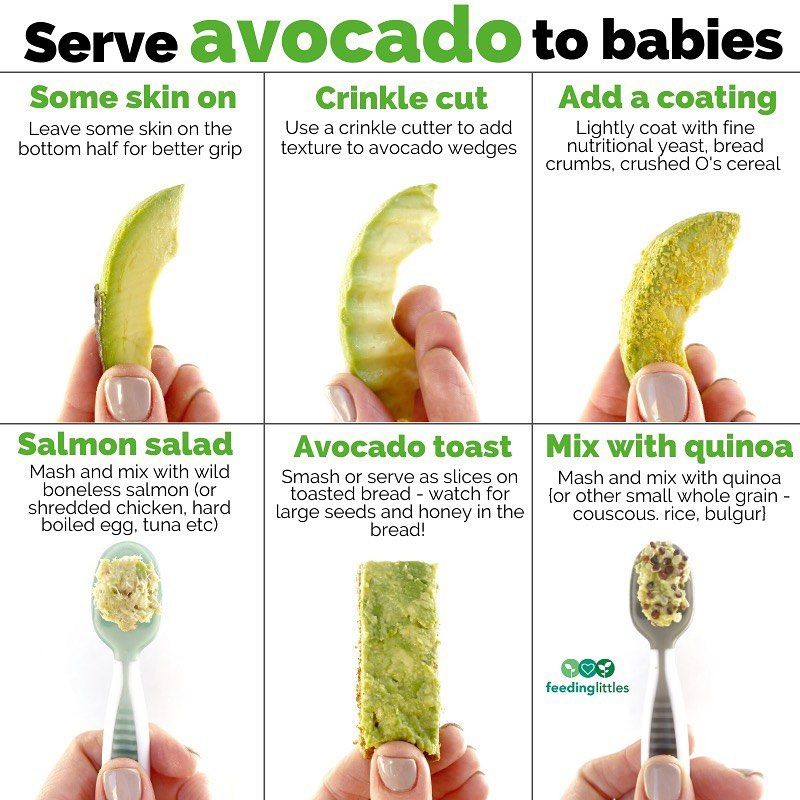 Start with a spoon, but you can wait a little with a cup, fork and knife. So, give out a cup when the baby has mastered the bottle (showing how to lean it against his lips and supporting it at first so that he does not choke), the plug is available by 1.5-2 years (at the same time, you need to pay attention to both ways of its use: picking up a side dish, and piercing pieces of food), and a knife - after 2-3 years.
Don't impose rules. Remember: your ultimate goal is for your child to eat on his own. But how he will do it, in principle, does not matter: the main thing is that it is clean and dry around. Therefore, if it is more convenient for him to hold the spoon a little differently than you showed, it does not matter. Moreover, do not force him to eat with his right hand - even if he is right-handed (there is nothing to say about the left-hander), he himself will determine how it is more convenient for him to deal with these devices.
Praise! It is very important for a little man to hear a high assessment of his work.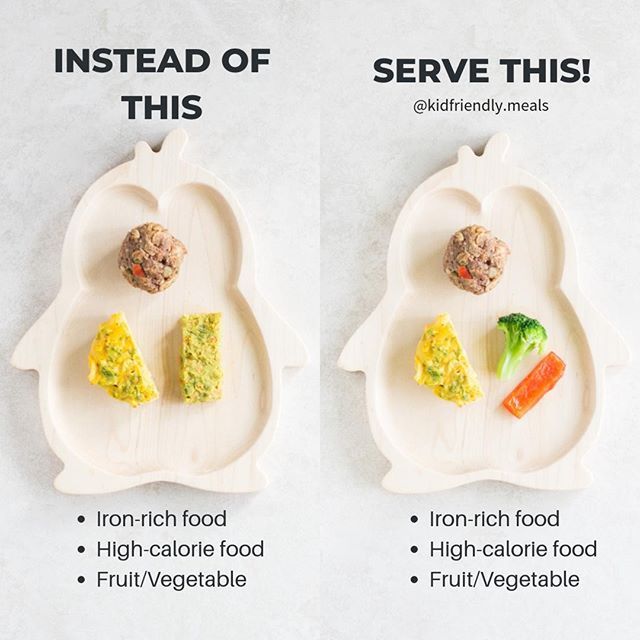 Therefore, any achievement in the matter of teaching independent nutrition should be celebrated and encouraged. Of course, you shouldn’t overpraise, but the joy of mom and dad from the fact that he learned to hold a spoon and didn’t spill anything on the floor will raise his self-esteem and make him even more actively master the wisdom of this business.
Step aside. As the learning process progresses, it is important to start gradually giving the child more and more independence. And this must be done gradually. At first you hold his pen with a spoon, then you help only in difficult or critical situations, then you just sit next to him while eating, and by the age of 3-4 you generally follow the whole process with one eye, doing your own business in the kitchen. After all, he already eats himself!
And finally, etiquette. Agree, it’s useless to explain to a very young child how to behave at the table in a decent society, why you can’t eat with your hands, pick your food, spit out chewed and burp, why you need to wish others a good appetite, etc.