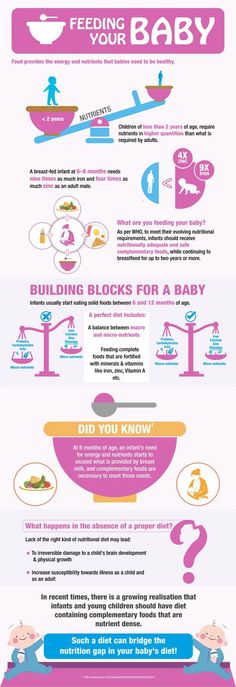
Infant feeders for baby food
Ultimate Guide to Baby Feeders: Mesh and Silicone
You may have seen baby feeders, whether mesh or silicone, and wondered what they are for. They are a great tool for feeding babies and toddlers—and are especially awesome for teething relief. There are many on the market though, so today I’m sharing the best of the best.
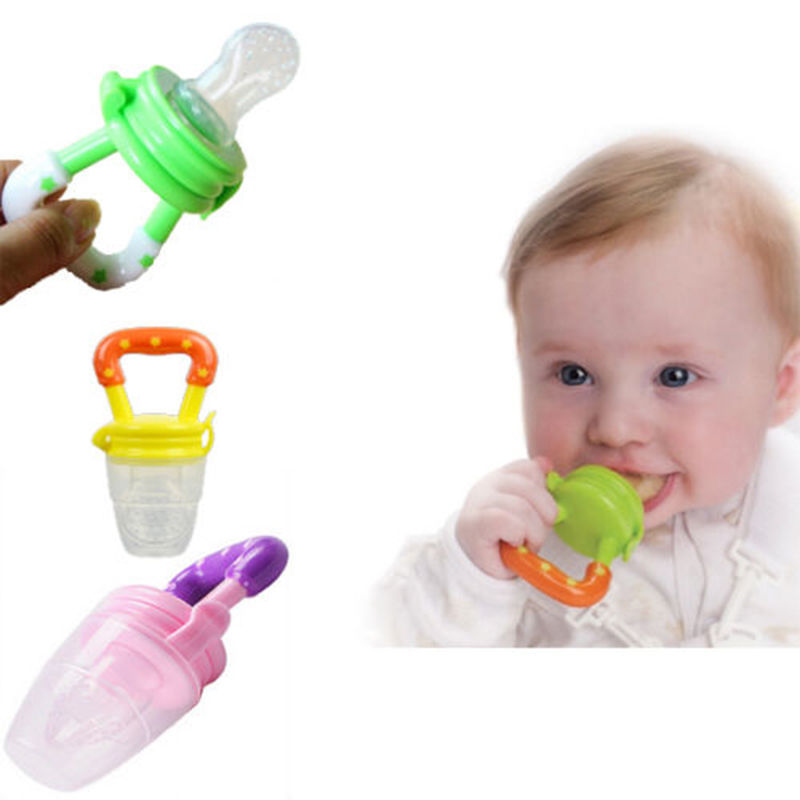
Baby Feeder
A baby feeder is made up of an easy-hold handle and a little pouch with lots of holes. The idea is that the holes allow some of the flavor and texture of the food to come out, without the concerns that may come with larger pieces of food.
This means you can worry less when it comes to choking risks.
One thing to keep in mind: They don’t allow babies to have the full texture experience of the food—since the texture is mostly the mesh of the feeder. That means you don’t want to use one of these for every meal (or even most meals).
Lots of exposures to lots of textures helps babies and toddlers gain confidence in handling all sorts of foods, which can make feeding kids a lot easier over the long run.
But an infant feeder can be a handy tool to have in the mix, especially if on the go, starting to transition to baby food, or trying out a new food that has you a little nervous.
And they are a great way to offer cold teething relief to soothe baby’s gums.
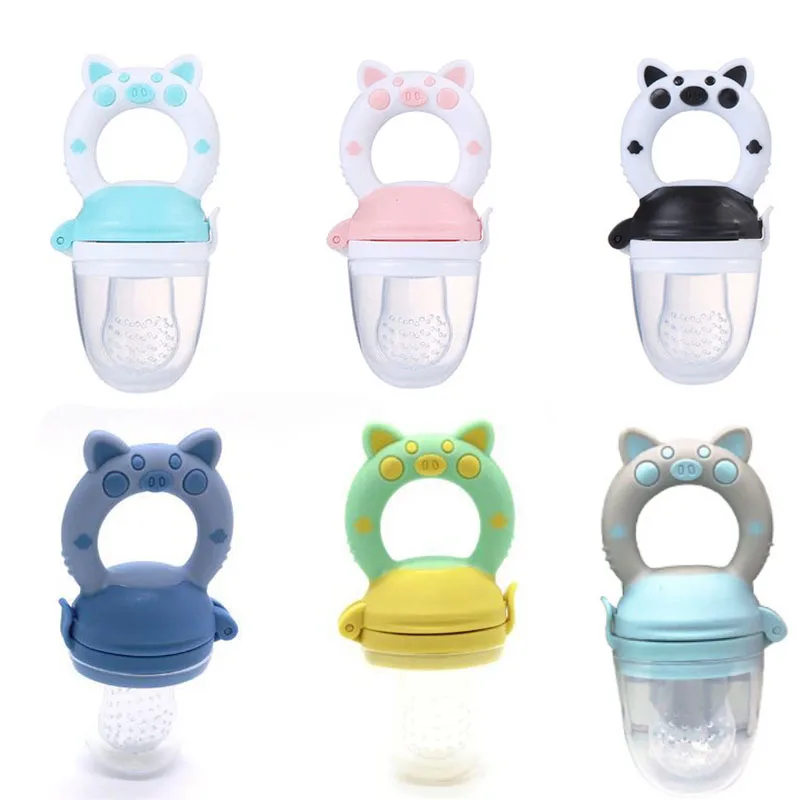
Baby Fruit Feeder
Many people like to use baby feeders to offer fruit, either fresh or frozen, since the product is a safe way for baby to suck on and explore the flavor of a wide range of fruit.
TIP: Another name for this is Baby Fruit Pacifier.
Best Baby Food Feeders
Below are my top picks for infant feeders chosen for ease of use, durability, and ease of care (as in washing!). There are different materials listed, as well as specific information on each product.
Best Mesh Feeder
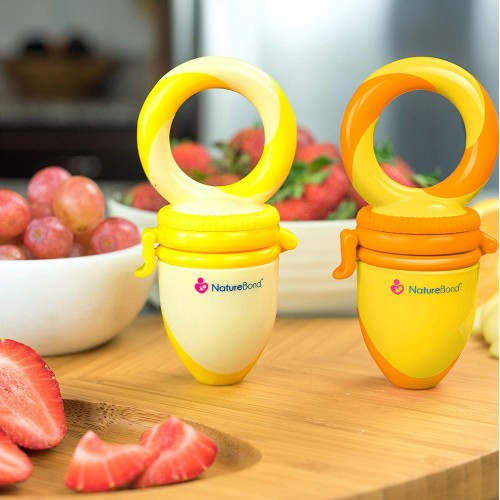
Munchkin Baby Feeder, sold in a set of two. (Or choose the ones that come with travel caps.)
This baby feeder has a streamlined, simple design of a mesh bag for the food and a ring for baby to hold onto.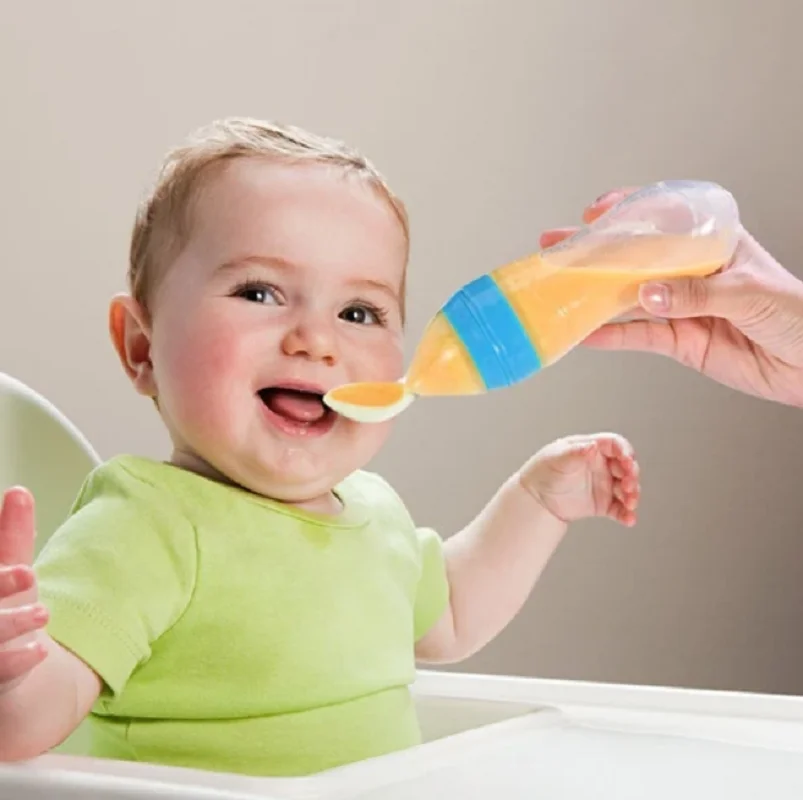 Small, digestible pieces of food come through so baby is getting some nourishment (and comfort if using for teething) without the risk of choking. It’s about $7 for two of them.
Best Silicone Feeder
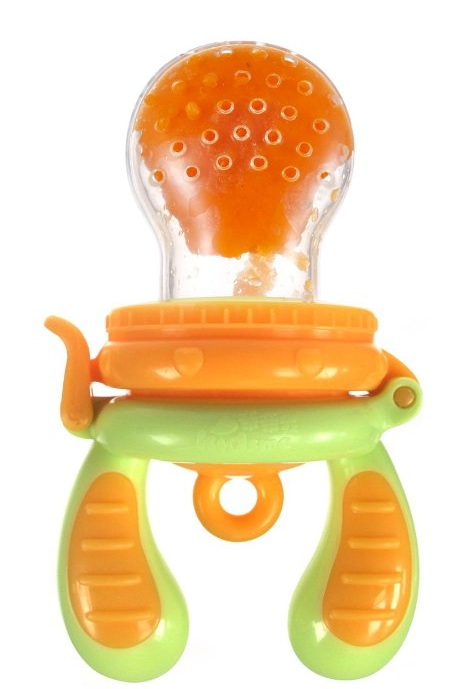
Boon Silicone Feeder
This baby feeder, which is priced at under $6, is made from durable silicone and can be used with fresh or frozen foods. The interior stem forces food toward the tiny holes in the feeder and the small handle is sized just right for baby’s little hands.
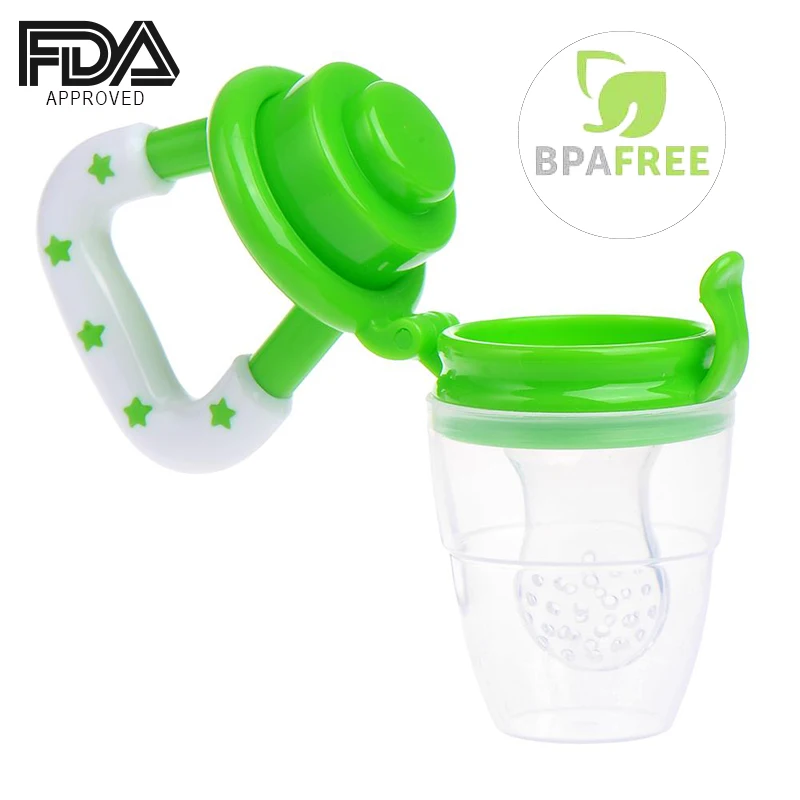
Kidsme Baby FeederBaby Feeder Pacifier Combo
Kidsme Food Feeder
This popular Kidsme feeder has a replaceable silicone pouch that comes in two sizes, so you can adjust and replace as your child grows. It has a unique handle style that some babies may prefer and can be used as a pacifier too. It’s usually priced around $15 and is recommended for ages 4-24 months.
What baby foods should I put into a baby feeder?
Here are some fruits that are good to serve in a baby feeder:
- Raspberries, fresh or frozen
- Strawberries, fresh or frozen
- Blackberries, fresh or frozen
- Cantaloupe
- Honeydew
- Banana
- Mango, fresh or frozen
- Roasted sweet potato
- Roasted butternut squash
- Ripe fresh pear
- Fresh cucumber, skin removed
- Watermelon
- Cooked red meat such as steak
- Frozen grapes (These are NOT safe served to a child this age in any other way as they are a choking risk.
 They are fine served inside the feeder, though.)
TIP: You can use frozen fruit or ripe fresh fruit that’s soft and easy to gum. Avoid any fruits or veggies that are very hard as baby may be frustrated by that texture.
Frequently Asked Questions
What age can baby use a mesh feeder?
Babies can use an infant feeder soon after starting solids around 6 months, or when they can easily hold it and bring it to their mouth.
How do I use a baby feeder to help with teething?
If you fill the feeder, whether mesh or silicone, with frozen fruit, you can soothe teething in infants who are eating solids or in toddlers. It’s cold and yummy, yet requires no real work for the child to suck on, so it’s comforting.
Are all of these baby feeders BPA-free?
Yes, if you choose a mesh baby feeder or one made from silicone, they are BPA-free.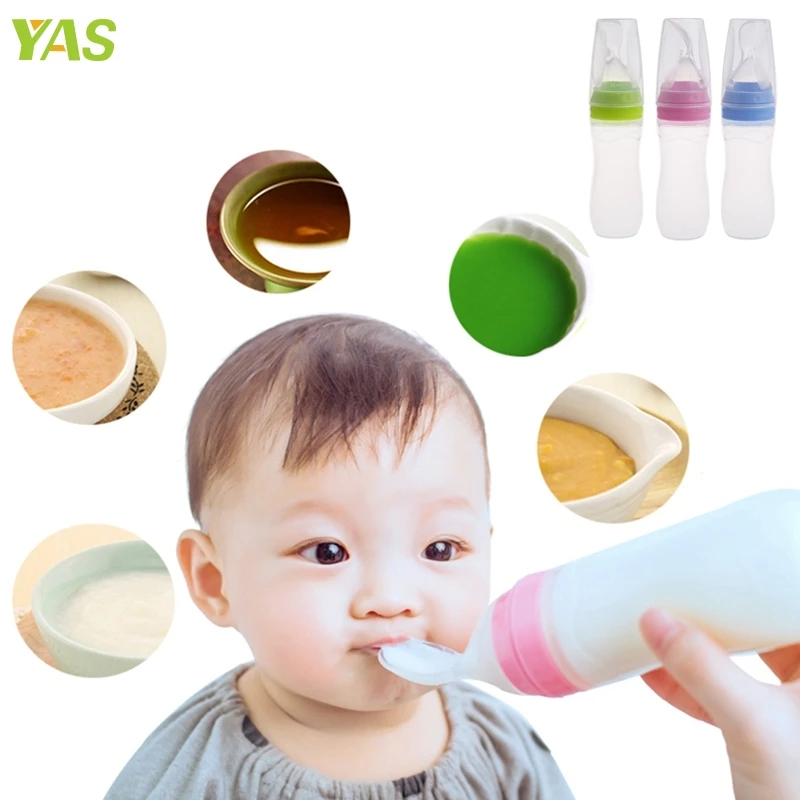
What’s the best way to clean a baby feeder?
Try using a bottle brush or just running water to clean out the mesh. It should be fairly easy to clean if you avoid letting it sit too long with food in it!
Are baby feeders good for babies?
The one downside could be that if you rely on them too much, the child learns the texture of the feeder, rather than of the food. This can make it harder for a child to learn to move actual food around in their mouths and harder for them to accept a range of textures in the future when you don’t want to be using the mesh feeder as much.
Because of that, I recommend using this product at limited times such as when on the go at a restaurant or to help sooth a teething infant, baby, or toddler.
This is not recommended as a way to feed your child at every meal.
If you are worried about choking, review this information on toddler choking and trust that if you serve foods that are easy to squish between your fingers, baby is sitting down at meals, and you are with them, they will learn to eat like so many other kids who have gone before them!
You May Also Like
- Best Baby Puffs
- Favorite Sippy Cups
- Best Snack Containers
- Best Lunch Boxes
- Favorite Suction Bowls
- Top High Chairs
I’d love to hear your thoughts on baby feeders in general or on these specific products, so please comment below to share!
This post was first published May 2019.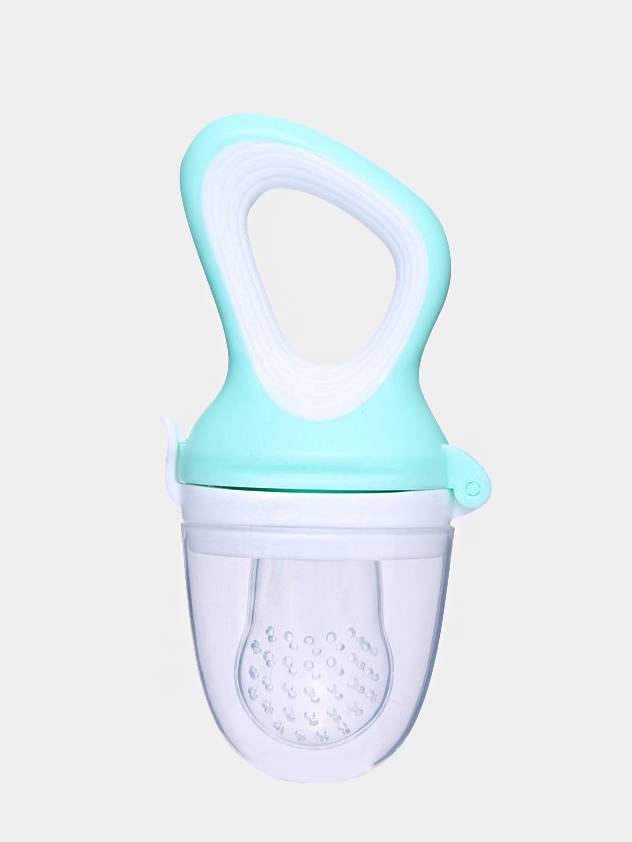
5 Popular Baby Food Feeder Options to Keep Baby Safe and Less Messy
Looking for a baby food feeder? Read on to discover the advantages of a baby food bottle feeder, mesh baby food feeder, silicone baby food feeder, reusable squeeze pouch baby food feeder, and a baby spoon feeder. These can help your child learn how to start to transition from baby feeders to more soft foods and someday solid foods as they get older.
I love my kids when are babies, but I don’t always love taking the time to sit there and feed them baby food from a jar (and I certainly don’t love taking the time to make my own baby food purees). I’m all about that baby-led weaning and finger foods! I am a busy mom with other kids and work and school so easy is my approach to introducing baby foods.
I wait until at least 6 months before introducing any type of baby food.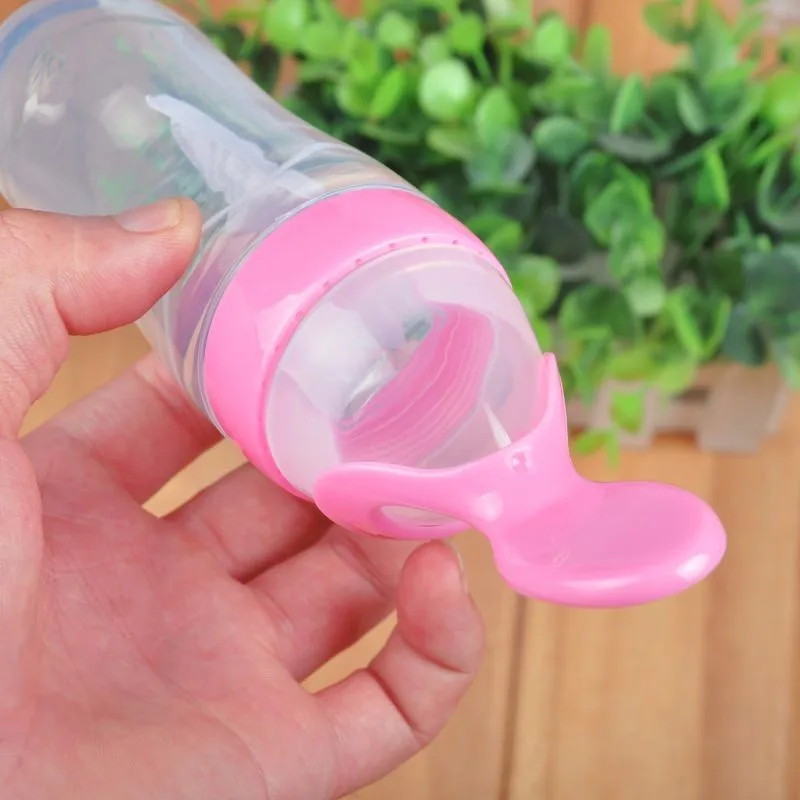 I usually buy some rice cereal and mix it with a little formula or pumped breastmilk (if I have any pumped) and give it a go. I may then try spoon-feeding some simple, single-flavor jarred baby food to my infant.
Once they get more a hang of the idea of food, and can move food around in their mouth and swallow better, I start giving the baby small, soft bits of whatever we are eating at the table, along with baby-friendly puffed cereals, freeze-dried yogurt bites, and more pureed baby foods perhaps from a baby food feeding pouch.
The biggest fear I have every time I start feeding babies is the fear of them choking.
This is one of my greatest fears, not just at the dinner table, but as they crawl around and find all the tiniest bits of whatever all over the floor and stick it in their mouths! I have pulled so many pieces of paper, leaves, grass, and toys out of my fifth baby’s mouth.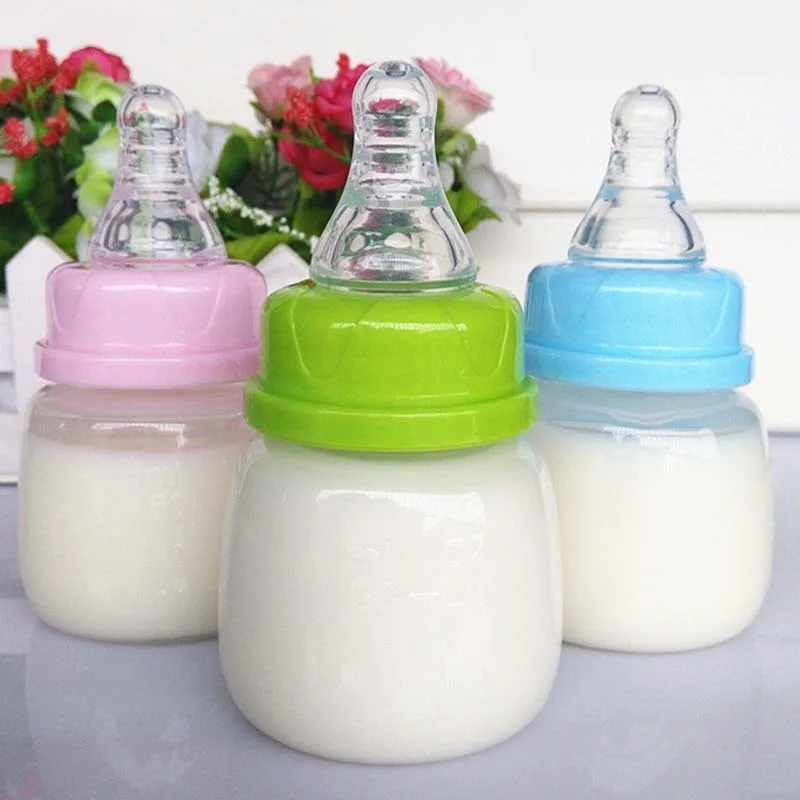 It’s nerve-wracking!
And that’s why I love the idea of a safe baby food feeder.
Why it works for easy feeding
Using useful tools like a mesh baby feeder is perfect for helping your child transition to soft foods and solid foods. It’s also an easy way to help your baby’s gums transition to eating a small size of food as well. Baby fruit feeders are great because they are made of safe materials with tiny holes that allow your child to hold onto the food-grade silicone handle and start to figure out the best way to eat.
This is a great way to introduce small amounts of food to a teething baby or to introduce them to new flavors of food in a fun way.
Keep in mind that a baby’s age and the baby’s diet needs to be kept in mind. Young babies shouldn’t be eating the same thing as an older baby so you still have to be very careful as well.
Use these for little hands. They also work great to work on hand-eye coordination as they’re putting them up to their mouths. I also love that they’re made for easy cleaning, too!
Baby Food Feeder
Using a baby food feeder is a new thing for me to try with my fifth baby, but I like it so much!
Not only does it make feeding babies safer but makes mealtime less messy! (See my post on limiting messy eating toddlers for tips for the slightly older crowd!)
I discovered that there are several very popular baby food feeder options out there today, so I wanted to discuss the various options and what makes them each great or not so great and where you can pick them up.
Munchkin Baby Food Feeder
To help facilitate this discussion, Munchkin sent me a few baby food feeders and a cool sippy cup cleaning brush set to review.
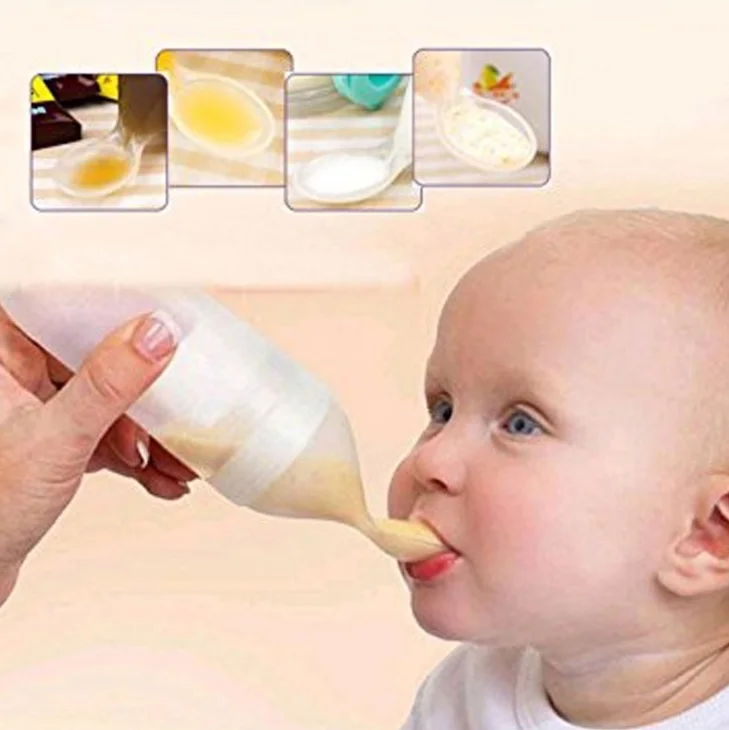
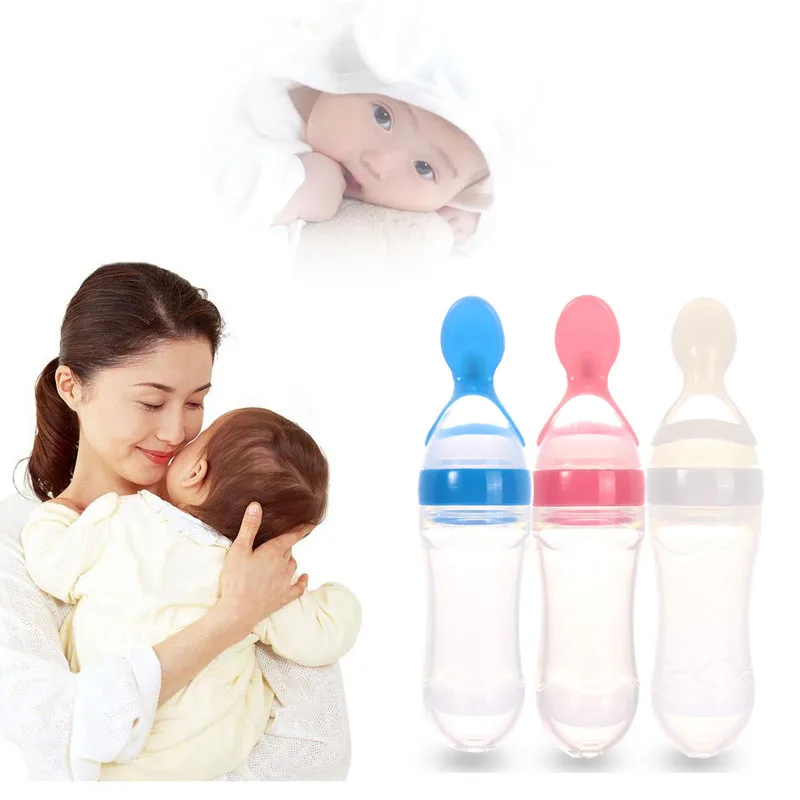
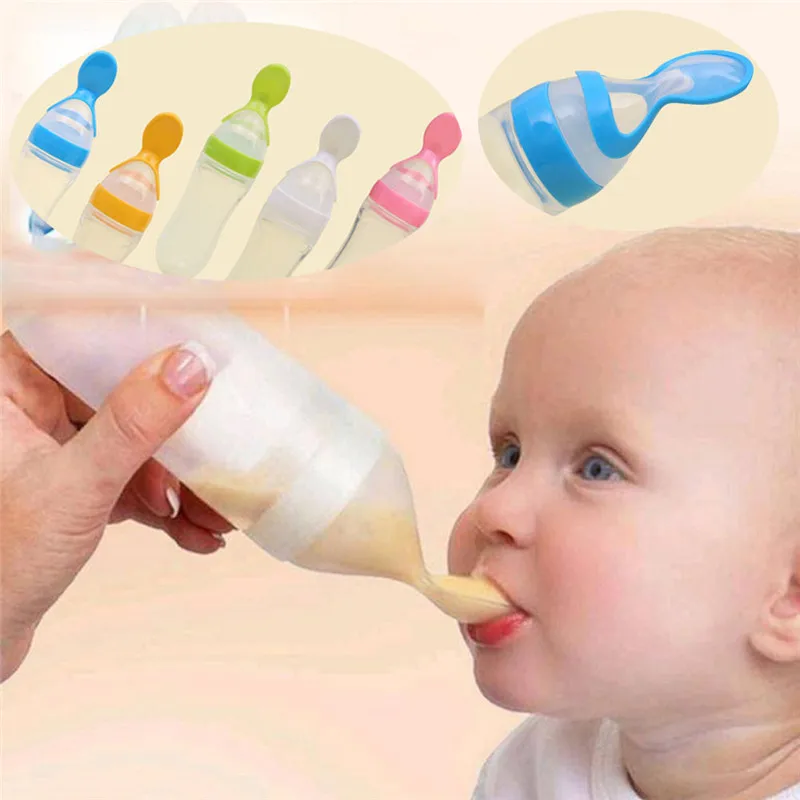
#1 Baby Spoon Feeder
This type of baby food feeder is where you dispense baby food through a baby food dispensing spoon.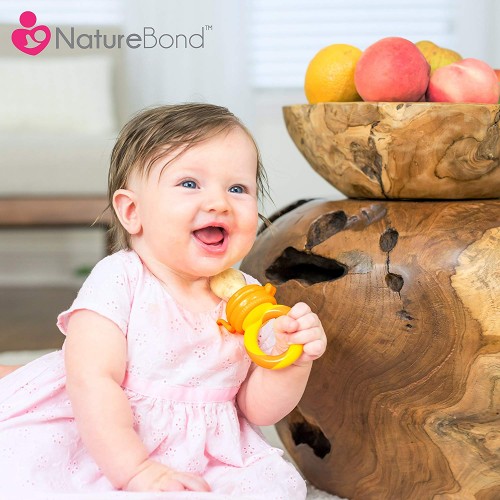 You simply fill up the soft silicone end with soft pureed foods or things like yogurt and then you squirt baby food out from the silicone part out onto the spoon!
I tried ours out with some Greek vanilla yogurt. While it still ending up being messy and it made all sorts of fun “farting” noises as I pushed out air along with the yogurt, which then kinda sprayed everywhere, it was pretty easy to use.
What I like about this versus a bowl or jar that you are spoon feeding your baby from, is there is less back and forth from the jar or bowl to the baby’s mouth. When babies are at the “swat at everything” stage, it means less chance of baby food ending up on the floor, or my lap.
So, still kinda messy but better!
It’s pretty easy to clean out, and you can take the squeeze feeding spoon on the go as it comes with a hard plastic cover you just snap on to the end of the spoon.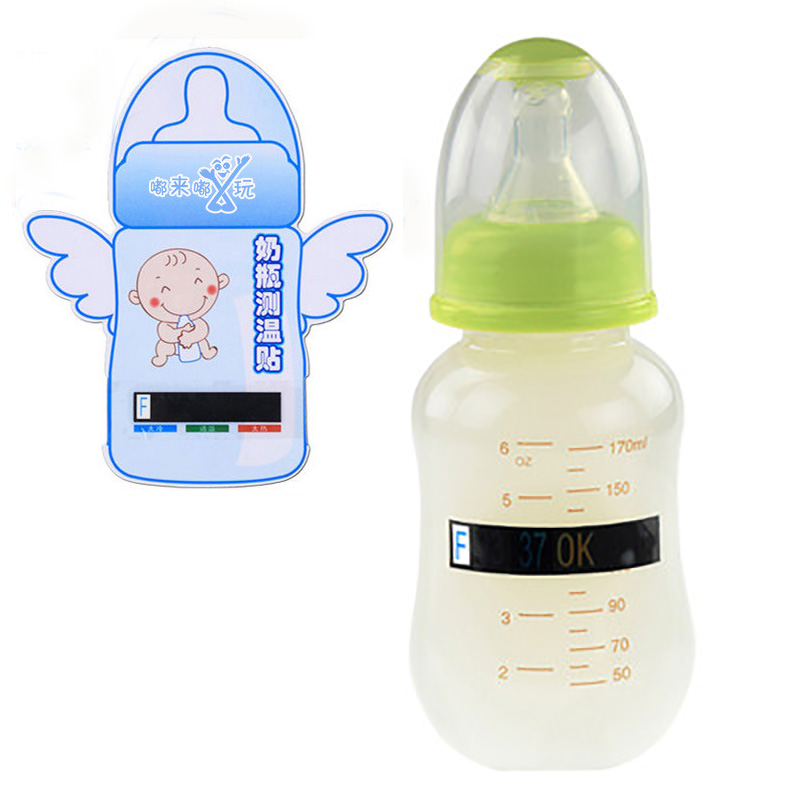
They come in colors blue, green, and pink and are $7 each on Munchkin.com. You can also find them on Amazon (though for more).
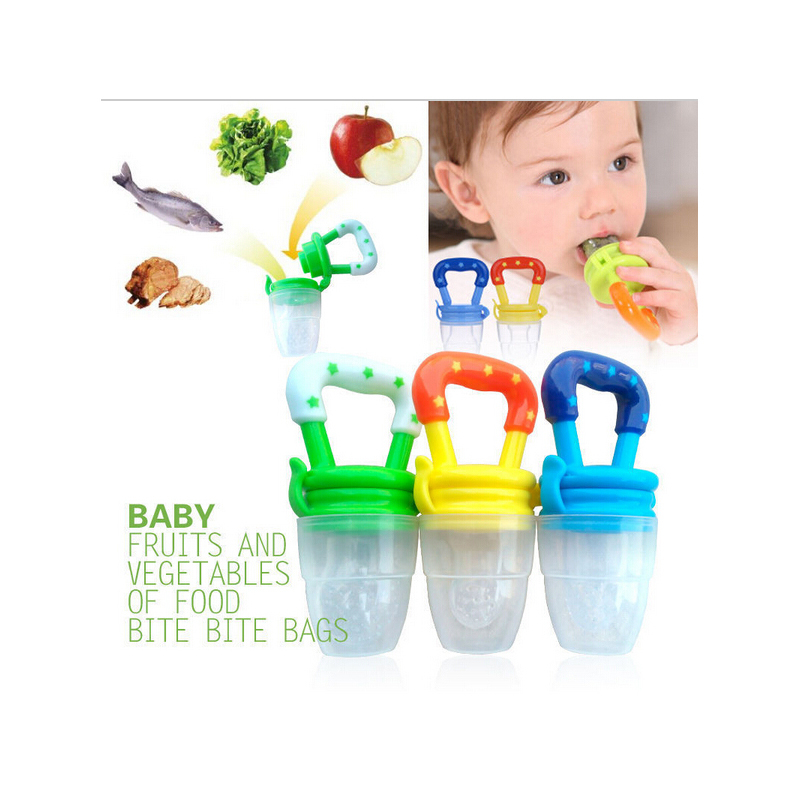
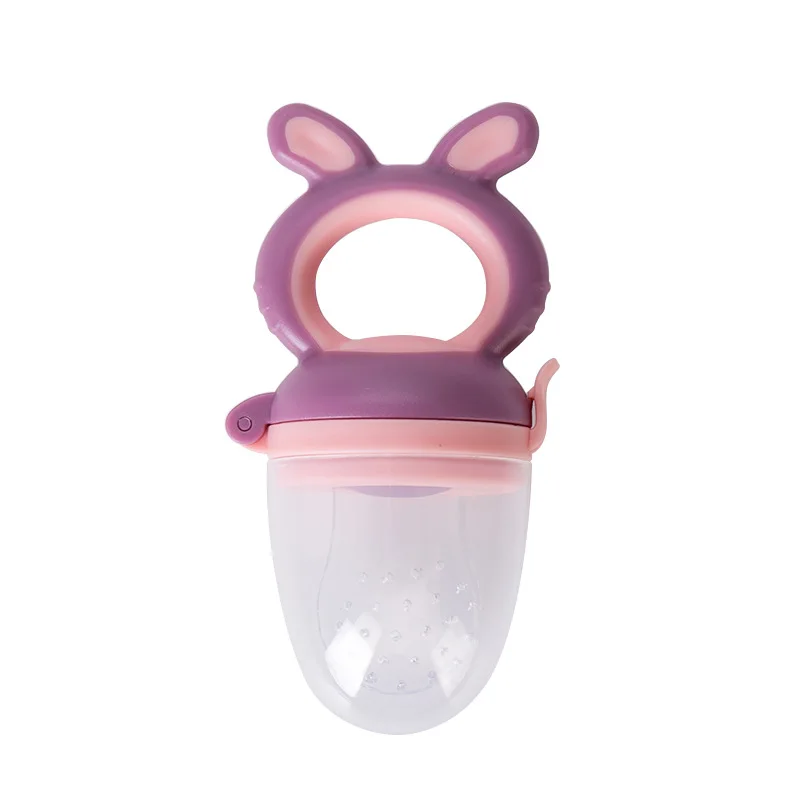
Munchkin Baby Mesh Feeder
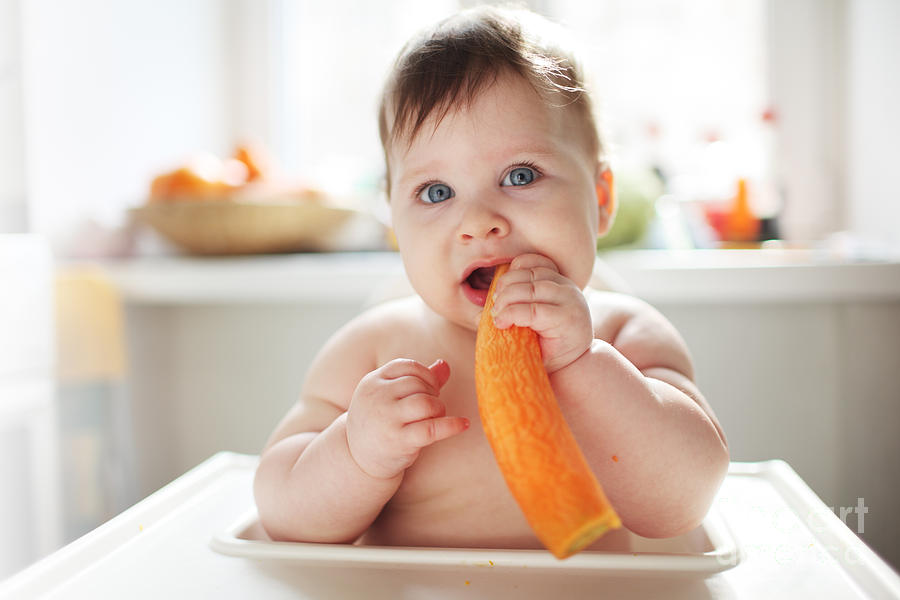
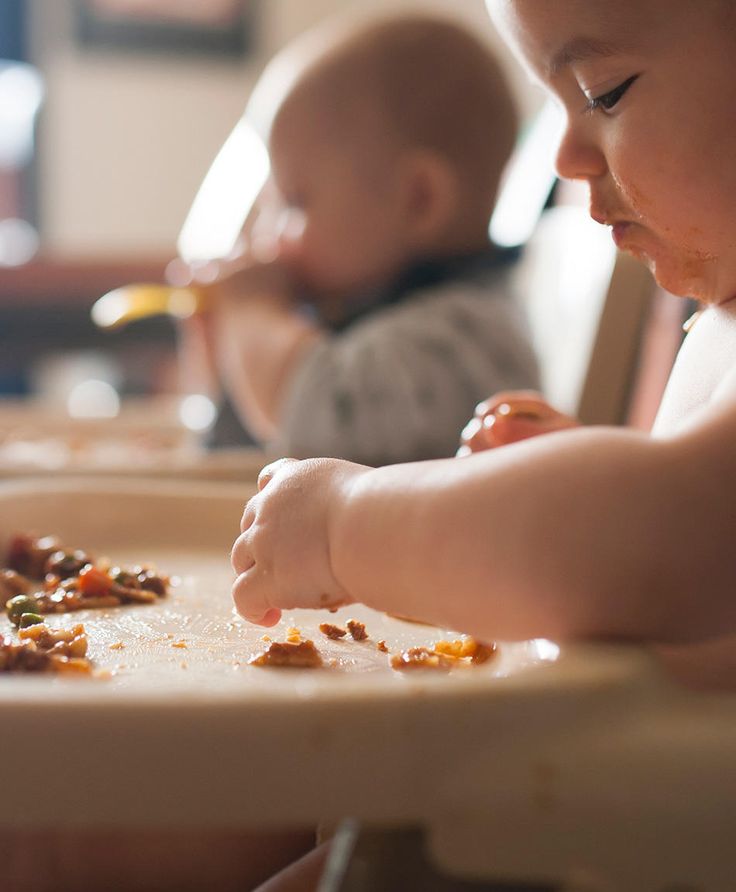
I have seen many friends over the years who use and love these mesh baby food feeders (and even pediatric occupational therapists highly recommend mesh feeders)! They are especially handy as a baby teething feeder! You can put some frozen raspberries or other frozen fruit or even an ice cube in it and let your baby safely gnaw and gum it, cooling their poor aching teething gums!
The Munchkin fresh food feeder is perfect in that you can give your baby chopped up pieces of fresh fruits and vegetables without having to puree them to a pulp! The mesh prevents large pieces from coming through so they won’t chock on the fresh food! Yeah!
I put some cut grapes, pieces of chicken, and more in mine when I tested it out to give to my 8-month old baby.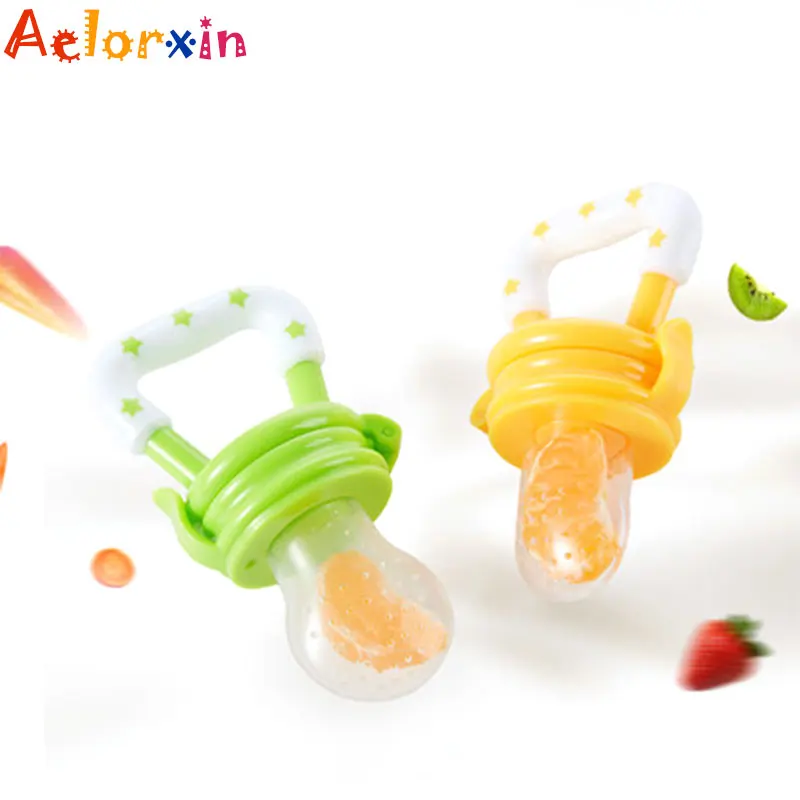 She loved gnawing on it!
Some of the best foods for a mesh feeder include:
- raw apples
- chunks of melons
- frozen blueberries
- pears
- peaches
- raw carrots
- nectarines
- chunks of meat
It is recommended to empty and wash out your mesh feeders shortly after use to make it easier to clean out and prevent any food going bad in there! I found it super easy to rinse out with a little dish soap at my sink. But some foods like bananas can be more difficult to clean out of it.
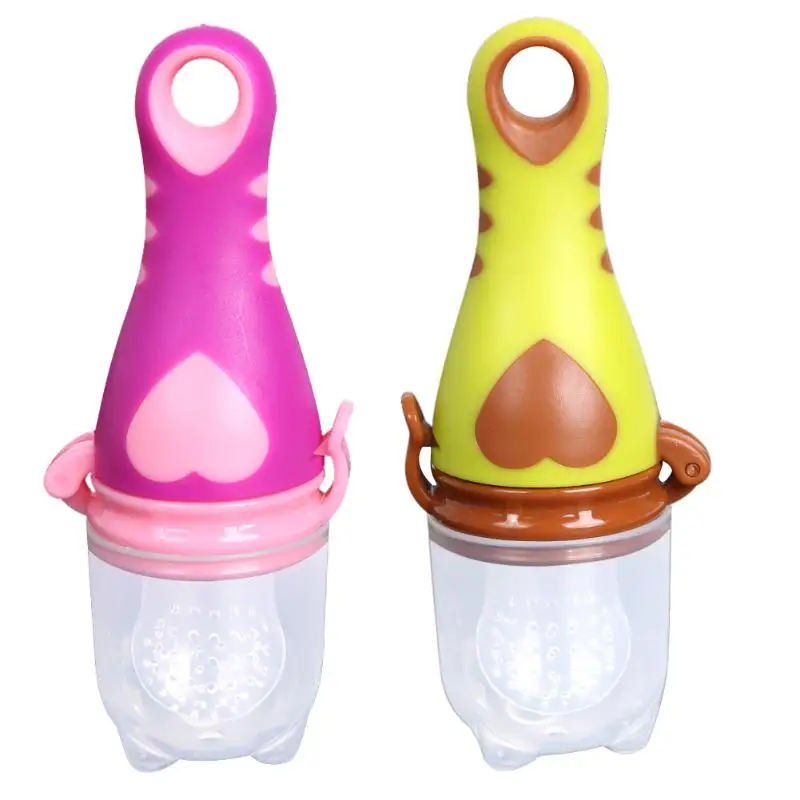
The Munchkin Fresh Food Feeder comes in pink/purple, green/blue, and yellow/green colors for $3 each on Munchkin.com. You can also opt for one of their Munchkin Deluxe Fresh Food Feeders that come with a convenient on-the-go cap with snap-tight closure for $4 each on Munchkin.com. Amazon has the 2-pack fresh food feeders that I received for $5.99.
Munchkin Silicone Baby Food Feeder
Similar to the above fresh baby food feeder, there is also a Munchkin silicone baby feeder too (but I didn’t receive this product to try out).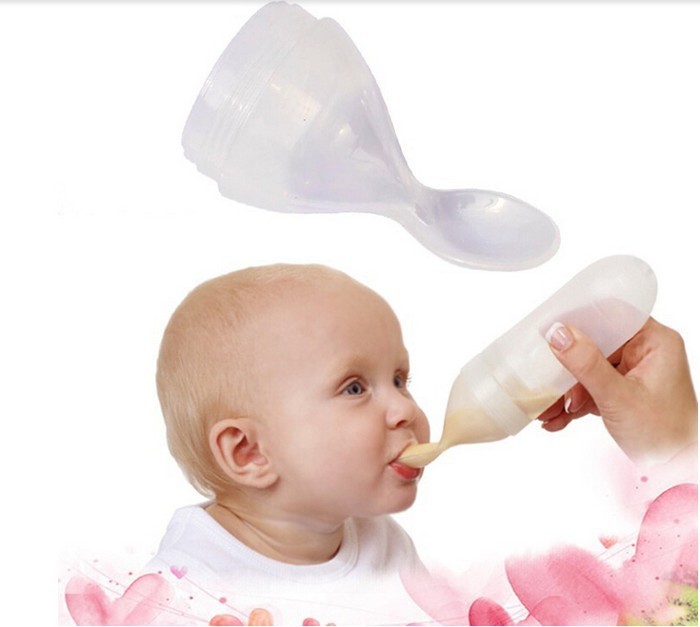
The silicone baby feeder is actually designed for babies ages 4+ months whereas the other ones are designed for babies 6+ months old.
The silicone baby food feeders are easier to clean, but smaller and actually designed for baby food purees rather than large fresh food, though some people still put large pieces of food in them (but it’s harder to fit them in these).
Munchkin silicone baby food feeders come in pink, green, and blue and includes an on-the-go cap for $4.50 on Munchkin.com.
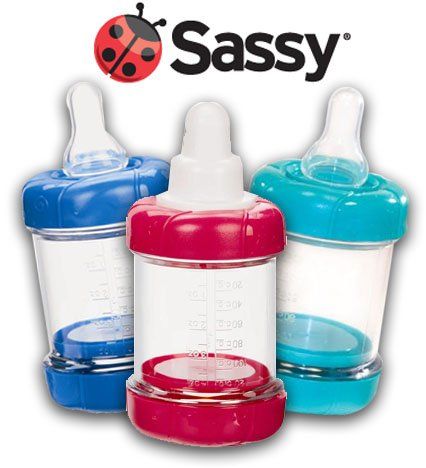
Baby Food Bottle Feeder
I don’t use baby bottles hardly at all, so maybe that is why I had never heard of a baby food bottle feeder before!
There are some bottle manufacturers that offer alternative bottle tips that allow you to squeeze out baby food from inside the bottle to the base of a replacement bottle head – a food dispensing spoon!
With our baby twins we had used baby bottles that could swap out tips for sippy cup tips, and we used those silicone sippy cup nipples with moderate success (until they got teeth and stuck utensils, pencils, and other objects into the opening making anything but spill-proof).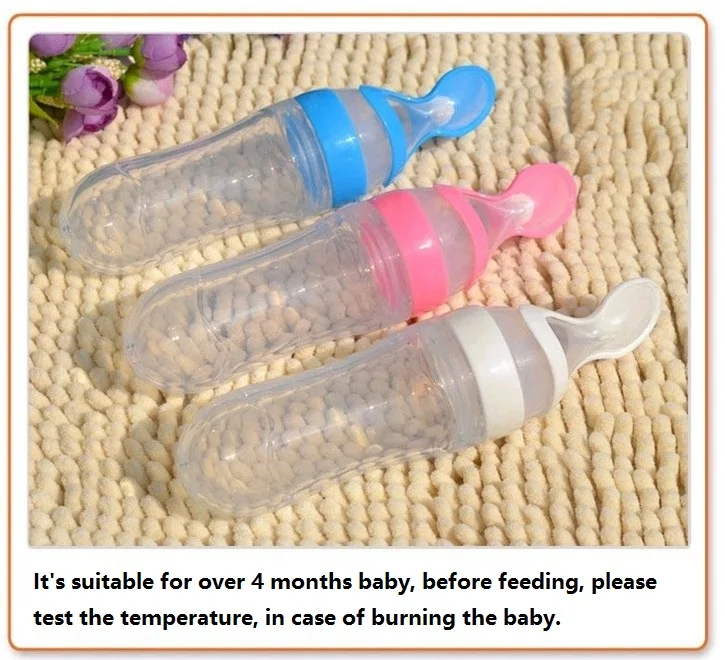 The baby food feeder bottle nipples also make sense!
It doesn’t appear like there are many bottle companies that actually make these anymore. Nuby used to make one called the Nuby Infa Infant Feeder and the Nurtur Care Infa Feeder but they are no longer available for purchase. I did find that Sassy offers a baby food nurser bottle (on BuyBuyBaby and Amazon).
The cool thing about this product is that it has a vacuum disc that keeps air out and moves cereal or baby food without clogging. Plus there is a handy travel cover so you can take baby food on the go much easier. The spoon is also like a soft nipple which is easier on those little mouths than a regular spoon.
Reusable Squeeze Pouch Baby Food Feeder
I recently got a reusable squeeze pouch baby food feeder from Noobie Box‘s Noobie Eat Box. I have always wanted one of these because I hate how wasteful and expensive all these baby food pouches out there! You can easily fill one of these up with apple sauce, your own fruit purees, or yogurt and save yourself a ton of money, time, and trash!
Squeeze pouches are super handy for feeding soft pureed foods to babies (and older kids too – let’s be honest!), especially on the go! No utensils required and when they get older can safely suck them down themselves without making any messes.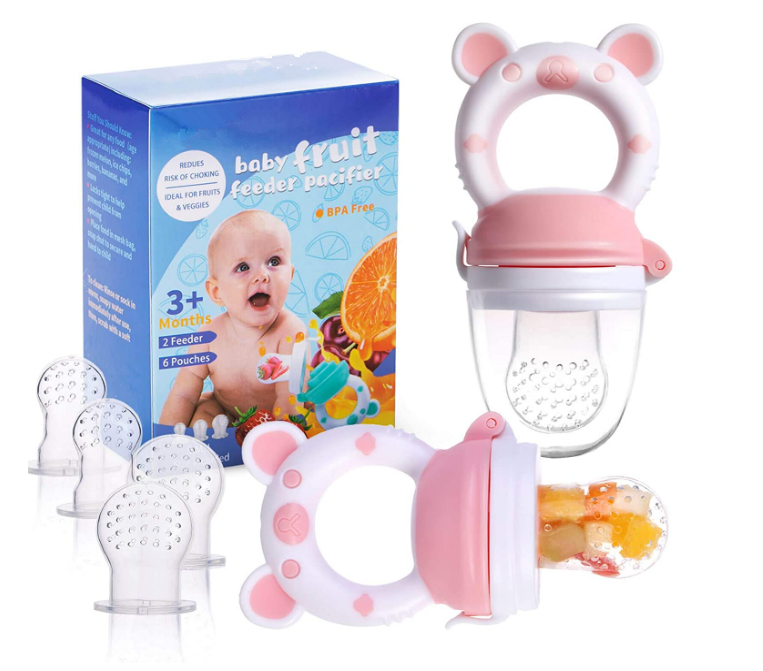
My baby at 8-months old cannot manage one of these on her own (she loves to squeeze them) but uses baby food squeeze pouches has helped her develop some sucking skills, skills that will come in handy when introducing sippy cups with straws.
If you are interested in picking up reusable squeeze pouches, there are many options on Amazon from brands like Squooshi, WeeSprout, Baby Brezza, Kiddzo, and others costing about $9.99-$19.99 for multiple reusable pouches.
Munchkin does not carry any baby food pouches, but they do have Click Lock Food Pouch Spoons! They work with most leading pouch brands. The spoons are twisted onto the ends of the pouches, allowing you to squeeze baby food from pouches onto a baby-friendly spoon. They’re designed for kids ages 4+ months. It’s pouch feeding without the mess (hopefully).
You can get a 2-pack of the Munchkin Click Lock Food Pouch Spoons for $4 on Munchkin.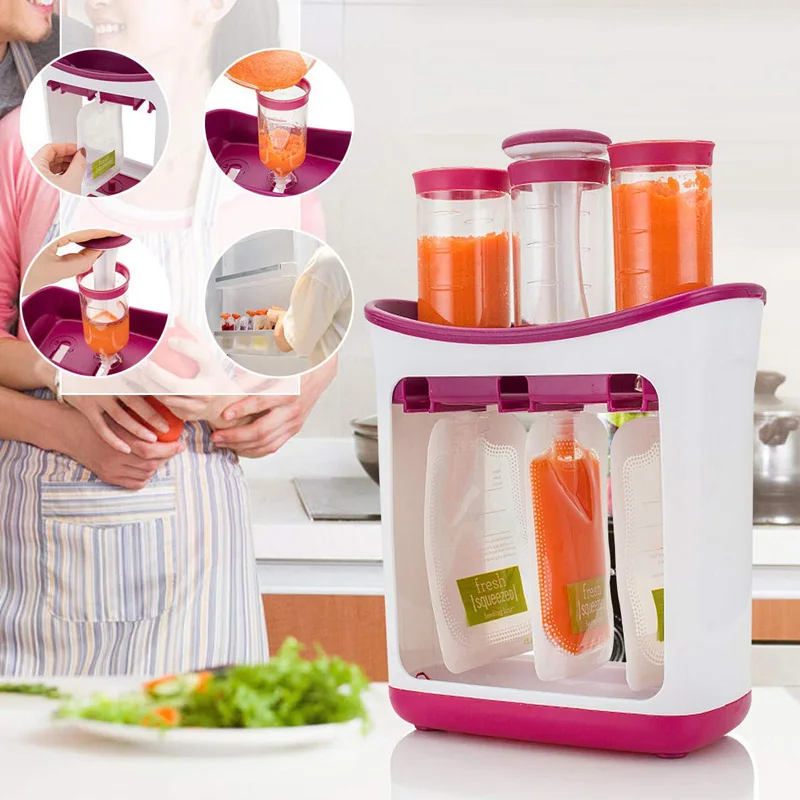 com.
com.
If you want to pick up several of these great Munchkin baby food feeders, remember that you get FREE Shipping on Munchkin.com Orders Over $25 + FREE Returns! Plus, you can also Sign up to receive an additional 10% OFF!
I’m so glad there are so many great and innovative baby brands making products to help me feed my baby safer and cleaner!
I’d love to know what you’ve thought about various baby food feeders you’ve used over the years, sharing your own reviews of which one(s) is your favorite.
Be sure to check out these other great posts:
- Thrifty Mom’s Guide to Essential Baby Feeding Supplies
- 15 Must-Have Baby Items
- How to Take Care of a Baby’s First Teeth
- How to Transition Baby from Bottle to Sippy Cup
- What Happens When You Grow Up to Be a Picky Eater Adult
Jummingbird Baby Feeder Project 💡 Gardening | Ru.
 homeinteriorz.com
 - Choosing your jar
- Prepare your can
- Add red
- STRISSISSISSIS IN THE FIDER
- Cleaning Jar Hummingbird Feeder
Hummingbirds to design tasty nectar, and making a hummingbird feeder from an empty jar is an affordable project that anyone can make. Turn a baby food container into a personalized, eye-catching feeder with this simple, versatile project, and you'll soon have a sprawling feed station that can accommodate more hummingbirds without having to buy more expensive feeders.
Choosing your jar
While baby food jars are popular for home feeders, they are not the only option. Any can can be used, although smaller cans are easier to hang. The jar can be glass or plastic, and vintage jars with fun shapes like hexagons or old honey jars can be interesting. Small bottles are also suitable, as well as smaller options such as test tubes or floral tubes.
 The jar should not have any chips or cracks, and the lip of the jar and screw cap threads should be intact, as they will need to hang the feeder safely.
 It is best to use a jar with a plastic or metal lid because the lid will help slow evaporation. Glass or ceramic lids are not a good choice, however, because it will be difficult, if not impossible, to drill holes through the lid to allow the birds to access the nectar. If the jar you choose does not have a suitable lid, it can still be used for a hummingbird feeder, but be aware that it will be more attractive to insects and may need to be cleaned and refilled more often.
Prepare your jar
To prepare your jar to become a hummingbird feeder, it must first be thoroughly cleaned. Remove the label and adhesive residue and wash the jar thoroughly with hot, soapy water, removing all food debris along the lip or threads of the jar, and anywhere on the body of the jar. A glass jar can be cleaned in the dishwasher on the top rack, but plastic lids may need to be hand washed so they won't warp.
After washing the jar and lid, sterilize them well by first rinsing them with a mild bleach solution, then rinsing several times with clean, clean water. Let the jar and lid dry before taking the next steps to turn it into a hummingbird feeder.
Once the jar and lid are dry, use a nail and hammer or drill with a thin piece to carefully poke a few holes in the lid. At this point, do not attach the lid to the jar to avoid the risk of breakage. Instead, place the lid on a flat, sturdy surface or workbench and use proper precautions when hitting or drilling. The holes can be placed anywhere on the lid, but a cluster of 3-5 holes either in the center of the lid or on what will become the bottom half of the lid when the feeder is hung will be the most efficient and easy for hummingbirds to use. After piercing the holes, carefully run your finger along the surface so that there are no sharp edges. If necessary, carefully apply any rough edges so that there is no chance of snagging or injuring the birds when drinking from the feeder.
Adding red
While the Baby Feeder can be used without any decorations, adding a few bright accents can help get the hummingbird's attention much faster.
Red attracts hummingbirds the most, and there are several ways to add creative bits of red to a simple bank feeder.
- Attach a flat petaled red silk flower such as a daisy to the lid after removing the center of the flower to expose the feed holes.
- Hang red beads or crystals on an extra length of wire from the feeder's mouth or lip, or slip them into different loops or swirls.
- Use exterior paint or red nail polish to paint flowers, swirls, or other patterns on the outside of the jar.
- Wrap a red or reddish ribbon around the feeder's body or tie it around the mouth, leaving a bow or streamer as desired.
- Craft polymer clay flowers or fun shapes to attach to the lid or directly through the mouth of the feeder.
- Add red balls, crystals or balls to the hopper, which will also increase the level of nectar so that the hummingbirds can pour it more easily.
 Note that if anything is added inside the jar, it also needs to be cleaned and rinsed whenever the nectar is changed.
Suspension of the feeder
Suspension of the baby feeder jar requires only the appropriate length of wire or tape. 16-20 diameter copper or steel wire works best and can be wrapped tightly around the mouth of the jar under the threads and twisted to keep it from slipping off. An excess loop may have swirls or whorls added to it both to decorate and provide perch for hummingbirds, and the feeder may be hung from a garden hook or plant hanger. Tape can be used in place of wire, but must be carefully tied to keep it snug against the jar.
To make the can feeder even more attractive to hummingbirds, place it near flowers and shrubs that provide natural nectar and insects that birds will also snack on. Hanging the feeder at an angle will make it easier for the hummingbird to hang and will keep the nectar closer to the top of the jar for easy feeding.
If you prefer not to hang the hummingbird feeder, it can be placed in a window or hummingbird planter to find it, but ants and other insects will also find it faster, so more frequent cleaning will be required.
Jar Hummingbird Feeder
Not only is this hummingbird feeder easy to make, it's also easy to clean. The jar just needs to be rinsed with clean water regularly; perfect every time it refills. If the old nectar has become particularly dirty, or if the feeder is showing other signs of dirt or mold, disinfect it with a mild bleach solution. The lid should also be rinsed, and perches can be dried thoroughly if spoiled by spilled nectar or feces.
Making a flask nectar feeder is a fantastic, easy recycling project and a great way to turn a piece of trash into lullaby treasures that will last for years.
Instruction video: .
DIY bird feeders: 50 ideas with photos
How to make a bird feeder? The cold has already set in, and the children in kindergartens, schools and at home with their parents rushed with might and main to build a variety of bird houses for food. But there are a lot of design ideas, so it’s convenient to familiarize yourself with all the possible options in advance and then make your own. We on the Active Mom portal also took care of this issue and therefore we offer to fully understand the topic of homemade feeders and see photos of ready-made bird canteens.
Contents
- Do-it-yourself feeder is a noble cause
- Bird feeders from plastic bottles
- Simple feeder
- Make your own bird feeder with metered feed.
- Complicated bottle feeder
- How to make a bird feeder from improvised materials
- From an ordinary glass jar.
- Original bird feeder
- Beauty and more!
Do-it-yourself feeder is a noble deed
In order for the feathered representatives of the fauna to remain wintering or come to wintering in this area not to experience hunger, it is important for us to take care of them, to feed them. It is a necessary and noble thing - besides, you can make a bird feeder with your own hands from anything.
It always hurts me to watch big birds chase small ones. Do you also not like it when impudent pigeons eat poor tits and sparrows? Will you take this into account when assembling a feathered house? Write your thoughts in the comments!
Bird feeders made from plastic bottles
The most popular, simple and quick option is to use a variety of plastic containers. It is very easy to cut out excess parts of them with a knife or scissors, and the container itself looks like a house. There are a lot of variations on the theme of a bird feeder made of plastic bottles: from very simple to complex designs.

Simple feeder
A simple option that even preschoolers can handle (with a little help from the elders): cut holes in an eggplant from under water or other plastic containers - “windows” (one or more - depending on the size), wrap their sharp edges with electrical tape or tape so that the birds do not get hurt, pour food on the bottom (millet seeds or special bird food bought at a pet store) and hang the resulting feeder on a tree on a rope.
See also
What is a sliding folder and how to make it? Materials for downloading and printing
Sliding folders are an effective way of conveying up-to-date information about the upbringing and development of children, which is actively used in kindergartens. The product is double-sided…requires not only a practical, but also an aesthetic component, then the feeder can be decorated. For example, using a thread of twine, straw and decorative elements (everything is attached to the base with a thermal gun), make such a house:
Or cut off the top and bottom of the bottle and, discarding the middle, connect them together, paint over with acrylics in a single color and then decorate.
 Then these cute cozy houses with food will be waiting for the birds:
Make your own bird feeder with metered feed.It's a great idea to dispense food for birds, because the advantages of such a device are obvious - they are not afraid of rain and wind, they are designed for long-term use, which does not require adding food every day.
So, you can make through holes in the bottle, into which plastic or wooden wide spoons can be inserted at a slight inclination. There should still be a place in the hole from which the food will spill out (or from which the bird can peck it out). Fill the container with food to the brim and hang it on a branch. A few grains will fall on the spoon, and as the birds eat them, new food will fall out.
Sophisticated Bottle Feeder
A more sophisticated but more durable design that will protect both food and birds from bad weather on a rainy day is a bird feeder consisting of three plastic eggplants: 6 liter, 2 liter and 1.
 5 liter. Feed is poured into a one and a half liter bottle, it is inserted into an empty two-liter bottle with the neck down. In a two-liter bottle, 3-4 holes are pre-cut through which the food will be poured into a large container. The construction of these two containers is attached inside a large six-liter eggplant, on the bottom of which you can pour food. In a 6-liter container, you must first cut out the windows, not completely removing the plastic parts, but forming “stands” from them, on which the birds will sit, and “visors” above their heads. As food is eaten from the bottom, it will gradually spill out of the neck of a one and a half liter bottle. Such a large, durable feeder will become a source of replenishment of the vitality of more than a dozen of our feathered brethren.
 How to make a bird feeder from scrap materials
Despite the popularity of plastic bottle feeders, there are many alternatives to making them.
Cans and coffee tins can also serve as a container for such a house.
From an ordinary glass jar.
And basket with lid.
And the usual cardboard packaging for milk or kefir - the option will be more durable and protect the structure from rain if you wrap the cardboard with tape.
Here is such a simple and at the same time original design in the form of a double-folded metal mesh, inside which you can put bread:
Original bird feeder
at the same time it will serve as a decoration for your yard, then make special "kozinaki" for birds.
To do this, mix bird food with melted lard (great for titmouse) or sugar syrup with diluted gelatin, fill muffin molds with the resulting mixture and pierce the place where you will pass the rope with a skewer.
Put the molds in the freezer for 20-40 minutes (depending on the size of the mold), remove them and carefully remove the resulting figured feeders. It remains to hang them by a rope on a tree.