What is the difference between stage1 and stage 2 baby food
When to Start Stage 2 Baby Food
Categories: Babies, Nutrition, Tips / How-TosYour baby’s first 12 months of life are marked by milestone after milestone, from learning how to roll over, sit up and crawl to growing those first few baby teeth and experiencing “real” food for the very first time. One especially exciting milestone is the move away from simple Stage 1 purees into the more complex flavor and texture combinations of Stage 2 baby food.
This brief guide covers the highlights of this important dietary transition for your baby, including when to introduce Stage 2 baby food, which blends to serve first and how to know when it’s time to move on.
What is the Difference Between Stage 1 and Stage 2 Baby Food?Baby food stages can be confusing because there’s no set standard for labeling these products. Different brands may use slightly different naming conventions (some even offer Stage 4!) and may list different recommended age ranges for each stage.
Regardless of branding or specific naming, however, the main difference between Stage 1 and Stage 2 baby food comes down to two key characteristics:
- Ingredients: Whereas Stage 1 baby foods are made from a single ingredient, Stage 2 baby foods blend two or more ingredients together. They may still have fruits and veggies as the primary ingredient, but Stage 2 foods often incorporate meats, legumes and grains as well.
- Texture: Stage 1 baby foods are very smoothly pureed and are soupy enough to drip off of a spoon, while Stage 2 foods may be roughly pureed, blended or strained. They maintain a thicker, denser consistency and may include small chunks for your baby to gum around in their mouth.
The move from Stage 1 to Stage 2 baby food will depend on your baby’s individual development.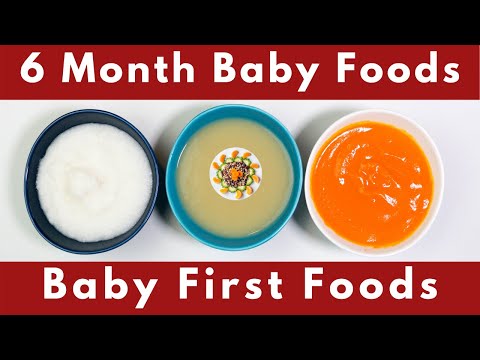 Because every baby develops on their own timeline, there is no hard-and-fast, one-size-fits-all “Stage 2 baby food age.” Instead, you can think of this transition as a natural continuation of your baby’s food journey, from first trying solid foods in Stage 1 to now exploring their full potential in combination purees.
Most babies start eating solid foods around 4–6 months, depending on when they show signs that they’re ready for solids:
- Sitting up unassisted
- Demonstrating steady head control
- Losing the “extrusion reflex” (where the tongue pushes food forward in the mouth rather than back)
- Expressing curiosity about what others are eating
While nutrition should still come from breast milk or formula during this time, Stage 1 foods are important for getting your baby used to the flavors, textures and sensation of food as well as identifying any allergies or sensitivities.
Stage 2: Experimenting With SolidsAfter several months of Stage 1 single-ingredient purees, babies will start expressing readiness for the next phase in their eating journey: more kinds of food, thicker textures and larger portions. To know when to start Stage 2 baby foods, watch out for signs and milestones that may include:
- Finishing a single-ingredient puree and seeming hungry for more
- Being able to swallow Stage 1 foods without the tongue thrusting it immediately back out
- Having tried a variety of Stage 1 purees in different food categories, such as vegetables, fruits, legumes and grains
- No signs or symptoms of allergies or intolerance to any of the Stage 1 purees
In terms of age, many babies start Stage 2 combo baby purees around 8 months, but try not to fret too much over the exact timeline. Just like with the introduction of Stage 1, your baby will let you know when they’re ready!
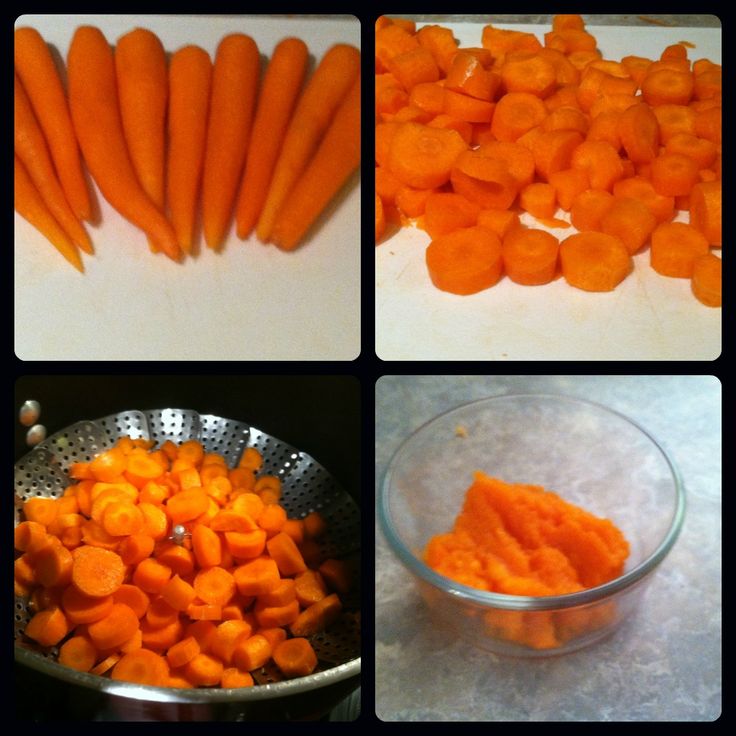
What are the Best Stage 2 Starter Foods?As you move to Stage 2 baby food combinations, it’s best to start with ingredients that your baby already knows and accepts. For example, if your baby loves single-ingredient carrot purees, try offering a basic Stage 2 combination that serves up this vibrant veggie with something new. Not only does this help with acceptance, but it also helps ensure that your baby tolerates each new ingredient you introduce. To ease the transition, you can even mix some of the new Stage 2 combination into the old Stage 1 standby!
Once your child has adjusted to relatively mild blends like this, you can move on to more “grown up” ingredients like slightly bitter veggies (kale, anyone?) or stronger herbs and spices.
How Long Should My Baby Eat Stage 2 Baby Foods?The window for Stage 2 foods typically lasts anywhere from 1–4 months, depending on when your baby started Stage 2 and when they show signs of readiness for Stage 3. For most babies, the transition to Stage 3 foods (also called “finger foods”) will occur around 10 months of age.
Signs of readiness for Stage 3 often center around an interest in self-feeding:
- Pushing your hand away when you feed
- Reaching for the spoon as you feed
- Playing with plates or bowls at mealtime
- Demonstrating greater hand-eye coordination
- Mastering (or almost mastering!) the pincer grasp
Again, try not to worry about the exact date; your baby’s move to Stage 3 foods will happen whenever they’re developmentally ready. For more tips on moving beyond combination purees, check out our guide to transitioning to Stage 3 baby foods.
Wherever your baby is in their eating journey, it’s never too early to work toward developing a healthy, well-rounded diet that will last for a lifetime. If you have any questions about when to start Stage 2 baby food or how to more smoothly transition between stages, Nurture Life’s child nutrition experts would love to help. Just reach out to us at [email protected]!
Lara Field
Lara has been working with Nurture Life since its inception, collaborating with the culinary team on the creation of all menus and recipes to ensure they are nutritionally appropriate and correctly proportioned for every age and stage of a child’s development and providing pediatric nutrition expertise to Nurture Life customers. Lara is the owner/founder of FEED—Forming Early Eating Decisions, a nutrition consulting practice specializing in pediatric nutrition and digestive diseases. Lara has over a decade of experience in clinical practice at two of the top ranked pediatric hospitals in the country, Lurie Children’s Hospital and University of Chicago Medical Center. Lara received her B.S. from the University of Illinois at Urbana-Champaign and M.S. and dietetic internship from Rush University Medical Center in Chicago, Illinois. Lara truly enjoys the process of eating (and feeding!), from procuring the ingredients at various grocery stores and farmers markets, to organizing her pantry/refrigerator at home to make it easy to select healthy options, to preparing balanced meals with her children. Whether it be a decadent treat to a hearty, home-cooked meal, there is no greater satisfaction for Lara than enjoying food with her family.
Back to Posts
Stay updated:
Thank you for subscribing!
Something went wrong.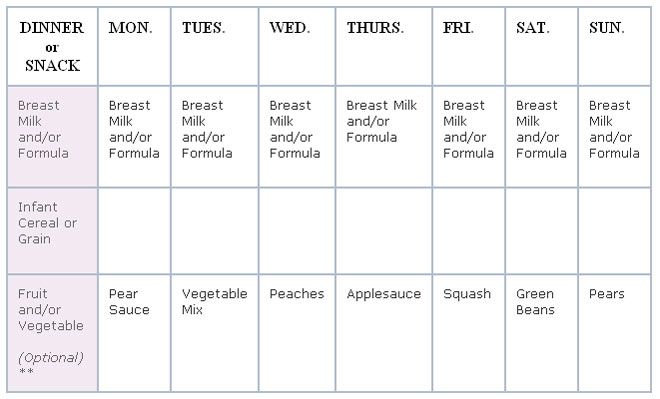 Please try again.
Guide to Baby Food Stages (Purees and BLW)
Learn everything you need to know about Baby Food Stages in this easy-to-read, comprehensive guide. It explains the different feeding stages, going over what every stage — Stage 1, Stage 2, and Stage 3, Finger Foods, and Baby-Led Weaning — is all about.
Medically reviewed by Jamie Johnson, Registered Dietitian Nutritionist (RDN)
Baby Food StagesAre you finding the baby food feeding stages confusing?
Well, you are not alone!
Stages 1, 2, 3, table foods, finger foods, baby-led weaning… ahhh… help! What does it all even mean? 🤯
Don’t worry; I’m here for you!
I broke down each stage into an easy-to-digest (pun intended) guide. 👊
What is in this guide:
- Baby Food Ages
- When Can Baby Start Solids?
- Overview: Purees – Stages 1, 2 and 3
- Overview: Baby-Led Weaning or Finger Foods
- Stage 1 Purees
- Stage 2 Purees
- Stage 3 Purees
- Baby-Led Weaning or Finger Foods
Baby Food Stages Video
Watch this video to see how the different baby food stages compare.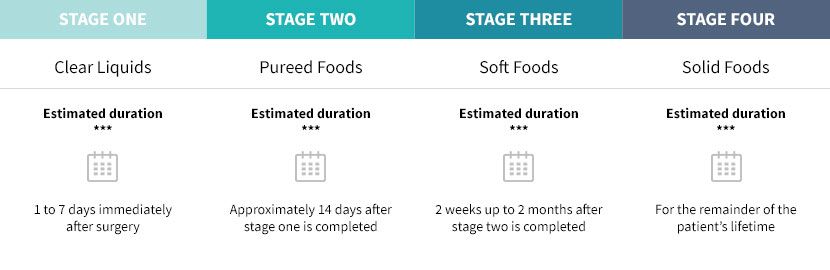
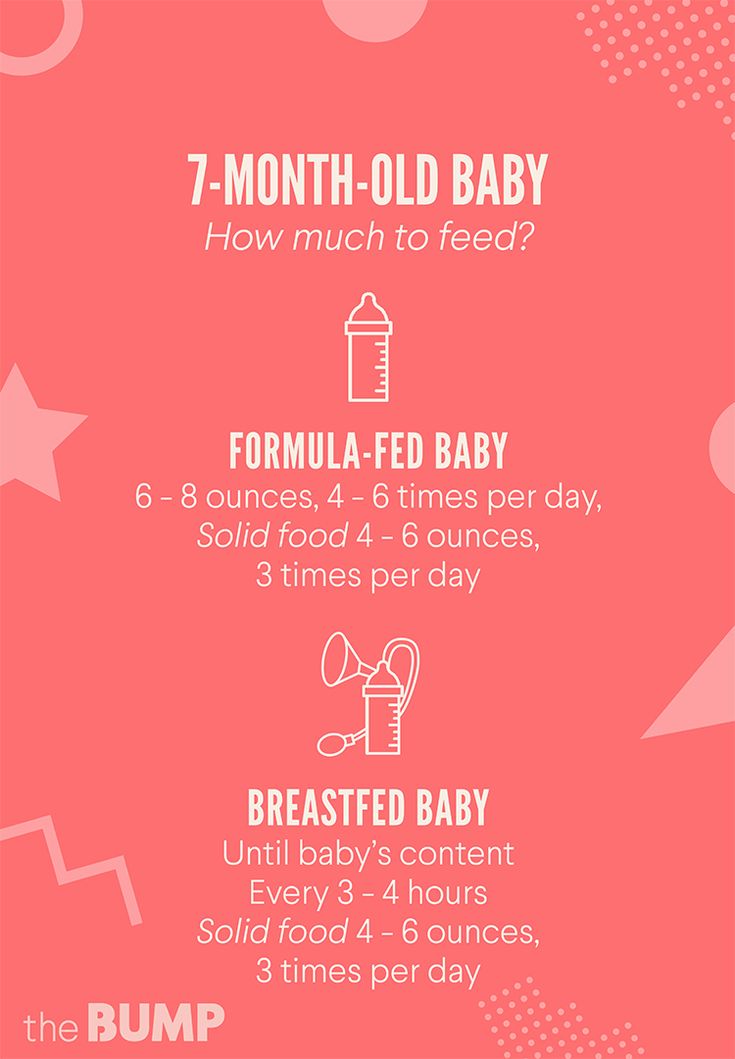
- Stage 1 Purees: 4-6+ months
- Stage 2 Purees: 6+ months
- Stage 3 Purees: 9+ months
- Finger Foods: 10+ months
- Baby-Led Weaning: 6+ months
When a baby can start on solids is determined by their own rate of development. Generally, it occurs between 4-6 months of age for purees and 6+ months for baby-led weaning. Some of the developmental milestones babies need to reach in order to start solids include: if your baby has solid control of their head and neck, if your baby has doubled in weight, and if your baby is reaching for or opening their mouth when you eat (see my guide here). But remember, before you start baby on solids, you should consult with your pediatrician to make sure your child is developmentally ready.
Purees – Stages 1, 2, and 3So, to start, Baby Food Purees are grouped into 3 different stages — Stage One, Stage Two, and Stage Three. Without a doubt, they all consist of baby food purees. But they actually range from single-ingredient smooth purees to chunky combination purees filled with soft-cooked foods. Here’s a quick reference:
- the first stage of feeding
- single-ingredient thin purees
- smooth and easy to swallow
- high chair
- suction bowl
- spoons
- bib with food catcher
- slightly thicker
- combination purees made up of several different ingredients like fruits and vegetables
- may also include yogurt, grains, and proteins
- combination purees with soft-cooked chunks of food
- perfect for babies that need to practice chewing and swallowing foods
First time making homemade baby food? Then, I would suggest that you start by reading my very in-depth Guide on how to Make Homemade Baby Food – which goes over all the important information such as the best cooking tools to have on hand, safe storage, how to know when baby is ready for solids, how to introduce purees, the best first foods for baby, and more! If you are doing Baby-Led Weaning, then be sure to check out my Complete Guide to Baby-Led Weaning – which covers what exactly is baby-led weaning, to every parent’s concern of baby-led weaning and choking, this guide goes over it all. I will also share how to know when baby is ready for BLW, the top 10 best first foods, a helpful sample blw feeding schedule, helpful tools to have on hand, and much much more!
Basically, Baby-Led Weaning and Finger Foods are the same types of food; they’re just served to your baby at different times. Baby-Led Weaning is a newer approach to feeding your baby where you skip the puree stages altogether. Rather, you serve baby chunks of cooked food. Whereas Finger Foods, or sometimes referred to as Table Foods, are typically served to your baby after they master Stage 3 baby food purees.
In short, finger foods are served at 10+ months and baby-led weaning starts at 6+ months.
You can read more here: The Ultimate Guide to Finger Foods for Baby-Led Weaning.
Baby-Led Weaning Products We Love- high chair or clip-on chair
- mat for under high chair
- suction plate
- self-feeding spoons
- long-sleeved bib
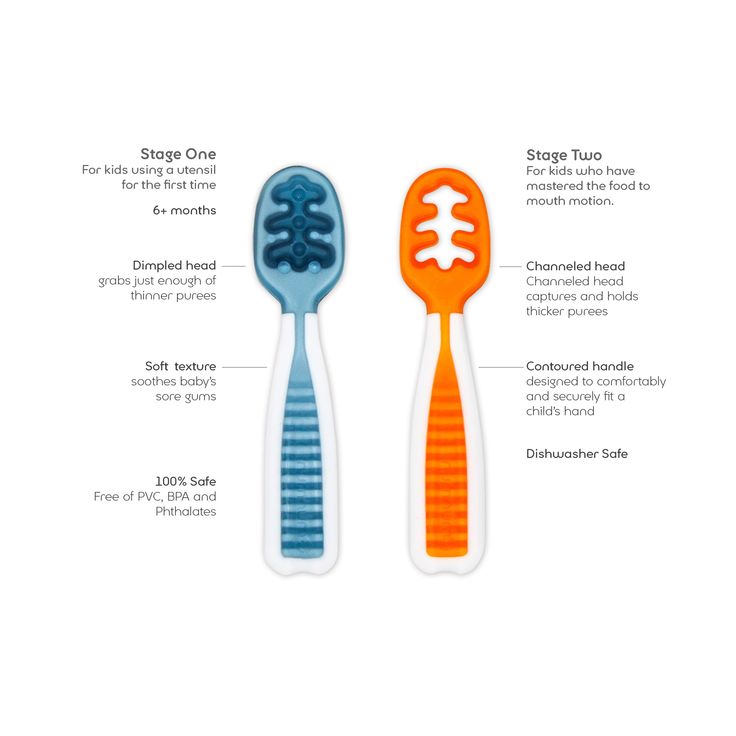
Stage 1 baby food is the first type of puree you will be introducing to your baby. Made with a single ingredient and pureed until smooth, these simple purees are perfect for your budding eater. Besides, they are nutritious and full of flavor!
- age: 4-6+ months
- single-ingredient recipes
- smooth texture
- can be thinned out (similar to a thick soup but dripping off the spoon)
- first bites can be fruits, veggies, or grain cereal
Here are a few tips:
- first, offer your baby one puree at a time to watch for any allergic reactions
- also, consider offering different colors of food and flavors to start developing their palette
- 15 Stage One Baby Food Purees (4-6 months)
- 4 Homemade Baby Cereal Recipes (4+ months)
- 36 Healthy + Homemade Baby Food Recipes (4+ Months)
Meanwhile, Stage 2 purees will make your baby’s mealtime more exciting with multiple ingredients. This time, you can focus on exposing your baby to various fruits, veggies, grains, and proteins.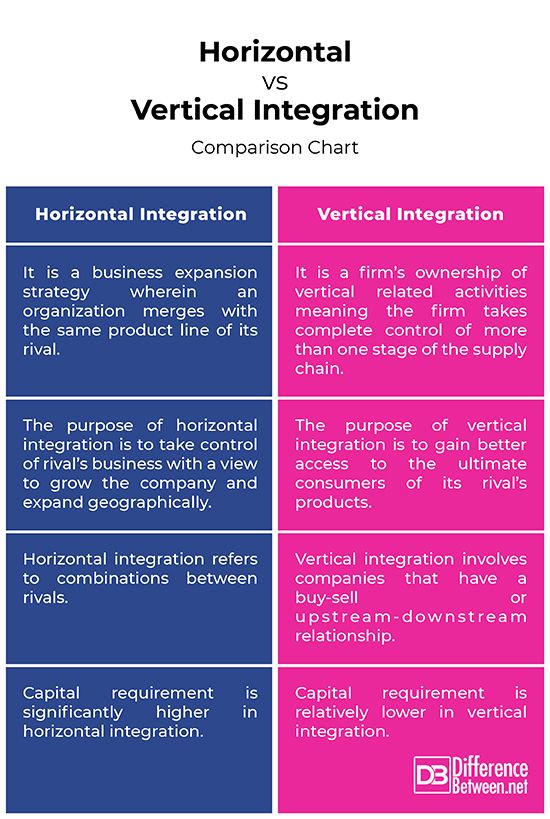 Plus, you can also add spices and herbs to come up with appetizing and unique flavor combinations.
- age: 6+ months
- combination of multiple-ingredient purees
- smooth texture
- can have a thicker consistency than stage one purees
- great way to expose your baby to a variety of flavors and food colors
- may include plain yogurt, grains, and proteins
- 18 Stage 2 Baby Food Purees (That Baby Will Actually Eat)
- 15 Fast + Easy Baby Food Recipes (made in under 15 minutes!)
- 18 Breakfast Ideas for Baby (6+ months)
In contrast, Stage 3 is full of hearty meals with multiple-ingredient purees plus soft-cooked chunks of food. This stage is all about giving your baby time to learn how to chew and swallow small pieces of soft foods. Then the next step will be finger foods or table foods.
- age: 9+ months
- combination purees and soft-cooked chunks of food
- also a great way to expose your baby to various food flavors and colors
- features wholesome fruits, vegetables, grains, meats, yogurt, even spices
- easy to make — simply pulse your own meal with a blender to turn it into a baby meal
- 18 Stage 3 Baby Food Recipes (Easy, Delicious + Homemade)
As mentioned, Baby-Led Weaning is actually a newer approach to feeding your baby where you skip the puree stages altogether. Instead, you serve small chunks or strips of cooked food right from the very start. Ultimately, you would be feeding your baby the exact food you are having at that meal.
However, finger foods can be served to your baby after Stage 3.
To sum up, finger foods and the food you serve to baby for Baby-Led Weaning are the same foods. But they are served at different times during your baby’s eating journey. Finger foods are served at 10+ months, while baby-led weaning starts at 6+ months.
If you want to learn more, check out my Ultimate Guide to Finger Foods for Baby-Led Weaning.
- baby-led weaning age: 6+ months
- finger food age: 10+ months
- both include chunks of cooked foods
- can be served in 2-3 inch strips or chopped to pea-sized pieces
Remember, avoid hard foods such as hot dogs, popcorn, dried fruit, nuts, etc., that can be choking hazards.
Baby-Led Weaning (Finger Food) Recipes- 125 Baby Led Weaning Foods (Starter Foods + Recipe Ideas)
- 8 Baby-Led Weaning Meal Ideas for Baby + Toddler
- 6 Baby-Led Weaning Breakfast Ideas
Stage 2 baby food: what is it, when to start and what options to try
Contents
- What is stage 2 baby food?
- Identification of stages by brand
- What is the difference between stage one and stage two meals?
- When and how should I start feeding my baby 2nd stage complementary foods?
- What are your baby food options for stage 2?
- Store-bought baby food stage 2.
- Homemade baby food stage 2
- Conclusion
Accompanying your child through the different stages of learning how to eat real food is an exciting journey. Sometimes, along with a sense of pride - - you can feel a little confused. How should you navigate milestones?
What is stage 2 baby food?
Let's start from the beginning: what do the stages of baby food mean?
Rome wasn't built in a day, and your child's digestive system won't jump from liquid to solid in one day either.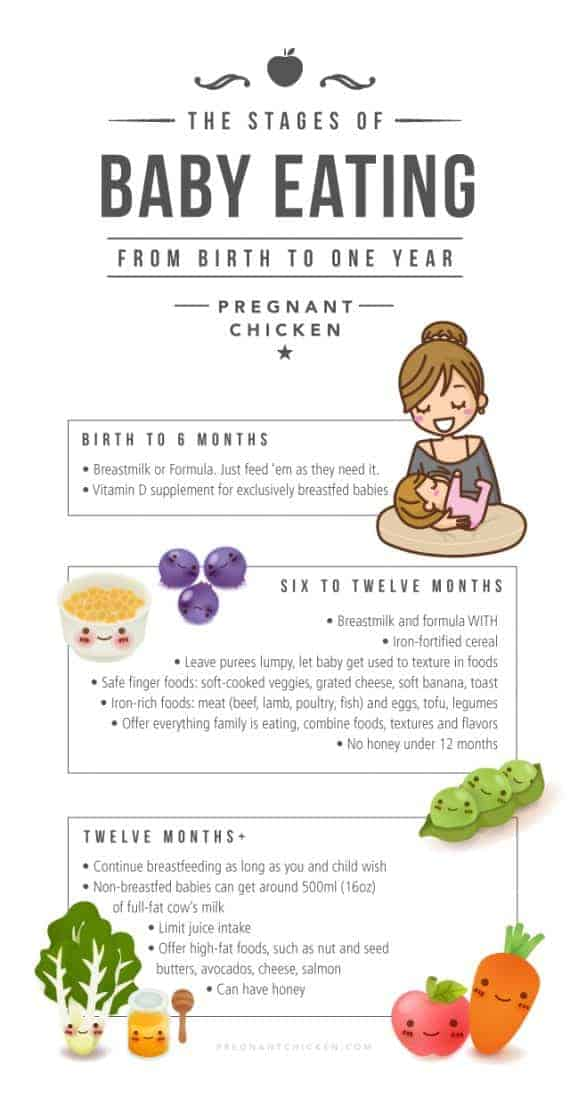 That's what baby feeding stages are for - to help your baby manage the mechanics of eating and ease the transition to your baby's digestive system.
Defining milestones by brand
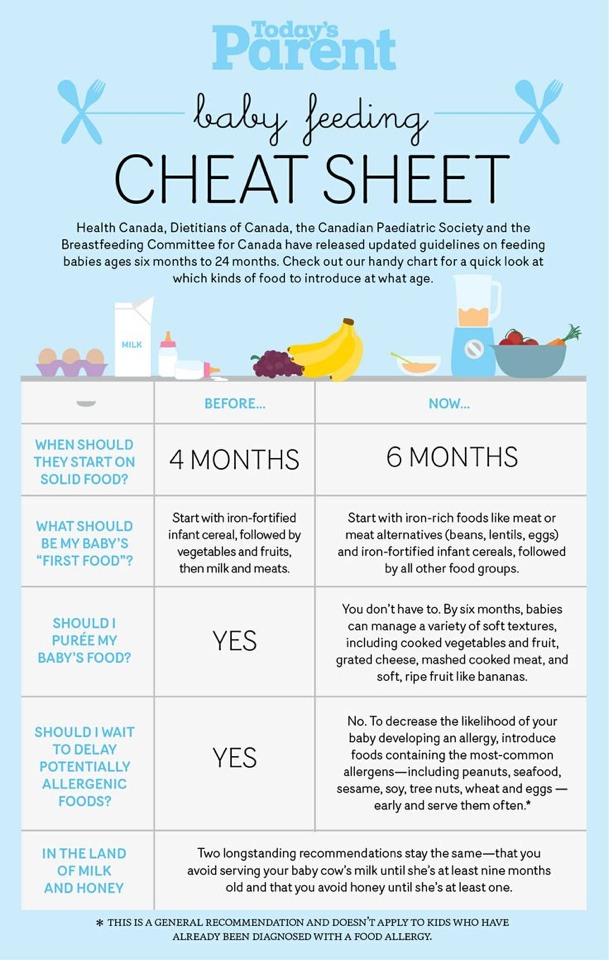
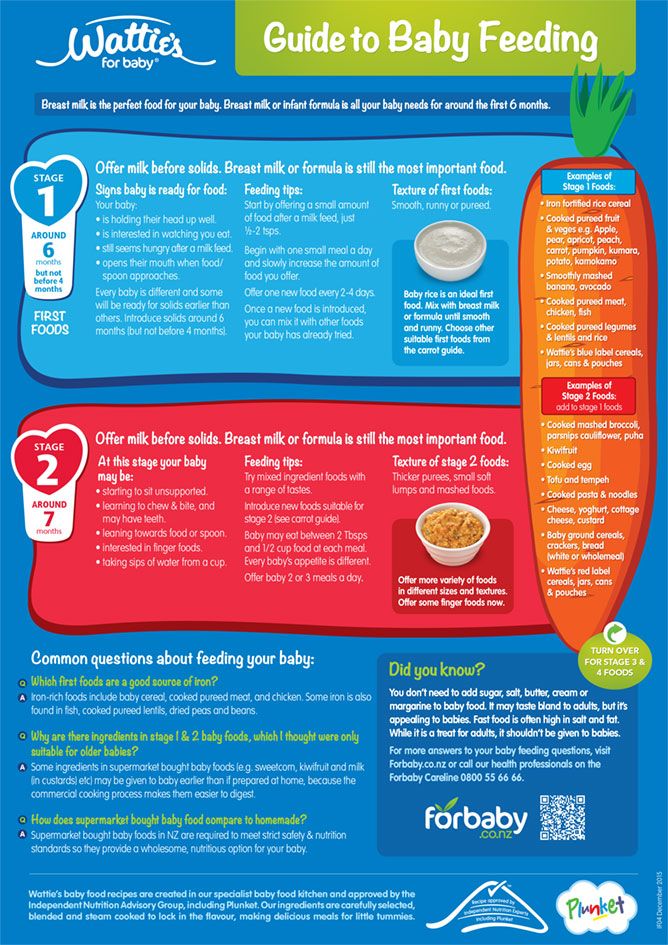
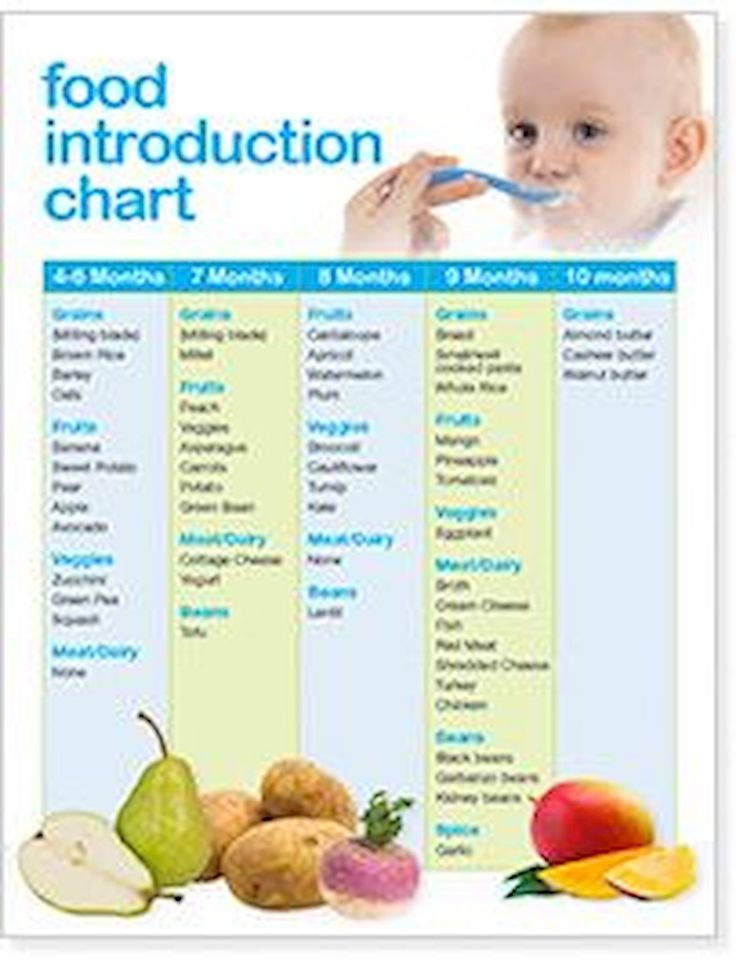
Although the different baby food steps are not standardized (if they were, your life would be easier!), most popular brands more or less follow these four steps:
- Step 1: From 4 up to 6 months (single ingredient watery puree)
- Stage 2: 6 to 9 months (thicker texture, strained or puréed)
- Stage 3: 10 to 12 months (porridge with soft chewy small pieces )
- Stage 4: After 12 months (food that you can eat with your fingers and small soft pieces of food that you share with your dinner)
What is the difference between eating the first and second stages?
Stage 1 food is quite watery. They turn into a smooth paste that runs off a spoon easily, so stock up on bibs.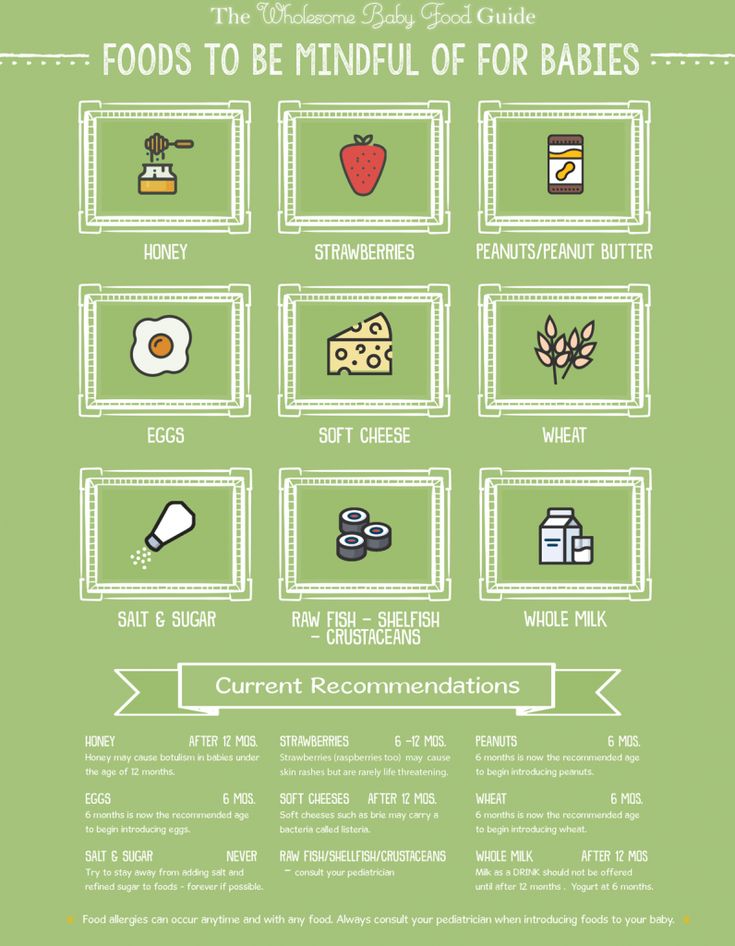 These products usually consist of one ingredient: oatmeal, apples, carrots. Your child will start eating about half a teaspoon of this.
Stage 2 food becomes more exciting. They are strained or ground into a thick paste. They are made from a combination of foods that can include legumes and even meat or fish. They can combine flavors, such as fruit and vegetable blends. Your child's appetite is growing and you will have to keep up with larger portions.
When and how should I start feeding my baby 2nd stage complementary foods?
Around 6 to 9 months of age, your baby is probably ready to switch to stage 2 complementary foods. Not every child will stick to this schedule, simply because every child is a separate world.
Here are a few signs that your baby is ready to move on:
- Tongue reflex: At around five months, your baby will begin to lose the tongue thrust reflex and will not immediately push out the food you are trying to feed.
- More Please: They will easily eat the first stage foods and look hungry to eat more.
- Variety: They ate foods from all food categories (vegetables, fruits, legumes, grains, meat) and showed no allergies or intolerances.
- Delight: They easily eat a spoonful of food in stage 1, swallow and swallow with pleasure.
At this exciting stage, feel free to give your child most of the foods. By offering them a wide range of flavors and textures, you give them the foundation for a healthy diet and also make it easier for you. Be aware of the following safety considerations:
- Choking Hazard: Avoid nuts, seeds, and popcorn at this stage. And don't forget to cut round foods like grapes and hot dogs lengthwise.
- No honey: Babies under 12 months old should not be given honey as it can lead to botulism.
- No Juice: Follow AAP guidelines and stick to breast milk, formula or a little water and stay away from juices.
- Safe Feeding: Always fasten your child to a high chair and supervise him while he eats.
And if you're curious about peanuts, here's the scoop: 2017 National Institutes of Health report suggests giving babies peanut-containing foods as early as 4 months of age. (Wait up to 6 months for children with mild to moderate eczema.)
Surprised? Do not be. A recent study showed that Israeli children rarely suffer from peanut allergies because they have been chewing bamba, a peanut-based snack, as early as 3 months old. Talk to your doctor about safe ways to include peanut products in your baby's diet.
What are your baby food options for stage 2?
What is included in the stage 2 baby food menu? Basically, you can go the store or home route. Or you can mix both depending on how much time you have. It depends on you and your personal schedule.
Here are some delicious ideas for both.
Store-bought baby food stage 2.
- Plum: These organic blends come in easy-to-carry bags. Try pear, spinach and peas, or banana and pumpkin.
- Beech-walnut: Available in tins and bags. Serve a few apples and bananas or pineapple, pear and avocado.
- Best in the world: Another organic option, in bags or jars. Try sweet potatoes, barley and chickpeas, or pasta with tomatoes and white beans.
- Gerber: A classic served in plastic jars, jars or bags. Flavor combinations include peach mango and dinner with oatmeal or chicken noodles.
Remember to keep an eye on your baby while he is eating. Bags are convenient, but caps can be a choking hazard. Glass jars can break, so keep them out of the reach of children. Your child should always enjoy snacks and meals under close adult supervision.
Homemade Baby Food Stage 2
Cooking up a storm for your baby's nascent taste buds doesn't have to be a daunting task at this stage.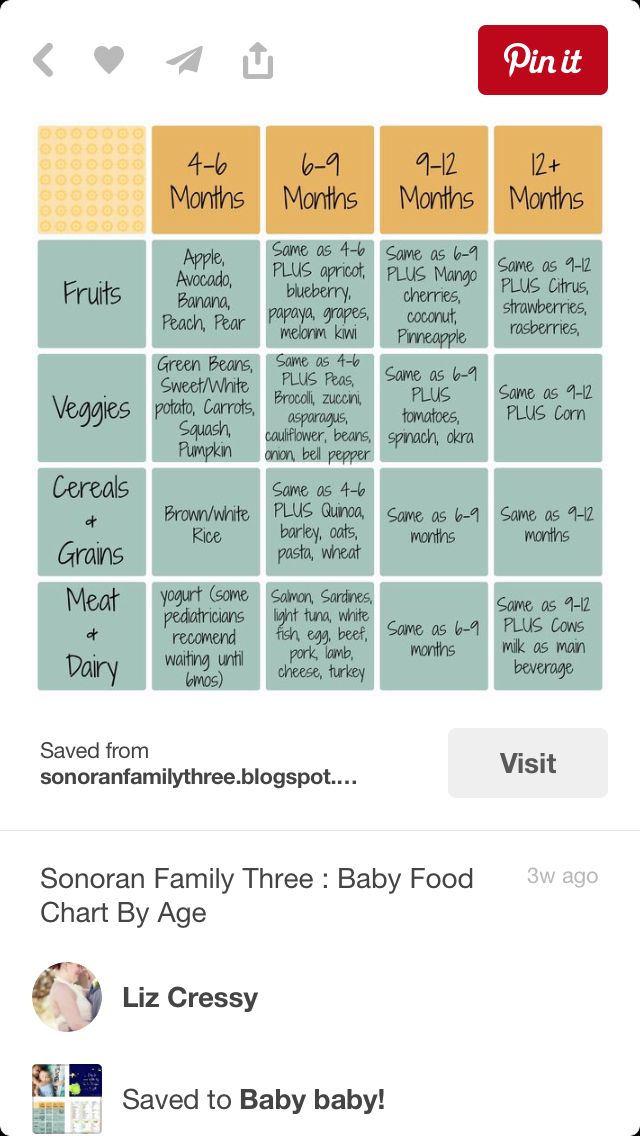 Here are some recipes to help you. (You can find more baby food recipes here.)
Don't skimp on spices and herbs: your little one will appreciate the extra flavor and the micronutrients they contain will boost their immune system.
- Apple, walnut and carrot: Cook the ingredients until they are soft when checked with a fork. Drain off some of the water, but set it aside in case you need to dilute the mixture. Sprinkle with a little curry and stir.
- Blueberries and chickpeas: You can make your own chickpeas or use ready-made ones to save time. Mix equal amounts of blueberries and chickpeas. Mix and add breast milk, formula, or water to get the right consistency. You can also add some rice for added appeal and texture.
- Salmon with fried zucchini and fennel: Drizzle salmon and vegetables with oil and roast for about 15 minutes. Add chopped parsley and stir. You can dilute formula with breast milk, formula, or water.
Conclusion
Enjoy this stage with your child because he will soon move on to the next stages. And then, sooner than you think, you may face competition for the last slice of caramel cheesecake.
Infant formulas without palm oil | How to choose a blend without palm oil
Formula milk is the best substitute for mother's milk if the mother is unable or unwilling to breastfeed her baby. In the article we will talk about:
- what to look for when choosing baby food
- how to properly prepare and store formula
- what you need to be prepared for when switching to artificial feeding
How to choose infant formula
Baby food up to a year should be recommended by a pediatrician who knows the history of the child and his peculiarities of digestion. Mixes are divided into classic and special. Special ones are prescribed for medical reasons for babies who need a special approach due to early birth or health problems.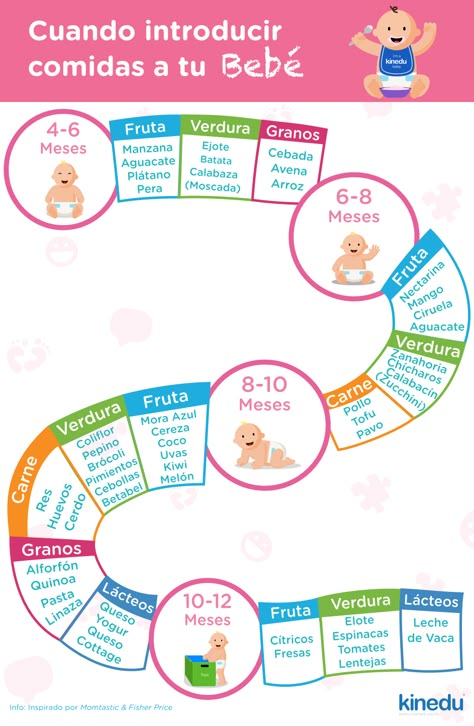 In our article we will talk about classic and improved mixtures. On the topic of special, look for information dedicated specifically to your task.
Composition of infant milk formulas
It is important to understand that baby food is subject to mandatory certification. This means that the state monitors the quality of the product and is a guarantee that it is safe for newborns. Why is not every mixture suitable for every child? It's all about some of the ingredients and their quality. Let's figure it out.
All products consist of proteins, fats, carbohydrates, vitamins and trace elements.
The amount of protein in baby food is an indicator that depends on the type of formula and the age stage. It is not necessary to control it. But you can pay attention to the ratio of whey protein and casein. All manufacturers strive to bring the composition of baby food closer to the composition of mother's milk. Therefore, the ratio of proteins most often corresponds to their ratio in the mature milk of a woman - 60 to 40. The situation is a little more complicated with fats and carbohydrates.
There are three types of carbohydrates: sugar, starch and fiber (prebiotic). The main carbohydrate for babies up to a year old is milk sugar - lactose. In specialized mixtures, lactose can be replaced by other sugar. Babies begin to receive starch later - with the introduction of complementary foods with cereals. A prebiotic is sometimes added to the mixture. These are dietary fibers that are not digested and are a breeding ground for beneficial bacteria. Therefore, mixtures enriched with prebiotics help to normalize digestion in the intestines.
Babies need different types of fats for development - saturated and unsaturated, which are found in breast milk. Neither animal nor vegetable fats can independently reproduce this composition. Therefore, they are combined in infant formulas. Often, as a vegetable component, there is palm oil, which in its pure form is poorly absorbed by the child's body. Hence, there was an opinion about its harm. However, it is important to know that there is a fraction of palm oil that is highly digestible. It's called palm olein. It is worth paying attention to the form in which palm oil is included in baby food.
Vitamins and trace elements in baby food - this is how different brands differ from each other. Below are the recommended norms for nutrient intake in the Russian Federation. You can evaluate the selected food for compliance with the recommendations of the Ministry of Health.
| Substance | Physiological need per day | Comment |
| Energy | 110-115 kcal/kg body weight | for children under 1 year old |
| Squirrels | 2.2-2.9 g/kg body weight | for children under 1 year old |
| Fats | 5.5-6.5 g/kg body weight | for children under 1 year old |
| Carbohydrates | 13 g/kg body weight | for children under 1 year old |
| Cholesterol | no more than 300 mg | for kids |
| Vitamin C | 30 to 90 mg | for kids |
| Vitamin B1 (thiamine) | 0. 3 to 1.5 mg 3 to 1.5 mg | for kids |
| Vitamin B2 (riboflavin) | 0.4 to 1.8 mg | for kids |
| Vitamin B6 (pyridoxine) | 0.4 to 2.0 mg | for kids |
| Niacin | 5 to 20 mg | for kids |
| Vitamin B12 | 0.3 to 3.0 µg | for kids |
| Pantothenic acid | 1.0 to 5.0 mg | for kids |
| Biotin | 10 to 50 mcg | for kids |
| Vitamin A | from 400 to 1000 mcgr. equiv. | for kids |
| Vitamin E | from 3 to 15 mg current equivalent | for kids |
| Vitamin D | 10 mcg | for kids |
| Vitamin K | 30 to 120 mcg | for kids |
| Calcium | 400 to 1200 mg | for kids |
| Phosphorus | 300 to 1200 mg | for kids |
| Magnesium | 55 to 400 mg | for kids |
| Potassium | 400 to 2500 mg | for kids |
| Sodium | 200 to 1300 mg | for kids |
| Chlorine | 300 to 2300 mg | for kids |
| Iron | 4 to 18 mg | for kids |
| Zinc | 3 to 12 mg | for kids |
| Iodine | 60 to 150 mcg | for kids |
| Copper | 0. 5 to 1.0 mg 5 to 1.0 mg | for kids |
| Selenium | 10 to 50 mcg | for kids |
| Fluorine | 1.0 to 4.0 mg | for kids |
Source: Guidelines. 2.3.1.2432-08 "Norms of physiological needs for energy and nutrients for various groups of the population of the Russian Federation" dated 11.12.2008
How to properly prepare infant formula
The ratio of the volume of dry powder and water depends on the type of mixture and the age of the child and is always indicated on the packaging. Recall the general rules that are important to follow:
- sterilize the bottle and teat in a sterilizer or boil;
- wash your hands with soap;
- prepare boiled water with a temperature of 36-38 degrees;
- pour water into the bottle and add the required amount of powder;
- close and shake until completely dissolved;
- Check your temperature by dropping it on your wrist.

Now you can start feeding.
How to store prepared milk formula
The finished mixture can not be stored for more than two hours. Prepare a fresh batch before each feeding.
Do not heat baby food in the microwave. Use a jet of hot water or a water bath.
Close the opened package tightly with a lid and store at room temperature. You don't need to put it in the refrigerator. The measuring spoon should not be stored inside the pack.
Until what age is formula given to a child
Mixtures are divided into stages or steps.
Stage 1 - from 0 to 6 months
Stage 2 - from 6 months to 12 months
Stage 3 - from 12 months
Stage 4 (less common) - from 18 months
Adapted diets are gradually phased out of the diet as they move to solid foods. Parents decide when to stop. It is important to listen to the needs of the child.
Babies over a year old who have already switched to an adult diet are often given formula at night because it is convenient.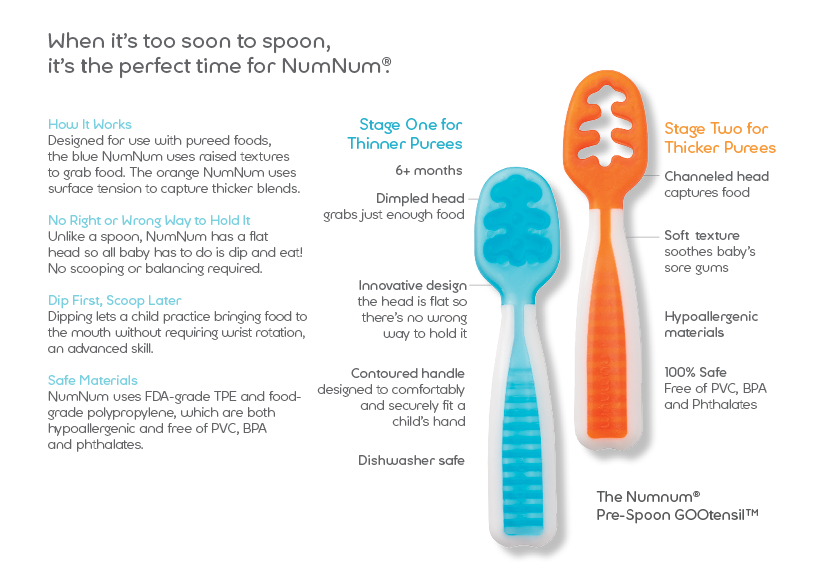 Or before going to bed, because it is high in calories and helps to sleep until the morning without waking up. Moms sometimes cook porridge for older children with a mixture - it's tasty and healthy.
Classic mixtures and mixtures with improved composition.
Such nutrition is suitable for healthy babies who were born at term.
Materna Gold is closest in composition to breast milk. This is the latest development of Israeli nutritionists - nutrition containing breast milk oligosaccharides, which are involved in the formation of the baby's immunity.
Materna Classic Milk is a traditional dairy food enriched with elements necessary for every age of the child.
Materna Extra Care is an improved formula of the classic blend. It strengthens the immune system and helps fight colic due to pre- and probiotics in its composition.
Materna Mehadrin - kosher food, similar in composition to the classic. The difference: Materna Mehadrin uses the milk of cows, which are carefully monitored by the Rabbinate of Israel.