Baby food jar art projects
50+ Fantastic Ways to Re-Use Baby Food Jars
Home » Crafts for kids » 50+ Creative Ways to Re-Use Baby Food Jars
Last updated on
22.6Kshares
50+ baby food jar crafts and creative ways to re-use baby food jars so you don’t have to put throw them in the trash.
If you’ve had a baby in recent years, there’s a good chance you’ve acquired quite a collection of baby food jars. Baby food jars ares so cute and chubby, and such a great size. If you’re like me, you find it hard to thrown them away. If that’s the case, your baby food jar collection could be growing at an alarming rate, and you’re probably looking for things to make with all of those jars.
Well, you’re in luck! One of my Facebook followers recently asked for ways that she could re-purpose her baby food jars, and the HH community responded with dozens of great crafts made with baby food jars along with practical ways to use baby food jars in and around the home.
I’ve gathered up their best suggestions and added a few of my own favourite uses for baby food jars, and I’ve come up with this long list of ideas for you.
From the craft room to the classroom to the bathroom and beyond, here are over 50 ways for you to use leftover baby food jars so you don’t have to toss them out.
50+ Baby Food Jar Crafts
Click on the links below to see project details.
Ways to use baby food jars in the classroom or craft room:
- Crayon Caddy: Paint several baby food jars and store co-ordinating, coloured crayons in them.
- Fill baby food jars with water, and set on the art table to rinse paint brushes in.
- Give each student in the class a baby food jar filled with cream, and make homemade butter together.
- Make a mini “ocean in a jar” in a baby food jar. Pretty on classroom window sill or fun to play with.
- Soak dried out markers in baby food jars to make liquid watercolour paint.
- Make and store homemade finger paint in baby food jars.
- Baby food jars make great paint and glue pots at the easel. Lids keep them from drying out between uses.
- Punch holes in the lids (with a nail) and use jars to store and dispense glitter.
- Make I-Spy Jars in baby food jars.
- Make collection jars for the preschool classroom.
- Fill with small amounts of water for syringe transfer work trays in preschool or kindergarten
- Paint tall baby food jars with food coloring, water and glue for a frosted look. Store pens, pencils and paintbrushes in them.
Things to make for kids with baby food jars:
- Play dough jars: fill several baby food jars with different colours of homemade play dough for a kids’ gift basket.
- Set some baby food jars out in the rain and make this scented rain paint.
- In the play kitchen: fill baby food jars with flour, rice, lentils etc. Glue the lids on, and kids can pretend-cook with them.
- Bug Jars – wrap a pipe cleaner handle around the top, and go exploring in the yard.
- Make these cute and quirky emoji jars for a kid’s dresser or desk.
- Glue painted toy animals on baby food jar lids, use as party favours.
- Fill with homemade slime or silly putty to put in loot bags.
- Make a tooth fairy jar.
- Teach kids how to manage their allowance with 3 tall baby food jars labeled SPEND, SAVE, BANK.
- Make an advent or countdown calendar.
- Fill baby food jars with layers of “coloured sand” (ground sidewalk chalk mixed with salt).
- Use baby food jars to make mini lava-lamps.
Ways to re-use baby food jars in the kitchen:
- Make magnetic spice jars to store on the refrigerator door
- Organize your spice drawer with baby food jars.
- Make Smore’s treats in baby food jars. Hand them out around the campfire or at a party.
- Make a window-sill herb garden with baby food jars.
- Fill baby food jars with condiments for camping or a bbq.
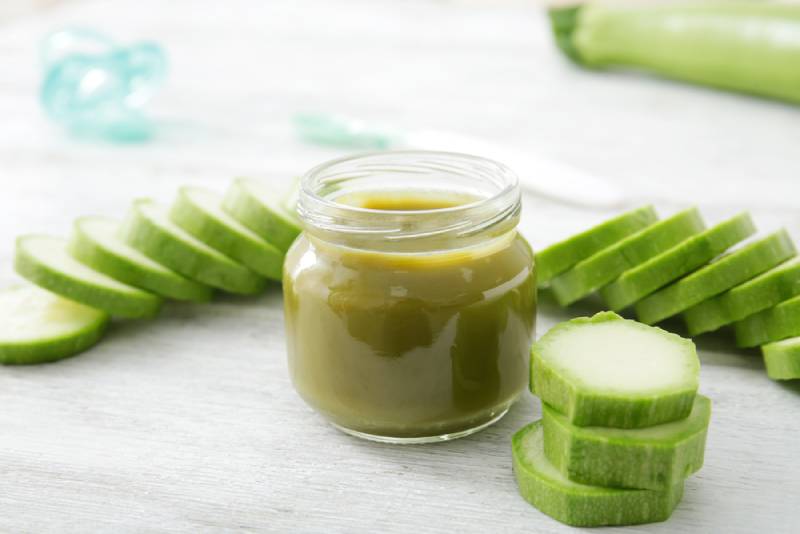
- Sterilize jars and lids, and reuse baby food jars for homemade baby food.
 The serving sizes are perfect.
Gifts and party favours to make with baby food jars:
- Baby food jars make great wedding favours. Decorate and place at each table setting.
- These baby food jar lanterns were hung in a tree at an outdoor wedding.
- Make Lego Head Jars as party favours for a Lego party.
- Make mini calming jars for kids or co-workers
- Make a wish jars or dream jars for your family and friends.
- Give a gift of homemade bath salts or sugar scrub in a baby food jar.
- Make these cupcakes in a jar to give to teachers, neighbours and friends.
- Make a craft kit for a child by filling jars with pom poms, sequins, foam stickers, and beads.
- Hot Cocoa in a baby food jar: layer hot chocolate, shaved chocolate and mini marshmallows in a jar. Cover the lid with a swatch of fabric tied with a ribbon.
Other ways to use baby food jars around the home and garden:
- Store pony tail holders, Q-tips, and hair clips in baby food jars on the bathroom counter.
- Make a spill proof nail-polish remover kit with a baby food jar.
- Plant succulents in baby food jars to display on a porch or patio.
- Hang these colourful baby food luminaries from a tree in your yard.
- Baby food jars are great for storing seeds for the garden.
- Make Photo Globes by placing your child’s photo inside a baby food jar.
- Organize your spare change: each jar holds a different type of coin.
- Use baby food jars to hold paper clips, thumb tacks etc. on a desk or in a drawer in an office.
- Travel jewelry keeper for earrings and rings.
- A Mini sewing kit in a baby food jar is great for travel or the office.
- Fill baby food jars with Puffs, fishy crackers, Cheerios, nuts etc. Keep in the diaper bag for the kids.
- Nail the lids of baby food jars to the underside of a shelf to store screws, nails and craft supplies.
- Store several baby wipes in a baby food jar and keep in your purse or diaper bag.
Baby food jar Christmas crafts:
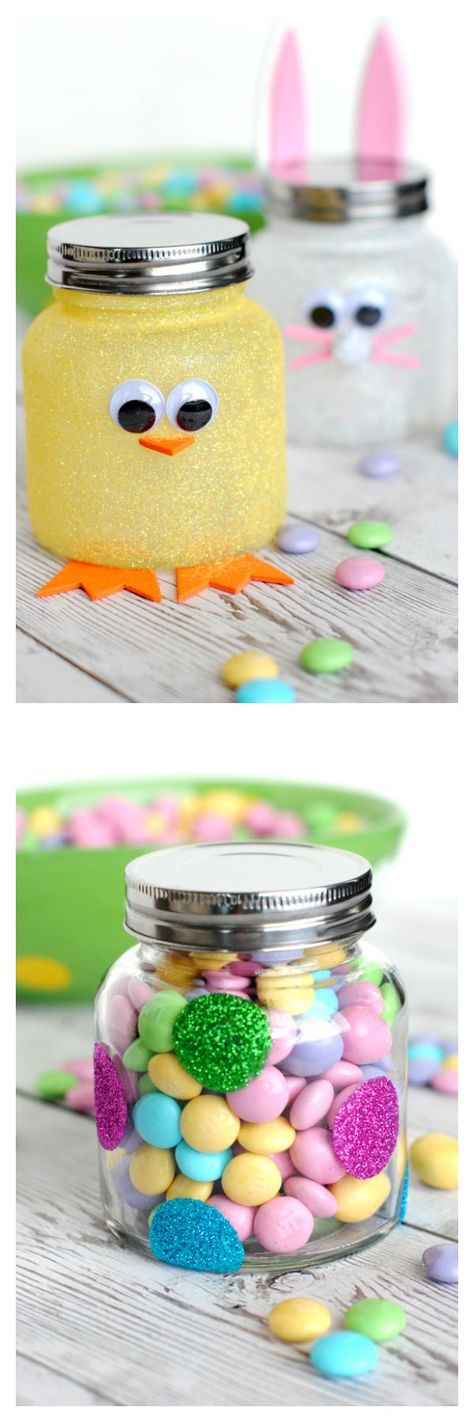
- Turn a baby food jar into a snowman Christmas tree ornament.
- Make festive holiday votive candle holders.
- Make sparkly tea light luminaries in baby food jars.
- Baby food jars make great miniature snow globes.
- Make Reindeer food for Christmas Eve.
What if you STILL have leftover baby food jars?
If you have more baby food jars than you could possibly ever use, even after reviewing all of the ideas, please consider giving your collection to a teacher, a crafter or a daycare provider. Most will be happy to put your little glass jars to good use.
Looking for more crafts to make with your recyclables? Check out:
Re-purposed Denim Craft Aprons
Re-purposed Denim Bibs
25 Creative Ways to Re-use your Keurig’s K-Cups
22 Ways to Re-Use Cardboard Tubes
Follow the Hooligans on Facebook!
Jackie Currie
Jackie is a mom, wife, home daycare provider, and the creative spirit behind Happy Hooligans.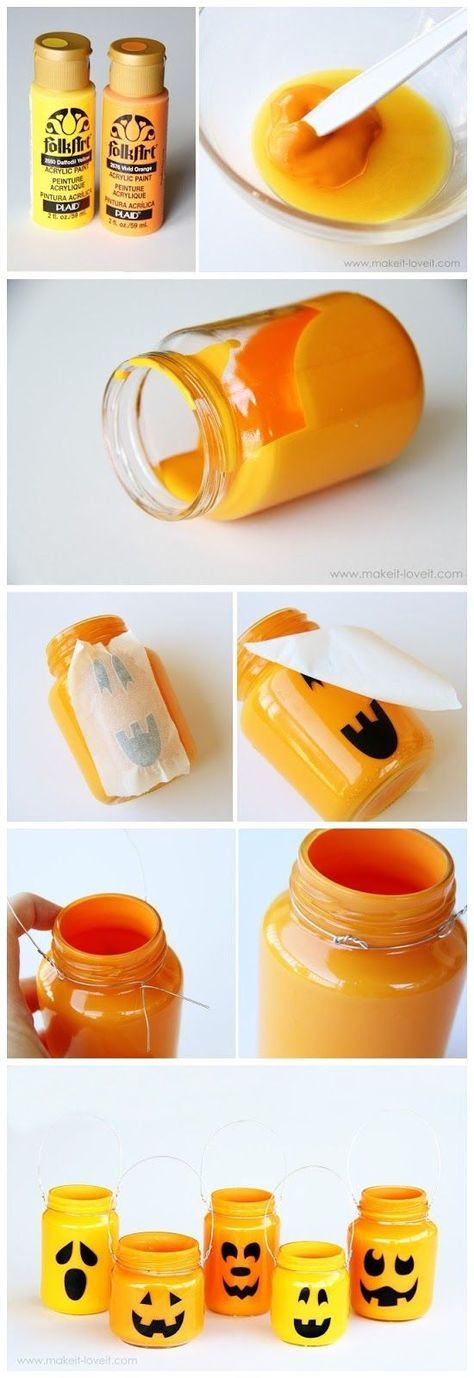 She specializes in kids’ crafts and activities, easy recipes, and parenting. She began blogging in 2011, and today, Happy Hooligans inspires more than 2 million parents, caregivers and Early Years Professionals all over the globe.
22.6Kshares
Reader Interactions
24 Clever Baby Food Jar Crafts – It’s all about Repurposing!
I love glass jars of any kind because you can reuse and repurpose them in so many different ways, and they’ll last forever.
My friend is a new mother and she’s been handing over all her empty baby food jars to me because they’re just so small and cute and I love them!
I knew I had to find something to do with them before my stockpile became unmanageable, so I thought I’d let you in on the wonderful ideas that I found.
Jump to:- S’mores in a Jar
- Photo Globes
- Storage Plaque
- Paint Dipped Vases
- Dyed Luminaries
- Spice Jars
- Mini Rainbow Cakes
- Hanging Planter
- Under-the-Shelf Storage
- Topiary Treats
- Small Storage
- Lego Heads
- Mini Pincushion
- Nail Polish Remover Jar
- Sugar Scrub
- Candles
- Chalkboard Paint Organizers
- Salt and Pepper Shakers
- Teacher’s Gift
- Snow Globes
- Kid’s Crafts Organizer
- Snowman Ornaments
- Nightlights
- Hummingbird Feeder
S’mores in a Jar
Everyone loves s’mores right? This cute and tasty craft makes excellent gifts – you can hand over a few for people to warm up and toast in their ovens at home.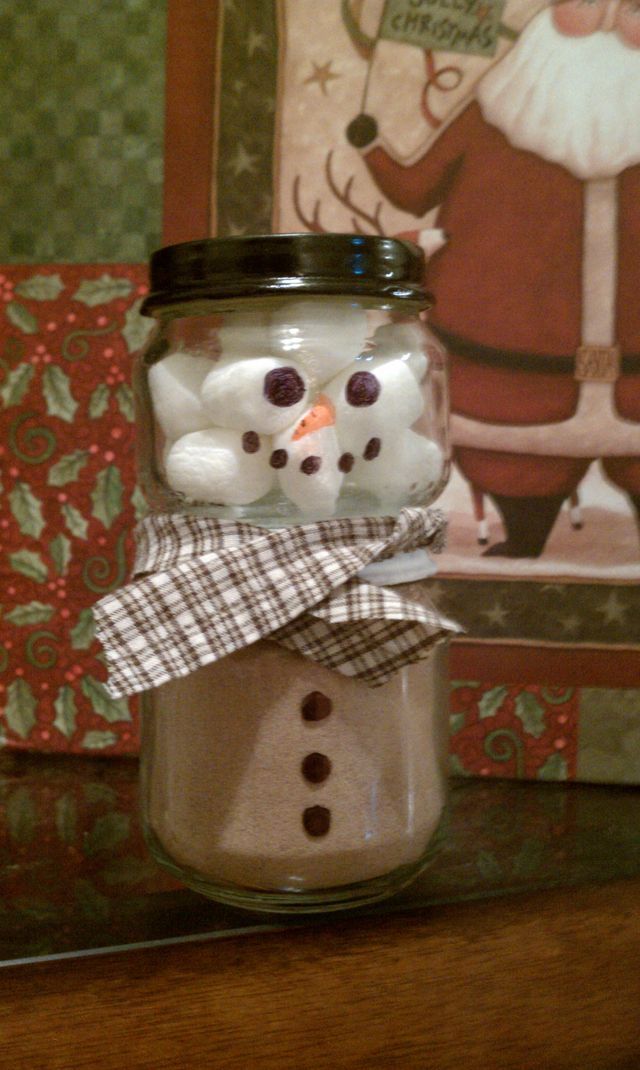
If you’re a real fan of this classic campfire treat, then you may enjoy this incredible s’more dip too!
DIY Instructions and Project Credit – PharMa
Photo Globes
These are sort of like snow globes, except you actually put photos in the jars instead of snowmen or Santas.
These would look so cute all resting on your mantelpiece, or they could make excellent Christmas gifts when the time finally comes around.
DIY Instructions and Project Credit – DesignMom
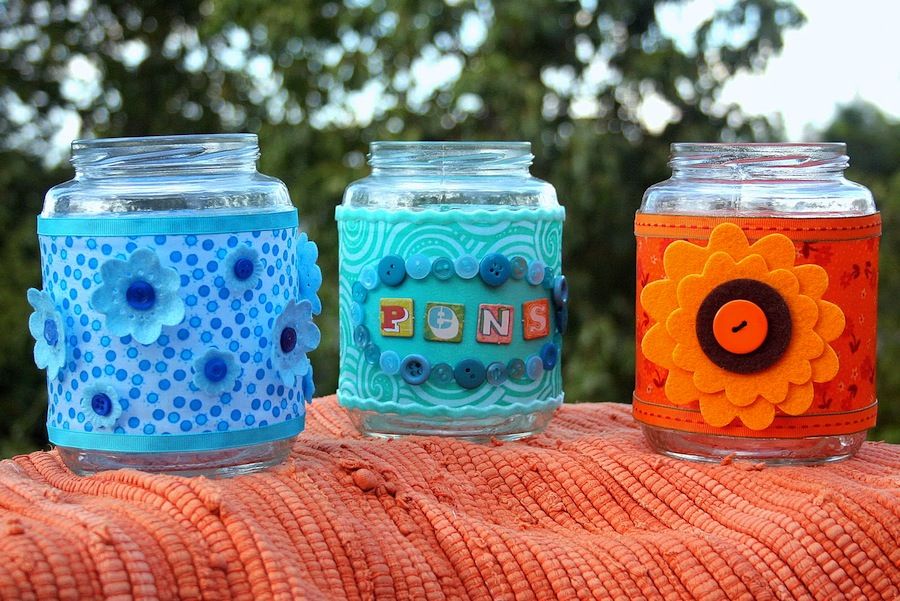
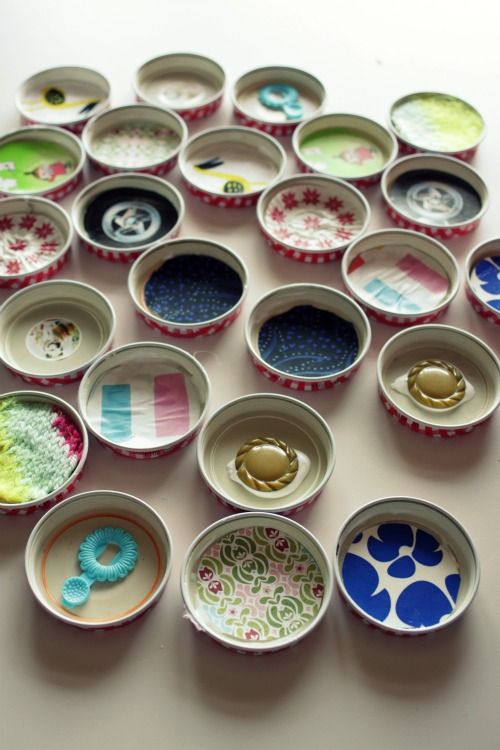
Storage Plaque
When laid on their sides, these jars make excellent little storage compartments, so all you need to do is attach them to a plaque which you can then mount on the wall.
You can keep all your Q-tips, bobby pins, nail files etc. neat and tidy.
DIY Instructions and Project Credit – OhHowCrafty
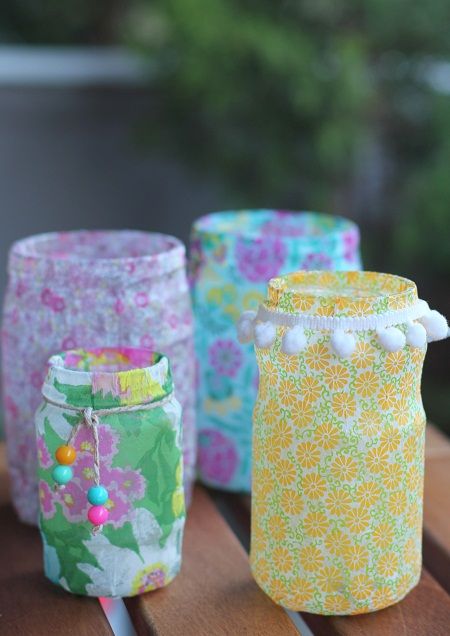
Paint Dipped Vases
Instead of having one large vase full of flowers, why not take a more modern and minimalist approach with a series of small paint dipped vases?
It’s such a simple thing to do, yet it can make such a big impact.
DIY Instructions and Project Credit – Apples&Onions and OhHappyDay
Dyed Luminaries
How gorgeous are these multicolored luminaries? They’d really brighten up your garden in the summer, especially if you’re having people over for a barbecue or just a nice evening out under the stars. There’s just something so magical about lights in the trees.
DIY Instructions and Project Credit – InspiredByFamilia
Spice Jars
These small jars are just the right size to store spices and make your kitchen look a little prettier.
You can either paint the jars and just stand them somewhere, or you can attach magnets to the lids and store them on the side of your fridge for easy access!
DIY Instructions and Project Credit – AtThePicketFence and Dav.I.Son
Mini Rainbow Cakes
I’m not quite sure why, but I just love eating treats out of jars. If you have a whole collection of these empty jars then you could use them to make these stunning little rainbow cakes – you’ll be happy about the portion size! They’re perfect for a kid’s party or even a baby shower.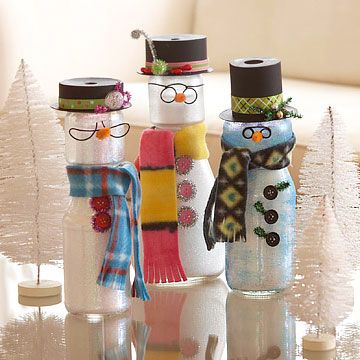
DIY Instructions and Project Credit – MakeLifeLovely
Hanging Planter
I am in love with this project! The planter looks so beautiful with the bursts of color from the flowers, and adding in some tea lights would create lovely lighting, too. It’s such a great idea, and luckily it’s not too difficult a task!
DIY Instructions and Project Credit – MakeLifeLovely
Under-the-Shelf Storage
Physical space is sometimes a bit of an issue when it comes to storage, which is why I am so in love with this idea!
The handy jars can hold all your little bits and bobs, and since they’re tucked away, hanging underneath the shelf, they won’t get in the way.
DIY Instructions and Project Credit – CraftinessIsNotOptional
Topiary Treats
These jelly bean jars with charming little felt flowers are just so endearing! They make perfect little decorations for kitchen teas or parties, which double up to become party favors when the guests make their way home.
DIY Instructions and Project Credit – SugarTotDesigns
Small Storage
These glass jars really make fantastic little storage solutions for any small items you may have from coins to hair clips to little sewing kits.
You can even use them to keep your jewelry safe when packing. All you need to do is make them look pretty and you’re good to go!
DIY Instructions and Project Credit – LovelyEtc.
Lego Heads
I can’t believe that I’ve never noticed that baby food jars have the exact same shape as Lego heads! What a revelation! I don’t even care what I store in these; I’m climbing up the Lego fandom ladder and making myself a whole population of these!
DIY Instructions and Project Credit – HandmadeCharlotte and UniqueAndChicCreations
Mini Pincushion
A baby food jar is just the right size for an adorable mini pincushion like this with space for little buttons. And it’s such a quick, easy and cheap craft to make – you’ll only need a couple of minutes.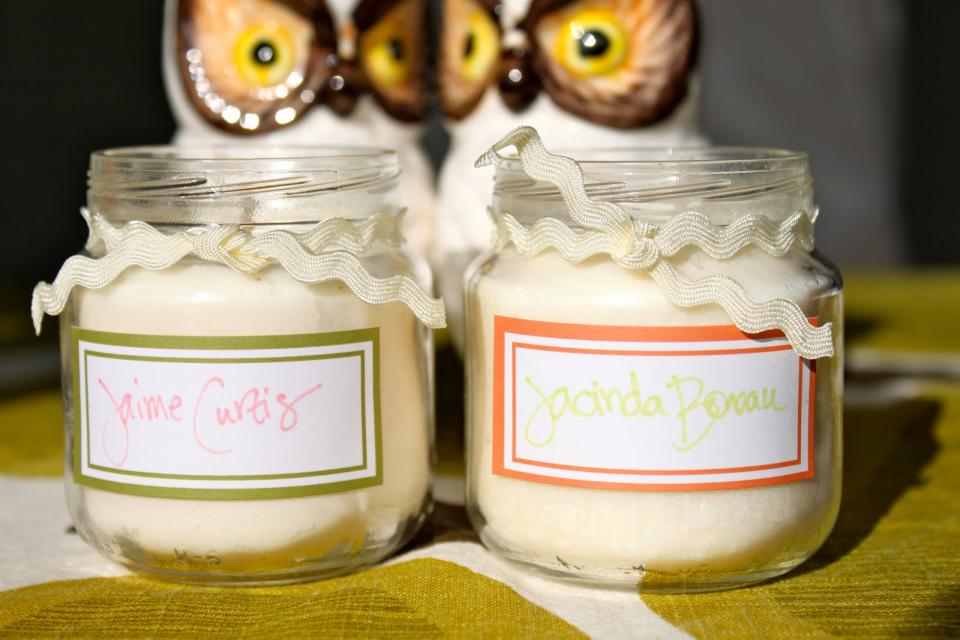 You can also make these with empty pill bottles.
DIY Instructions and Project Credit – CraftPudding
Nail Polish Remover Jar
This little homemade contraption is wonderful for getting your nail polish off in a hurry. It’s really easy to make since all you need to do is shove some sponge into the jar and pour in the nail polish remover so that when the time comes, you can just rub each nail clean.
DIY Instructions and Project Credit – BellaShoot
Sugar Scrub
Sugar scrubs are fantastic because they help moisturize and soften your skin, and thanks to these little jars, you know have packaging for some soothing homemade body and lip sugar scrubs. Just make a nice label and you have the perfect gift!
DIY Instructions and Project Credit – CincyShopper and HonestlyWTF
Candles
Isn’t this just so creative? Someone had the clever idea of making a collection of candles in these little baby jars and it’s absolutely brilliant! You get to experiment with different scents, and you can play around with pretty decorations, too.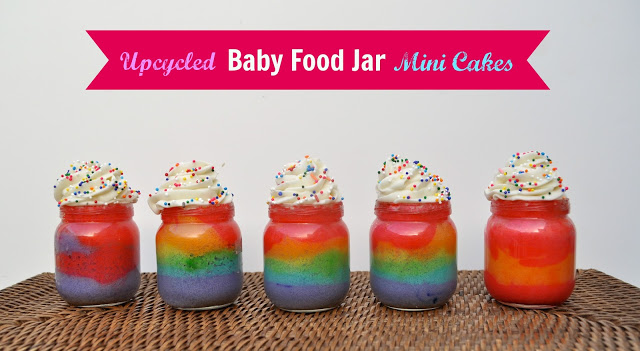
DIY Instructions and Project Credit – DearBeautifulYou
Chalkboard Paint Organizers
You can store a whole lot of hair accessories (and other small items like craft supplies) in these little jars for some organized storage. And the chalkboard lids are genius, since you can reuse and relabel them over and over again.
DIY Instructions and Project Credit – MapleMemories
Salt and Pepper Shakers
Don’t these just look so much better than regular salt and pepper shakers? You can decorate them however you wish, and you can even make a whole collection of interesting flavored salts too!
DIY Instructions and Project Credit – DreamALittleBigger
Teacher’s Gift
If your little one really appreciates his or her teacher and wants to express that, then get them to help you make these cute little gifts. We all know the custom of giving a teacher an apple, but I think they’d much prefer an apple-looking jar filled with treats!
DIY Instructions and Project Credit – The36thAvenue
Snow Globes
One thing I’ve learnt is that it’s never too early to start thinking about Christmas decorations and presents. So you can get a head start and make these lovely little snow globes. I’d love a whole collection of different ones showcased on my windowsills.
DIY Instructions and Project Credit – CraftaholicsAnonymous
Kid’s Crafts Organizer
Make sure that your little one keeps all their crayons, markers, pencils and other little crafts neat and tidy with this simple jar organizer. The color coding makes it easier to keep everything in its right place, and plus, it looks so cute!
DIY Instructions and Project Credit – MonkeySee,MonkeyDo
Snowman Ornaments
I love holidays and I love decorating for the holidays, but I much prefer making my own themed ornaments as opposed to purchasing. These happy little jars-turned-snowmen are perfect for Christmastime, and you can get the little ones involved in this too.
DIY Instructions and Project Credit – StareIfYouMust and CrazyLittleProjects
Nightlights
Here’s another fun project that the kids can do – mini baby jar nightlights! The scraps of colored tissue paper give it a stained glass look actually; just imagine how gorgeous it would look to have a couple of these adding a soft, warm glow to your little one’s room.
DIY Instructions and Project Credit – NothingButCountry
Hummingbird Feeder
Hummingbirds are so lovely to look at and have around, and luckily, they’re quite easy to attract with just some sugar water. You can make your own homemade birdfeeder from some clay and a baby food jar, and you get to decorate it however you like.
DIY Instructions and Project Credit – BirdsAndBlooms
New Year's hand-made with children December 22, 2014 17:01
PROJECTS
As well as lanterns and a winter fairy tale in a jar.
mung.pp.uaWe involve the preparation of New Year's souvenirs and decoration of the house of the little ones! The Izhlife.ru portal has collected simple, but at the same time original crafts from what is always at hand. Not only children, but even the most distant from creativity adults can easily cope with them. nine0003
Christmas palm wreath
Making a Christmas wreath is not easy.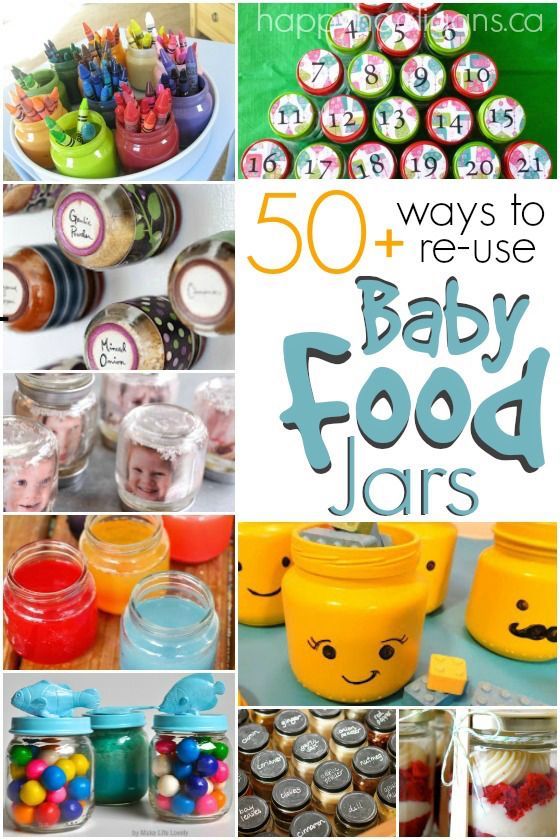 But everyone can handle this wreath. We need green cardboard, preferably several shades. We put our palm on a sheet of cardboard on the reverse side and circle it with a pencil. We make more painted palms. You can make both children's and adults - in the finished wreath they can be alternated. Then we glue the palms in a circle so that the fingers of one are glued to the base of the next. We glue decorations to the finished wreath - circles of colored paper of bright colors and a bow of satin ribbon. nine0003
Paper Christmas balls
Cut colored paper into strips of the same length. Paper can be taken as one color or different. You will also need a thick thread - you will need to thread it into the needle and tie a knot at the end. Fold the strips together and pierce by threading first through one end of the strips and then through the other. Pull the thread so that the strips of paper take a curved position, and tighten the knot. Now straighten the strips so that they take the shape of a ball.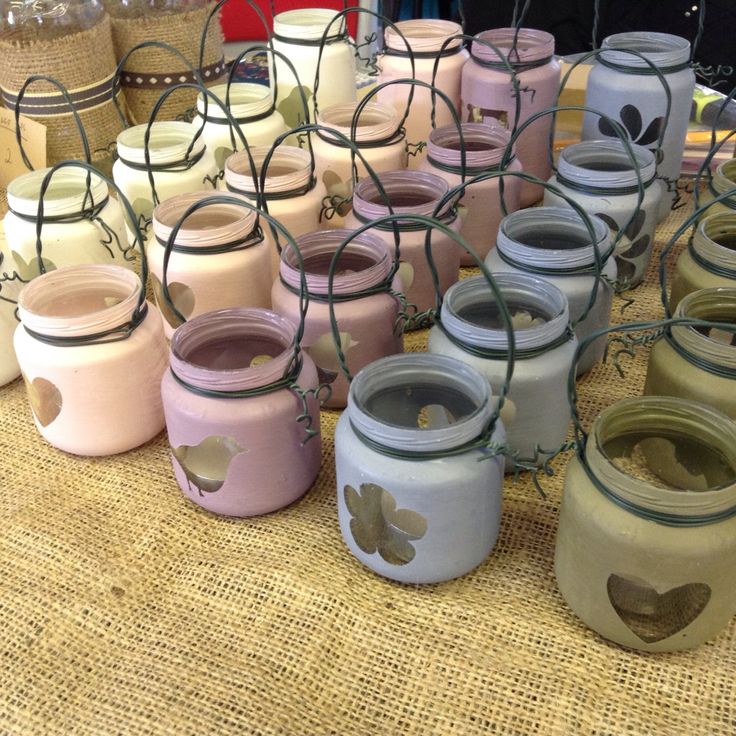 From the remaining thread, make a loop so that the ball can be hung on the Christmas tree. It will be nice if the colored stripes on the ball alternate. nine0003
Winter fairy tale in a glass jar
Take any small glass jar with a screw cap. It's great if the jar has a non-standard shape, but, by the way, any will do. Depending on the size of the jar, we cut out any New Year's figurines from thick paper - a Christmas tree, a deer, Santa Claus, a snowman - so that they can be glued to the lid and fit freely into the jar. If you have ready-made figures - great. We glue the figures to the lid - one or more (for example, a Christmas tree and a deer nearby). Pour a little artificial snow into the jar itself (if it is not there, you can cut thin white paper into small squares). We twist the lid and turn the jar over - now our figures are sprinkled with snow. The winter fairy tale is ready. nine0003
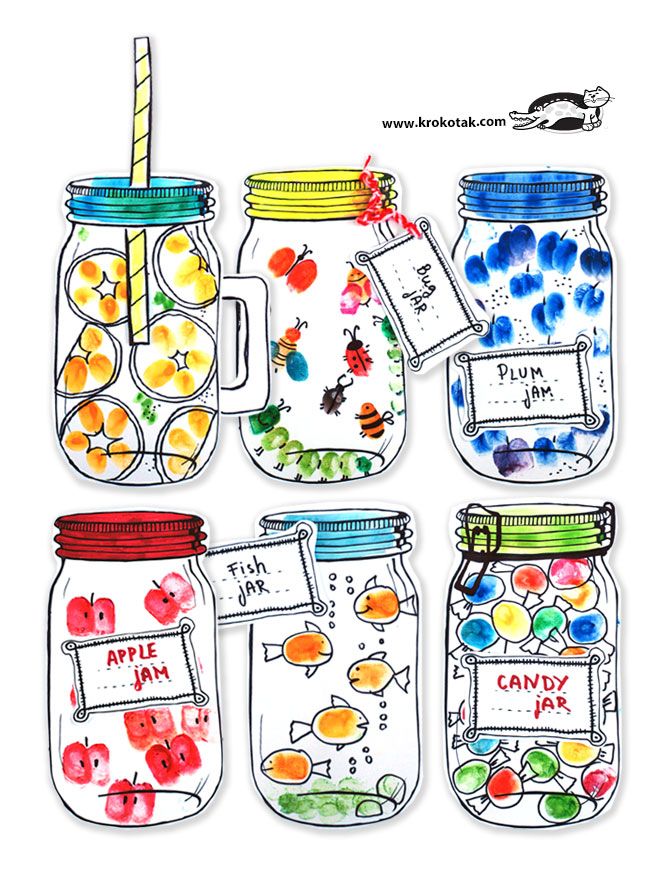
P.S.: small jars of baby food are perfect for flashlights - paint them with paint as you like (preferably translucent, on glass), and put a pill candle inside.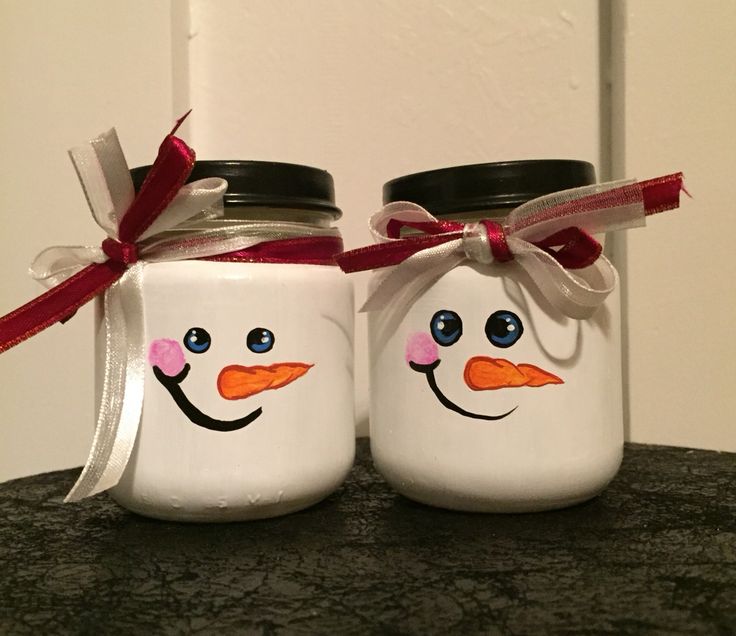
Lamb from paper strips
The symbol of the coming year is easy to make using the now fashionable quilling technique. The bottom line is that all the figures are made up of strips of paper twisted into a spiral. The lamb is curly, so quilling is especially suitable for him. Cut out the base of the lamb: two cardboard ovals - a larger one for the body and a smaller one for the head, as well as four rectangles for the legs. We glue everything together. Then you need to cut more thin paper strips. We fold them, as shown in the photo, and glue them to the base. On the "head" draw a muzzle and glue the ears. nine0003
Cotton swab sheep
This lamb will look like a soft toy. Just as in the previous version, you need to prepare a cardboard base for it. And now we take more cotton buds, which girls usually have on the farm. We cut off the cotton ends from them - this will be the wool of our lamb. Glue them tightly to the base. We glue a few pieces for the bangs and two for the ears to the “head”. We draw a muzzle, and our lamb is ready!
Clothespin Santa Claus
Everything is even simpler here - we paint an ordinary clothespin (preferably a straight shape and a wooden one) in red or blue color - depending on what kind of fur coat your Santa Claus will have. We draw a belt and buttons (or just paint in one color) and glue the “head” drawn and cut out of paper to the top. In this way, you can make absolutely any character, and attach the resulting figure anywhere.
Light Bulb Snowman
Do not rush to throw away the burnt out light bulb - it turns out to be a very cute and extremely easy-to-make snowman. We take a classic-shaped light bulb and paint it well with white paint. In the place of narrowing, we glue a strip of felt or fleece (at worst, colored paper is suitable) and fold it in the form of a scarf. We glue a nose-carrot from a triangle of paper, painted in red color, draw eyes, mouth and hands for our snowman.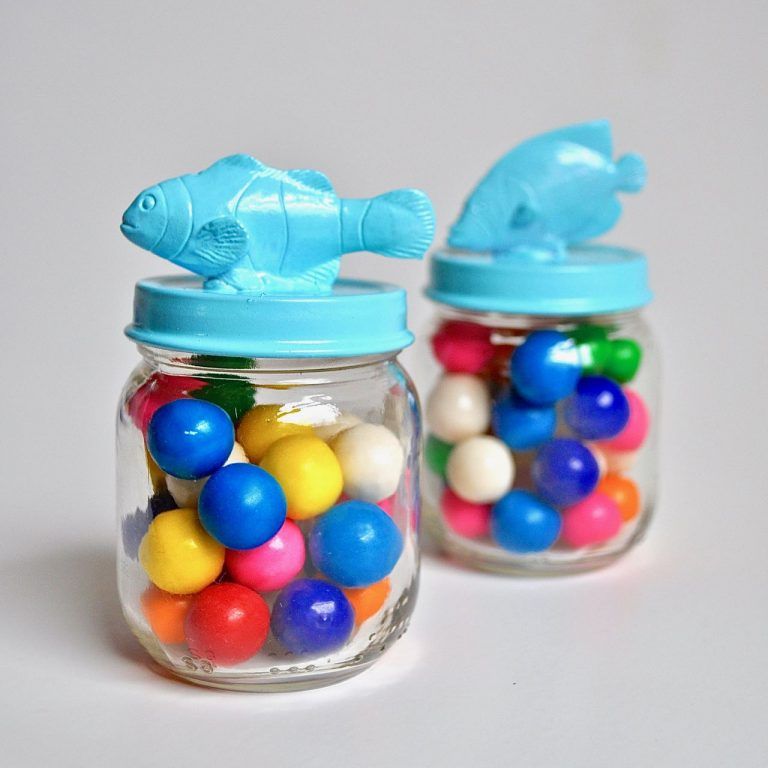 Buttons can also be drawn or glued real. nine0003
And finally, for the laziest - Santa Claus from a square of red paper:
Share material:
- # Izhevsk
- # children
Subscribe to IZHLIFE and get the news of Izhevsk where it is convenient
What to do with baby food jars: malyshi — LiveJournal
Some time ago I wrote in a comment on a post about where to put baby food jars that we recycle them for free as recyclables. They asked me to tell you more - and here I am. nine0066 I’ll say right away that I’m not too turned on this topic, I’m just interested (haha, and I worked in the reserve, gave lectures at schools, didn’t miss a single clean-up day, and also sorted out garbage on empty hills) and I sympathize, so I try to do what I can .
1. Things to donate and not throw away. Almost the entire range of dairy cuisine is suitable for processing. Bags of kefir, milk, mixture - this is Tetra-pak. Food jars - of course, glass.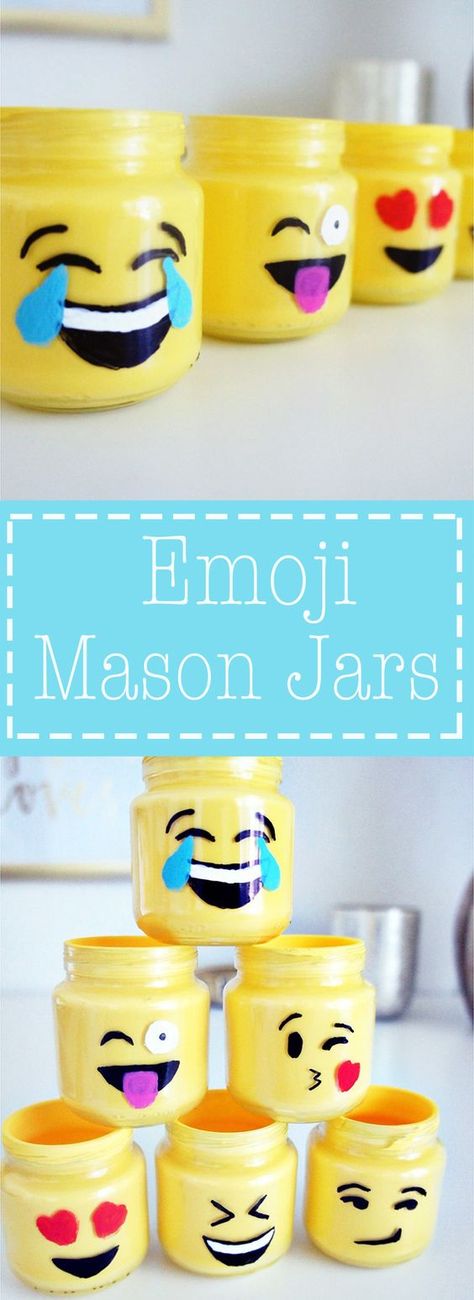 Jars from cottage cheese - plastic. Boxes - paper or cardboard. In addition, at home there are probably still bottles of water, shampoo, trays for packaged goods (all this is also plastic, you can usually find a triangle with a number on the packaging - this is a type of plastic), cans of canned food or beer))
2. Where can I donate. There are several sites with maps that collect information about points: Greenpeace, for example. If your city is not on this map, all that remains is to google and find out where you have what. Having found a convenient point, call there and ask if they are still alive - the points are always closing, moving - and find out what they accept. Depending on what they can hand over, collect it. If something is not accepted - well, you have nothing to do with it, throw it away. Sometimes I throw away cardboard and milk cartons, because they are in a landfill, if anything, they will quickly rot or burn. But the hand does not rise directly on glass or plastic. nine0066 3. How to assemble. Check this with the organizers of the reception point. Most often, the requirements are simple: recyclables must be clean. This is also important for you, because you can’t hold a dirty jar at home for a couple of weeks.
4. How to organize everything. I'm just going to tell you how things work for us. I rinse all the packaging jars immediately after eating the products, I have to cut the tetra-packs further to rinse inside. Then I dry it on a shelf, specially allocated in a cupboard for dishes. Ok, it's dry - I throw everything indiscriminately into a bag lurking behind the refrigerator. What can be flattened is ivy, simply by stomping on a yogurt box, for example. The same is often nested in one another. When the bag is full, I cowardly put it out on the balcony. When two or three packages are collected there and the husband shows concern about this, it's time to pack up. I haul the bags into the apartment and quickly sort through the contents. This month, for the first time, a businesslike son helped me! It turns out several smaller packages: plastics by type, glass, pieces of iron, paper.