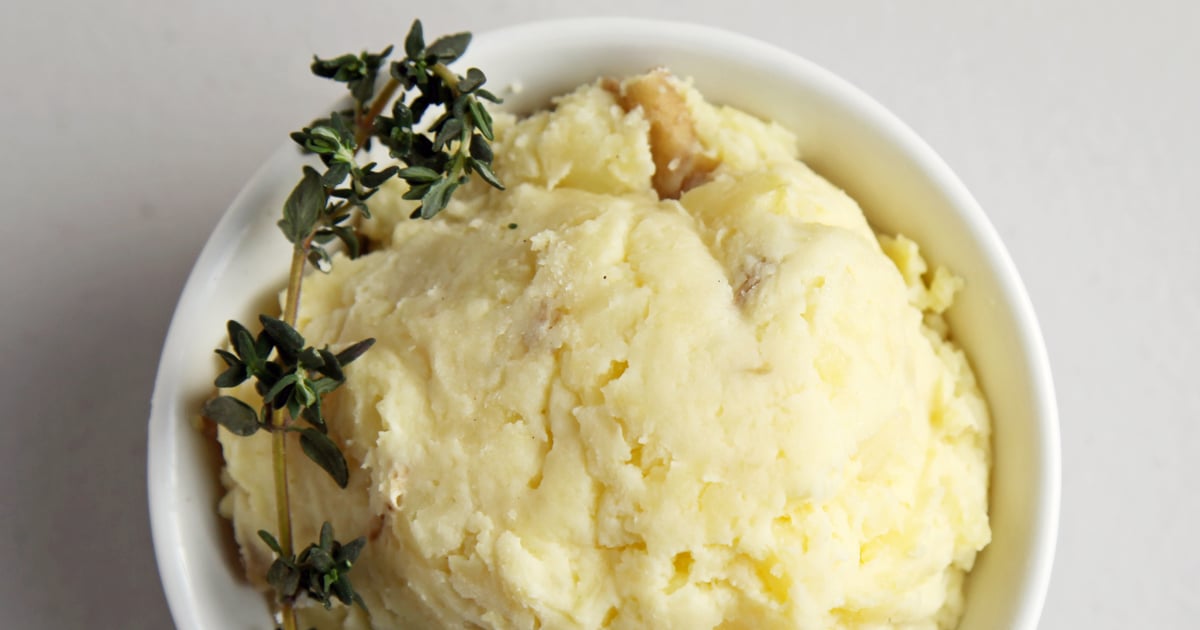
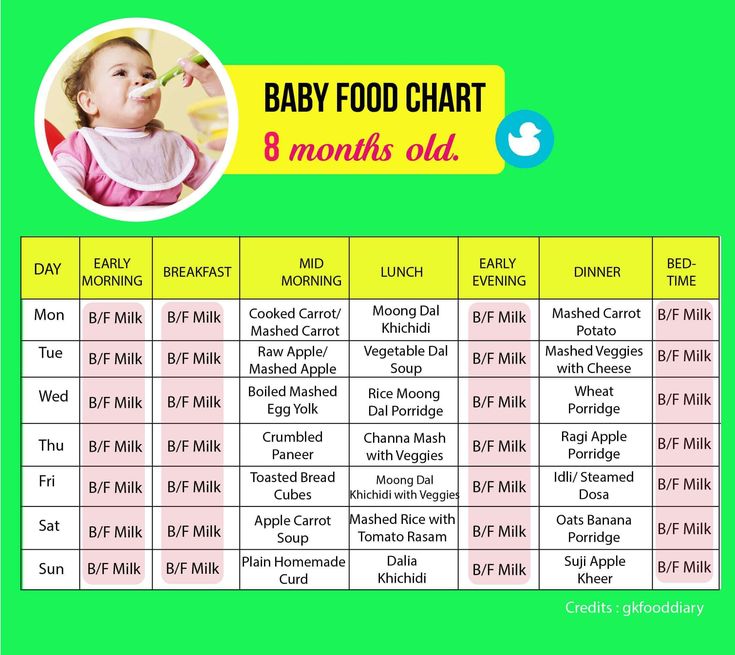
Homemade baby food 9 12 months
Easy Yogurt Melts for Baby (plus, 4 feeding tips!)
These 2-Ingredient Yogurt Melts are great for your baby and toddler! Serve as a cold refreshing treat, as a gumming tool to help ease teething pain, or for a quick yummy snack! These melts are easy to make and full of essential nutrients for growing baby. Great for 8+ months!
Medically reviewed and co-written by Jamie Johnson, Registered Dietitian Nutritionist (RDN), and Lauren Braaten, Pediatric Occupational Therapist (OT).
Baby Yogurt Melts
Looking for an easy DIY version of the store bought yogurt melts for your baby?
Then this recipe is for you!
These melts only require 2 ingredients and take 10 minutes to make! They are not the same freeze-dried melts that you will find at the store, but to me these yogurt melts are so much better! These yogurt melts are made with fresh ingredients and are great for babies and toddlers to help work on their pincer grasp, ease teething pains, and are a deliciously tasty bite for a snack or part of a meal.
Yogurt Melt Video
Watch this video to see how easy it is to make these homemade yogurt melts!
Just getting started on making your own baby food? Then, I would suggest that you start by reading my very in-depth Guide on how to Make Homemade Baby Food – which goes over all the important information such as the best cooking tools to have on hand, safe storage, how to know when baby is ready for solids, how to introduce purees, the best first foods for baby, and more! If you are doing Baby-Led Weaning, then be sure to check out my Complete Guide to Baby-Led Weaning – which covers what exactly is baby-led weaning, to every parent’s concern of baby-led weaning and choking, this guide goes over it all. I will also share how to know when baby is ready for BLW, the top 10 best first foods, a helpful sample blw feeding schedule, helpful tools to have on hand, and much much more!
Want more information? Then make sure to check out my best-selling cookbook for even more information and recipes!
Reasons to Love these Frozen Yogurt Melts
- Simple 2-ingredient recipe
- Cold treats for soothing teething pain for babies or toddlers
- Healthy – with no added sugar
- Helps older babies and toddlers work on their pincer grasp
- Easy to change up flavors
- Great for picky eaters
- Easy to make a big batch and freeze for quick snacks
- Can be made dairy-free as needed
Ingredients
Make sure to read the recipe card below for full ingredients and instructions!
- Yogurt: try to use a thicker plain whole milk yogurt such as Greek or Australian style, so the melts will stay in their disc shapes while freezing.
 You can also use a plant-based yogurt if you prefer. If your yogurt gets too thin while working with it, simply put it back into the fridge for 10-15 minutes to firm back up.
 - Baby Puree: you can use any store-bought or homemade baby food purees that you like.
Health Benefits of Yogurt for Babies
Yogurt boasts many health benefits for babies since it is full of nutrients babies need for healthy development.
- Calcium- which is needed for growing bones and teeth
- Full of fat (if buying full fat or whole milk yogurt, which is recommended)- essential for brain development, metabolism and the immune system
- Probiotics- helps to establish a healthy microbiome in baby’s rapidly developing gut
- Protein- to help support muscle growth and development
Step-by-Step Instructions
- Line a baking sheet with parchment paper or a silicone mat.
- In a small bowl, mix the yogurt and baby food puree until completely incorporated.
- Spoon the yogurt mixture into a resealable baggie or piping bag and cut the very end of the bag off. At any point your yogurt blend becomes too thin or runny; simply put the baggie back into the fridge for a couple of minutes to harden back up.
- Squeeze small round discs into rows onto the baking sheet. When the baking sheet is full, place the baking sheet into the freezer for 4 hours or overnight.
- Pop the melts off of the parchment paper and store them in an air-tight container. These melts do melt rather quickly so it’s best to only take out a couple at a time.
Feeding Tips for Baby
- Let the yogurt melts sit at room temperature for 1-2 minutes to thaw a little before giving them to your baby. If the yogurt melts are too solid, there is a risk of choking. You can also check and see how quickly they melt in your mouth before giving them to your baby.
- You can also put a few melts in a mesh or silicone teether.
- Offer your baby plenty of opportunities for teething toys, as these encourage jaw and tongue movements necessary for chewing.
 And getting into the habit of brushing teeth regularly not only helps with good oral health, but also provides sensory awareness for oral motor skills.
 - Start setting up consistency and structure for meal times from the beginning. This can include when (timing) and where you offer foods, as well as providing a variety in what you offer. These will help your baby develop the foundation for recognizing hunger and fullness cues.
Frequently Asked Questions
Are yogurt melts good for babies?
Yes! These two ingredient yogurt melts have no added sugar, plus they are a cold treat that can help ease teething pain. They are perfect for babies around 8+ months.
Can baby choke on yogurt melts?
As with any food for your baby, always supervise when giving yogurt melts. We recommend letting the yogurt melts sit at room temperature for 1-2 minutes to thaw a little before giving them to your baby.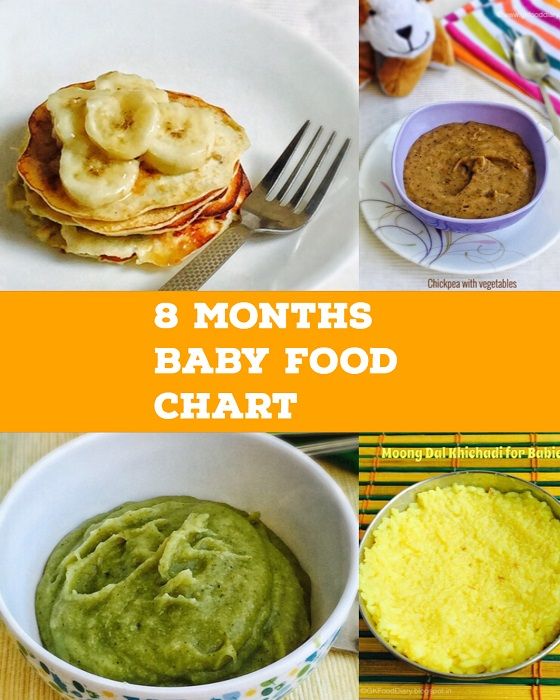 If the melts are too solid, there is a risk of choking. You can check and see how quickly they melt in your own mouth before giving them to your baby.
Can toddlers eat yogurt melts?
Yes! In fact, yogurt melts can be a fun and subtle way to introduce new flavors to a toddler who’s in the midst of a picky eating phase. You can create all kinds of fun colors and flavor combinations, like spinach + banana or mixed berry.
How to Store Yogurt Melts
Yogurt melts should be stored in an air-tight container in the freezer for up to 4 months.
Purees you Can Use for this Recipe
The wonderful thing about these baby yogurt melts is that you can use leftover homemade baby food puree. Or you can make the process even easier and use store-bought purees. Here are some of our favorite homemade baby food purees:
- Peach Baby Puree
- Creamy Mango-licious Baby Food Puree
- Spinach + Apple Baby Food Puree
- Blueberry Baby Food Puree
- Apple, Raspberry + Vanilla Baby Food Puree
- Banana, Cherry + Beet Baby Food Puree
The flavors I used for these yogurt melts are:
- Red: steamed beets and strawberries
- Orange: steamed carrots and mango
- Yellow: mango and banana
- Green: steamed apples and kale
- Purple: steamed apples and blueberries
Recipe Tips
- For toddlers over the age of one, you can add in a teaspoon of honey for a sweeter treat.
- Use a spatula instead of your hands to help avoid melting while transferring to a freezer-safe container.
- These creamy treats do melt rather quickly, so it’s best to take out only a few at a time when eating.
- 1/2 cup plain whole milk yogurt
- 1-2 tbsp baby food puree, homemade or store-bought
Prep: Line a baking sheet with parchment paper or use a silicone mat.
Mix: In a small bowl, mix together the Greek yogurt and baby food puree until completely incorporated.
Prep Pipping Bag: Spoon the yogurt mixture into a resealable baggie or piping bag and cut the very end of the bag off.
 At any point your yogurt blend becomes too thin or runny, simply put the baggie back into the fridge for a couple of minutes to harden back up.
Dot: Squeeze small round discs into rows onto the baking sheet. When the baking sheet is full, place the baking sheet into the freezer for 4 hours or overnight to harden.
Store: Pop the melts off of the baking tray and store them in an air-tight container. These melts do melt rather quickly so it's best to only take out a couple at a time.
Age: 8+ months. For toddlers over the age of one, you can add in a teaspoon of honey for a sweeter treat.
Flavors: I made several different flavors of these melts at the same time, but you can easily stick with one flavor of melts to save you time and make less dishes.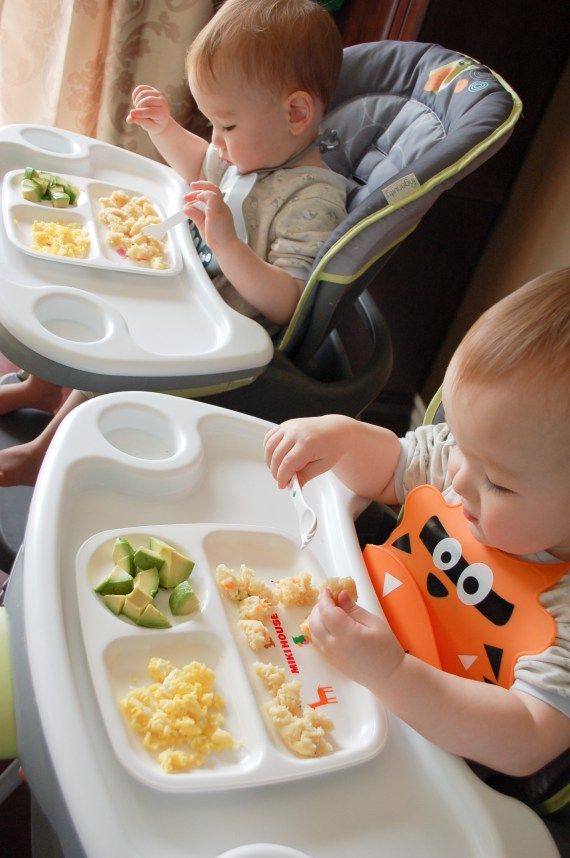
Storage: in an air-tight container in the freezer for up to 4 months
Nordic Ware Baking Sheet
Bumkins Baby Bowl
Bumkins Sleeved Bib
Did you make this recipe?
Tag @babyfoode on Instagram and hashtag it #babyfoode!
Pin Recipe Email a Friend
Easy Spinach Muffins for Kids
These delicious Spinach Muffins just may be the most perfect veggie-filled muffin! Quick and easy to make, they are a favorite with babies, toddlers, kids, and even grown-ups! Filled with spinach, applesauce, and no refined sugar, these muffins are great for breakfast, snack, or packed lunch! Great for 9+ months and up.
Green Spinach MuffinsLooking for an easy way to have your kid eat spinach?
Then look no further! These muffins are a fun-filled way to serve spinach to your little one. Made with wholesome ingredients such as spinach, applesauce, maple syrup, and olive oil, these muffins are great for a healthy breakfast, snack or lunch!
If you are looking for more easy and healthy muffins for your little one, then be sure to check out my Blueberry Avocado Mini Muffins, Mini Pumpkin Muffins, or these delicious Applesauce Muffins. You can also find more recipes and information in my best-selling cookbook Little Foodies: Recipes for Babies and Toddlers with Taste.
Spinach Muffins Video
Watch this video to see step-by-step instructions on how to make these muffins!
Reasons to Love Mini Spinach Muffins
- toddler, kid and adult-friendly
- easy to make
- can customize with different add-ins
- great for school or packed lunches
- healthy
- freezer-friendly
- great for breakfasts on the go
- can be made gluten and dairy-free
- naturally nut-free
Make sure to read the recipe card below for full ingredients and instructions!
- Flour: you can use all-purpose, white whole wheat flour, a mixture of 50/50 white and whole wheat flour, or gluten-free one-for-one flour.
- Spinach: the star of the show! You can use 1-2 cups of baby spinach, not packed down.
 I have found if you use more than 2 cups the muffins become dense because of the extra water content.
 - Applesauce: can use homemade or store-bought. If using store-bought then make sure to look for no-added-sugar applesauce.
- Oil/Butter: to make the muffins nice and moist. You can use coconut, avocado, vegetable, olive oil, or melted butter.
- Milk: you can use any milk you like in this recipe. Dairy milk works well, but make them dairy-free by using almond, oat or cashew.
- Maple Syrup: to naturally sweeten the muffins.
- Spices: a little cinnamon and vanilla deliver some big flavor!
- Baking soda and powder
- Salt
- Egg
Allergy Tips: to make these muffins gluten-free, you can use any one-for-one gluten-free flour blend. If you are looking for a dairy-free muffin option, you can use any plant-based milk you prefer such as almond, soy, hemp, oat, etc.
Benefits of Spinach
These muffins are loaded with fiber, manganese, folate, magnesium, copper, calcium, antioxidants and vitamins K, A, B2, B6, E, and C. WOW!
- high in fiber to help build a healthy heart and aid in digestion
- has a good amount of vitamin C, which is important for skin, eye, immune and brain health
- contains the mineral boron, which may be important for building strong bones and supporting brain function
- great source of iron that helps muscles store and use oxygen, and it is vital for brain development
- Prep: Preheat the oven to 350° F. Spray or line a mini muffin tin.
- Whisk: In a medium bowl, whisk together the flour, baking soda, baking powder, salt, and cinnamon.

- Blend: in a blender, add the spinach, milk, applesauce, oil/butter, maple syrup, egg, and vanilla extract. Blend until completely smooth and there are no chunks of spinach – roughly 45-60 seconds.
- Combine: pour the spinach mixture into the dry ingredients and stir until just combined. Do not overmix.
- Fill Muffin Tin: Scoop the batter into the muffin tin. For mini muffins – use roughly 1 tablespoon per cup. For regular muffins – use roughly 1/4 cup per cup.
- Bake: Place the muffin tin into the oven, and bake for 12-14 minutes for mini muffins and 18-20 for regular size muffins or until just golden brown.
- Eat: Let cool for 5-10 minutes, and serve.
- Mini Muffin Pan
- Cookie Scoop
- Measuring Cups and Spoons
These spinach muffins are delish as is – or you can add in a 1/3-1/2 cup of your favorite mix-ins. I always make half of the batch plain and then add in some mix-ins for the other half. This way we have plenty of options for a yummy snack and both of my kids are happy! Some of our favorites are:
- Mini Chocolate Chips
- Chopped Walnuts
- Blueberries
- Craisins or raisins
- White Chocolate Chips
Once the muffins have cooled completely, store them in an airtight container. They will keep on the counter for up to 4 days and in the fridge for up to a week.
To freeze the muffins, place the mini muffins into a freezer zip-lock baggie or stasher bag and place in the freezer. They will keep for up to 3 months frozen.
Thaw frozen mini spinach muffins overnight in the fridge or by gently warming them in the microwave.
Frequently Asked Questions
Can you make these without a blender?
Yes! For these muffins, you do need a blender in order to breakdown the spinach until smooth so that there are no spinach chunks in the muffins. You can also try a food processor for this step and let it run for 60-90 seconds or until all the spinach is smooth.
Can you freeze these spinach muffins?
Yes! These muffins are totally freezer-friendly. Just place them in a zip-lock baggie or an air-tight container and freeze for up to 3 months.
Baby-Led Weaning Spinach MuffinsThese muffins are perfect for baby-led weaning or as a finger food because they are soft to eat and your baby can easily pick them up in their hands for a palmar grasp or with their pincer grasp if they are cut into smaller chunks. You can serve them to your baby sliced in half or cut into small chunks.
Spinach Muffins For Toddlers & KidsThese quick and easy muffins are also great for toddlers and kids. You can serve them as is, or with a smear of cream cheese, butter or peanut butter for breakfast, snack or packed into a school lunch.
- Do No Overmix: I can’t stress this point enough – do not over mix the muffin batter, if you do they won’t rise in the oven and will become dense and hard. The dry ingredients should be just combined with the wet ingredients.
- Preheat Oven: Ensure the oven is fully preheated so the muffins cook through evenly.
- Let Cool: let the muffins cool for about 10 minutes before enjoying them and let them cool completely before storing.
- Blend the Wet Ingredients: to make sure the spinach gets completely incorporated into the batter, and you don’t get huge chunks of spinach in these muffins, I would recommend that you blend all the wet ingredients in a blender until smooth (roughly 30-60 seconds).
- Applesauce: to avoid including added sugar in this recipe, make sure the applesauce you use doesn’t have any added sugar in the ingredient list.

- No Sticking: make sure you generously grease the mini muffin molds or use mini muffin liners so that the muffins don’t stick to the pan.
- Toddlers can help measure and put the ingredients into the bowl.
- They can help mix the ingredients.
- Toddlers can help scoop the dough into the muffin pan.
- Preheat the oven.
- They can pick out and measure all of the ingredients.
- Kids can help mix the ingredients.
- They can help to fill the muffin cups with the batter.
- Once filled, kids can carefully put the muffin tin into the oven (with adult supervision) and remove once baked.
Or watch a shortened version here.
- 1 1/2 cups flour, all-purpose, white whole wheat pastry flour or one-for-one gluten free mix
- 1 tsp cinnamon
- 1/2 tsp baking powder
- 1/2 tsp baking soda
- 1/4 tsp salt
- 1-2 cups spinach, not packed
- 1/2 cup milk, regular whole milk or a plain plant-based milk
- 1/3 cup applesauce see notes
- 1/3 cup oil or melted butter see notes
- 1/3 cup maple syrup
- 1 large egg
- 1 tsp vanilla extract
Prep: preheat the oven to 350° F. Spray or line a mini muffin tin.
Dry Ingredients: in a medium bowl, whisk together the flour, cinnamon, baking soda, baking powder, and salt.
Wet Ingredients: in a blender, add the spinach, milk, applesauce, oil/butter, maple syrup, egg, and vanilla extract.
 Blend until completely smooth and there are no chunks of spinach – roughly 45-60 seconds.
Combine: pour the spinach mixture into the dry ingredients and stir until just combined. Do not overmix.
Fill Muffin Tin: Scoop the batter into the muffin tin. For mini muffins – use roughly 1 tablespoon per cup. For regular muffins – use roughly 1/4 cup per cup.
Bake: Place the muffin tin into the oven, and bake for 12-14 minutes for mini muffins and 18-20 for regular size muffins or until just golden brown.
Eat: Let cool for 5-10 minutes, and serve.
Age: roughly 9 months and up
Mini or Regular Size: you can make these muffins into mini or regular size muffins, the only difference is the baking time. For mini muffins, bake for 10-12 minutes, for regular muffins bake for 18-20 minutes.
Storage: store in an air-tight container on the counter or fridge for up to 4 days or in the freezer for up to 2 months.
Note on Flours: you can use all-purpose, white whole wheat flour, a mixture of 50/50 white and whole wheat flour, or gluten-free one-for-one flour.
Spinach: the star of the show! You can use 1-2 cups of baby spinach, not packed down. I have found if you use more than 2 cups the muffins become dense because of the extra water content.
Applesauce: can use homemade or store-bought. If using store-bought then make sure to look for no-added-sugar applesauce.
Oil/Butter: to make the muffins nice and moist. You can use coconut, avocado, vegetable, olive or melted butter.
Stackable Glass Bowl Set
Muffin Pan
Silicone Muffin Cups
Measuring Cups
Did you make this recipe?
Tag @babyfoode on Instagram and hashtag it #babyfoode!
Pin Recipe Email a Friend
Diet for a child aged 9-12 months
By 9 months the main complementary foods have already been introduced, so the expansion of the child's diet continues. It is important to know that at this age the consistency of the products should change from homogenized to finely and coarsely ground.
A meat dish for an older child can be offered in the form of meatballs, which diversifies the child's diet and stimulates the formation of chewing skills. Canned meat industrial production for children over 8 months. - coarsely chopped, spices and spices (white pepper, celery, parsley, dill, onion, basil, thyme) can be added to them.
The amount of fish puree increases to 60 g per day by 12 months. Fish is given 2 times a week boiled without broth (instead of meat).
At this age, children's pasta can be offered to the child.
The number of children's cookies and crackers is increased up to 10-15 g per day (2-3 cookies).
By the year it is useful to add finely chopped fresh garden greens (dill, parsley) to various dishes, which significantly enriches the diet with vitamins and minerals.
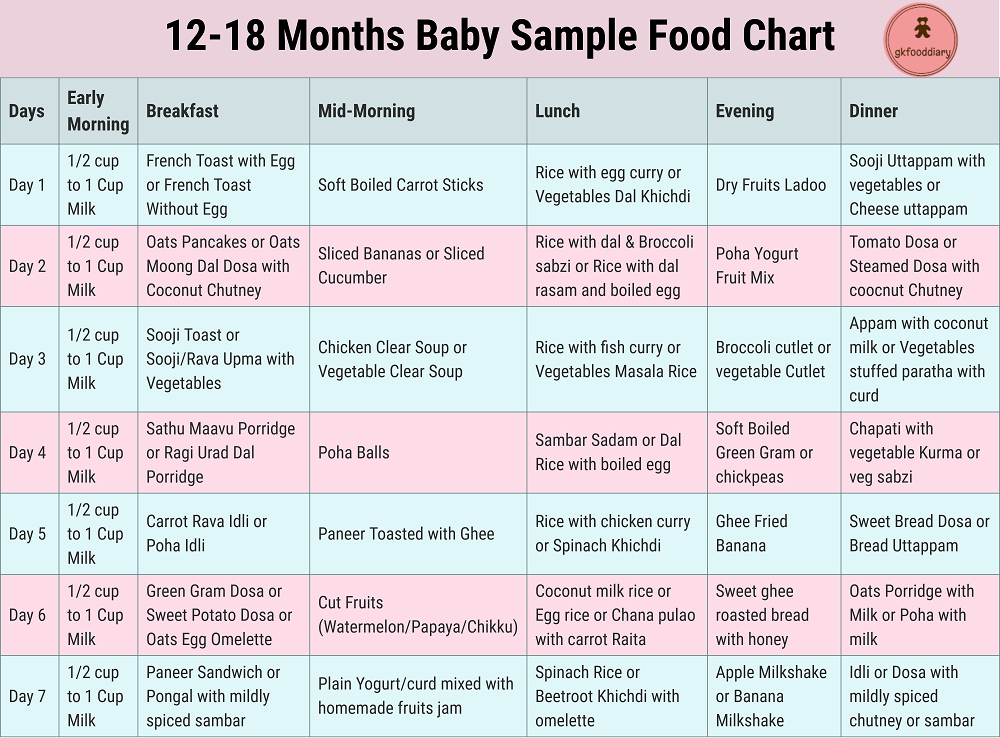
Sample diet for a 12 month old child:
| breakfast 8 hours | Dairy-free or milk porridge* Butter Boiled egg yolk Fruit puree | 150-200 g approx. 1 tsp. 1/2 pcs 50 g |
| lunch 12 noon | Vegetable puree Vegetable oil Meat puree (meatballs) or fish Bread/rust Compote | 180 g |
| afternoon snack 4 pm | Breast milk (kefir or yoghurt)** Cottage cheese Fruit puree Baby biscuits | 100 g 50 g 50-70 g 2 pcs |
| dinner 20 hours | Vegetables or porridge** Meat puree Vegetable oil Fruit juice | 180 g 20 g 1/2 tsp.  50 ml |
| before bedtime 11 pm | Breast milk (DMS)*** | 200 ml |
* - dairy-free porridge should be diluted with breast milk or infant formula that the child receives. Milk porridge is diluted with water.
** - daily volume of kefir or yogurt can be up to 200 ml,
*** - baby milk formula
Approximate diet of a 12-month-old child with an allergy to cow's milk proteins:
| breakfast 8 hours | Dairy-free porridge* Vegetable oil Fruit puree | 150-200 g approx. 1 tsp. 50 g |
| lunch 12 noon | Vegetable puree Vegetable oil Meat puree/meatball Bread/crust Compote | 180 g approx.  1/2 tsp. 1/2 tsp. 50-70 g 10 g 50 ml |
| afternoon snack 4 pm | Breast milk or medicated formula for infants with cow's milk protein intolerance Fruit puree Rusk | 150-180 ml |
| dinner 20 hours | Vegetables or dairy-free porridge** Vegetable oil Meat puree Fruit juice | 180 g approx. 1/2 tsp. 30-40 g 50 ml |
| at bedtime 11 pm | Breast milk or formula for infants with cow's milk protein intolerance | 200 ml |
* - dairy-free porridge should be diluted with breast milk or formula for children with intolerance to cow's milk proteins.
** - you can either alternate porridge or vegetables, or offer a mixed dish - porridge with vegetables.
The materials were prepared by the staff of the Laboratory for Nutrition of a Healthy and Sick Child of the National Research Center for Children's Health of the Ministry of Health of Russia and are based on the recommendations given in the National Program for Optimizing the Feeding of Children in the First Year of Life in the Russian Federation, approved at the XV Congress of Pediatricians of Russia (02.2009g.)
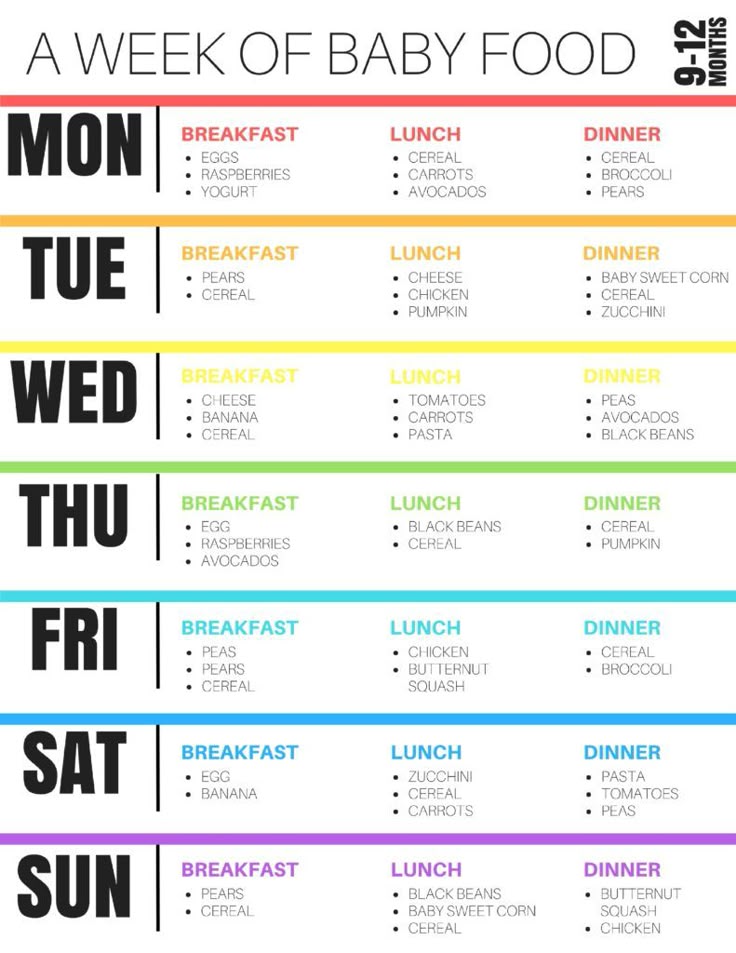
menu for a week, diet for a 9 month old baby with artificial and breastfeeding
Published: 06/20/2020
Reading time: 5 min.
Number of reads: 219051
Author of the article: Ponomareva Yulia Vladimirovna
Pediatrician, Candidate of Medical Sciences, Allergist-Immunologist
Your baby is 9 months old, and it's time to adjust his nutrition again. The activity of digestive enzymes is already high, teeth erupt in the crumbs, and the volume of the stomach becomes larger, which determines the possibility of increasing the amount of food per feeding and further expanding the diet. What can a child eat at 9months?" - this question very often worries the parents of a grown baby. By this age, the baby's nutrition already includes all the main food groups, and parents should try to diversify the child's menu, expanding the range of his taste sensations. In addition, a varied diet naturally provides a wide range of nutrients. Let's focus on the main food groups that should be on the menu of a 9-month-old baby.
Contents: 9-month-old baby is not enough, so mother's milk should now be no more than a third of the diet. It is best to leave breastfeeding (HF) before bed at night, as well as immediately after waking up in the morning. If the baby is formula-fed, an adapted formula for babies over 6 months of age can be offered at these meals.
See also: Complementary foods and dishesmonths in an amount of at least 200 grams per day. It is a source of minerals, vegetable fibers and organic acids. The assortment of vegetables is very wide, which allows them to be evenly distributed throughout the week. In addition to potatoes, zucchini, cabbage, carrots - traditional vegetable complementary foods for children in the second half of life, pumpkin, beets, spinach and tomatoes can be used in the nutrition of a 9-month-old baby. At this age, if the baby is not worried about excessive bloating, the diet can be diversified with legumes. Start with mashed green peas as a side dish with a meat dish or as an addition to a vegetable soup for dinner.
Fruit and berry complementary foods
Fruits and berries have low nutritional value, but, despite this, they are actively used in the daily diet of a 9-month-old child. Fruits are rich in natural sugars and have an attractive aroma that enhances the palatability of many dishes and is liked by kids. In addition, such food is a source of valuable minerals, organic acids and fiber, which determines its biological significance. It is optimal to include a fruit and berry component 3-4 times a day, it can be a fruit dessert for an afternoon snack, an additional component in the composition of porridge or a curd dish. Every day, a baby can consume up to 90 grams of fruit. By 9 months, it is already permissible for a child to give garden and wild berries, bananas, plums and apricots. Expand the fruit menu consistently and take your time to introduce foods with high allergenic potential, such as citrus fruits, melons, strawberries and exotic fruits.
Grain-based complementary foods
Grain-based foods continue to be the most important source of nutrition and energy for a 9-month-old baby. By this age, the assortment of cereals is increasing, on the basis of which you can cook porridge for your baby. In addition to traditional buckwheat, rice, corn, oat and wheat groats, you can expand the diet with multi-cereal porridge, which may also include rye, barley and millet. When choosing a method for preparing porridge, preference should be given to industrial products. In addition to guaranteed environmental and microbiological safety, the enriched composition provides a daily supply of vitamins and minerals. AT 9months, the child can already eat bread and special baby biscuits without prior dissolution. It is preferable to use wheat bread, no more than 10 grams per day. It is better to dry it before use for easier digestion. Children's cookies are not only a delicacy and a source of energy for the baby, the multi-cereal composition and enrichment with a vitamin and mineral premix favorably distinguishes this healthy food product from traditional bakery products.
Complementary meat
By the age of 9 months, the baby is already well acquainted with meat foods, and he already has favorite combinations with vegetable and cereal products. What changes await him during this period? The development of the maxillofacial apparatus makes it possible to move from puree-like grinding of meat to various options for meatballs and steam cutlets. In the daily menu, meat complementary foods should be at least 60 grams. In addition to beef and veal, turkey, chicken and rabbit, the baby can be offered dishes based on pork, lamb and horse meat. Meat lure is a traditional lunchtime meal. This feeding accounts for up to 40% of the energy needs of the baby, which is satisfied by a rational combination of vegetables, meat and grains.
Fish
At 9 months, a new food product appears in the baby's diet - fish. In addition to easily digestible protein, it is a valuable source of iodine, fluorine, phosphorus, iron, zinc and magnesium, as well as a number of vitamins. In the diet of young children, ocean fish is primarily used. This variety is rich in polyunsaturated fatty acids, including omega-3, which are extremely important for the functional maturation of the central nervous system and the formation of the retina. However, fish protein is a powerful allergen, so this type of complementary food should be introduced with caution. Start with a teaspoon of fish puree at lunchtime and keep a close eye on changes in your baby's health. In the next two days, do not give the child any new foods so that there is no doubt about the tolerance of the product. Within a month, the amount of fish puree can be gradually increased to 30 grams, but introduced into the menu no more than 1-2 times a week.
Sour-milk products
Specialized unadapted sour-milk drinks (kefir, yogurt, biolact) can be used in a 9-month-old baby's diet. Unlike whole cow's milk, the protein and lactose in them are partially split, which determines their better digestibility, low allergenicity and a slight burden on the kidneys, provided that they consume no more than 200 ml per day. The most preferred choice among the products of this group are drinks based on probiotic cultures, which have a positive effect on their own intestinal microbiota. Cottage cheese is a valuable source of calcium and a complete protein in terms of amino acid composition. AT 9months, it is given to a child in an amount of not more than 50 grams per day in combination with a fruit, vegetable or cereal filler.
Fats
Butter is added to prepared meals in the amount of 5 grams per day, improving the taste of prepared complementary foods, as well as increasing their nutritional and energy value. Vegetable oils are rich in polyunsaturated fatty acids, so they should also be present in the baby's daily menu at 5 grams per day as an additive to meat, vegetable or fish dishes.
Drinks
Babies meet their physiological fluid needs through mother's milk or adapted formula. But at 9 months, the consumption of mother's milk is noticeably reduced, so it is necessary that the baby receive other drinks. If your child is thirsty, encourage him to drink baby water. The balanced mineral composition and the absence of sugars make it the best option for satisfying fluid needs. Water should be drunk between meals so as not to overload the digestion process. To diversify the diet, you can use specialized children's tea based on extracts of herbs and dried fruits. The pleasant taste of such drinks is combined with a calming and normalizing effect on the digestion process.
How to make a diet for the day
The standard diet at 9 months includes 5-6 meals.