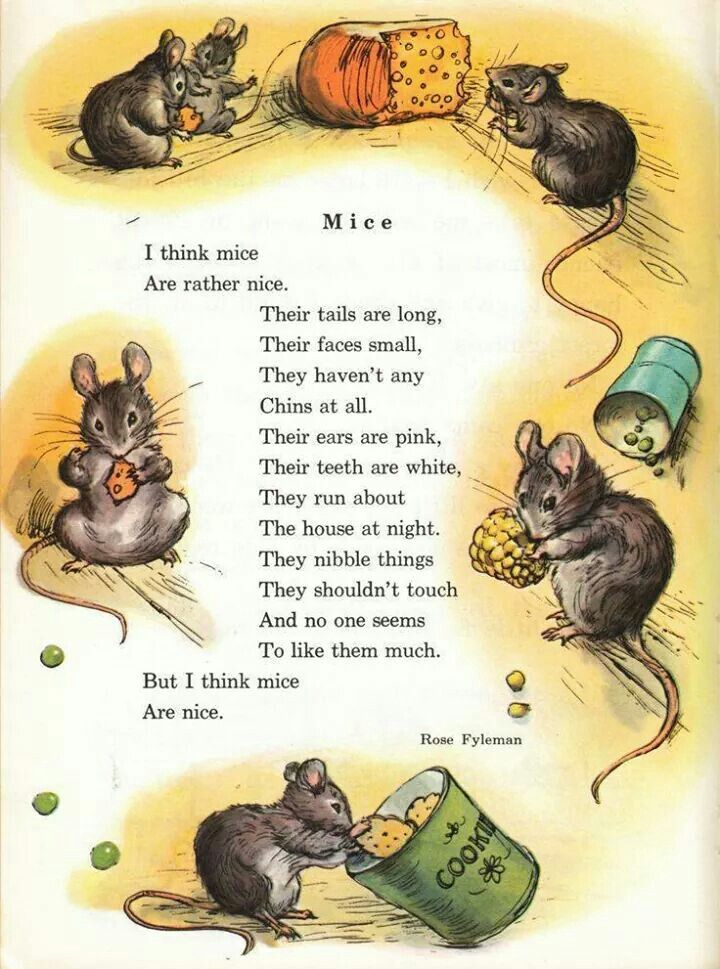
How often to feed a baby mouse
How to Take Care of Baby Mice
By Lee Parker | Updated September 26, 2017Caring for orphaned baby mice is not easy; many infant mice don't make it through the first week due to heat loss, lack of nutrition or sickness. If the baby mouse is a pinkie; that is, without any fur, raising him to adulthood is difficult, but not impossible. With feedings every one to two hours and plenty of warmth, he has a decent chance of survival.
Supplies to Have on Hand
Being prepared is the first step in the successful raising of an orphaned baby mouse. Items to have on hand include Pedialyte, a small syringe, a heating pad or hot water bottle and soft nesting material such as old T-shirts, blankets and small stuffed animals. Puppy milk replacement, found at most pet food stores, is also important, as this is the closest option to mouse milk available.
Where to Start
Inspect the baby mouse first for any wounds or signs of illness such as blood around the nose, or labored breathing. You also will need to stimulate the baby mouse to go to the bathroom; he cannot do this on his own. Mimic the mother's natural way of licking his genitals by using a damp cotton swap, or the tip of your finger. You will need to do this after every feeding until the baby mouse is able to void on his own.
Full Bellies Are Important
Feed the baby mouse by filling a small 1 cubic centimeter syringe with puppy milk replacement and slowly administering it into his mouth. Be careful not to press too hard on the syringe or the mouse will aspirate; you will see milk come from his nose. Position the baby mouse upright and belly down for his feedings. For the first three feedings, dilute the puppy milk replacement with a little water and watch for diarrhea. If the stools are mustard yellow, everything is normal.
Warm Nests Make Happy Babies
When using a heating pad for your baby mouse, never place the mouse directly on the pad and always keep the pad setting on low. A too-warm pad can dehydrate a baby mouse quickly. If he has other orphaned siblings, keep all the baby mice together and ensure one does not wander off on his own. Fill the mouse's enclosure with plenty of bedding, both under and above the baby mouse. Do not cover the mouse in an airtight container, but do keep him under wraps to trap heat.
Tips and Tricks
Warm the formula for the baby mouse by placing it in warm tap water for a few minutes. The baby mouse will indicate when it is full, but a helpful trick for expected formula amounts is to weigh him first. The mouse's weight in grams, divided in half, equals the amount of cc's he should be eating. If the mouse refuses to drink, try using Pedialyte before attempting formula again.
References
- The Fun Mouse: Orphaned Mice
- Rat and Mouse Club of America: Orphaned Rats and Mice
- Rat Fan Club: Raising Orphaned Rats and Mice
- Fancy Mice: Baby Care
- The Complete Care of Baby Animals: Expert Advice on Raising Orphaned, Adopted or Newly Bought Kittens, Puppies, Foals, Lambs, Chicks and More; C.
 E. Spaulding, Jackie Clay
Photo Credits
Orphaned Mouse Care | Chip Chloe Squirrel
What should I do if I find an orphaned baby mouse?
Determine if the mouse/mice are indeed orphaned. If you have accidentally destroyed a nest with babies in it, build a makeshift nest using any of the nest remains in a small shallow container, and place it near the original nest site and leave it undisturbed for an hour or two to see if the mother returns to retrieve and relocate her babies. If any of the babies have already died, if they are lethargic or cold to the touch, or if you find one baby wandering alone, chances are that they have been orphaned.
Always wash your hands thoroughly after handling mice.
The risk of contracting disease is rare but increases if you live in the southwestern United States.
When you find an abandoned mouse, there are a few essential steps that should be immediately taken.
(Please note - these instructions are also applicable for other small rodents like orphaned voles and rats)
The first priority is to get the baby warmed up before attempting to feed it anything. Baby mice with their eyes closed (and even for a week after eyes open) are unable to maintain their own body temperature without a supplemental heat source. Make a small nest using t-shirt material, flannel or fleece and place it in a secure container with ventilation (a reuseable Tupperware with vented lid works well) and place it on a heating pad set on low. Make sure it doesn’t have an ‘auto shutoff’. If you don’t have a heating pad, you can fill an old sock with rice, corn or another grain and microwave it for 30 seconds to use as a heat source (use good judgement to make sure it’s not too hot – you’re trying to mimic the mother mouse’s body temperature). This will need to be rewarmed every couple of hours to maintain the warmth.
While the mouse is warming up, use ahnow.org to locate wildlife rehabilitators in your area who may be able to assist in raising the mouse. Leave messages with as many as possible because you may not get a return call for several hours or days. Orphaned mice are VERY difficult to raise and require feedings every 2-3 hours around the clock for several weeks. Rehabilitators are already equipped with the proper tools, formula and knowledge to properly rehabilitate orphaned wildlife but they are very busy and usually overloaded with animals to care for, so be prepared to transport your mouse to them.
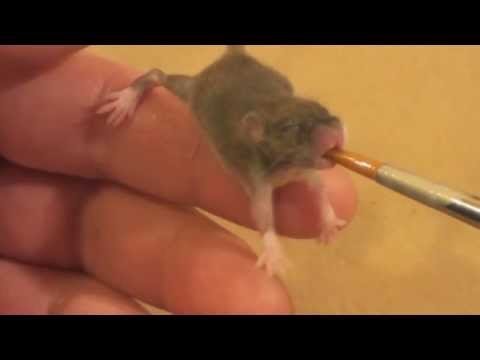
After warming, the mouse needs to be hydrated within a few hours of being found. Plain Pedialyte is the best option, but you can also make your own makeshift hydration solution by dissolving 1 tablespoon of sugar and 1 teaspoon of salt in 1 cup of warm water. The best tools for feeding mice are small syringes with pointed rubber nipples (example here), but you probably won’t have those on hand, so you can try dipping the tip of a tiny paintbrush in the fluid and allowing the mouse to lick it off. Get as much fluid into the mouse as you can (0.2-0.5 mL), every 2 hours for the first 4-6 hours.
Mice with their eyes closed need to be stimulated to urinate and defecate after each feeding/hydration session. Gently rub the genital area with a q-tip or tissue in a motion that mimics the mother mouse licking the area. Moistening the q-tip in warm water may help. Do this for about 10 seconds, and if no results, try again after feeding some more. You may not see any poop for the first few times, but you should hopefully see a few drops of urine unless they’re very dehydrated.
If you are unable to locate a wildlife rehabilitator after multiple attempts:
Baby mice can’t go too long without being fed, so if you’re not able to locate a rehabber within about 6-8 hours of finding the babies, you will eventually need to transition them from the hydration solution to a suitable formula. After 2 feedings of the hydration formula, you can start to feed watered-down formula, gradually making the formula to water ratio stronger over the next 3-4 feedings (for example, start with 5 parts water to 1 part formula powder, then 4:1, then 3:1 and finally 2 parts water to 1 part formula powder). For babies under 1 week old, I like to keep the ratio at around 3:1 or 2. 5 parts water to 1 part formula so it's easier on their digestive systems. Acceptable formulas are: Goat’s Milk Esbilac Puppy Milk Replacer, Fox Valley brand formulas (20/50 squirrel formula; Puppy Formula), or if none of those are available, you can make homemade formula (3 tbsp goat’s milk, 3 tbsp plain yogurt, 2 tbsp heavy cream, 1/2 egg yolk. If you can't find goat’s milk, double the yogurt.)
Powdered formulas are preferred because you can mix a fresh batch each day for the needed amount, in comparison with liquid formulas which must be used within three days. Please contact me for advice if you are having trouble locating suitable options. DO NOT FOLLOW OTHER ONLINE RECIPES FOR MIXING YOUR OWN FORMULAS WITHOUT GUIDANCE FROM A LICENSED REHABILITATOR – these can result in severe malnutrition and issues like bloat that can lead to death.
Baby mice need to be fed as often as once every two hours depending how old they are. (This chart can help to estimate age.) This means that you must be prepared for some sleepless nights. A good goal is to feed every 3 hours around the clock, and for the mouse to ingest between 0.3mL – 0.5mL per feeding (up until eyes open) and up to 1mL for eyes-open babies until they gradually wean at 3 weeks of age.
You can use the same method of dipping a tiny paintbrush into the formula and allowing the mouse to suck it off. However – this is a very difficult method of feeding small mice and usually results in the mouse not getting enough food at each feeding. Please try to order the proper syringes and small pointed nursing nipples for the best results.
After warming formula, gently hold the mouse between your fingers, with your index finger near the head, ready to prevent it from lunging forward and falling. Carefully and consistently apply pressure to the syringe plunger to administer 1 drop at a time and ensure that the baby is suckling and swallowing the formula.
TIP: Mice like their formula WARM and it cools very quickly in such a small syringe so it’s recommended to fill 2 syringes and have one sitting in a cup of hot water so you can swap back and forth regularly while the other one keeps warm.
Be careful not to allow any formula to enter their lungs. You can check this by observing that no milk is bubbling from their nose. If milk enters their lungs, aspiration pneumonia may occur. The best way to avoid this is to keep the mouse upright when feeding it, never allowing it to rest on its back. If you do see a bubble form, flip the baby to a head-down position to prevent any more liquid from entering its lungs and wipe the nose with a tissue to absorb any liquid.
Overfeeding is also dangerous and can lead to bloat. Check to ensure that they are well fed by the emergence of a white patch in the middle of their belly, a milk belly. This should recede before the next feeding. If you are seeing a full milk belly when the time comes for the next feeding, wait an extra half hour, and water down the formula to a 50:50 water to formula ratio for one feeding. If your mouse experiences diarrhea, it is also likely a result of being overfed. If this happens, or if your mouse is looking bloated, it’s ok to substitute Pedialyte/electrolyte solution for one or two feedings until the condition resolves.
Make sure to gently massage your baby’s abdomen and rectal area after each feeding to assist food in moving through the digestive tract and to help the baby eliminate waste. It’s almost impossible to reverse the effects of bloat once too much formula has backed up in the digestive tract, and this can lead to a painful death.
Baby mice begin to open their eyes at around 10-12 days of age. They may need a larger enclosure at this point (acrylic kritter keepers work well), but still keep using the heating pad on low under the nest portion of their tank. At this point, you can begin to add some dry oats into their nest and they will start to nibble on these within 1-2 days. Once they start nibbling solids, they will no longer require a nightly feeding – they can last from midnight to 6am without formula.
You can start to introduce other soft solids like spinach and other greens, fruit and crushed nuts. At three weeks of age, the babies will also no longer require the syringe for feedings and may begin to feed from a dish (jar lids work well as shallow dishes). Gradually make the switch from the syringe to a dish by leaving a dish of formula available between meals and spacing out feeding times to every 4-5 hours.
You can begin integrating foods such as baby food, fresh fruits and veggies, seeds and commercial mouse foods. Make sure to add a shallow dish of fresh water.
Mice are often very messy eaters, so after they finish their meals, it will be necessary to clean them up and replace soiled cage bedding often. Plain paper towels make for easy clean up when used to line the cage. Alternatively you can use an unscented shredded paper bedding made for rodents.
By this point, your babies will be getting more active so you can move them to a larger tank – a large acrylic kritter keeper or 10 gallon tank with a tight fitting screen lid are best. A wheel for exercise and some places to hide and things to chew on are also good for enrichment.
Mice can be released at about 4 weeks of age – about 1 week after weaning. However, it’s often better to keep them for an extra week if possible to allow them to put on some more weight. To begin acclimating for release, ensure that the weather is consistently above 50 degrees Fahrenheit and that there are at least 3-4 days with no rain forecasted*. A suitable release location should be an area with plenty of underbrush for shelter and nearby food and water sources.
It’s good to move their cage outdoors in a protected area at least a full day before release so they can adjust to the outdoor smells and sounds. Secure the lid so no predators can intrude overnight. Mice should be released at dusk since this is when they are most active. Gently tilt the tank on its side and gradually open the screen cover. Continue to place food and water at the release location for at least a week, if not longer, while they establish a nesting site nearby.
*If the mice are old enough for release but it’s too cold outside or if heading into the winter months, you may need to overwinter the mice until spring. Please visit the Adult Mouse Care page for further instructions.
Rearing of bats - Ukrainian Bat Rehabilitation Center
So, you have found a baby bat. Your actions:
- Carefully inspect the animal for injuries (swelling, bruising, fractures, etc.). If the bat has fractures or injuries, the help of a veterinarian will be needed.
- Determine the age of the cub . The age of the cub will depend on its diet and conditions of detention.
- Give water to drink , since often the animals are found dehydrated, and the first thing they need is clean boiled water.
Chiroptera are mammals, during the first month of life mothers feed them with milk. Baby bats are not able to fly at first (first mothers wear them on themselves, and then leave them in a shelter for the period of hunting for insects). Sometimes the cubs fall out of the shelter (or fall from the mother) and hide not far from it. If your foundling is not injured, not exhausted, and you can get to the shelter (attic of the house, hollow tree) from which he fell out, the best solution is to return him to his place. A baby bat is very difficult to feed for a lot of reasons, only his mother can do it perfectly. If you have such an opportunity, do it - quietly and gently plant the animal in the shelter.
How to determine the age of a baby bat
Below are photographs of a baby bat of different ages using the example of two-tone leather on . They will serve you to determine the age of your foundling, as well as a guideline in its subsequent development. This cub was initially breastfed, that is, it was fed by its mother, therefore, the timing of the development of the animal may differ slightly on artificial feeding.
1 day:
- completely "bald"
- "blind"
- no teeth
- pay attention to the sides of the tummy, this is how a well-fed baby bat looks like
4 days:
- "blind" Make a wool at
days:
- eyes open
- withers, part of the back and stomach are covered with a short coat of
days:
- eyes are open
- the whole body is covered with short wool
- tiny teeth
14 days are noticeable:
- wool becomes longer than
- holding on to the wand, the cubs waves wings, but does not jump, since it still does not know how to fly
9000 20 days:
- wool rather long
— dark bases of hairs and light, like silver, tips are clearly visible; grayer than adults
- teeth are almost formed but smaller than adults
adult:
- well formed sharp teeth
General rules of keeping
Baby bats are best kept in a box or box with access to air and natural light (but not direct sunlight). Ordinary cages are often not suitable, as the animal can crawl between the twigs. It is a good idea to put and hang pieces of cloth in the shelter so that the animal can hide in them. If you can’t find a convenient box, then a small cloth bag will do.
Keep the animal out of the reach of pets and children!
Bats often have ectoparasites - ticks, fleas, etc. They are not dangerous for humans and domestic animals. If the animal is weak, does not wash itself or is heavily infected, it is necessary to help it get rid of the parasites. They can be removed with tweezers or a damp cotton swab. If you see a need for special treatments, please contact us for further advice.
Age 0 to 20 days
Temperature
Such an animal needs to be kept warm. Maintain a constant temperature around 37 degrees. For this, thermal mats for animals or just a stable bottle of warm water wrapped in a towel (or sock) are suitable. But don't overheat!
Nutrition
Very young mice are fed goat's milk or special puppy formula (available at pet stores) prepared according to the recipe on the package. Cow's milk is not nutritious enough for baby bats, they will not be able to fully develop on it. The same applies to milk formulas for baby food - the animal lags behind in development.
It is very important that the milk is fresh, boiled and the mixture is prepared just before feeding. Do not leave the finished mixture until the next feeding. Do not add eggs or other ingredients to milk or formula - risk of intestinal infection and death. It is also undesirable to change one milk to another. Inventory must be well washed, sterilized or boiled.
Vitamin and mineral supplements are often needed, especially if you are feeding with milk rather than formula. Look in your pet stores for bird vitamin/mineral supplements without gastroliths (sand, pebbles, etc.). The dosage will depend on the selected complex. This question needs to be clarified individually with our specialists.
Feeding schedule
Babies are fed every 2-3 hours, day and night. Grown up - every 3-4 hours. If the animal did not have time to digest the previous portion, and this is noticeable by the enlarged tummy, increase the interval between feedings.
When feeding, hold the animal so that the head is slightly lower than the body. Then the spilled milk will not stain the little body. Feed the animal slowly.
With age, the interval between feedings increases.
Amount of food
Cubs of different species and even different ages can differ significantly in weight, and therefore the amount of food they need is different. For this reason, we cannot clearly say how much your baby bat should eat.
If you know its weight, you can use the formula for calculating the approximate portion of food: weight of the animal in grams * 0.05 ml. So, for a serving for a 10-gram animal, 10 g * 0.05 ml \u003d 0.5 ml of milk or mixture will be required. We emphasize that this is an approximate portion, everything is individual. If the animal eats with appetite, and then begins to turn away, it means that he has eaten, do not be discouraged.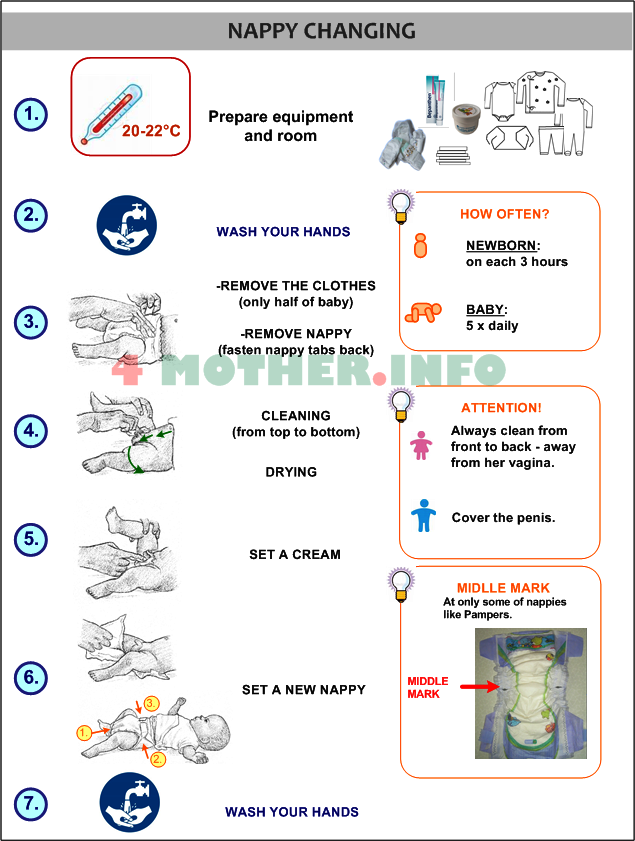
The portion of the food eaten is conveniently tracked by the scale on the syringe. It is very important not to overfeed the animal . Babies often cannot cope with large volumes of food, bloating begins, which often ends in death. Therefore, feed the animal in small portions, but often. For 1-2 days of observation, you will select portions and feeding regimen suitable for him.
Growing up, the animal eats more food, and the intervals between feedings increase.
Equipment
Often the plastic tip of a syringe or pipette is too large for this purpose. A syringe (without a needle) is not bad, with a heat-shrink tube put on the spout (you can buy it at a hardware store).
Feeding with a Q-tip soaked in milk is sometimes suitable. The animal just sucks it. When feeding, it is important to ensure that the baby does not swallow air.
Care
At this age, problems often occur with the intestines - stale food or too large a portion. The problems are very serious, it is important and requires attention. Examine the animal's tummy before eating - did the previous portion manage to be digested, is there any swelling, etc. If the animal gets dirty during feeding, wipe these places with a damp cotton swab.
Every time after eating, lightly massage his anus (butt) with a wet, warm cotton swab. This will encourage the baby to poop. This procedure is mandatory up to 2 weeks of age.
It is important to monitor the regularity and character of the stool of small bats - color, consistency. Normally, feces when breastfeeding are yellow, jelly-like. It's black, that's ok. But green indicates problems!
Other
If the found animal is covered with hair, but after some time began to go bald, it means that there are not enough vitamins and minerals in the food. Most often, the first bald spots appear on the chin, abdomen. Also, normally there should be no curvature of the forearm or bones of the fingers. Therefore, periodically inspect the animal. Vitamin and mineral complexes for birds (without gastroliths) are suitable for bats. Contact us for further advice in case of such a problem.
It is convenient to monitor the growth dynamics of the cub by tracking its weight and measuring the length of the forearm. Make such notes daily, as bats grow very quickly. They will allow you to understand how well the diet is chosen and adjust it in time if the animal does not grow.
Normally, young bats at an early age most often sit in a shelter, sleep, eat, wash. From 7-10 days they begin to study the shelter and the world outside it. They are not yet capable of flying, they can only run on horizontal surfaces or climb vertical ones.
Age: more than 20 days
With a normal diet at this age, the cub is already covered with hair, his teeth grow. They are still smaller than in adult bats, but sufficient to chew on solid food, namely insects.
Temperature
A 24-hour heating pad is not required. Warming is necessary only after feeding. The cub learns to regulate its body temperature - it cools down when it sleeps and warms up when it wakes up. Before feeding, you need to give the animal time to warm up. When warmed, the bat "trembles" all over.
Feeding
Once your bat's teeth are big enough to chew on solid food, it's time to start feeding on insects. The larvae of the flour beetle are best suited for this. Complementary foods are introduced into the diet of the animal gradually. That is, the main food is still milk or a mixture.
The first evening of complementary feeding - let you try the pomace (innards) of flour beetle, no more than half of the insect, a couple of bites. Most likely, the animal will not understand that you are offering him food, since he has not encountered insects before. You will have to tear off the head of the insect and put a little entrails on the “lips” of the animal. When he licks them off, give him some more pomace. After that, you give a bit of food familiar to him - milk or a mixture. Do not leave the animal unattended, since mealworms are new food for the intestines, the animal is just learning to digest it, and there is a risk of problems with the tummy. Watch the chair and the behavior of the animal. Subsequent feedings are dairy, as usual.
The next evening, offer the baby bat a slightly larger portion of mealworm entrails. And so, for several days, increase the portion of pomace. When the animal begins to eat them willingly and digest them without problems, let him gnaw on the chitin of the flour beetle, quite a bit. Again, he still does not know how to chew, so he will do it awkwardly. Supplement with entrails or milk, and then again observe how the intestines react to new, more solid food. In the future, let the animal eat more and more pieces of flour beetle.
In this way, you will gradually teach the baby bat to eat and digest insects. When he successfully eats the mealworm and digests it, you can gradually increase the amount of mealworm in the diet while reducing the amount of milk or formula. Often these are evening and night feedings with insects, and morning and afternoon feedings with milk or a mixture.
Do not forget about vitamin and mineral complexes. A growing animal needs them every 2-3 days. The dosage is individual and depends on the complex itself and the weight of the bat. Contact our specialists.
If you have picked an animal at 3 weeks of age, have good teeth, but do not fly yet, feed it milk or formula for 2-3 days as described for mice aged 0 to 20 days. Only when the animal is digesting dairy food normally, start feeding insects, as described in this section.
Feeding regimen
An adult animal needs to be fed 5-6 times a day. These are evening and night feedings, as well as morning and afternoon feedings. When the animal is able to feed on insects, gradually remove daytime feedings. Having digested the morning portion of food, he should cool down and sleep until the evening. In the evening, when it gets dark, the animal will wake up on its own, warm up, and then it will be ready to warm up and eat.
Download the manual in PDF format: "Cultivation of bats"
Compiled by: Zhilkina N., Prilutskaya A.
What and how to feed a bat?
Skip to content
Published
6 comments on What and how to feed a bat?
Often, people who have picked up wild bats on the street or indoors call and write to us, the Feldman Ecopark Chiroptera Rehabilitation Center, and ask “What to feed him?”, “I read on the Internet that you can milk, eggs and meat. This is true?".
What to feed?
All European bats eat live insects. They can’t “baby meat puree, cat food, boiled meat, eggs, honey, etc. ...” Even if the animal eats a piece of meat or a banana, this does not mean at all that this food will benefit him. He may have problems with the intestines in the future, and eventually he will die.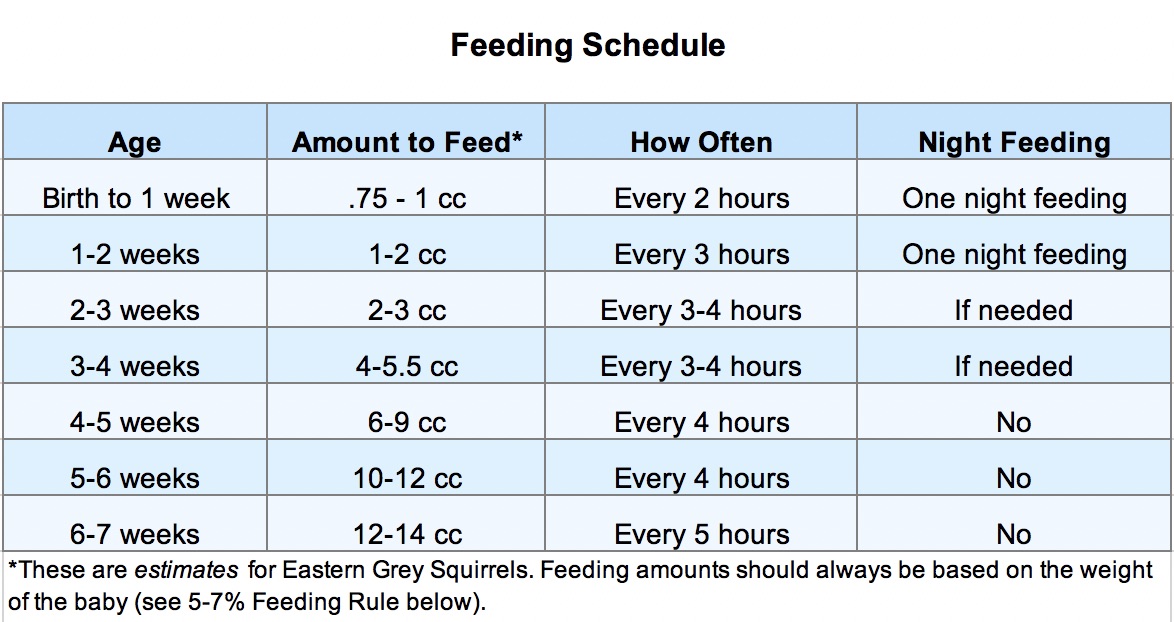 Bats eat milk only in the first month of life (early summer). All bats found in winter are already adults and do not need milk.
On maggots and bloodworms (larvae of flies and mosquitoes) they do not gain fat, so feeding is meaningless. The best food for bats is mealworm beetle and beetle larvae, which can be found at some pet stores (call first). You can also give tropical cockroaches (by cutting) and banana crickets.
flour beetle larvae zophobas larvaeHow to feed?
If you picked up the animal in winter, it can really be weakened. To do this, it must be weighed. Weight is an indicator of fatness. If red evening weighs less than 27 grams, it needs to be fed. For late leather on it is 25 grams, Kuhl's bat - 7 grams, two-tone leather on - 13 grams.
First of all, you need to drink water. As much as the animal can drink. From a syringe, or from a spoon or drinker for rodents.
Before feeding, the bat needs to be “warmed up” for 10-15 minutes, either in hands (with gloves) or near the battery. She will wake up and be ready to drink, eat. She may shake (this is rapid breathing), try to escape and squeak. This is normal and necessary so that the animal can then digest what it has eaten.
You can hold the animal in your hand or cover it from above with your hand without pressing it to the surface. Insects should be given with tweezers. During the first feeding, it is better to cut the insects in half and give the juicy part first. Keep in mind that in nature, bats feed on the fly, so they may not immediately realize that you are giving them food. This requires patience and skill. Sometimes you need to put the insect directly into the mouth so that the animal understands that this is food. Crickets and cockroaches need to be crushed so that they do not run away, and then give them to the animal.
After feeding it is necessary to offer the animal water. The second and subsequent feedings are already easier and faster, as the bat understands that food is being offered to it.