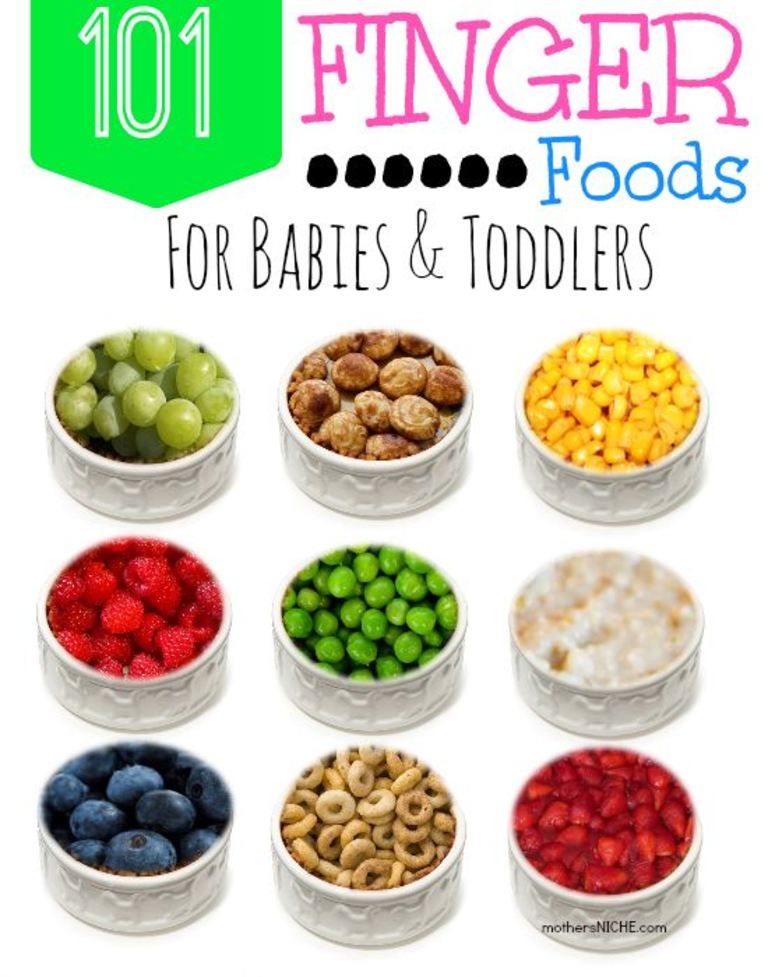
How to feed baby finger foods
Best Early Finger Foods for Baby (With Tips, Visuals, and Recipes)
Use this list of safe, nutritious, and easy to eat finger foods for baby to help you know exactly what (and how) to offer at meals and snacks. Plus, find the best first finger foods, troubleshooting tips, and visuals of foods broken down by food group to keep things easy!
Finger Foods for Baby
After baby starts solids and is ready to move onto finger foods, you may feel a little confused by exactly what to serve and how to serve it. Which is totally normal because it can be scary to let baby feed themselves this way and we may not have any experience doing this—or we may have totally forgotten from our last kiddo!
This list of finger foods for baby will cover some great first finger foods to start with, then set you up with plenty of healthy options from each food group.
TIP: Find more info on starting solids here and the best foods to start with if doing baby led weaning or purees with baby.
Healthy Baby Food
I love sharing these ideas for baby food since they are easy to prepare and serve and because I know how hard it can be to continue to come up with flavorful and healthy meals and snacks for our little ones. Let me tell you, I’m on my third kiddo and it can be such a challenge to feed him during the chaos of parenting the rest of my crew! These foods are wholesome and nutritious—perfect for your baby.
TIP: I’m a big fan of SpoonfulONE, a company that offers the most complete way to introduce food allergens to our kids. They make mix-ins, puffs, and crackers that are yummy and easy for babies and toddlers to eat. Learn more about their pediatrician-approved baby foods here. (sponsored link)
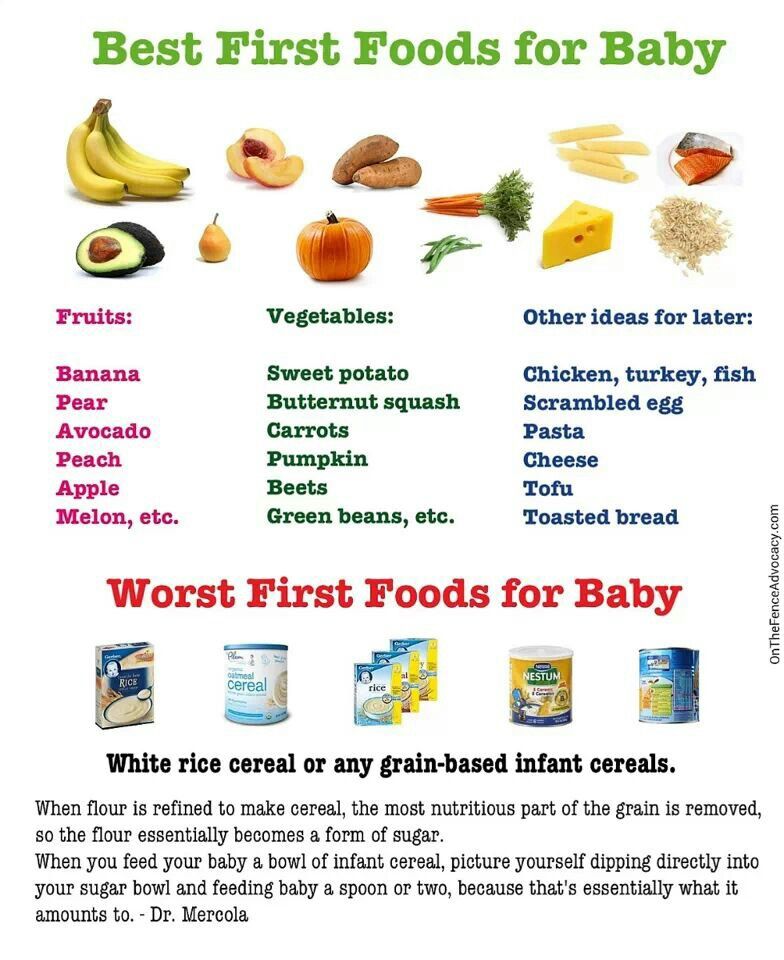
Best First Finger Foods
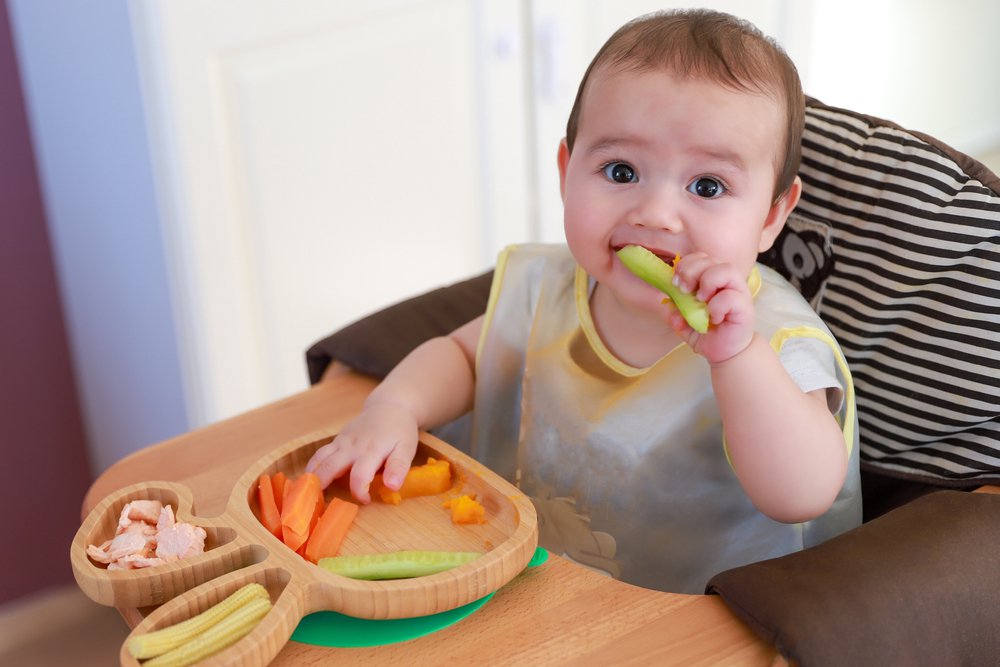
When baby is around 9 months, you’ll notice that they’re able to pick up smaller pieces of food with two fingers. This is known as the “pincer grasp” and is a sign that they’re ready to start finger foods.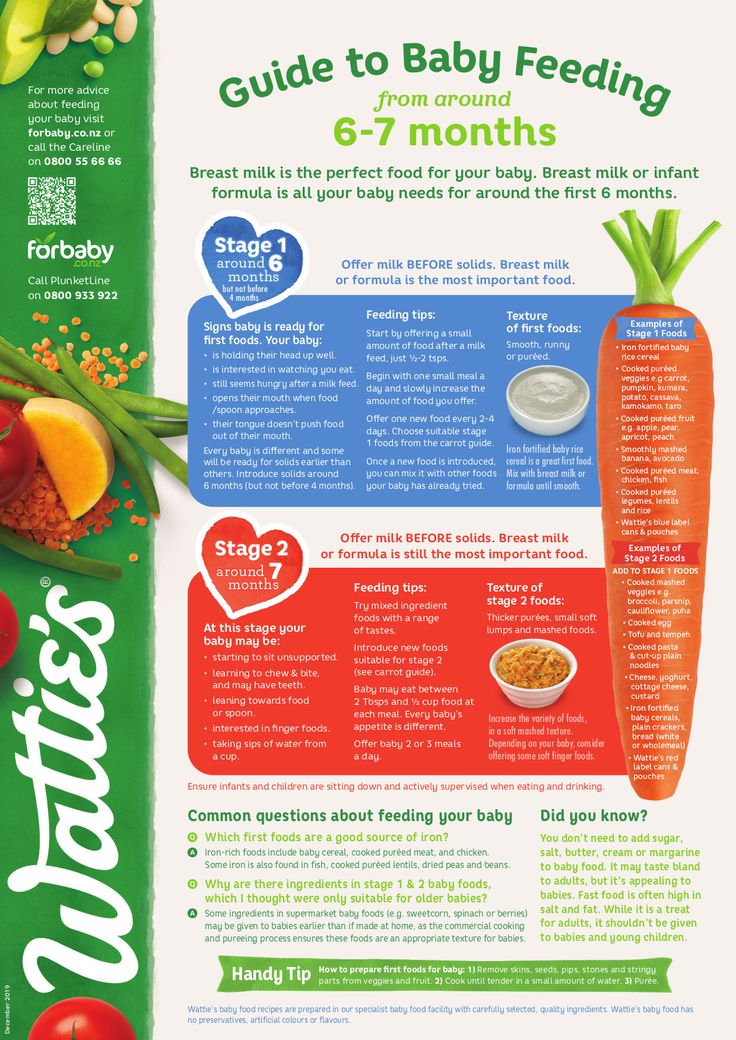 To be clear, when I say “finger foods” I mean small pieces of food that a baby (or toddler) can feed themselves.
Here are some of my favorite ones to start with that are all super soft, safe to eat, and easy to pick up.
- Scrambled egg, broken up into small pieces
- Roasted sweet potato mashed and broken up into small pieces
- Fresh raspberries, broken up into smaller pieces
- Oatmeal, cooked according to package directions and allowed to cool
- Tofu, diced and sauteed lightly or steamed
- Ground beef, chicken, or turkey, broken up into small pieces or lightly mashed meatballs
- Shredded cheese or crumbled goat cheese
- Mashed sweet potato, in little pieces
- Peanut butter puffs
TIP: You can serve the tofu, ground meat, or meatballs in veggie puree from a pouch or a simple marinara sauce for extra moisture and flavor. Learn more about how and why to introduce peanut butter.
Finger Foods for Baby: Fruits and Veggies
Some of my favorite early fruits and veggies to serve babies are:
- Mashed roasted sweet potato, broken up into small pieces
- Warmed frozen peas, slightly mashed if desired
- Roasted Zucchini
- Diced Roasted Sweet Potato or Butternut Squash
- Fresh blueberries, cut in half or quarters
- Fresh raspberries, broken into small pieces
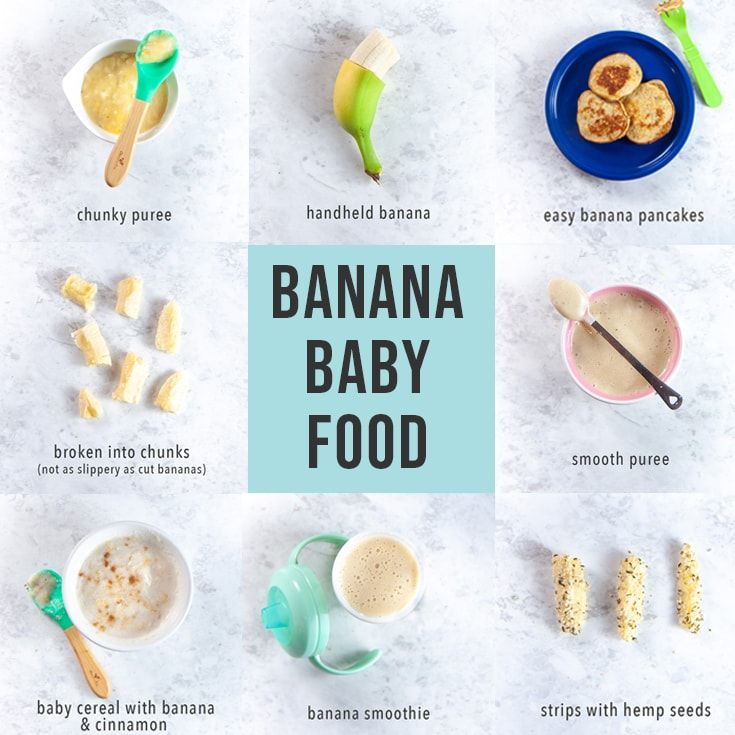
- Banana, broken into small segments (they are less slippery this way versus slicing them)
- Avocado, diced and mashed slightly (be sure it’s ripe and very soft)
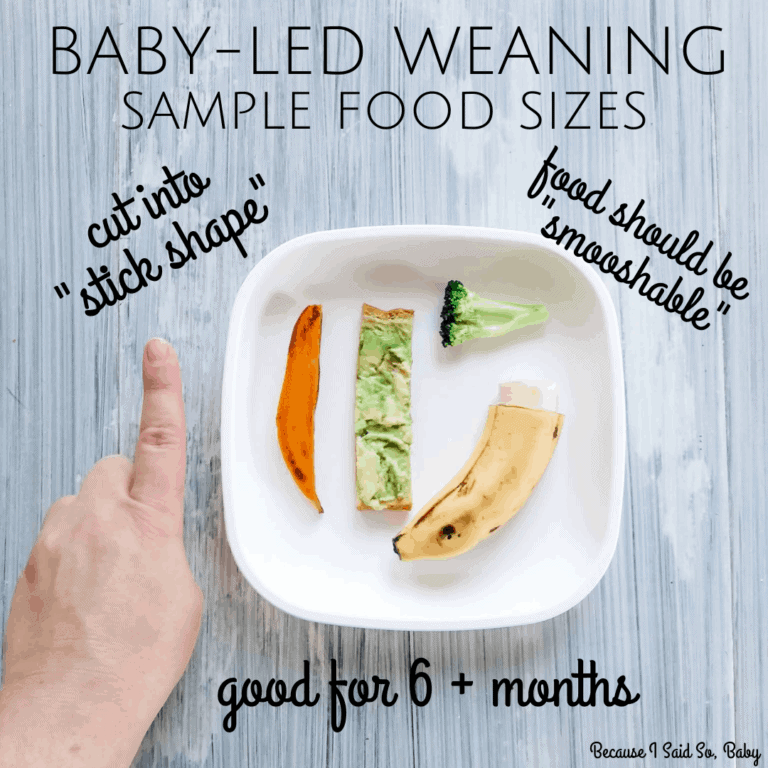
TIP: A good rule of thumb is to serve pieces of food that are about the size of a pea to start and soft enough that they are easy to squish between your fingers. This will be easy for baby to pick up and eat and will also reduce chances of choking.
Finger Food Ideas: Carbohydrates
Offering complex carbohydrates can provide fiber, a variety of textures, B vitamins, and more. Try these with your baby.
- Spinach pancakes (moisten with applesauce or plain yogurt if needed; this recipe is particularly moist and great for babies)
- Oatmeal, cooked according to package directions and allowed to cool
- Baby Puffs
- Peanut Butter Puffs
- Rice (it’s easiest if it’s in little clumps so baby can pick it up; this Coconut Rice or this Cheesy Rice are both good options)
- Baby Banana Muffin
- O cereal (soften in nondairy unsweetened milk or yogurt as needed)
- Baked Oatmeal, diced
Finger Food Ideas: Proteins
Offering proteins will continue to expose baby to a range of nutrients. These are my go-tos for babies newer to finger foods—and toddlers too.
- Shredded cheese (thicker cuts are a little easier to pick up)
- Tofu, diced and sauteed lightly or steamed
- Flaked cooked wild salmon
- Lightly mashed meatballs
- Shredded chicken, cut up finely (we love this Butter Chicken to share with baby)
- Ground beef, turkey, or chicken, broken into smaller pieces
- Lightly mashed beans
- Scrambled eggs, broken up into small pieces
- Diced egg muffins
I’d love to hear any questions you may have, or if you have foods that your babies enjoy that I didn’t include here.
 Chime in below in the comments!
Prep Time 5 minutes
Cook Time 5 minutes
Total Time 10 minutes
Author Amy Palanjian
Cuisine American
Course Baby Food
Calories 124kcal
Servings 1
First Finger Foods (choose 1-3 per meal)
- ▢ 1 Scrambled egg (broken up into small pieces)
- ▢ 1/4 cup Roasted sweet potato, mashed and broken up into small pieces
- ▢ 1/4 cup Fresh raspberries (broken up into smaller pieces)
- ▢ 1/4 cup Oatmeal (cooked according to package directions and allowed to cool)
- ▢ 2 tbsp Tofu (diced and sauteed lightly or steamed)
- ▢ 2 tbsp ground beef, chicken, or turkey, broken up into small pieces or lightly mashed meatballs
- ▢ 2 tbsp shredded cheese or crumbled goat cheese
- ▢ 1/4 cup Mashed sweet potato (broken into little pieces)
- ▢ 1/4 cup Peanut butter puffs
Fruits and Veggies
- ▢ 1/4 cup mashed roasted sweet potato (broken up into small pieces)
- ▢ 1/4 cup warmed frozen peas
- ▢ 1/4 cup Roasted Zucchini
- ▢ 1/4 cup diced Roasted Sweet Potato or Butternut Squash
- ▢ 1/4 cup blueberries (cut in half or quarters)
- ▢ 1/4 cup raspberries (broken into small pieces)
- ▢ 1/4 cup banana slices (broken into small segments—they are less slippery this way versus slicing them)
- ▢ 2 tbsp avocado (diced and mashed slightly—be sure it's ripe and very soft)
Whole Grains and Carbohydrates
- ▢ 1 Spinach pancakes (moisten with applesauce or plain yogurt if needed; this recipe is particularly moist and great for babies)
- ▢ 1/4 cup Oatmeal (cooked according to package directions and allowed to cool)
- ▢ 1/4 cup Baby Puffs
- ▢ 1/4 cup Peanut Butter Puffs
- ▢ 1/4 cup fully cooked rice (it's easiest if it's in little clumps so baby can pick it up; this Coconut Rice or this Cheesy Rice are both good options)
- ▢ 1 Baby Banana Muffin
- ▢ 1/4 cup O cereal (soften in nondairy unsweetened milk or yogurt as needed)
- ▢ 1/4 cup Baked Oatmeal (diced or regular oatmeal broken into little pieces)
Dairy
- ▢ 2 tbsp Shredded cheese (such as mozzarella)
- ▢ 2 tbsp Tofu (diced and sauteed lightly or steamed)
- ▢ 2 tbsp flaked cooked wild salmon
- ▢ 1 lightly mashed meatballs
- ▢ 2 tbsp finely shredded chicken (we love this Butter Chicken to share with baby)
- ▢ 2 tbsp ground beef, turkey, or chicken (broken into smaller pieces)
- ▢ 2 tbsp lightly mashed beans
- ▢ 1 Scrambled egg (broken up into small pieces)
- ▢ 1 Diced Egg muffins
For each meal or snack, choose 2-3 foods from a mix of food groups.
 Aim to include some fat in most meals and protein in many too.
Prepare the food, cutting into small pieces and/or mashing as needed to make the food easy to eat.
Start with small portions and allow more as baby indicates according to their hunger.
- Store leftovers in an airtight container for 3-5 days in the fridge.
- Many foods you cook for your family will work as baby finger foods—just be sure they are easy to squish between your fingers and the pieces are small and easy to chew.
- Babies very normally make a lot of faces when they eat, so don't assume they don't like something just because they scrunch their nose!
- Flavors and textures can take time to learn to eat, so continue offering foods in small portions even if baby hasn't liked them in the past—and make sure they taste good to you!
Calories: 124kcal, Carbohydrates: 14g, Protein: 7g, Fat: 4g, Saturated Fat: 1g, Polyunsaturated Fat: 1g, Monounsaturated Fat: 2g, Trans Fat: 1g, Cholesterol: 164mg, Sodium: 81mg, Potassium: 344mg, Fiber: 4g, Sugar: 5g, Vitamin A: 9857IU, Vitamin C: 18mg, Calcium: 51mg, Iron: 1mg
Tried this recipe?Rate in the comments and tag @yummytoddlerfood on IG!
Easy, Healthy, Perfect for Kids and Babies!
These sweet Banana Spinach Pancakes are a favorite when you’re looking to boost nutrition in a favorite breakfast option.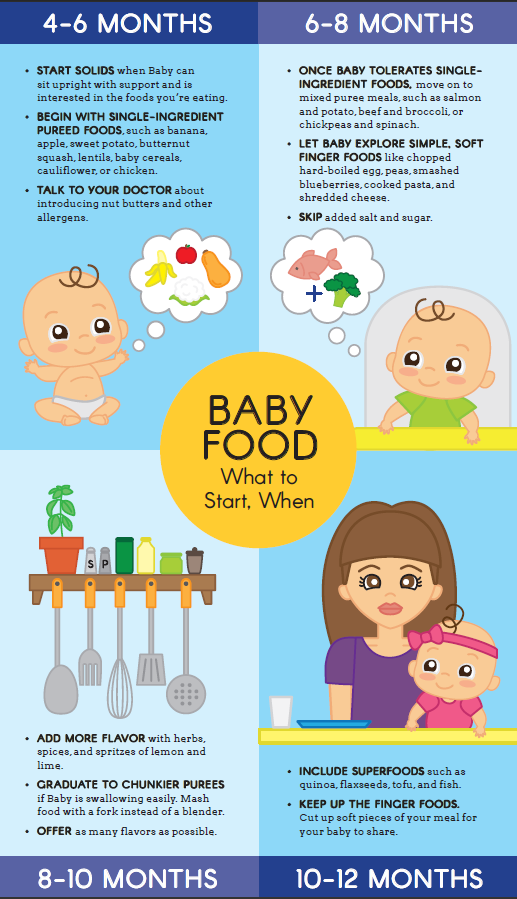 Or to have a little fun at the breakfast table by serving up a colorful meal.
Spinach Pancakes
I never thought that my older daughter would be such a fan of green pancakes, but just when you think you know your kiddo, they go and surprise you! It turns out that she’ll eat pretty much anything in pancake form. This (and Spinach Pesto and my Spinach Muffins) are by far her preferred ways to get her greens.
I love how these are both easy to make and they’re so easy for the kids to enjoy.
The beauty of this kids pancake recipe is that it comes together in the blender so you don’t have to dirty a sink full of dishes to make it happen.
And it includes two bananas and small pile of spinach, so everyone will get a nice amount of vitamins and minerals to start the day.
TIP: The flavor is sweet, so despite the color, they taste like healthy banana pancakes.
Ingredients You Need
To make this simple pancake recipe you’ll need:
- Very ripe bananas: Those with brown spots will have the best flavor
- Eggs
- Buckwheat flour or whole wheat flour
- Milk: Dairy or nondairy
- Baby spinach: You can use fresh spinach or spinach that you’ve frozen
- Ground flaxseed
- Baking powder
- Cinnamon
- Vanilla extract,
- Oil or butter for cooking
Ingredient Substitutions
Both whole wheat and buckwheat flour work well in this recipe, though the pancakes cook through more easily with buckwheat. Look for it in the natural flours section of your supermarket. It’s widely available and very nutritious. For tips on using whole wheat flour, see the Notes section at the bottom of the recipe as you’ll want to reduce the milk amount slightly.
Use an egg replacer like the one from Bob’s Red Mill to make these egg-free.
Use buckwheat flour to make these gluten-free.
Use nondairy milk to make these without dairy.
Step-by-Step Instructions
Here’s a look at how to make these healthy pancakes. Scroll down to the bottom of this post for the full information.
- Add all ingredients to a blender except the flour.
- Blend, starting on low and working up to high. You want the spinach to be very well incorporated.
- Stir or pulse in the flour. Avoid over-blending but do make sure to get all of the flour blended in.
- Cook as you would any other pancakes and serve warm.
TIP: I like to cook these in a nonstick skillet or griddle since they are easiest to flip.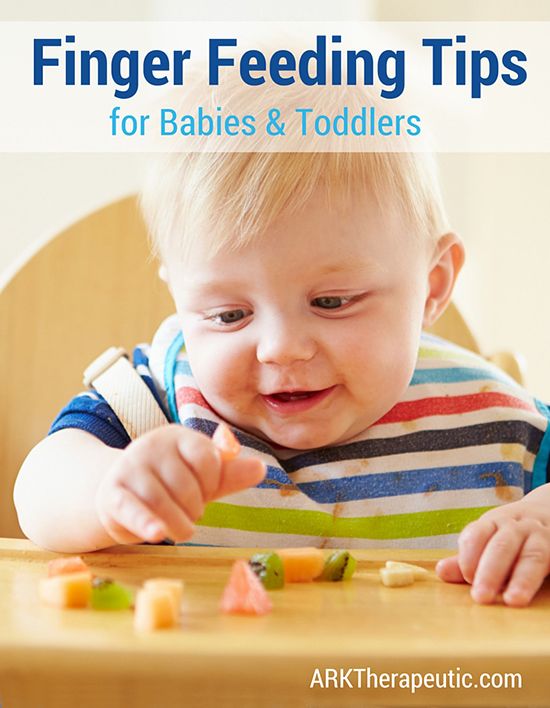 Cast iron also works if well greased.
Gluten-Free Spinach Pancakes
Yes! Buckwheat flour is naturally gluten-free and it works well in this recipe.
Dairy-Free Spinach Pancakes
To make these dairy-free, simply use nondairy plain unsweetened milk instead of dairy milk and cook with neutral oil.
Easy Baby Pancakes
Due to the very soft texture of these pancakes, they tend to be much easier for babies to eat than traditional ones. And since they are packed with nutrients, this is a favorite pancake recipe to make for baby led weaning and once a baby is starting to eat finger foods.
TIP: Find my favorite early finger foods for babies here.
Serving Suggestions
Maple syrup and butter of course, or nut butter, yogurt, applesauce, chopped fruit, or jam are all good options. When my middle kiddo was a baby, she ate them plain!
TIP: We like to have ours with a fruit salad rainbow (without the pot of gold at the end, unfortunately!) for St. Patrick’s Day, but that part is of course optional.
How to Store
These store really well if you let any leftovers cool and store in an airtight container or zip top freezer bags. You can store leftovers in an airtight container in the fridge for 3-5 days or in a freezer safe container or bag for up to 3 months. Warm in 15 second increments in the microwave to serve.
Tips for Making the Best Spinach Pancakes
- You can store a bag of baby spinach in the freezer to use in smoothies and pancakes. Freezing it maintains the nutrients but it knocks out any “green” flavor which is handy! It’s also nice that you don’t have to worry about it going bad before you can use it up.
- Be sure to blend the batter very smooth to get the greens very well processed.
- You can sub in whole wheat flour for the buckwheat, but you’ll want to reduce the milk by ¼ cup.
- If the bottoms start to brown too much before they are set, lower the heat to medium-low.
- Look for buckwheat in the natural flours section of your supermarket.
 It’s widely available and very nutritious.
 - If making for a baby who’s not yet consuming cow’s milk, you can use unsweetened nondairy milk.
- I prefer to use a nonstick skillet or griddle for this recipe, though cast iron works too.
- You may also like Spinach Banana Muffins, 2-Ingredient Pancakes, Banana Oatmeal Pancakes, and Yogurt Pancakes.
I’d love to hear what you think of this recipe so please comment below with feedback!
This post was first published March 2018.
Prep Time 5 minutes
Cook Time 15 minutes
Total Time 20 minutes
Author Amy Palanjian
Cuisine American
Course Breakfast
Calories 237kcal
Servings 4
- ▢ 2 small very ripe bananas (about 1 cup tightly packed sliced banans)
- ▢ 2 large eggs
- ▢ 1 cup buckwheat flour or whole wheat (See Notes at the bottom if using whole wheat)
- ▢ 1 cup milk
- ▢ 2 cups lightly packed baby spinach
- ▢ 1 tablespoon ground flaxseed
- ▢ 1 1/2 teaspoons baking powder
- ▢ 1 teaspoon cinnamon
- ▢ 1 teaspoon vanilla extract
- ▢ Coconut oil for cooking (or canola oil or butter)
Add all ingredients to a blender except the flour.
Blend on high until very well combined, about 20-30 seconds, or until you no longer see any noticeable flecks of spinach.
Stir or pulse in the flour and thoroughly combine without over-mixing.
Warm a nonstick or cast iron skillet or griddle over medium heat and coat with oil or butter. Pour small rounds of batter onto the hot surface—the batter should spread fairly thinly on its own—and let cook until bubbles form on the surface and the surface is mostly set, about 3-4 minutes.
Flip and cook for an additional 3 minutes, or until fully cooked.
Continue to prepare the rest of the batter, keeping the finished pancakes warm in a 275 degree oven if desired.
Serve warm with fruit, maple syrup, or another favorite dip.
Green Pan Non-Stick Pan
Vitamix Blender
Spatula
- To store, let cool fully and keep in an airtight container in the fridge for up to 3 days.
 Warm slightly before serving. Or, store in a zip top freezer bag for up to 3 months and warm through to serve.
 - Whole-wheat flour: You can sub in whole wheat flour for the buckwheat. Just reduce the milk to ¾ cup.
- You can use baby kale in this recipe if you prefer.
- You can store a bag of baby spinach in the freezer to use in smoothies and pancakes. Freezing it maintains the nutrients but it knocks out any “green” flavor which is handy! It’s also nice that you don’t have to worry about it going bad before you can use it up.
- Be sure to blend the batter very smooth to get the greens very well processed.
- If the bottoms start to brown too much before they are set, lower the heat to medium-low.
- Look for buckwheat in the natural flours section of your supermarket. It’s widely available and very nutritious.
- If making for a baby who’s not yet consuming cow’s milk, you can use unsweetened nondairy milk.
- I prefer to use a nonstick skillet or griddle for this recipe, though cast iron works too.

Calories: 237kcal, Carbohydrates: 40g, Protein: 9g, Fat: 6g, Saturated Fat: 2g, Polyunsaturated Fat: 1g, Monounsaturated Fat: 2g, Cholesterol: 104mg, Sodium: 206mg, Potassium: 577mg, Fiber: 6g, Sugar: 11g, Vitamin A: 1674IU, Vitamin C: 9mg, Calcium: 208mg, Iron: 2mg
Tried this recipe?Rate in the comments and tag @yummytoddlerfood on IG!
Finger food - Encyclopedia Baby food
Viktoria Levchuk©
Finger food is baby food prepared in the form of pieces of boiled soft food so that the child can independently take it and transfer it to the mouth, chew it or swallow it without anyone help and any problems.
Finger food is a fun way to encourage the development of motor coordination and skills for biting, chewing and self-feeding. Food in pieces should be easy to grasp by children's fingers and long-term storage, and should not contain bones or seeds.
As soon as the child begins to take food with his fingers and put it into his mouth with reasonable hand-eye coordination, then the fun begins! Let your child experiment with soft snacks such as a banana or peach that can be “hand-mashed” to the right consistency. The more a child experiments with finger food, the faster he will masterfully feed himself.
Finger food helps keep a child's food interest. As soon as he begins to feed himself on his own, then new taste horizons open up for him. What child refuses to try to bring the product to his mouth on his own, even if he didn’t really like it before.
Contents:
Very often mothers think at what age should they give finger food to their baby.
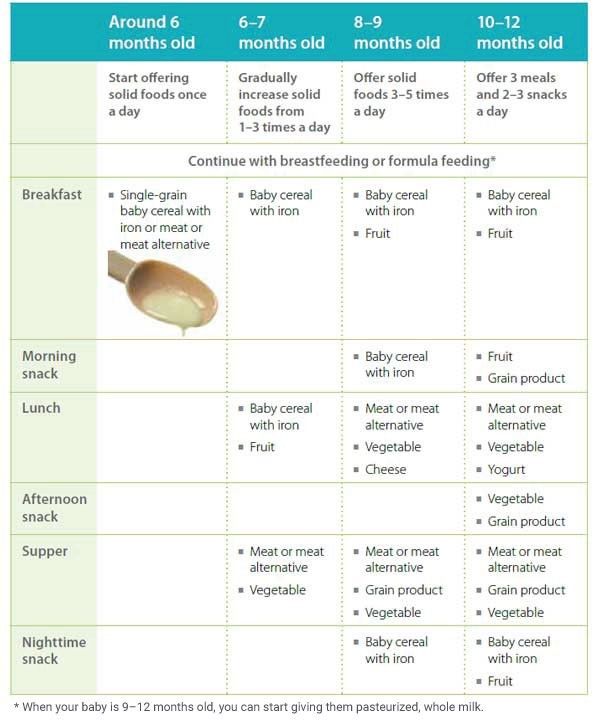
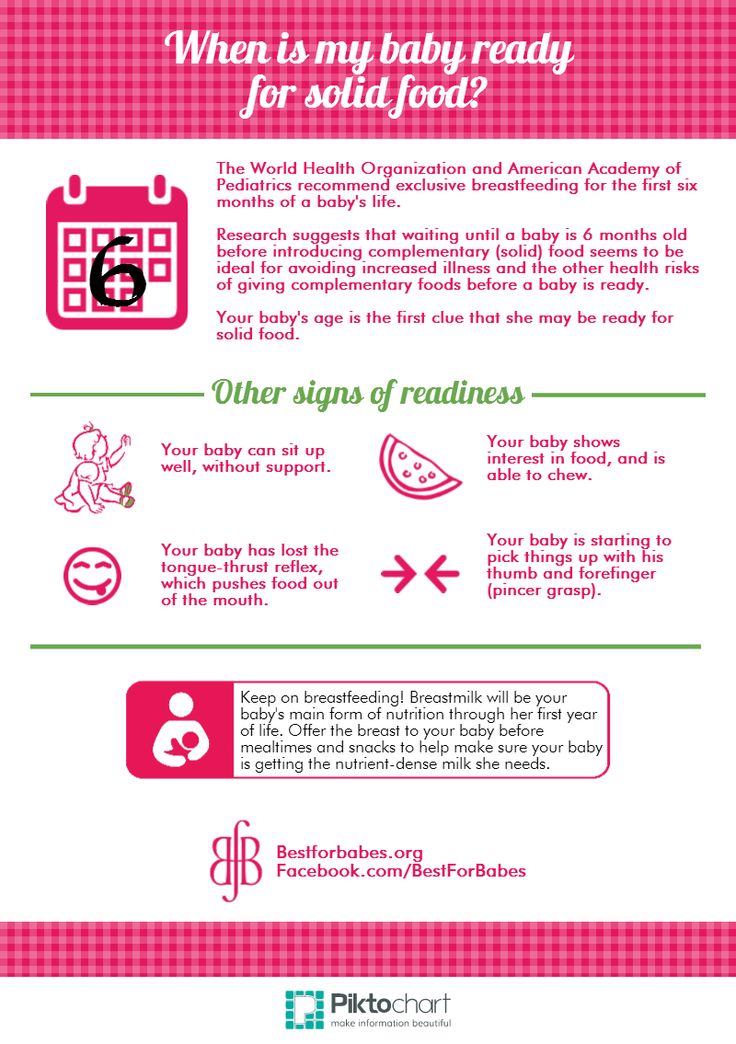
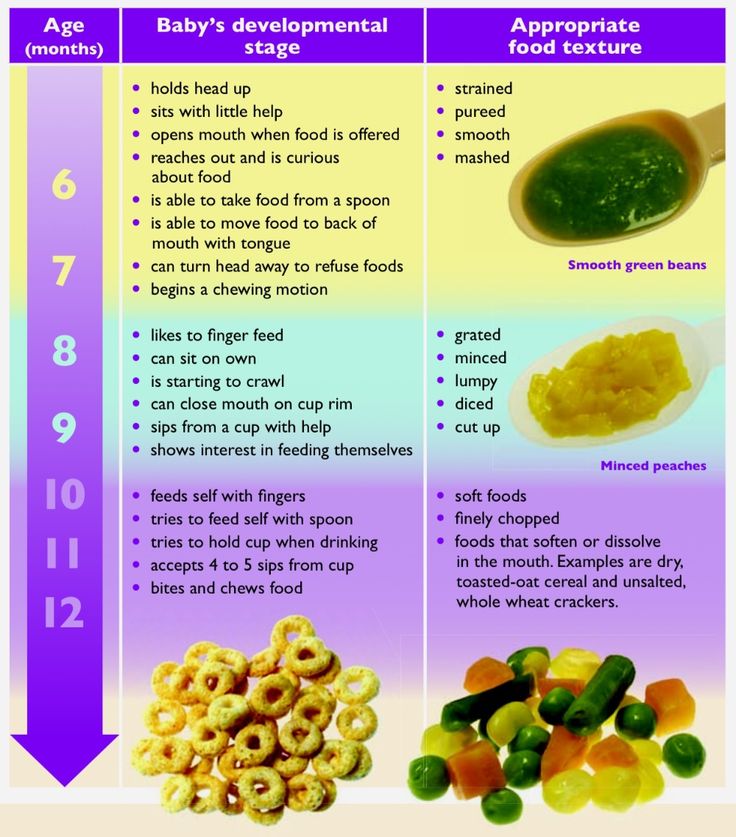
Honestly, even for me it's a difficult question. It's just that sometime between eight and nine months, the baby began to eat small pieces of food. The change in the consistency of food by age is very well described in the WHO recommendation, so it should be guided by.
Food consistency up to a year. Click on me!!!
However, you should not do it blindly and try to feed the baby in pieces at a certain age, perhaps he will not be ready yet. Children are all different, some want food in pieces, almost from the beginning of complementary foods, others are not ready for lumpy food for up to a year or more.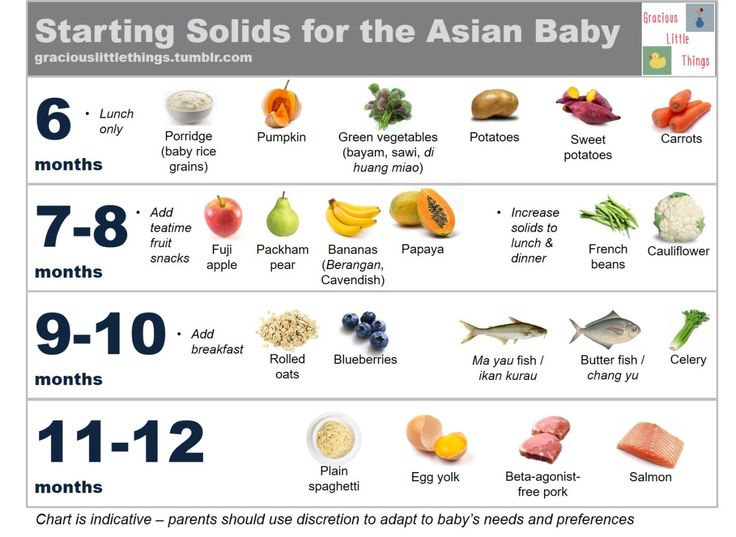 Therefore, any decision on finger food is made based on the child and his readiness. An excellent preparation for finger food is a nibbler, which will prepare the child for lumpy food.
The child has no teeth
Click on me!!!A child's gums are incredibly strong, as is the tongue, so the number of teeth is not an indicator of whether to give finger food or not. If the decision has been made to start complementary foods and the baby is doing well with mashed foods, then you can safely start giving small pieces of soft food when the baby is ready for it. At this stage, it is important to let the child try to eat food of a different consistency, more complex, in order to train the maxillofacial apparatus. Thus, the child gradually prepares for the full chewing of food with the help of the entire jaw, teeth and tongue.
Knowing if finger food is safe for a child
A good rule of thumb to help prevent choking is to avoid anything hard (e. g. raw carrots), round (e.g. whole grapes), sticky (e.g. , spoon of nut butter) or too much gummies (such as gummies). At first, the child is given pieces of food in the form of sticks, which can be easily clamped in the child's chick, later, when the child begins to control the finger grip better, you can move on to cubes. At first, finger food should be soft, boiled and melt in your mouth. As a child learns to manage with such products, it is possible to complicate the task and switch to fresh soft foods, etc.
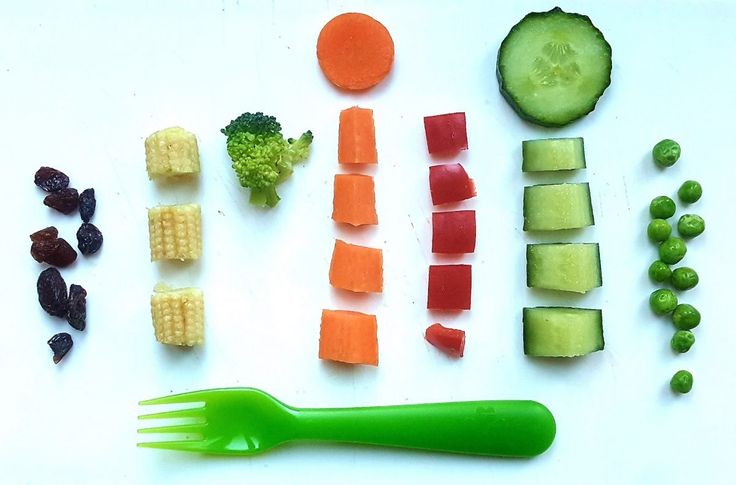
Foods that squeeze easily between fingers are good for older children and for younger children. Around 16-18 months, many babies are ready for more complex textures. During this period, cutting food into pea-sized pieces is also a good idea - many babies tend to put large pieces of food in their mouths, so small cubes are used to avoid choking. We always adjust the sizes of products according to the age and eating experience of our own child.
Usually the first finger food is biscuits or baby biscuits, which are very soft and dissolve easily in the mouth. The baby first sucks it, procrastinates, and learns to roll pieces of food in the mouth with the help of the tongue. A little later, when the teeth appear, you can give the product a little harder, for example, a soft apple, some parents play it safe and give a baked apple without a peel. Later, as new foods, vegetables and fruits are introduced into complementary foods, they are offered in the form of finger food, such as boiled broccoli or cauliflower. In general, the child can be offered almost all products in the form of finger food, which is introduced into baby food.
Should the product be peeled or not?
We give an apple to a child without a peel. The first finger foods in the form of vegetables and fruits are given without skins. Yes, the skin of many fruits and vegetables contains valuable nutrients. It is often recommended to leave the skin on in order to take full advantage of the nutrients contained in the product. But removing the top layer from fruits and vegetables helps reduce the amount of pesticides that may be in the product. Peeling fruits and vegetables helps avoid choking hazards due to the rough texture of the skins. The peel also usually sticks to the palate in the child's mouth, thereby hindering him, and can be there for a long time, and when the child swallows, the probability of choking in the absence of an adult nearby is higher. Getting rid of the skin at the beginning of complementary foods also helps prevent disorders
digestion. And we also take into account that there are some vegetables and fruits, such as pumpkin and avocado, which need to be peeled, because their peel is really inedible. It is not worth getting rid of the product from the peel for a long time, only at first. Usually the first couple of months of complementary foods and exposure to finger food. Then the product with the peel is given to the child in the presence of an adult, after which it is advisable to check the baby's mouth to see if he swallowed everything. Forcibly open your mouth should not be, play the game "Show your tongue or where are your teeth." By the age of 1.5, the child copes well with the peel of fruits and vegetables, if it is too rough, then it easily spits it out.
Choking
The presence or absence of teeth does not mean that a child can chew. Sometimes children can bite off a piece of food, try to swallow it whole and choke, so never leave a child alone while eating. Some children can store food in their mouths like hamsters, so we always check to make sure the child has swallowed everything before leaving the kitchen. You can read the article on suffocation here.
Our finger foods
At first I gave biscuits to my first child, later I switched to a fresh apple, mostly fresh fruits, he sucked and procrastinated them more than he ate. Later, food appeared in the form of a toy, i.e. we crumbled it, crushed it, and sometimes something got into our mouths. However, since breast milk is always given at the end of complementary foods, I was not too worried about whether the baby was full or not.
With the second child, finger food was a gradual transition from the nibbler. We used it for about a month, then I ventured to give the first pieces of food. But to be honest, the child himself tried the first pieces of food, namely, he stole an apple and took a bite. The first experience of finger food is always scary, because at first the child often coughs and spits out food, he is learning, so it is important to be with the child, if something goes wrong, then the parent will be able to provide first aid. I remind you that the child is suffocating quietly, not a single sound. If he coughs, clears his throat, then everything is within the normal range, you need to help get rid of the food that interferes. Rules for helping with choking know before introducing finger food into complementary foods. It is imperative to look and study, and then give a new consistency of complementary foods.
Of course, at first, only one type of finger food is placed in front of the baby, later a plate is bought, divided into three to five sections, which is filled with finger food. The baby is already given a choice of what to eat, so you can easily determine the taste preferences in nutrition.
Finger food quick hacks
- The first finger food should be well kneaded between the gums.
- Food in pieces should be age appropriate - do not offer whole eggs to an 8 month old baby .
- If the child cannot raise his head and sit up without help, do not offer him finger food.
- The child should always sit in an upright position, not walk, especially at the first meeting, when he is offered baby food in the form of pieces, to avoid suffocation.
- NEVER leave your child unattended when serving finger food.
Examples of finger food
The first finger food is a biscuit or a baked apple. Those. food that does not need to be chewed, it melts easily in the mouth without additional help from the child. You can start with foods that have been well received by the child in a pureed form on a spoon, serving them in convenient cubes or pieces - the size of a pea for harder items, the size of a stick or wedge for softer foods.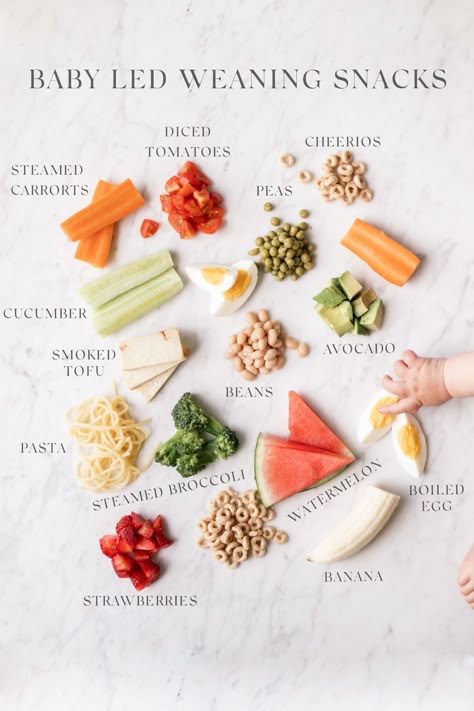
Examples of finger food are:
Click me!!!- pieces of soft bread or crackers
- Soft cheese, Chedder or Mozarella
- Banana
- Ripe pear without peel
- Ripe soft green apple without a peel, the first time you can give boiled
- Boiled cabbage
- . carrots
- Boiled potatoes
- Boiled green peas
- Boiled pumpkin
- Boiled fish
- Boiled meat in the form of meatballs
- Pasta
- Quail eggs, etc.
*All products must be familiar to the child or introduced into complementary foods.
Finger Foods to Avoid
When it comes to feeding your baby with morsels, the biggest problem is preventing choking. So we do not allow him to eat anything without the presence of parents or any adult nearby. And we exclude any food that can get stuck in the child's airways:
Click me!!!- Popcorn,
- Nuts, peanuts,
- raisins and other dried fruits,
- raw vegetables (e.
 g. carrots),
 - grapes,
- Cherries without bones, hard fruit and vegetables with a peel of
- Zhevaliy Confinctions
- popcorn, pretzels, corn chips and other snack foods
- marshmallows, etc.
Most doctors do not recommend these foods until the child can eat them safely - around 4 years (although it depends on the child, closer to 3 or 5 years).
Finger paints for kids: what to choose, how and what to draw even very young children are able to join this exciting and useful process. Yes, it's troublesome, and yes, it will take you longer to clean up after your child than to draw with him. But this “dirty hour” is simply necessary for the correct formation of tactile skills, muscle development and brain growth.
Why do we need this?
Some parents are skeptical about finger painting. Well, what is it if not fussing over paper? But pediatricians and psychologists are sure that this is a very useful activity that develops different skills. Each age has its own.
Finger paints up to a year
The kid is just beginning to discover the world and does it in all possible ways, including through tactile sensations. Drawing with fingers, the kid learns that there are different textures (paints, water, paper) and textures (paper, glass, tile, film). Smearing, dripping and splashing, the baby makes himself a reflex massage of the palms, where there are a million nerve endings. This has a very good effect on the nervous system, calming and relaxing the young artist. The child learns the world around him through color and understands that he can create a new shade himself by mixing the other two.
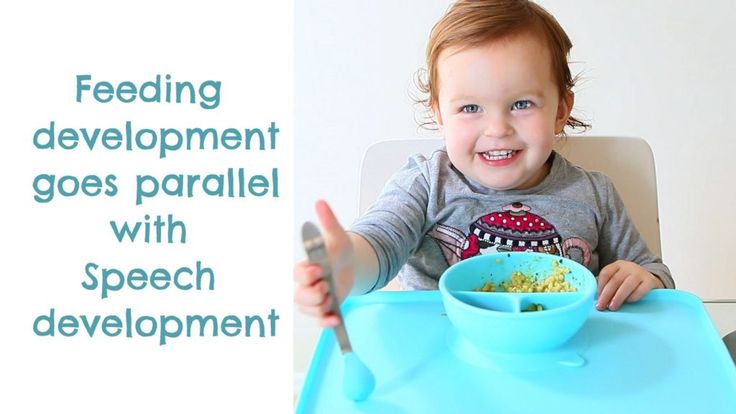
And most importantly, fine motor skills develop during finger painting. And this, in turn, affects the development of speech. It is known that the areas of the brain responsible for movement and speech are located nearby and affect each other, so the “lag” of one will certainly affect the work of the other.
Finger paints from 1 year old
At one year old, a child improves the skills he acquired at an earlier age and develops others. For example, creative abilities are manifested, and the potential for their further development is laid. Finger painting can help with this. If at the age of up to a year, drawing with finger paints affects the development of speech, then from a year old - already on the volume of vocabulary.
The child learns to think logically, establish cause-and-effect relationships (why the paint drips and what will happen if you put a blot), and most importantly, he becomes more diligent and responsible.
Paint preparation
Fill a bowl with water to dip your pens in before painting, then rinse off excess paint. Prepare a sponge, napkins and a towel. What to wear for a child? The less clothes the better! If the temperature in the room allows, it is best to leave only diapers. This will not only make it easier for you to further wash your baby, but also provide him with freedom of movement while drawing. Well, if you can’t do without clothes, dress your baby in those things that are not afraid to put a stain on.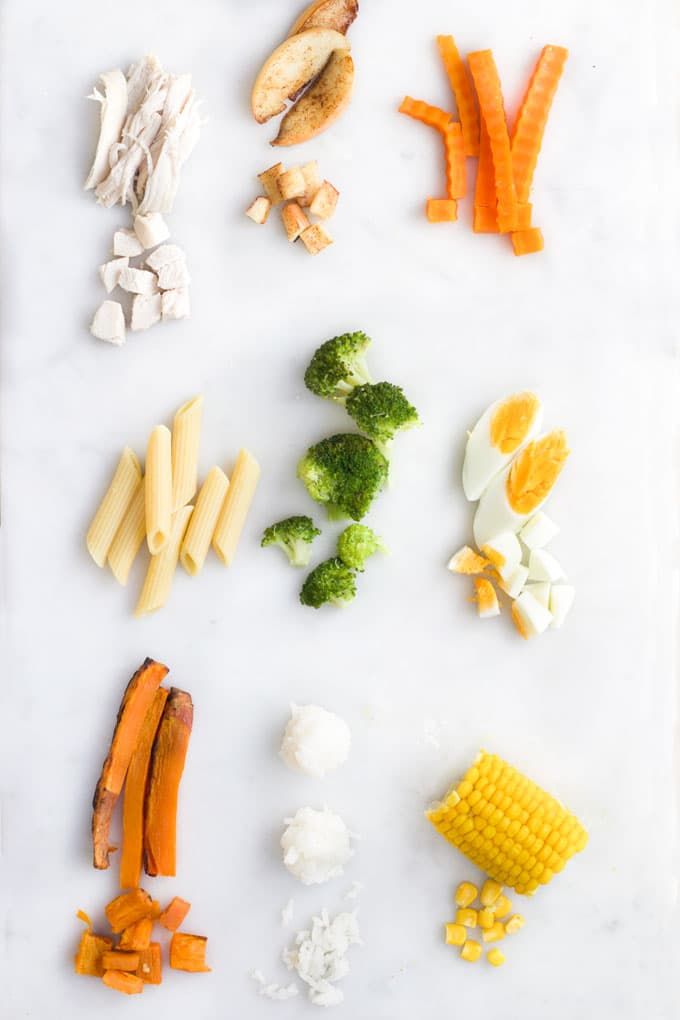 Although there is nothing to fear: finger paints are usually easily washed off from all surfaces.
Do not dilute paints with water. Just open the jars, put them in front of the baby and go. If you come across fairly thick paints or the jars have narrow necks, transfer the paints to a palette, saucers, or any plastic lids. It will be more convenient for the baby to dip his hands in them.
You can draw while sitting at a highchair, so the baby does not stain the floor. And if this is not possible, it is not necessary to sacrifice the cleanliness of the floor - cover it with plastic wrap, newspapers or an old sheet.
- Photo
- Getty Images/fStop
What to paint on?
The first thing that comes to mind is paper. But in this case, we advise you to choose a large format. For a small child, a landscape sheet and even an A4 sheet are not enough. While the kids do not move as coordinated as we would like, and draw with sweeping movements, take the A2 format, and even better whatman paper. A suitable option is the reverse side of old wallpaper or large paper bags.
But paper is not the most reliable option. It is easy to tear, and if you drag it with wet fingers for a long time, it starts to roll. Therefore, if you are not embarrassed by further cleaning, let the baby draw on easy-to-clean surfaces: on the floor, wall, closet.
Many mothers prefer to have their first exposure to finger paints in the bathroom. Pour the paint directly into the tub and let your little one smear the color over the sides and tiles. This will delight even a little artist, and it will be more convenient for mom to wash the art - after the drawing session, all that remains is to reach out for the shower hose and direct it to the right place. Another option is to stick a sheet of paper on the wet wall in the bathroom and draw on it.
When your little one gets comfortable and loves the activity, let your imagination run wild and think about other surfaces you can draw on.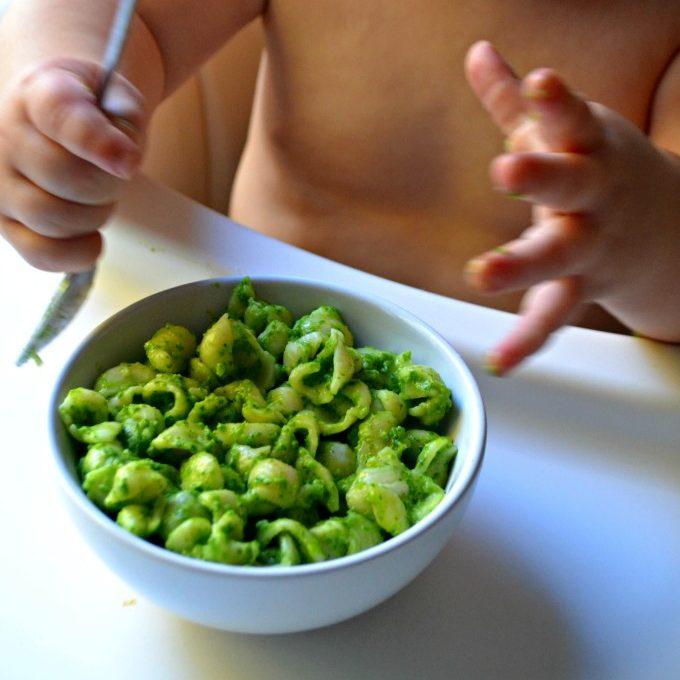 A tray, baking sheet, large lids from plastic food storage containers, a tarp, or a piece of plastic wrap. Bubble wrap, for example, is a great option, which, moreover, further develops the sensitivity of children's fingers. Drawing on a mirror helps kids learn the laws of reflection and light, and drawing on wax paper helps them learn the law of resistance. It is very curious to observe the gaze of a child who does not understand why the paint does not want to fall on paper rubbed with a candle.
What to draw?
Here the flight of fancy is not limited. And do not limit the creator, let him depict what he wants. And then, when he puts the prints of his palms or heels on the canvas, finish the missing elements: a bird or a flower can turn out from a palm, and a funny face from a footprint.
If you are not drawing on paper, but want to keep the “masterpiece”, just attach a blank sheet to the drawing, press it down hard and, voila, an exact copy is ready! You can hang it on the wall or give it to your grandmother.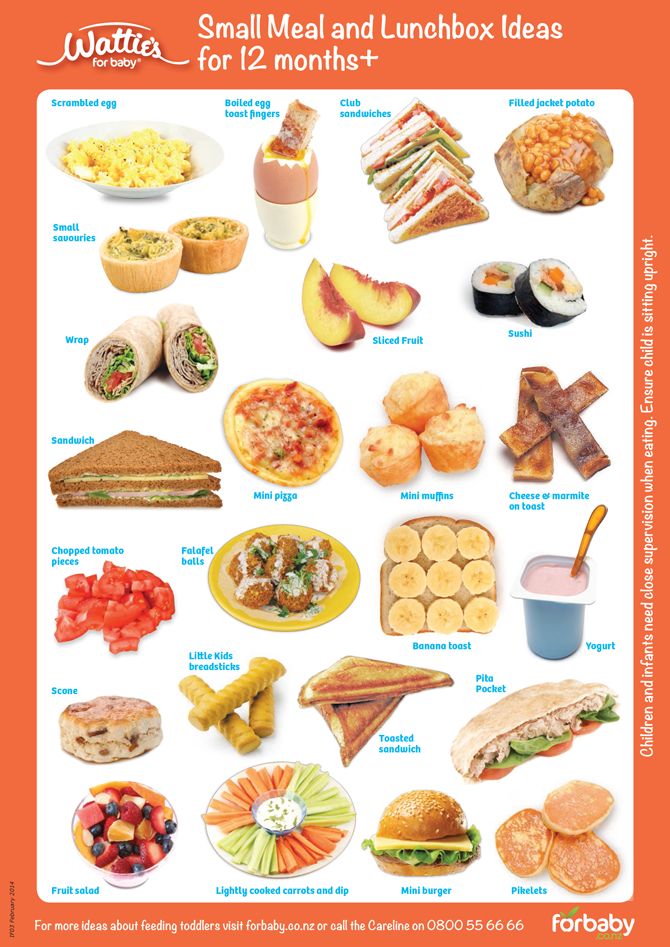
The duration of the first lesson should be short, otherwise you will discourage the child from all the hunting. As soon as you see that he is no longer interested, he is distracted and looks around - finish.
In the process of drawing, parents should play a big role, helping to bring the child's vague idea to a certain conclusion - this will show the child that it is possible to create a meaningful drawing.
- Photo
- FatCamera/Getty Images/E+
Are paints safe
Any paints you use must be non-toxic and safe for both skin and occasional internal use. Therefore, very young children are not recommended to paint with ordinary paints - the usual watercolors or gouache. For delicate children's skin, the heavy composition of such paints can be harmful. But when buying special finger paints, you can be sure that they will not harm the baby.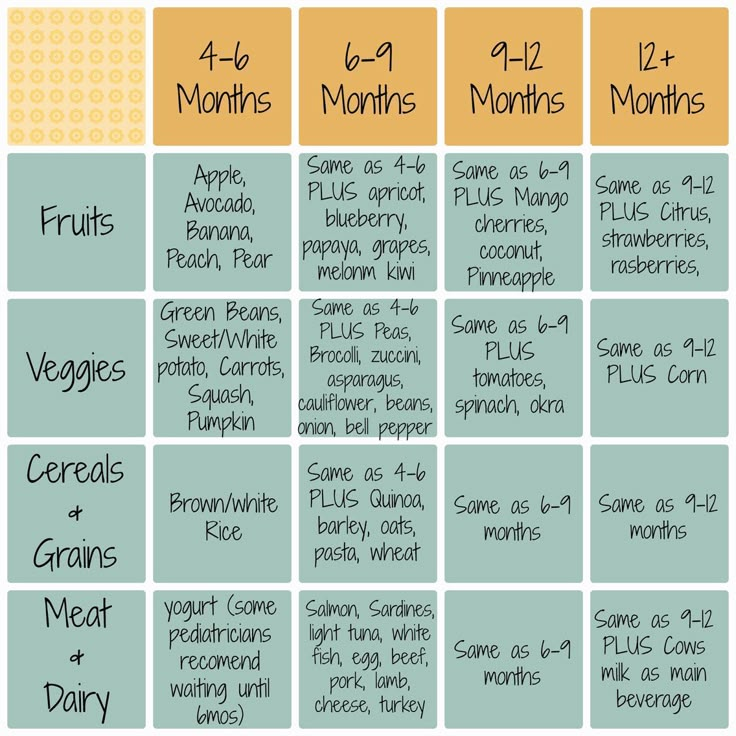 Of course, you don't have to eat them. But even here, the manufacturers made sure - most of these paints taste salty or bitter, so once you try them, the child is unlikely to want to do it again.
But despite the fact that such paints are positioned as absolutely harmless, some of them are not completely transparent, so you should still carefully study the packaging before buying. High-quality finger paints contain only food coloring and salt, and they must be water-based. If you didn’t follow the child and saw that he was putting his fingers in his mouth, don’t panic: nothing bad will happen from salt and water. And while drawing, a small child can be given a pacifier - then he will not pull anything into his mouth.
You can make these paints yourself.
DIY Finger Paints
-
Dissolve 2 tablespoons of fine salt in four cups of water. Put on fire, gradually add a couple of cups of flour and dye, mix until the lumps disappear.
-
Mix potato starch with warm water until creamy, then add food coloring.
 You can use the dyes from the Easter kits.
You can also add glitter to your homemade paints to make it more fun. But in this case, make sure that the child does not put his hands in his mouth.
If you don't mind the process of painting smoothly flowing into an afternoon snack, then you can create paints from products. However, it is undesirable to teach a child that any paint can be eaten. Such paints are best done only if the baby constantly tastes everything.
Edible finger paints
-
Mix natural yoghurt and a couple of tablespoons of bright jam (currant, strawberry or raspberry).
-
For green dye: a handful of spinach, half a glass of dry baby porridge and milk, mix in a blender.
-
For purple dye: 5 blueberries, half a glass of dry porridge and milk, mix in a blender.
- Photo
- Getty Images/Cultura RF
Which finger paints to choose
Today, finger paints can be bought on the Internet, in stationery stores and even in ordinary large regional supermarkets.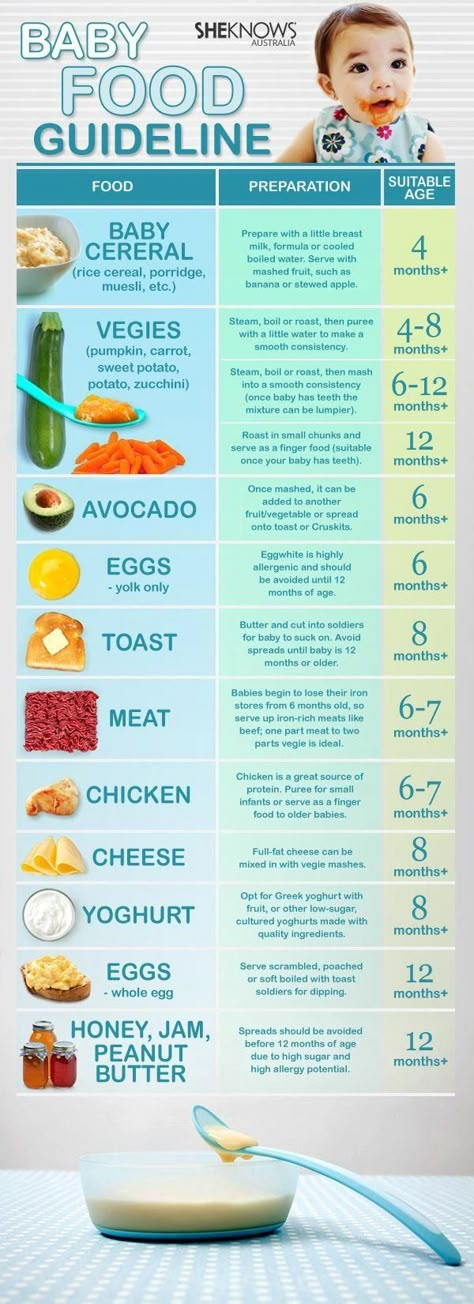 First of all, focus on the composition. Choose only from those options in which nothing bothers you.
-
Please note that there are finger paints marked "allergy friendly". If your baby has sensitive skin, look for these. Also, be sure to check the expiration date: even the highest quality paints can cause allergies if the expiration date is coming to an end.
-
Don't try to buy a paint kit with as many colors as possible. You can get by with three basic ones: red, blue and yellow. The rest of the colors the baby can mix directly on a sheet of paper.
-
Finger paint boxes usually show the age of the baby. If you cannot find a clear division into age categories, also focus on the composition: the younger the child, the more natural the colors.
-
There are also so-called touch paints among finger paints. Fine sand is added to their composition, so that when drawing, tiny fingers feel both the jelly-like structure of the paint itself and the small grains in it.