How to prepare baby led weaning food
Ultimate Guide to Baby Led Weaning (and Best First Foods)
Learn the basics of how to do the feeding approach known as “baby led weaning” and the best first foods for baby to make starting solids easy and fun. Plus: Learn why it’s perfectly okay to use a combined approach of blw and purees.
Baby Led Weaning
The feeding approach known as “baby led weaning” or “BLW” for short, is a style of feeding infants that allows them to feed themselves right from the start. The food is offered in thick finger-size pieces and is soft and easily squishable between your fingers. This way, the food is both easy to hold but has a low risk of choking.
TIP: This method became popular about a decade ago after the publication of the Baby Led Weaning: The Essential Guide to Introducing Solid Food by UK author Gill Rapley.
BLW Baby
One of the many reasons that people are starting to opt for this style of feeding more and more is simply that it’s easy. In many cases, you can modify foods you’re already making to share with your baby and there’s not always a lot of separate cooking involved. It also allows a baby to have control over what goes into their mouths, which sets a good precedent for letting them eat intuitively from the start.
What age should I start baby led weaning?
According to the American Academy of Pediatrics, a baby is ready to start solids with baby led weaning when:
- They’ve doubled their birth weight (at least).
- They can hold their head up well and are starting to sit up unsupported.
- They show signs of being interested in food (watching you eat, reaching for food when you’re eating, etc).
- When you feed them, they are able to move the food around in their mouths—rather than spit it right out.
TIP: Look for a highchair that allows a baby to sit up relatively straight so they can have good posture and better control over their arms and hands.
How to Start Baby Led Weaning
The first time you offer solids is such a fun milestone, so you’ll be ready once you follow these simple steps.
- Make sure baby has hit the milestones listed above to let you know that he’s ready to start.
- Get the highchair ready and adjust the straps and foot rest as needed.
- Plan to introduce water when you start solids. I recommend a trainer cup.
- Choose one food to start with and plan to offer only one food at a time.
- Stop when baby starts to fuss, turns his head away, or shows any other signs of not wanting to continue. It’s usually fairly obvious when they are done!
TIP: If you start offering solids and baby just doesn’t seem interested at all, it’s okay. Take a break for a few days or a few weeks and start again. Each kiddo has their own unique timeline.
Best Tips for Starting BLW
Here are a few more tips to consider and review before you get started.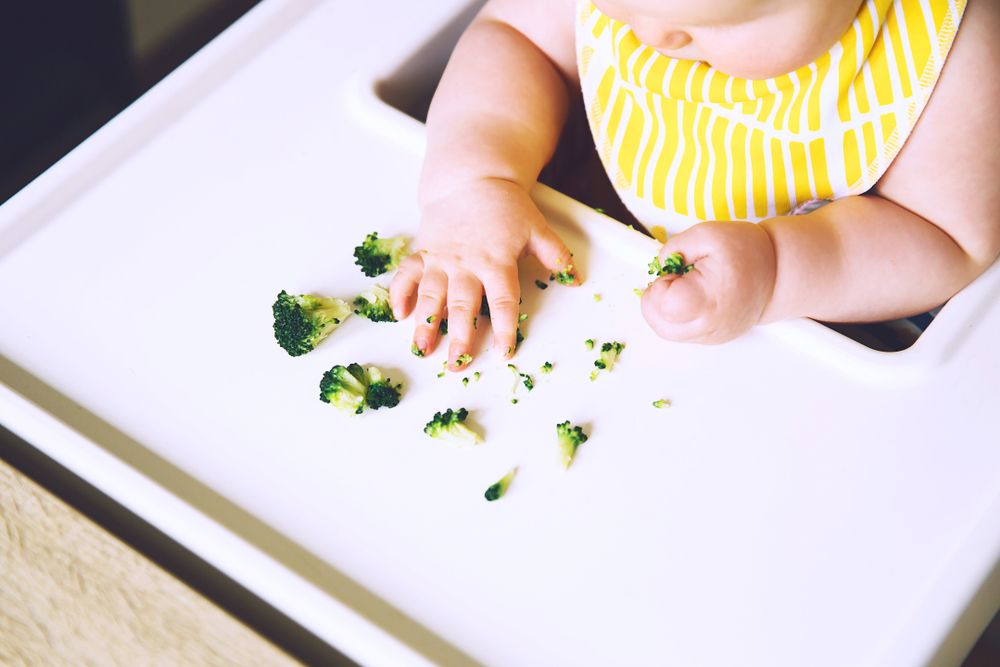
- Understand the gag reflex. Gagging is different than choking though and is most often a sign that baby is learning to move food around in their mouths—and to get it out of their mouths, which is a skill you want them to have!
- Brush up on the basics of how to know when baby is ready to start solids. (Go back to the top of this post for the signs to look for.)
- Set them up for success with a highchair that allows them to sit up straight and has foot support.
- Sit with them as you offer food.
- Check your own expectations of what will happen and simply allow your baby to take the lead.
- Start with one new food a day or every few days.
- Vary the textures of foods you offer to start exposing baby to many right from the start.
- Offer water in a sippy cup or small open cup.
TIP: Remember that breastmilk or formula will continue to satisfy baby’s hunger for the first few months of eating solids. Do not expect solids to replace milk feedings at this age.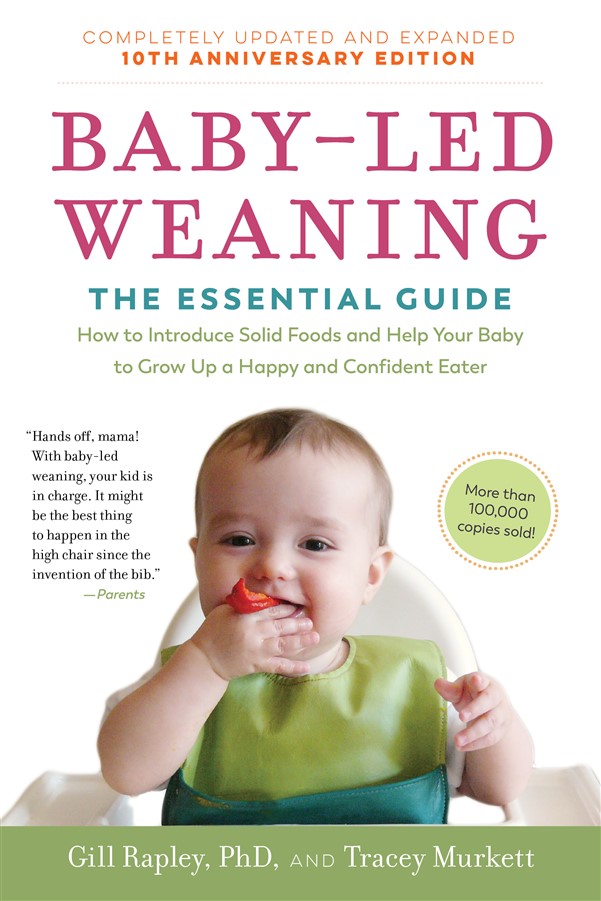
First Foods for Baby
Starting solids with baby led weaning or purees are both perfectly acceptable ways to introduce a baby to solid foods—but the topic can get so heated! There’s a lot of pressure to do it the “right” way and I’m here to say that there isn’t one. You 100% can do one or the other, or combine the two to make it work for your family. It’s all good!
Remember, the goal with first foods for baby is that they’re introduced to flavors, nutrients, and foods they can easily eat or suck on. It should be an enjoyable milestone for all involved.
TIP: It’s a good idea to get into the habit of offering an iron-rich food since iron stores in babies start to run out around 6 months and they’ll need to start ingesting it in their food.
Best First Foods for Baby Led Weaning
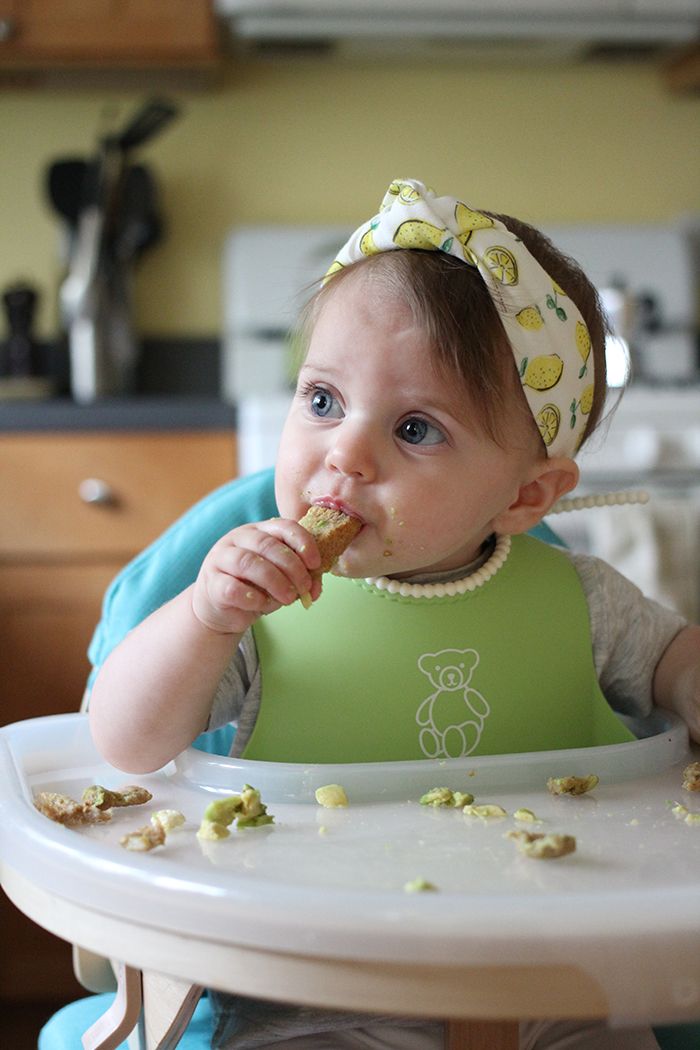
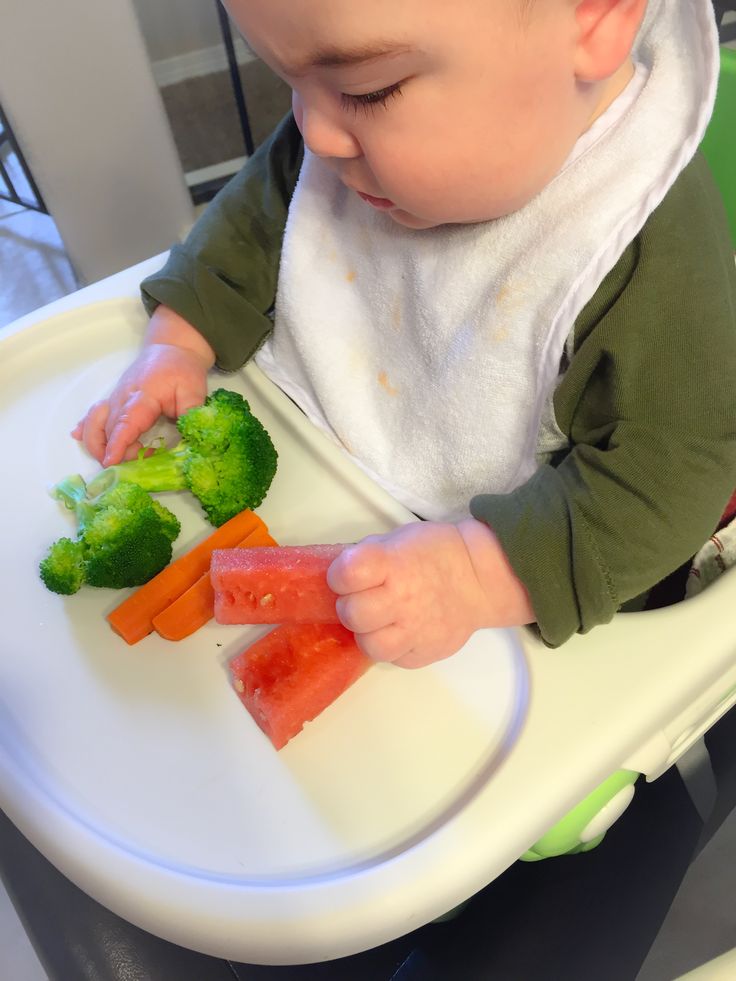
Here are some of our favorite first foods to offer baby led weaning style. You want foods to be finger sized so they are large enough that baby can’t force the whole piece into their mouth, and a shape that’s easy for a 6 month old to hold with their chubby little hands. These are some of our favorites.
- Roasted sweet potato wedges
- Roasted apple wedges, skin on to help them hold together
- Roasted or steamed broccoli florets (big enough for baby to hold)
- Melon slices
- Thick mango slice
- Banana with some of the peel still on
- Toast sticks with mashed avocado
- Avocado spears (make sure the avocado is ripe and soft)
- Lamb or beef, on the bone or a large piece for baby to suck on
- Dark meat chicken, on the bone or a large piece for baby to suck on.
TIP: The foods should generally be soft enough to squish between your fingers with the exception of the large pieces of meat. If baby gnaws a piece down into a smaller piece, replace it with a larger one to avoid her putting a chunk of food into her mouth.
Baby Led Weaning Banana
To serve a banana to a baby, wash it well, then slice it in half. Cut off an inch or two of the peel, but leave the rest of the peel on so it’s not slippery for baby to hold.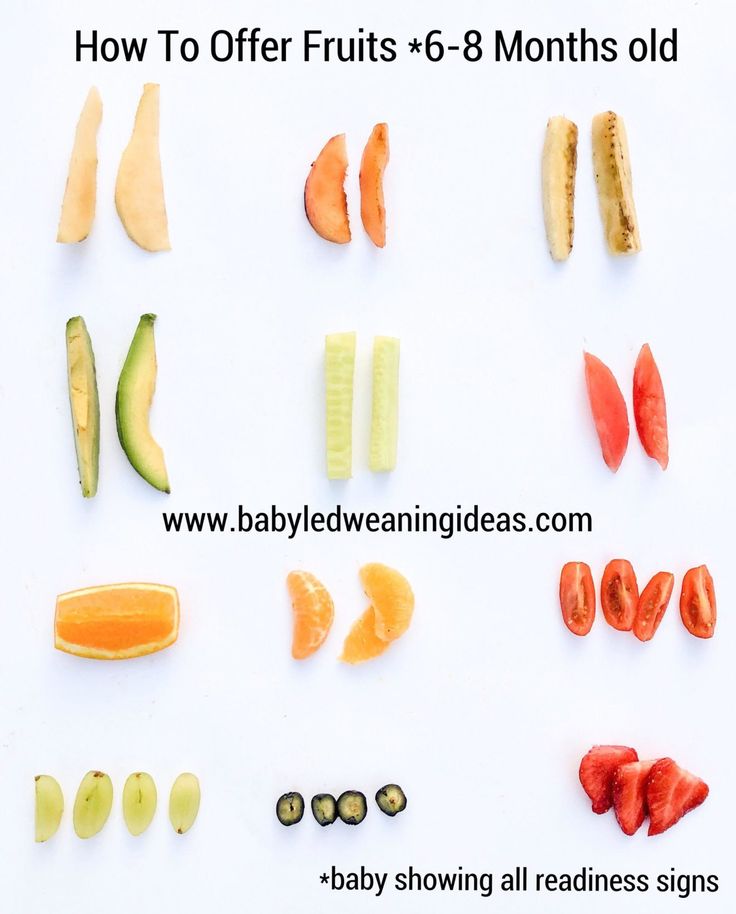 They’ll suck on the top part like a little popsicle! You can also help them hold the banana if needed.
Foods to Avoid Serving While Doing BLW
You want any foods you offer to a baby while doing baby led weaning to be soft enough to squish between your fingers and safe for them to eat and digest. Plan to avoid:
- Anything hard, sticky, or crunchy (like raw apple or carrot, whole nuts, crackers, or a big spoonful or nut butter)
- Added salt
- Cow’s milk (which is difficult for kids under 1 to digest; plain yogurt is fine though)
- Added sugar (they simply don’t need it)
- Honey (to avoid a risk of botulism)
- Super slippery foods that would be hard for baby to hold (which can be frustrating)
TIP: Always sit with your baby and watch them try to eat. They are your best guide for making adjustments to the foods you serve.
Baby Led Weaning and Choking
There are many parents who dislike this method of feeding because it often sounds like a baby is choking. And while there are surely some incidences of choking, what’s more likely is that a baby will occasionally gag on a piece of food that gets into their mouth that they weren’t expecting.
But remember: Gagging is a sign that baby is doing what she needs to in order to move the food around in their mouth as they learn to eat. It usually sounds more dangerous than it actually is.
TIP: If the sound of gagging really freaks you out, you’re not alone. Consider offering more preloaded spoons with purees to start your journey more slowly.
How to Cut Foods for BLW
You generally want the food to be big enough that it would be difficult for baby to put the entire thing into their mouths. Here are some specifics:
- Foods that are roughly the size of a finger, so about a 4-inch stick.
- Foods that are easy for the baby to pick up—they can’t pick up small pieces until closer to 9 months when they develop the ability to use their fingers in what’s known as a “pincer grasp”.

- Foods that aren’t too slippery—so you can wash and leave some of the peel on fresh foods like bananas, avocado, kiwi, and mango.
TIP: You can also go even bigger if you’re worried about size. Think half of a slice of bread or a big chunk of watermelon.
Will my baby actually eat much food with BLW?
Probably not at first. There will likely be more tasting of the food than eating of it and that is totally fine. They will still rely on breast milk or formula at this age for their main nutrition, so don’t expect them to suddenly start eating full meals. (They’ll get there in a few months, but it takes time!)
Do babies need teeth for baby led weaning?
No! Gums are super strong and front teeth aren’t used for chewing—that happens when the back molars come in. Teeth really have nothing to do with whether or not a baby can eat solids.
TIP: Learn more about what to expect from teething here.
Can you mix baby led weaning and purees?
Absolutely! I think it’s a great idea to mix the two methods simply because it gives you many more options for foods and allows the baby to experience more textures.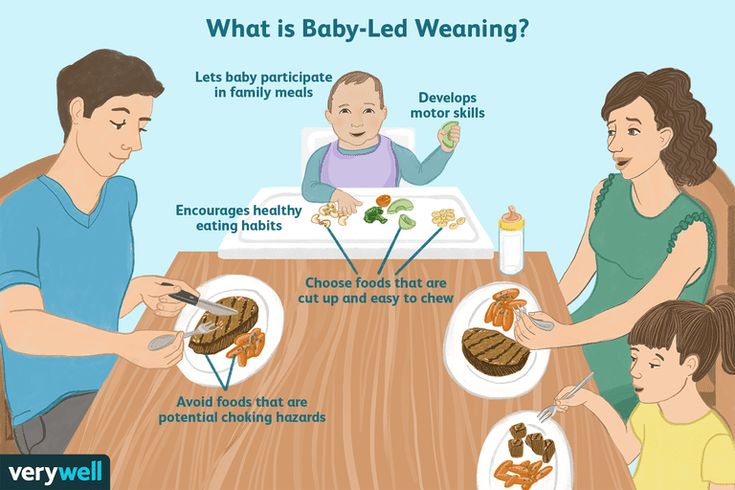 I recommend allowing babies to feed themselves preloaded spoons—so you put the puree on a spoon, then hand it to them to actually put the spoon into their mouth—so they still have control over what goes into their mouths.
TIP: Feeding some purees is also helpful if you’ll be sending food with a baby to daycare since the care provider may not have experience with blw.
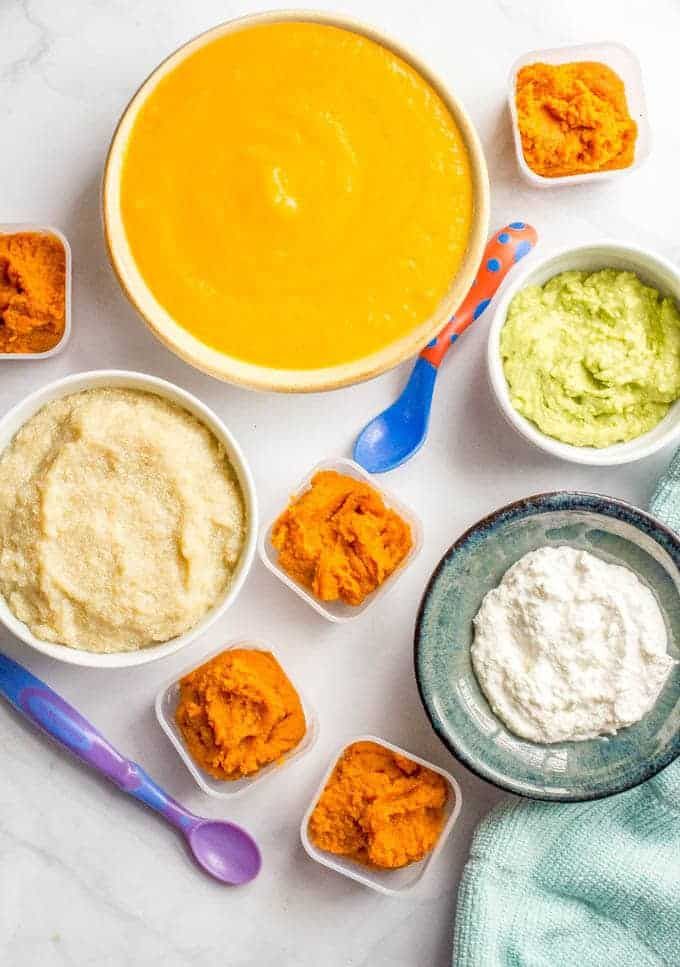
Best First Foods for Baby: Purees
Here are some of our favorite purees to start offering baby when they’re ready to start solids. Remember: There’s no evidence that says that you need to start with vegetables versus fruits, so go with something that tastes good to you. Start with single foods pureed smooth and offer just a little at a time on a spoon.
- Mashed roasted sweet potato puree
- Mashed avocado puree
- Mashed banana puree
- Butternut squash puree
- Applesauce, unsweetened
- Mashed pea puree
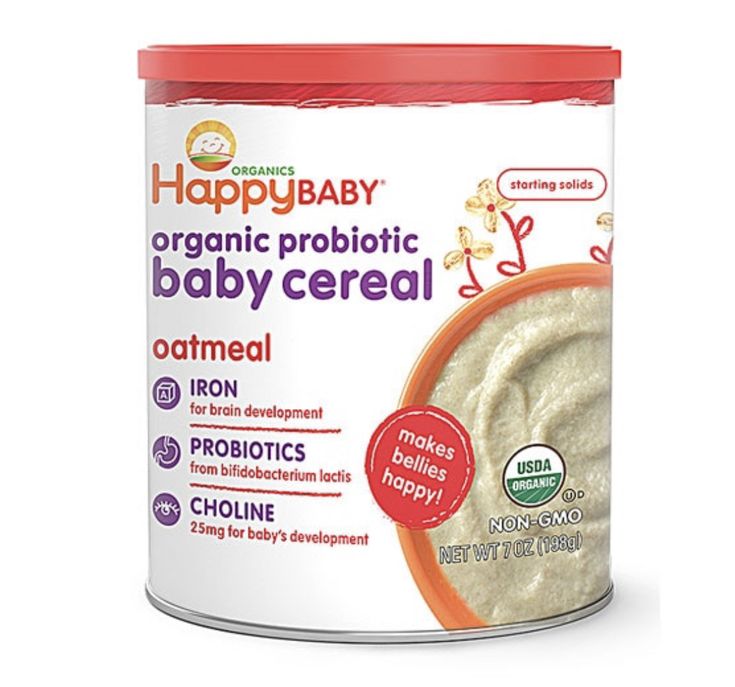
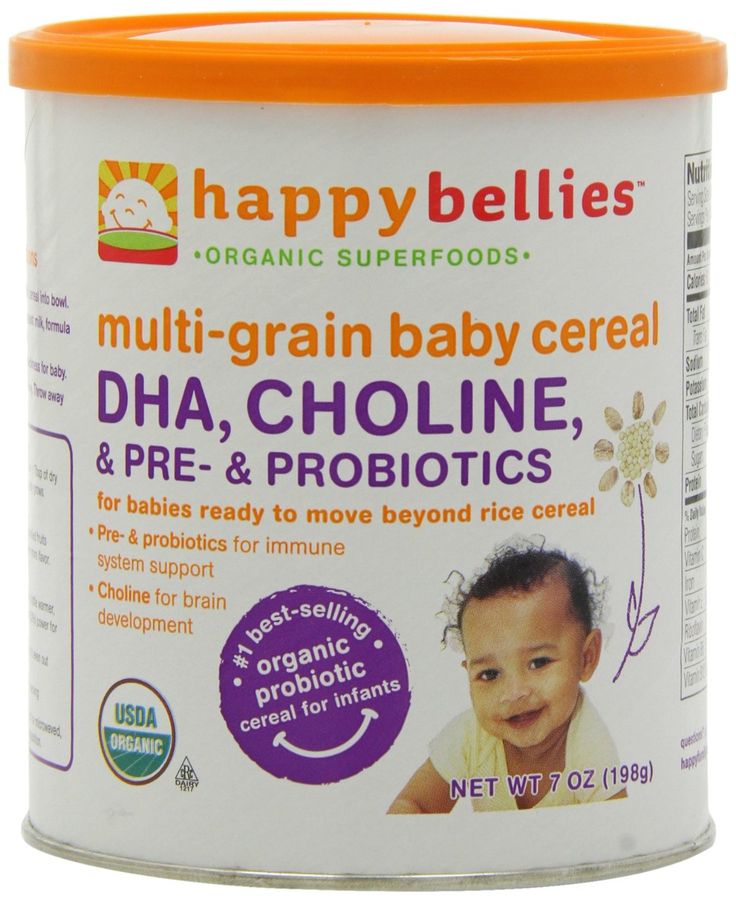
- Oatmeal baby cereal (with added iron)
TIP: One of my favorite baby food companies is Amara Organic Baby Food, a company using a nutrient protection technology that makes organic purees just as good as homemade. I love how easy they are to use when I need a shortcut and that they have fun baby-led weaning recipes on the side of every box! (paid affiliate link)
How do I know when baby has had enough?
If your baby is eating and then starts to turn her head away or just refuses to open her mouth, she’s done! Babies may also start to fuss if they’ve had enough. Learning this new skill takes time and babies can become tired fairly quickly into the process, so don’t expect them to always eat very much or to last very long at the table. This stage is about exploration!
Baby with preloaded spoon of yogurtHow to Let Baby Self Feed Purees
I love offering purees on a preloaded spoon. To do this, the parent, puts some of the food on the spoon and hands it to baby. Then baby can bring the food to their mouth all by themselves. This gives you some of the same advantages of baby led weaning, but can be more comfortable for many parents.
Remember, you can mix what you offer, going back and forth between purees and blw finger foods, so you can offer the same food two different ways to let baby explore.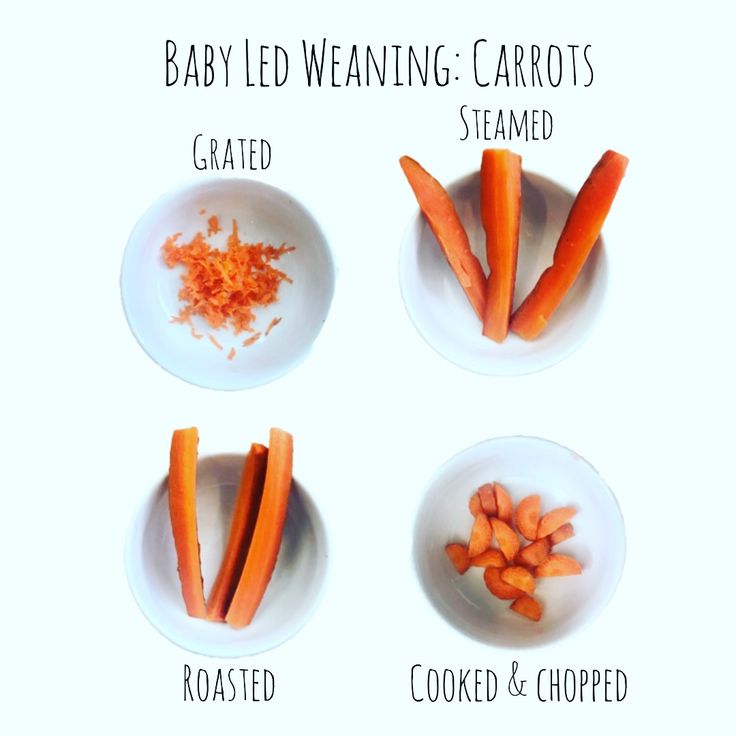 The main goal is to avoid forcing baby to take more bites than they want to, which can sometimes happen with purees.
When to Introduce Potentially Allergenic Foods
In recent years, guidelines have been updated on when to introduce potential allergens including peanuts, eggs, and shellfish, so unless you have a family history of a food allergy, you can go ahead and introduce them soon after baby starts eating solids. In fact, research is showing that introducing these foods early can actually protect baby from developing an allergy. Talk to your pediatrician if you have concerns.
TIP: Thin unsweetened peanut butter with water to form a very thin Peanut Butter Puree until it’s about the consistency of regular yogurt and offer a very small amount on a spoon or spread on a toast stick.
What does a baby led weaning meal look like for months 7 and 8?
Until a baby is closer to 9 months and is able to pick up smaller pieces of foods, but after they have gotten the hang of one food at a time, I try to offer 1-2 foods they can feed themselves and one puree.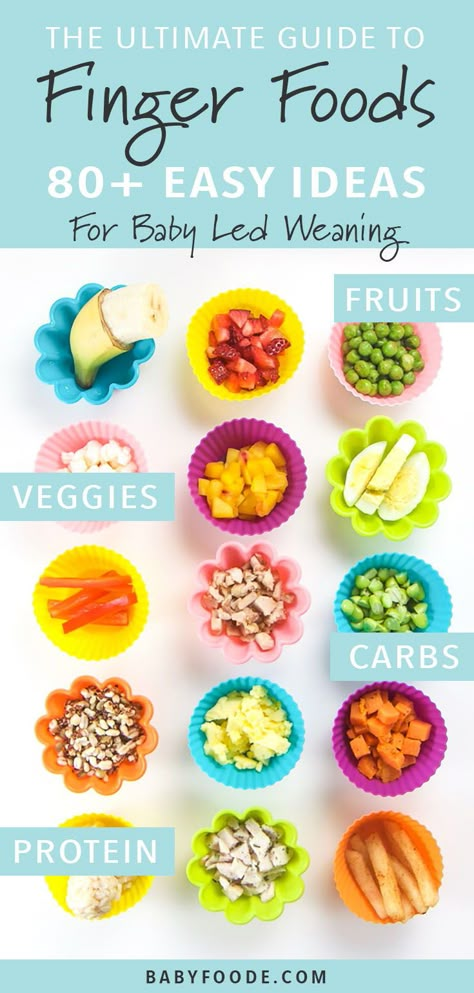 This offers them a chance to ingest more via the puree but still feed themselves a range of textures. You can do more or less food following the lead of the child.
TIP: My Baby Food Chart has loads of with ideas for blw foods and purees by month.
Recipes for Every Stage of Starting Solids
If you’re ready to start solids with baby, or you’re just curious what it looks like to do a mix of baby led weaning and purees, check out my Yummy Baby Food cookbook. It goes stage by stage with specific foods to start in each, with simple recipes and easy feeding tips.
Listen to a recent podcast episode to hear about some of the basics of BLW with our guest Megan McNamee, MPH, RDN, CLT, and a Registered Dietitian Nutritionist specializing in pediatric nutrition who runs Feeding Littles.
I’d love to hear any questions you have with BLW or if your baby had a first food that I didn’t list here. Please comment below to share your experience!
Prep Time 5 minutes
Total Time 5 minutes
Author Amy Palanjian
Cuisine American
Course Dinner
Calories 28kcal
Servings 1
Banana
- ▢ 1 small ripe banana with peel on
Roasted Sweet Potato
- ▢ 1 small sweet potato + 1 teaspoon olive oil
Roasted Apple
- ▢ 1 small apple + 1 teaspoon butter or neutral oil
Roasted Broccoli
- ▢ 1 cup broccoli florets + 1 teaspoon olive oil
Sauteed Green Beans
- ▢ 4 green beans 1 teaspoon olive oil
Melon
- ▢ 1 small piece watermelon or cantaloupe
Avocado Toast
- ▢ 1 slice whole grain bread
- ▢ 1 tbsp ripe avocado
Avocado Spear
- ▢ ⅛ ripe avocado
Lamb or Beef
- ▢ 1 lamb chop, roast, or steak
Pan-Seared Chicken Thighs
- ▢ 1 chicken thigh
- ▢ 1 tsp olive oil
- ▢ 1 garlic clove, optional
Banana with some of the peel still on
Cut a banana in half.
 Use a knife to gently cut around the peel about 2 inches down, leaving some of the peel on so that the banana is easy for baby to hold and less slippery.
Roasted Sweet Potato Wedges
Preheat oven to 400 degrees and line a rimmed baking sheet with foil. Wash and dry the sweet potato. (You don't need to peel it.) Cut in half, then cut lengthwise into strips. Cut each strip in half again until each is about 1/2-inch thick. Slice in half horizontally if the sweet potato is very long. (Each strip should be about the size of your finger.) Place into a bowl and toss with the olive oil. Spread onto prepared baking sheet and roast for 22-25 minutes or until soft. Let cool slightly and serve.
Roasted Apple Wedges
Roasted Broccoli Florets
Preheat the oven to 400 degrees F. Place the broccoli onto a rimmed baking sheet and toss with the olive oil, coating and mixing well until all of the florets are a little shiny and coated with oil.
 Roast for 15-18 minutes or until tender. Let cool slightly and serve.
Sauteed Green Beans
Warm the oil in a large skillet over medium heat. Add the green beans and stir. Cover and cook for about 8 minutes. Remove cover and taste one to see if it’s soft enough. Cook for an additional minute or two as needed.
Melon slices
Avocado Toast
Avocado Spears
(Make sure the avocado is ripe and soft): Cut a thick strip of avocado and offer to baby. You can leave the peel on if that makes it easier for baby to hold (just wash it first).
Lamb or Beef
Prepare a roast, steak, or chop without salt and with butter or olive oil until cooked medium well. Offer a thick slice at least the size of your finger or a drumstick.
Pan-Seared Chicken Thighs
Warm 1 tablespoon olive oil or butter in a large skillet over medium heat. Add the chicken thigh and top with a few slices of fresh garlic, if desired.
 Cover and cook for 4-5 minutes. Remove cover. Flip over and cook for an additional 4-5 minutes uncovered or until a meat thermometer registers 165 degrees F.
- Add spices like garlic powder, cinnamon, cumin, oregano, or any other non-spicy flavor you like to make these more interesting.
- Offer just one piece at a time when starting out.
- If baby gnaws a piece down into a smaller piece, replace it with a larger one to avoid her putting a chunk of food into her mouth.
- Store any leftovers in an airtight container in the fridge for 3-5 days. Reheat briefly if needed.
- Remember that it's normal for babies to take time to actually ingest the food. Part of the process is exploring all of the senses related to the experience of eating.
Calories: 28kcal, Carbohydrates: 2g, Protein: 1g, Fat: 2g, Saturated Fat: 1g, Polyunsaturated Fat: 1g, Monounsaturated Fat: 2g, Sodium: 6mg, Potassium: 75mg, Fiber: 1g, Sugar: 1g, Vitamin A: 23IU, Vitamin C: 2mg, Calcium: 2mg, Iron: 1mg
Tried this recipe?Rate in the comments and tag @yummytoddlerfood on IG!
Printable Baby Food Chart: BLW, Purees, Finger Foods
Make feeding your baby easier with this free, downloadable baby food chart. It has straight forward ideas for what to feed baby from when they start solids on up to one year—including purees, baby-led weaning style foods, finger foods, and more.
Baby Food Chart
Starting solids with a baby can be so fun and often a little challenging—but this baby food chart will help. I’ve compiled my best ideas for which foods to serve based on age and development of the baby to make it easy for you to make decisions in the kitchen.
This infant feeding chart is meant to help remind you of options you have at each age. It is not meant to add any pressure or function as a checklist of foods you have to serve (unless you want to do that!).
TIP: Download your free printable baby food chart here.
What baby foods should you start with?
Whether you start with purees or baby led weaning, starting with flavorful and nutrient-dense foods is a simple way to think about introducing foods to a baby. I love simple foods like roasted sweet potato, avocado, banana, and apple puree as first foods for a baby.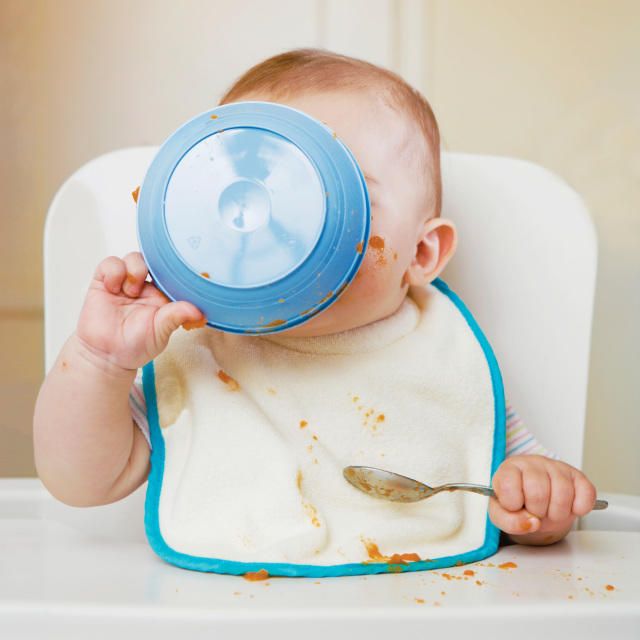
Remember that a first food is just that—a first food. It is not going to be the sole thing that determines how your child likes all foods. It can be sweet or savory, or from a variety of food groups. I would do your best to make sure that the food is easy to eat, has some flavor, and that the environment in which you offer it is free from pressure and, maybe even joyful!
What age should baby start eating foods?
The American Academy of Pediatrics recommends waiting to start solids until a baby is 6 months, and to go with wide variety of foods, introduced one at a time. But many pediatricians still say it’s okay to start rice cereal at 4 months.
If your pediatrician recommends this at the 4 month check up, ask their thoughts on the recommendation from the AAP.
TIP: Learn more about starting solids here.
How much food should I feed my baby?
The best way to know the right amount of food to give to a baby is to follow their lead.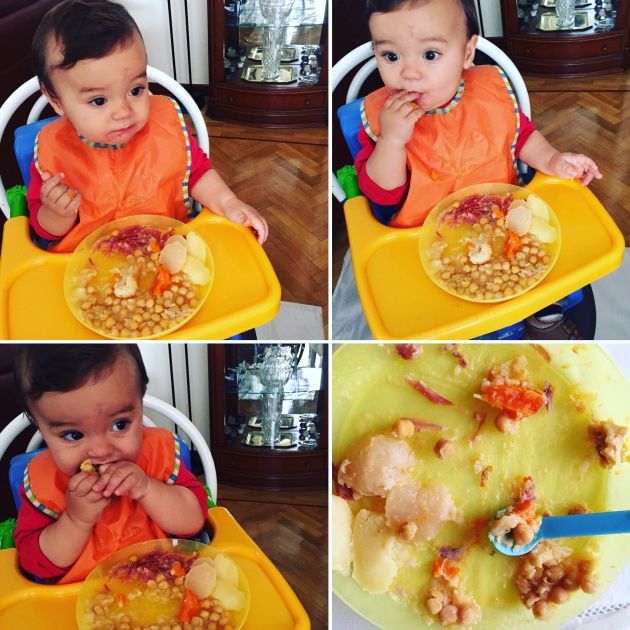 It should be very clear when a baby is done eating—they will close their mouth, turn their head, and generally make it very hard to feed them. (They may also play with their food, which is a fine way for them to interact with the foods at this early stage.)
It’s okay if baby eats very little to start. It’s also okay if they surprise you by being very interested in food!
TIP: Download your free printable baby food chart here.
6 Month Baby Food Chart for Purees
If you’re ready to start solids with a baby, here are some foods you may want to start with. This list is perhaps more broad than you expect, but more recent research shows that it’s a good idea to introduce potential allergenic foods earlier and that lots of flavor is a great way to set baby up for eating a range of foods as they grow.
Don’t feel like you need to serve all of these foods (you 100% don’t!), but it should give you a range of ideas to consider based on season, availability, and your own preference.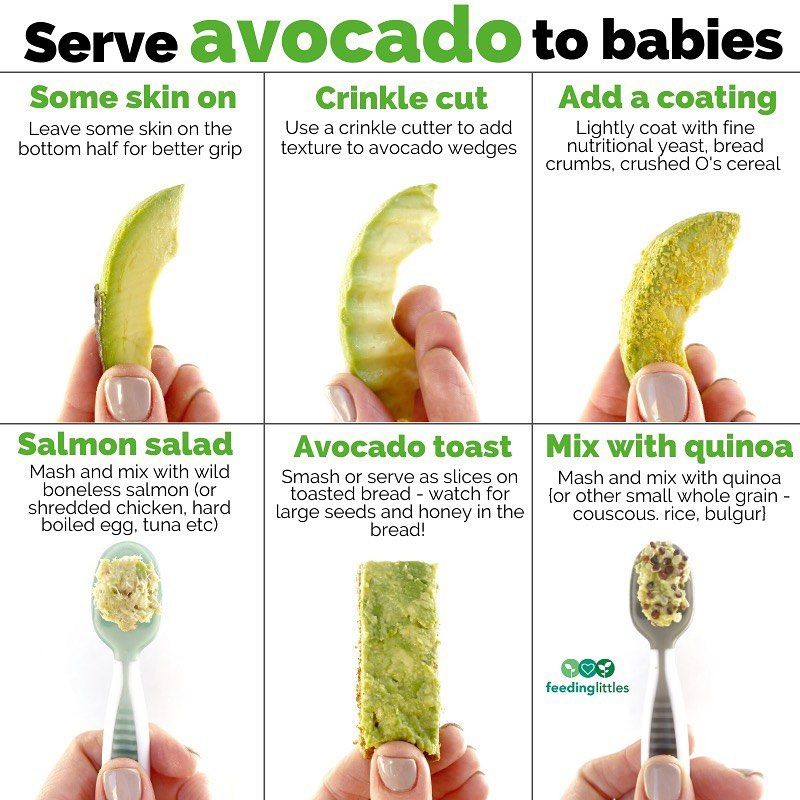
- Almond butter puree
- Apple Puree
- Avocado puree
- Banana puree
- Baby oatmeal
- Bean puree
- Butternut squash puree
- Egg yolk, hard cooked mashed with water
- Green bean puree
- Melon puree
- Pea puree
- Peach puree
- Peanut Butter Puree
- Pear puree
- Pumpkin puree
- Sweet potato puree
- Whole milk plain yogurt
- Single ingredient baby food
TIP: Find more in depth details on how to know if your baby is ready to start solids here.
6 Month Baby Food Chart for Baby Led Weaning
If you decide to use the baby led weaning method of feeding, you’ll want to cut these foods into the shape of a finger or larger. The foods should also be soft and easily squishable between two fingers—like the texture of a roasted sweet potato wedge or ripe avocado.
You don’t need to feel like you have to serve all of these foods by any means, but it should give you a range of ideas.
- Apple, roasted wedge
- Avocado spears
- Banana
- Beef, ground (large piece)
- Beef hamburger patty (sliced)
- Beet, steamed or roasted
- Broccoli florets, roasted/steamed
- Cauliflower florets, roasted/steamed
- Chicken, dark meat shredded
- Cucumber
- Green bean
- Egg, hard cooked
- Egg in omelet, sliced
- Figs, halved
- Lamb
- Mango slice
- Meatball
- Melon slices
- Peach, very ripe slice
- Pear, very ripe slice
- Potato, roasted wedges
- Steak slice
- Sweet potato, roasted wedges
- Toast with mashed avocado
- Toast with mashed sweet potato
- Toast with light smear of peanut butter
- Toast with mashed hard cooked egg
- Watermelon slice
- WiId salmon
TIP: Find my Ultimate Guide to Baby Led Weaning here.
7 Month Baby Food Chart
With a 7 month old baby, you can add in a few more foods including those with more acid like citrus.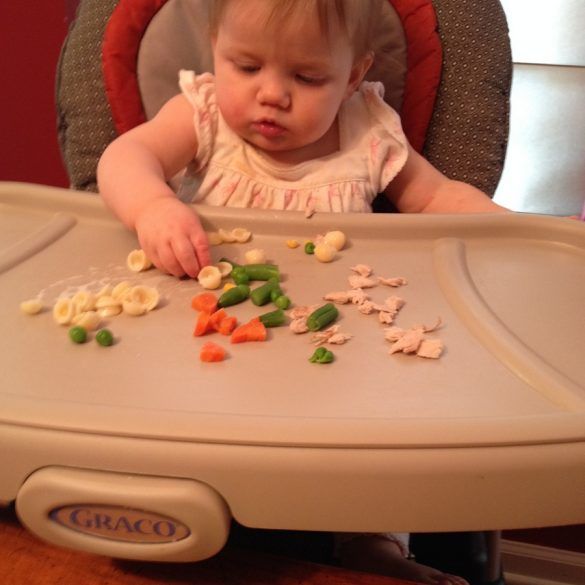 Continue serving the foods on the 6th month list, or introduce ones that you didn’t get to in that first month.
- Baby rice crackers
- Bean puree
- Beet puree
- Brussels Sprouts, pureed (or large piece for BLW)
- Guacamole
- Kiwi puree (or large piece for BLW)
- Hummus
- Mango Puree
- Mixed ingredient baby foods
- Orange segment for BLW
- Pineapple puree (or large piece for BLW)
- Prune puree
- Strawberry puree (or large strawberry for BLW)
- Spinach puree
- Smoothies (simple)
- Tomato sauce
- Tomato sauce with ground meat
TIP: Try my 10 easy No Cook Baby Foods.
9 Month Baby Food Chart
As a baby nears the 9 and 10 month mark, they will begin to be able to pick up small, pea-size pieces of foods with their fingers. This development of the “pincer grasp” means they are ready to start sampling table foods.
A good rule of thumb is to cut foods to about the size of a pea and to serve them very soft and easily squishable between your fingers.
Bread-like textures in foods like pancakes and muffins may be difficult for your child, so you may want to moisten them with water, applesauce, yogurt, breastmilk, or formula.
Remember that babies learn to eat a variety of paces, so follow the lead of your baby and avoid pressuring them to eat foods or amounts of foods that they aren’t ready for. If a baby turns their head away, closes their mouth, shakes their head, or cries, they are done with food and it’s okay to end the meal.
Continue serving foods from the previous months. And try adding:
- Banana, diced and mashed slightly as needed
- Barley, cooked until very soft
- Beans, slightly mashed
- Beef, ground
- Blueberries, diced
- Cheese, shredded
- Chex cereal
- Chia seed in smoothies, yogurt or oatmeal
- Chicken, ground
- Chicken, shredded and chopped into small pieces
- Clementines, diced (you may want to remove the slightly tough membrane)
- Cottage cheese
- Corn
- Flaxseed in smoothies, yogurt or oatmeal
- Goat cheese, soft crumbles
- Grapes, diced (never whole)
- Kefir, plain
- Meatball, diced
- Muffins, diced (moistened if needed)
- Millet
- O cereal
- Oatmeal
- Overnight oats
- Pasta
- Peas
- Potatoes, roasted or mashed
- Puffs
- Raspberries, diced
- Pancake, diced (moistened as needed with applesauce)
- Quinoa
- Rice
- Salmon, small pieces
- Tofu, diced
- Tomatoes, fresh
- Tilapia, small pieces
- Turkey, ground
TIP: Find my best Early Finger Foods, which will cover this stage and early toddlerhood.
Best First Finger Foods for Baby
I put together my go-to first finger foods for babies, which may help you narrow down which foods to start with. Each of these is a nutritious whole food that’s soft and easy for baby to eat. It’s helpful that many of these foods are ones that us grownups like too, so it should make meal planning and prep for the little ones easier on you!
Printable Baby Food Chart
Grab your free copy of my downloadable Baby Food Chart with access to my entire Resource Library of Printable charts by signing up for my newsletter.
You May Also Like
- ABC Baby Muffins
- Master List of Baby Snacks
- Extra-Veggie Baby Soup
- Sweet Potato Teething Biscuits
- Master List of Baby Food Recipes
I’d love to hear your feedback on this chart, so please comment below! I always love to hear from you guys.
This post was first published Jan 2019.
WE PREPARE FOOD OURSELVES! - 53 answers
We choose products and prepare complementary foods ourselves.
Cooking our own complementary foods: vegetables
Cooking our own complementary foods: cereals
Cooking our own complementary foods: fruits
Cooking our own complementary foods: meat
Cooking our own complementary foods: fish
Cooking our own complementary foods: fermented milk dishes cook food. It would seem that there is nothing simpler than home-made dishes: cooked, chopped with a blender, issued. A modern mother can be frightened by rumors and myths about terrible winter vegetables, in which there is nothing useful, genetically modified foods, the inability to prepare complementary foods that are not inferior to factory ones ... Before you start preparing complementary foods yourself, you need to decide and choose the best, but how? Everything is very simple. If you have increased suspiciousness, and dangerous herbicides and genetically modified tops appear in every carrot, feed your child with canned food, you should not prepare complementary foods yourself.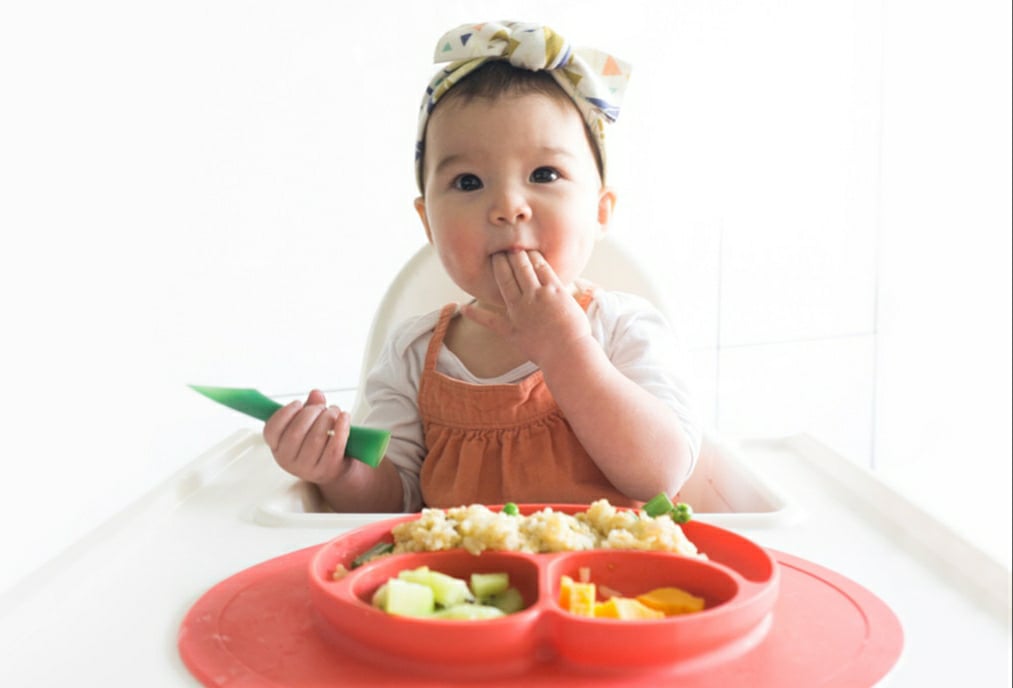 Canned food is no more harmful than daily concern about the benefits or harms of natural products. Use canned food and sleep peacefully - there is nothing wrong with industrial nutrition. As for the eternal debate about GM foods, most of the vegetables and fruits we consume have already undergone genetic changes over hundreds of years of hybridization. In winter, do not buy imported vegetables (zucchini, cauliflower) for self-cooking of complementary foods - they are absolutely overfed with chemicals for long-term storage and transportation. There are no healthy vegetables and fruits in winter. But if you still want to make your own food, or have the opportunity to use your harvest, this collection of tips may be useful.
MAKE YOUR OWN FOOD: VEGETABLES
To prepare vegetable puree, choose the most beautiful vegetables without blemishes or cracks. For the first feeding, vegetables are used that do not contain coarse fiber: zucchini, cauliflower, carrots. Mixtures of vegetables are introduced when the child has already tasted all their components within a week. Vegetables should be washed well under running water - if you doubt the quality of water, use boiled or purified water. Try not to cook vegetables on the stove to retain as much of the nutrients as possible. It is better to cook for a couple - or use a double boiler. Microwave cooking is acceptable, but vegetables dry out in it - nowadays there are microwaves with a steamer function. They can also be baked, in which case the loss of nutrients is minimal. When cooking on the stove, vegetables are laid only in boiling water. Frozen at the same time, in no case are defrosted beforehand. In winter (and early spring), it is favorable to use a variety of frosts for feeding. There are many stereotypes about their usefulness, but they are all debunked. In winter, frosts literally save, but check their quality at least by touch so that large pieces of ice are not felt inside.
Nothing is added to the very first vegetables, after a month vegetable oil (sunflower or olive) is added. Ready vegetables are rubbed through a sieve or modern means are used: a blender or other chopper.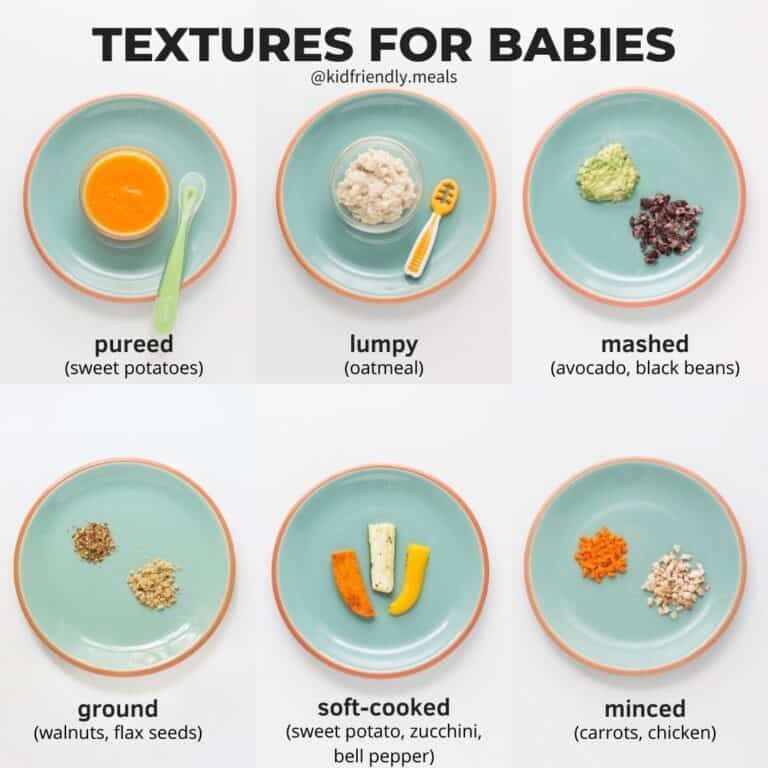 You should not soften the first vegetables (that is, for the first feeding at 6-7 months) with a fork or crush, they cannot cope with the fibers, and the complementary foods will come out undigested.
What can be added for taste: vegetable broth, a little expressed breast milk or formula. Vegetables do not need to be salted. The child does not have salt receptors, this taste is imposed forcibly. What taste you accustom to, this will be a priority in the future. If a child refuses vegetables, this does not mean that they need to be salted - this means that vegetables are introduced too early. Every child has their own feeding schedule. You can start introducing vegetables at 6, 10 or 12 months, it all depends on the desires of the child himself. In the process of introducing vegetables, the main thing is not volume, but variety. If a child eats a crumb of this and a crumb of that (a spoonful of zucchini, two tablespoons of carrots) - fine. And in terms of benefits, it is much better than those fed by force - with the release of the family choir of grandmothers or "for advertising" - one hundred grams laid down according to the instructions.
Possible errors: Do not wash vegetables from which you want to prepare complementary foods yourself with soapy water. This is an extra precaution. The soap is not washed off completely, and its remains are by no means useful for the child. They prepare complementary foods on their own immediately before serving - and only at one time! Cooked mashed potatoes should not be reheated, this will increase the loss of nutrients.
What vegetables are not introduced into complementary foods for up to a year: white cabbage, beets, tomatoes, cucumbers - and greens. They are quite aggressive for the stomach, and for a child up to a year there will be enough of those vegetables that can be introduced: zucchini, broccoli, cauliflower, kohlrabi, green beans, carrots, pumpkin, potatoes, closer to a year - corn, peas. Some vegetables have a hard shell; corn and green beans sin with it. But in a double boiler, the shell softens easily and quickly. Mashed potatoes are a heavy dish, it is advisable to mix potatoes with any other vegetables.
WE PREPARE COMPLETE FOOD: PORRIDGE
For the first complementary food, low-allergenic cereals are taken: rice, buckwheat or corn. Corn porridge is the heaviest, so you yourself should prepare complementary foods from rice or buckwheat. Rice is washed with warm or hot water to separate the starch. The groats are ground in a coffee grinder to the state of flour and boiled in water. In principle, you can grind ready-made porridge, but in this case, vitamins and trace elements are lost much faster. Groats (the resulting cereal flour) are placed only in boiling water, ideally they are not boiled until cooked, but left to swell. Otherwise, there is a chance that it will continue to swell in the child's stomach.
In order to properly prepare a healthy porridge for feeding yourself, you need to observe the ratio of water and cereals. Do not add water during the process. All cereals - except buckwheat and rice - are stirred in the process. For the first feeding, a liquid porridge is made: a teaspoon of cereals (cereal flour) per 100 ml of water. After 1-2 weeks, the amount of cereal is doubled. Cow's milk is not added to self-prepared complementary foods for up to a year, only a little breast milk or a mixture immediately before serving, and a month after the introduction - butter (3 g). Sugar or fructose in complementary foods is not needed! Permissible additives: fruit puree; closer to a year, ground dried fruits, pumpkin, carrots are put in cereals.
When a child has tasted all three types of low-allergenic cereals, mixtures are made from them. At 10 months, you can try oatmeal, the rest of the gluten-containing cereals are introduced into self-cooked complementary foods no earlier than a year. At home, whole grains cannot be processed perfectly, they will still be heavier than baby instant cereals in boxes, so it is better to push back all the deadlines. Semolina porridge is not introduced until two or three years; recently, experts have increasingly doubted its value. Semolina contains 70% starch, proteins and very few vitamins and minerals. As well as phytin, which binds calcium salts, that is, it prevents calcium from entering the bloodstream. When there is little calcium in the human body, the parathyroid glands "withdraw" it from the bones and send it into the blood. All cereals, one way or another, bind calcium - that is also why they are recommended to be introduced after vegetables and meat. But semolina tries the most, having a pronounced “rachitogenic” effect, it contributes to the formation of rickets in children of the first two years of life.
WE PREPARE COMPLETE FOOD: FRUITS AND JUICES
Entering fruit starts with green apples and pears. It is advisable to find your native fruits, such as Semerenko apples, Kuban Champion or Antonovka. They are sourer (and much more useful) than imported ones, and the acid is “knocked down” by baking. Most imported fruits ripen along the way, being picked unripe, this already impoverishes their composition, not to mention chemical additives to preserve their appearance.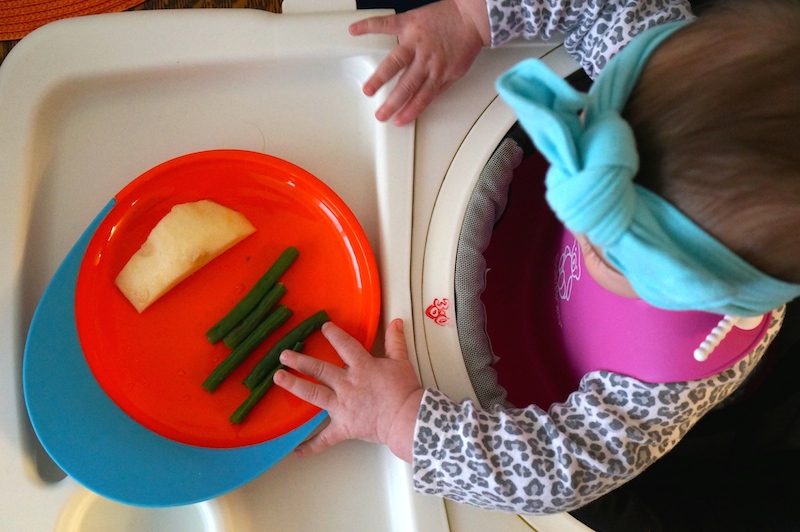 Fruit for import is grown and harvested in less than ideal conditions. When preparing complementary foods on your own, do not use apples with dark (black) spots, one such spot indicates a loss of vitamins by a third. Apples and pears are given fresh, making a “scrape”, or baked, in a baked fruit, the acidity decreases and the amount of pectin, a useful substance that removes toxins, increases. How to bake: peel, cut into pieces and remove the part with bones. Or bake whole: add a little water to the container, loosely cover with foil and bake at a temperature of 200 degrees for 20 minutes, the time depends on the type of oven and the number of apples. You can also "bake" in the microwave for 2-3 minutes, while the fruit is covered with cling film.
Puree is made from fruit, it is offered for an afternoon snack, then added to porridge or cottage cheese - or left as an independent dish. Fruit is also given in pieces, in this case, make sure that the child does not choke. Fruit should be peeled and pitted.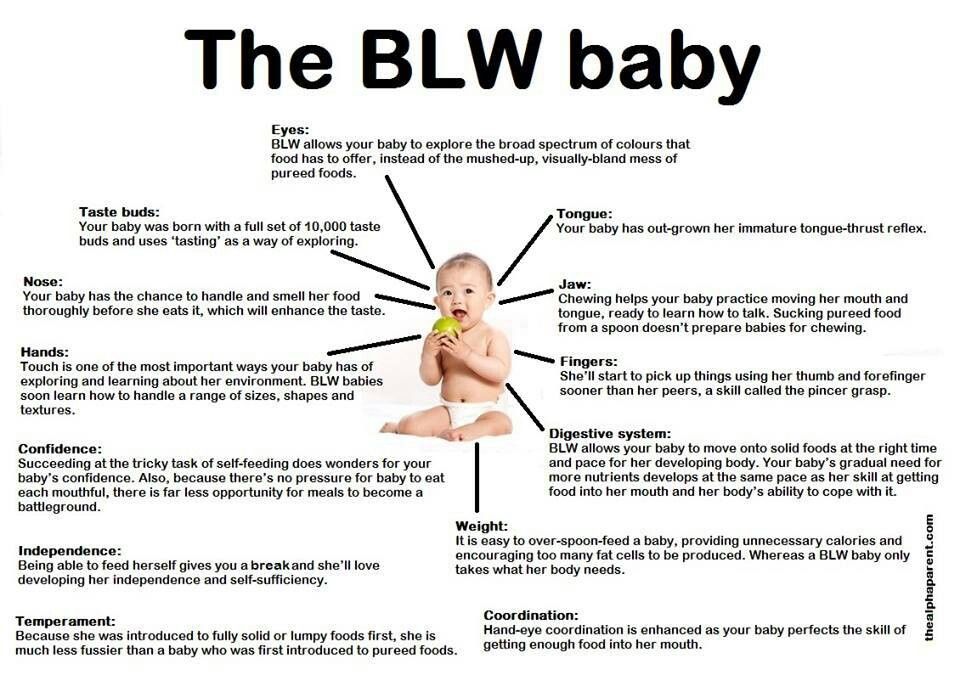 The peel is cleaned not only because it may contain paraffin residues, the peel is too hard, it is simply not digested. The banana is next after the green fruit, it is fibrous and starchy, so it should be crushed with diligence. Peaches, apricots and berries are tried last. Berries have a lot of fiber, tiny bones, they can cause serious intestinal upset, hence the moral: the norm of berries for a child is exactly as much as he can keep in his handful, and this is a lot.
Freshly squeezed juices are introduced not earlier than one and a half years and only in a diluted form (50:50).
WE PREPARE COMPLETE FOOD: MEAT
Meat is a heavy product, it takes a long time to digest, so there is no need to hurry with its introduction, especially if the child is breastfed. Begin to introduce meat puree with half a teaspoon. You can give this norm for three days and monitor the reaction. If you are making your own complementary foods, mix meat with vegetable puree (for better absorption). Just add the meat to the puree little by little, gradually increasing the dose.
Rabbit, lamb, turkey are ideal for preparing complementary foods. Veal, pork, chicken are introduced after a year. At 10 months, the child can be offered meatballs, and after a year - steam cutlets. Meat broths are not used in the diet of children, they contain harmful substances boiled down from meat. Before cooking, the meat must be separated from the bones, the finished dish is not poured with the remaining meat broth, and when cooking the soup, the meat broth is half diluted with water - or the finished mashed meat is added to the vegetable soup.
Method of self-preparation of complementary foods: meat passed twice through a meat grinder is steamed until tender, or already cooked meat is passed through a meat grinder (blender, mini-combine). Minced meat is rubbed through a strainer (or blender). The steam method of self-preparation of complementary foods from meat: water is added to raw minced meat (the more water, the more tender), spread in a deep bowl and put it in another bowl with boiling water.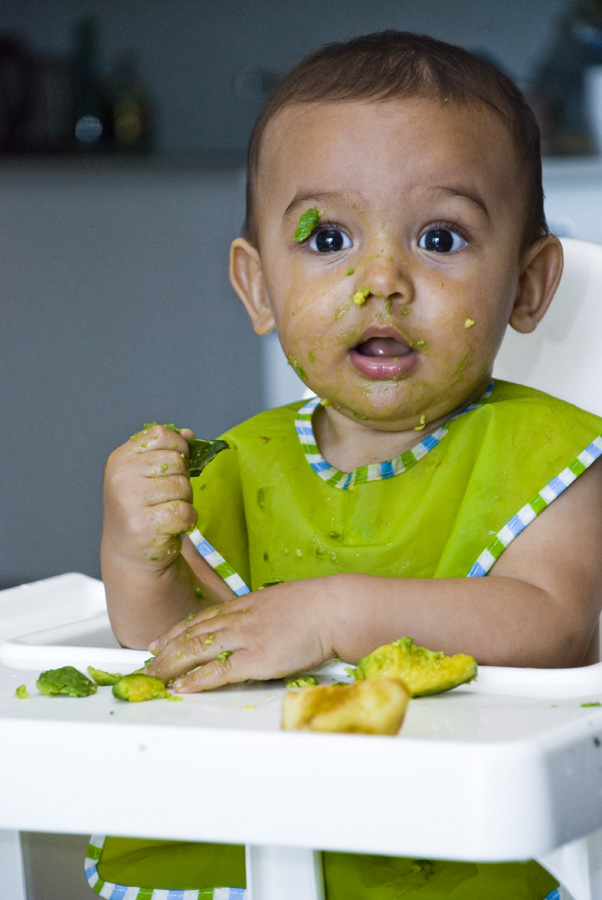 Cover with a lid, cook for 10-15 minutes. Non-steam method: the meat is boiled for 20 minutes, then the broth is drained, poured with hot water again - and cooked until tender. In no case do not salt the meat puree - there are plenty of salts in the meat.
Meat contains a lot of coarse fibers, it is impossible to turn it into an easily digestible dish at home. And in stores it is difficult to find meat for the first feeding. It can be said that meat is not the best product for preparing complementary foods.
MAKE YOUR OWN FOOD: FISH
Boil the fillet in a small amount of water for 15-20 minutes, cool, pass through a meat grinder, and then grind with a blender. For self-preparation of complementary foods, it is necessary to buy only fillets of low-fat varieties of fish (hake, cod, pollock). It is better to thaw in salt water to reduce the loss of minerals during defrosting. The fillet is not recommended to be completely defrosted. Slightly thawed fish is washed in cold water and subjected to heat treatment, which, unlike meat, should not be too long. Put the fish only in boiling water, after which the fire is immediately reduced.
WE PREPARE FOOD OURSELVES: SOUR-DAIRY DISHES
Homemade kefir
Methods for making kefir for feeding yourself:
yogurt. We add the starter to a liter of warm milk, close the jar with a tight lid, wrap it in a terry towel and send it to a warm place (for example, to the bathroom - it is always warm there) for 6-10 hours. When a kefir clot forms, we send the jar to the refrigerator for a few more hours.
2. Boil half a liter of milk, cool to 35 - 36 degrees (so that you can easily hold your finger in the milk) and add 5 - 6 tablespoons of old kefir to it. Stir, wrap the bottle in a blanket and leave for 5 - 6 hours in a warm place, and then keep a few hours in the refrigerator. If instead of old kefir you add yogurt to milk, the taste of the drink will be slightly different. If there was no old curdled milk or kefir at home, you can use a piece of black bread as a starter.
Home-made cottage cheese
Ways of self-preparation of cottage cheese for complementary foods:
1. Kefir cottage cheese (fermented milk) is easier to digest and assimilate. To prepare it, pour kefir into an enameled saucepan (mug) and put on the smallest fire. When a clot forms on top, fold it onto a sterile gauze to drain the serum.
2. Calcined cottage cheese is prepared by adding a solution of calcium chloride to cold pasteurized or boiled milk; it is sold in pharmacies. The amount of calcium chloride in all recipes is different, there is this: to get 100 g of cottage cheese for 600 ml of milk, put 1.5 teaspoons of calcium chloride. Another recipe: bring milk to a boil and remove from heat. When it cools down a little, add calcium chloride dissolved in a small amount of boiled water with continuous stirring, cool the curdled milk, strain through gauze, let the whey drain. Per liter of milk - 1 tablespoon of calcium chloride. The famous pediatrician Natalya Rashidovna Vasilyeva recommends the following recipe: for 1 liter of cold raw milk, 1 ampoule (10 ml.) of 10% calcium chloride - pour in - boil - cool - strain through a sieve or cheesecloth - calcined cottage cheese is ready.
There is an opinion that such cottage cheese is not very suitable for self-preparation of complementary foods, in fact, this recipe came to us from veterinary medicine, calcium chloride cottage cheese is given to baby animals. At the very least, calcined cottage cheese should not be given every day. It can be noticeably bitter in taste, and its consistency is not suitable for the first complementary foods. Try it - form your own opinion.
3. Boil milk, cool to body temperature. Add the starter, previously loosened in a small amount of the same milk. This is for its even distribution. Put in a warm place for a day or two. At the same time, it is better to interfere with it, disturb it several times during fermentation. Then - heat in a water bath, and not just putting the pan on the fire. The more heat, the more the casein coagulates. If you heat it on fire, then it can curl up into such nasty-hard lumps, that is, it will be very dry and hard cottage cheese. And for tender cottage cheese, you need to warm it up very carefully, in a water bath.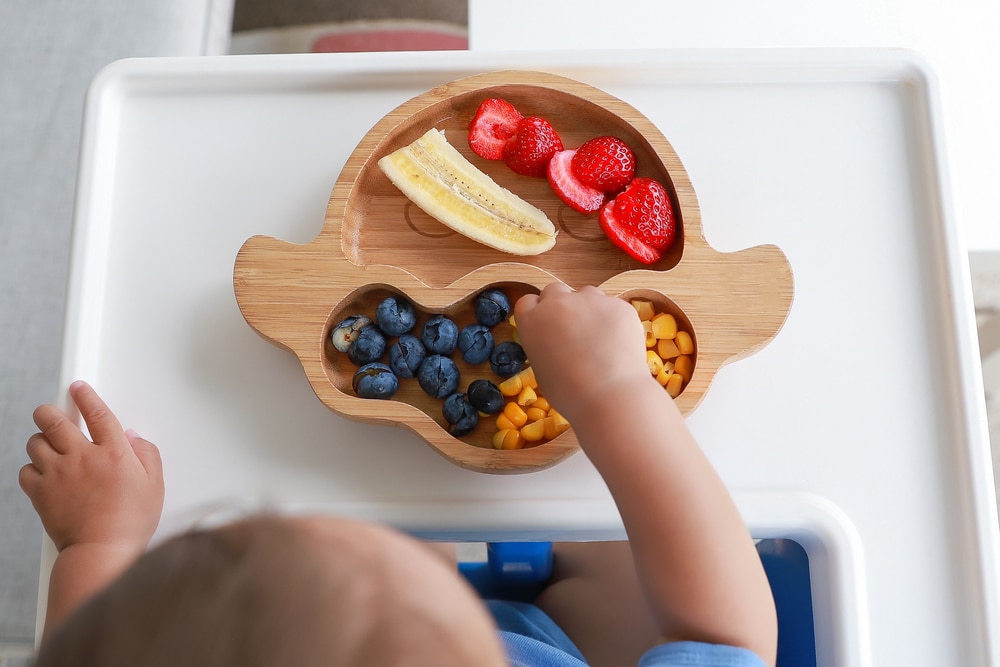 Then - cool and discard: put gauze on a colander, pour the previous semi-finished product there, wait until the whey drains, and then collect the ends of the gauze from above and start twisting to squeeze out the whey. For greater density, you can then put this bag in a colander, pressing down on top with a plank with a load.
4. Get the lowest fat milk available. Pour it into a large bowl or saucepan. Squeeze lemon juice into milk (for each liter of milk - from half to a whole lemon). You can also use ready-made purchased lemon juice or diluted citric acid. Pour boiling water from the kettle into a saucepan with milk and lemon juice. Boiling water should be about the same or even a little more than milk. Stir calmly and watch with interest how the milk curdles before your eyes, the whey begins to become transparent. Do not wait until the milk clots become dense. This will give your curd an unwanted graininess. Catch tender clots with a spoon with holes and put them in another bowl.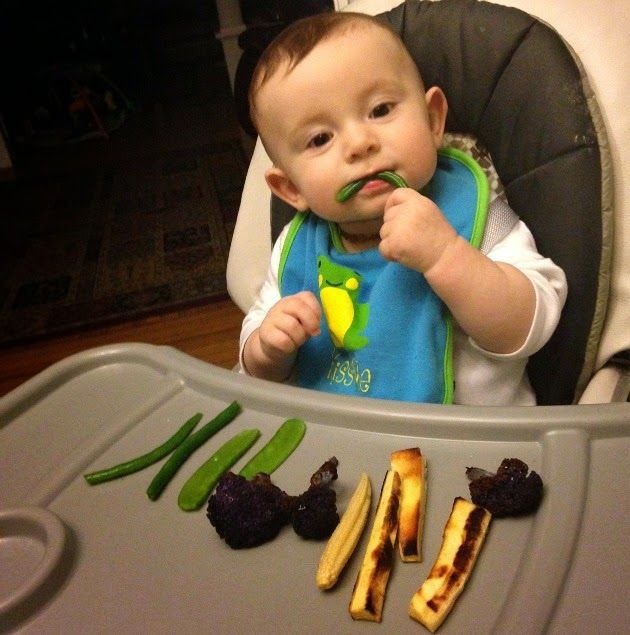 A little more serum may stand out, you drain it. All.
5. 4 cups sour milk, 2 cups fresh milk. Boil fresh milk and pour into a vessel with sour milk. Mix thoroughly and leave to cool. After the mixture has cooled, pour it into a sieve and strain through a fine sieve.
WE PREPARE COMPLETE FOOD OURSELVES: STORAGE
Knowledgeable people say in a voice: ready-made vegetable (meat and vegetable) purees do not need to be stored. These are dishes with a broken structure, ideally they are cooked strictly at one time. At home, it is impossible to provide shock freezing - useful substances are inevitably lost. It is necessary to freeze whole (cut) vegetables and fruits, and then mash them. Vegetables are stored at a temperature of - 6 ° C - a week, at - 12 ° C - 1 month, at - 18 ° C - 3 months.
However, sometimes there is a need to freeze meat or vegetable puree. One easy way is to fill the ice cube tray and put it in the freezer. Do not freeze hot or warm food, it needs to be chilled first. Once food is frozen, immediately place it in an individual plastic bag. Don't forget to mark and date when you did it. In this form, mashed potatoes can be stored for 3-4 weeks at a temperature not higher than -18. Never refreeze food.
It is not recommended to freeze cottage cheese at home, as such freezing is slow, which significantly disrupts the protein structure, and worsens the taste and other qualities of the product. As an exception, this can only be done in freezers with two and three stars on the lid or in freezers with a temperature of - 18 °; store cottage cheese in such conditions should be no more than two weeks.
How to reheat frozen food: Transfer to a suitable container and place in a pot of boiling water, stirring occasionally. You can also use microwave heating. Food should be well heated, in no case warm. Do not reheat food more than once: leftover food should be discarded.
Zucchini puree for the first feeding
The introduction of zucchini in the first feeding is recommended by WHO, and zucchini puree for feeding the baby can be prepared without any problems yourself.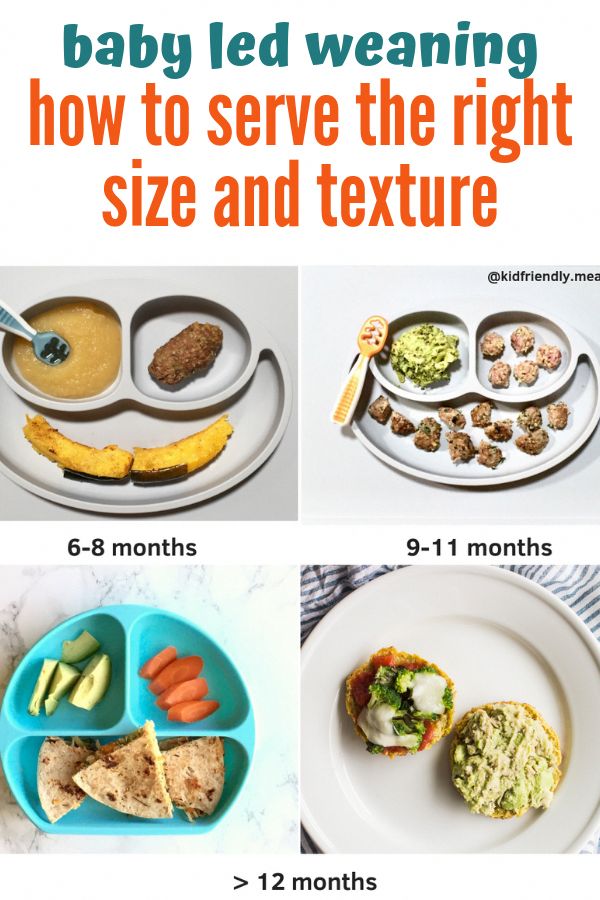 There is nothing complicated in growing zucchini and the mature fruits of many varieties can be stored throughout the entire frosty period. The pulp of the fruit with elementary heat treatment retains its beneficial properties and is easily absorbed by the child's body even from an early age.
Contents
- How to prepare courgettes for the first feeding
- Courgettes for complementary foods in baby food
- Composition of marrow
- Benefits of zucchini for children and adults
How to prepare zucchini for the first feeding
If you decide to start weaning your baby, start with zucchini. It will be the best addition to breast milk or adapted formula. Zucchini is a hypoallergenic product and contains a large amount of nutrients needed by the child.
Zucchini puree recipe
Cooking zucchini puree for the first feeding at home. Of the ingredients you need only zucchini and water. Let's start by rinsing the zucchini under cool running water. Peel off the skin and cut into cubes. Next 2 options. Either put it in boiling water, cook the zucchini for 6-10 minutes, while retaining the benefits of vitamin C. Or steam it, which will undoubtedly be tastier and healthier. Then we wipe through a sieve or grind with a blender.
You need to start complementary foods with one teaspoon, gradually day after day, increasing the number of spoons. It is important to introduce your child to this product at a very young age. When the child grows up, he will also need nutrients. And you can spoil him with many different zucchini dishes.
How to cook zucchini correctly and how much
For the first feeding, it is recommended to boil zucchini for up to 10 minutes. Usually this time is enough to soften the cut pieces. Do not forget that the longer the heat treatment of the vegetable takes place, the less vitamins and useful trace elements remain. Then everything is thoroughly crushed into puree and the first complementary foods are ready.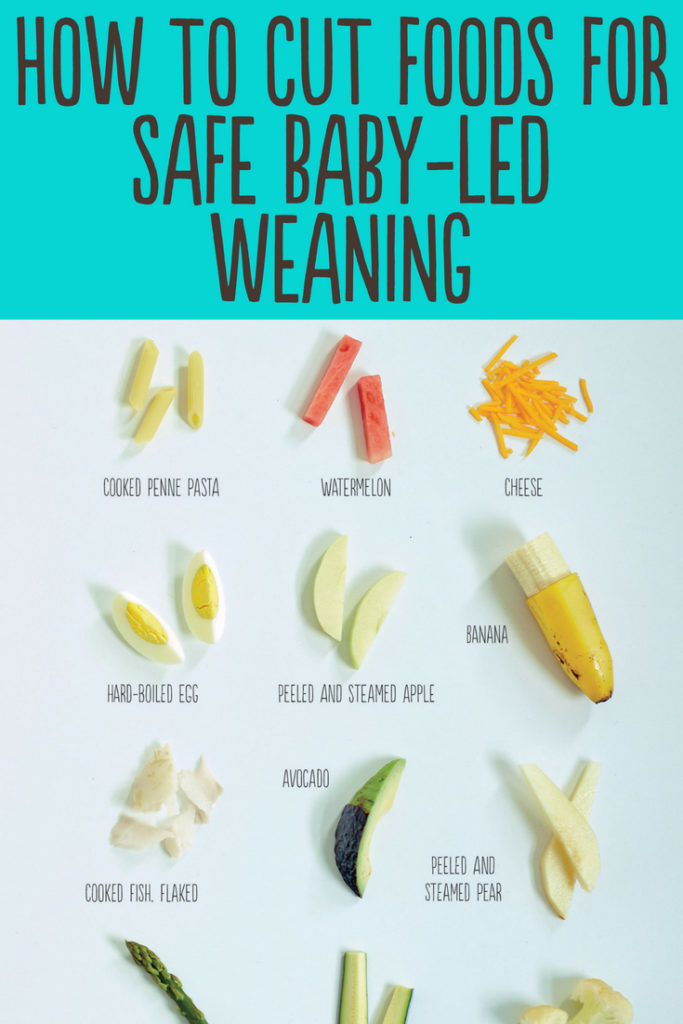 Depending on the period of introduction of the puree to the baby, you can add a little vegetable oil to the puree if the mass of the portion of the puree has reached 100 g (usually on the 6th-7th day of feeding).
To prepare mashed potatoes, babies need to pick only young and fresh zucchini fruits: without rot, cracks and dents. The fruit is thoroughly washed under running water. Then its lateral parts are cut off: the tail and the “butt”; peel is removed. The zucchini is cut lengthwise into several parts, from which the central soft part with seeds is removed. The remaining parts are cut into cubes. If the vegetable is bought at the market or in a store, it is recommended to soak the zucchini in clean water for about 2 hours to remove unnatural trace elements from the fruit in the form of fertilizers and pesticides.
How to freeze and defrost zucchini? Cooked cut fruit cubes in the right amount are placed in plastic bags or containers, and then in the refrigerator. For the preparation of frozen fruit puree, it is recommended to use a defrosted vegetable. To speed up the process, bags or containers with zucchini are placed in water at room temperature or under running tap water. After 1-2 hours, you can start cooking according to a known scheme.
Squash for complementary foods in baby food
Squash is widely used in baby food for its unique properties. In addition, vegetable squash purees are considered the most popular when introducing the first complementary foods to a child. One-component zucchini puree manufacturers recommend using for children from 4 months.
Table of the introduction of the first complementary foods with zucchini according to WHO recommendations
Baby food products recommended for the first complementary foods include Heinz zucchini puree, which additionally includes corn flour and water.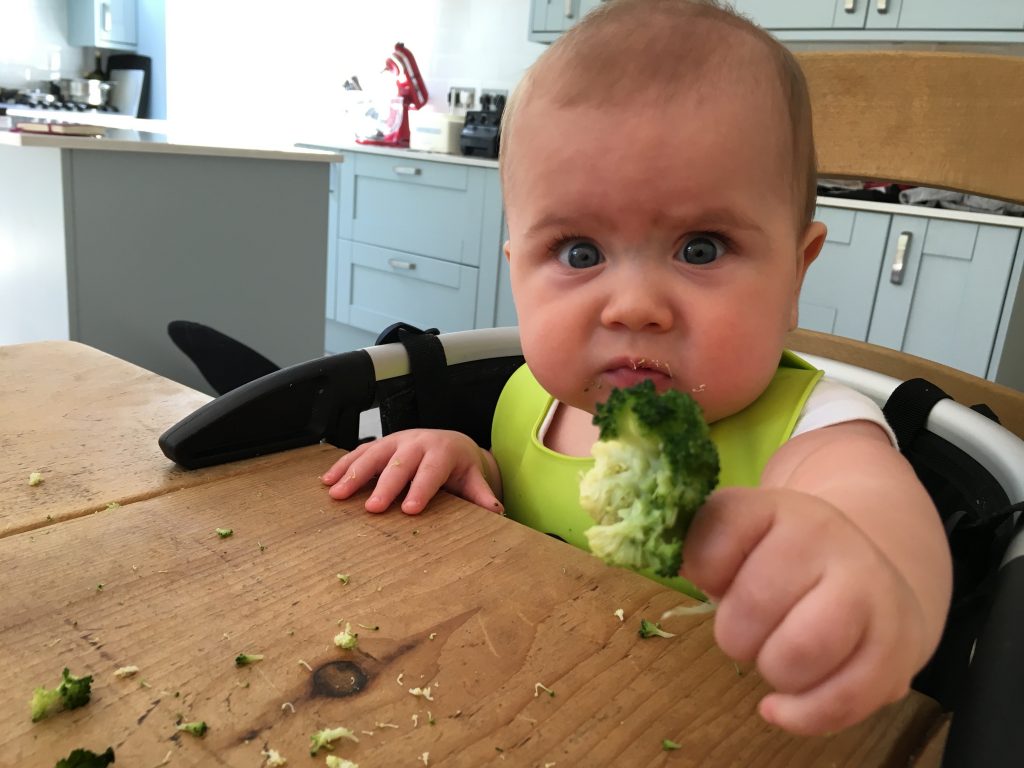 A similar product is Hipp zucchini puree, which contains coarse rice flour. These products are sold in glass jars with a net weight of 80 grams, and the puree contains no salt, sugar, starch, preservatives or dyes.
At a later age, in baby food, zucchini is used with vegetables, fruits, cereals and meat. For children over 5 months:
- Frutonyanya Broccoli and Zucchini Puree
- Puree Frutonyan zucchini and potatoes
- Frutonyanya puree cauliflower and zucchini
- Puree Frutonyanya apples and zucchini
- Frutonyanya zucchini-oatmeal puree
- Gerber Potato and Zucchini Puree
- Puree Gerber apples and zucchini
Children's puree Tyoma beef with zucchini is recommended to try not earlier than 6 months from birth.
Ingredients of zucchini
Zucchini is a source of substances that have a beneficial effect on digestion. They contain a small amount of calories when cooked (20 to 25 kcal per 100 grams), so you can use them in food during therapeutic diets.