How to use autumnz baby food processor
Autumnz Double Tier Multifunction Baby Food Processor / Baby Food Maker (Steam & Blend) + Free Gift
19
19
19
19
19
19
- Product
- Description
- Reviews (0)
- What's in the box
Description
Highlight
Features of 8 in 1 Food Processor :
- Steaming food
- Making vegetables & fruits puree for your loved one
- Steaming & blending boneless meat.
Make sure the meat is defrosted and cut into small cubes before steaming and blending
- Auto function to blend food when the preset steaming time is up
- Warming up cooked food with adjustable time according to the food amount
- Further blending to achieve finer consistency of baby food
- Sterilization of small size feeding bottles and feeding accessories
- Self-cleaning the jug at a preset time of 10 minutes when required
FEATURES of Double Tier Multifunctional Food Processor:
FREE Munchkin Soft-Tip Infant Spoon x 1 (random colour)
- Multifunctional:
- (a) Steam (Double Tier)
- (b) Blend Food
- (c) Cooks Porridge / Rice / Pasta
- (d) Warm Milk
- (e) Sterilise / Defrost
- Double Tier Steamer: Steaming different food at the same time
- Cooker: Cook rice, porridge and pasta at any time
- Practical: Steams and blends food, preserving the natural nutrients to create healthy and tasty dishes
- Easy To Use: Touch keys to operate with LED screed display
- Ideal for all food types: Suitable for fruits, vegetables, meat and fish
- Over-Heat Protection: Steamer auto stops when water tank dries out
Specification:
Heating Power: 300W
Blending Power: 130W
Rated Power: 220v-240v; 50/60Hz
Water Tank Capacity: 200ml
Blending Jug: 600ml
Blending Capacity: 300ml
Dimensions: 300mm x 144mm x 245mm
Net Weight: 1.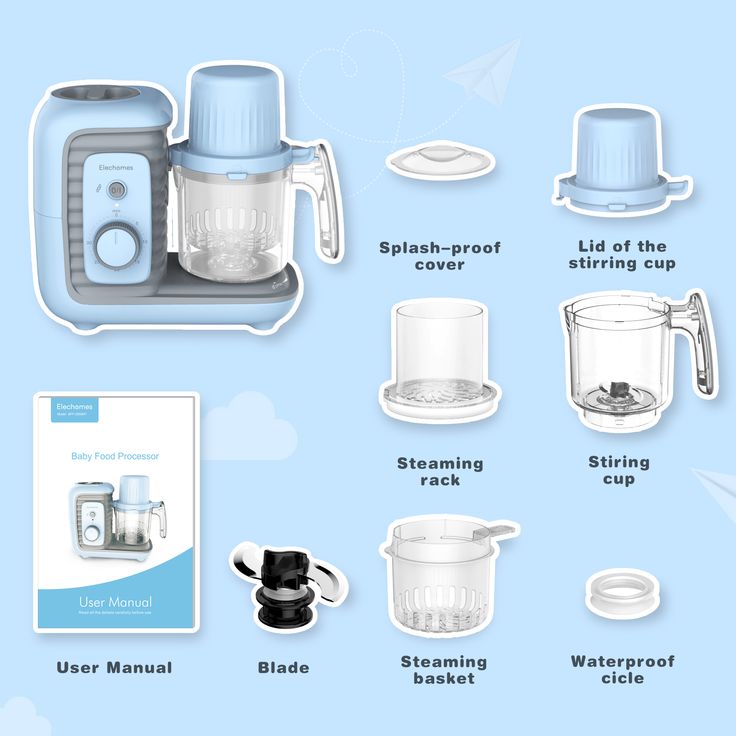 72kg
72kg
--------------------------------------------------------------------------------------------------
Autumnz 2 in 1 Baby Food Processor / Food Maker (Steam & Blend) Turquoise
Autumnz Baby Food Processor is an essential kitchen appliance for today's busy parents, offering a quick and efficient way to prepare and cook healthy, tasty and nutritious meals not just for the baby, but for the whole family. Parents can prepare nutritious and delicious meals in minutes with Autumnz Baby Food Processor.
FEATURES
- Practical - Versatile 2-in1 appliance that steams and blends food, preserving the natural nutrients to create healthy and tasty dishes
- Easy to use - one dial controls all functions making it simple to use
- Ideal for all food types - suitable for fruits, vegetables, meat, poultry, fish, etc
- Value for money - help parents give their children nutritious homemade meals while offering savings of time and money on meal preparation
- Durable & safe - comes with BPA Free Tritan™ Processing Bowl
Specifications
With its 250W heating element and powerful 150W blending motor, you can steam and blend anything, from fruits and vegetables, to meat, poultry and fish quickly and conveniently, and in one easy step. The device features a built-in 190m water storage tank for the steaming function, and its food bowl can make up to 500ml of food at one time, so you can make small batches and save some for later!
It features a 30 minute timer, a heating indication light and sticky rubber feet for extra stability during use. It is compact, easy to carry and easy to use.
___________________________________________________________________________________
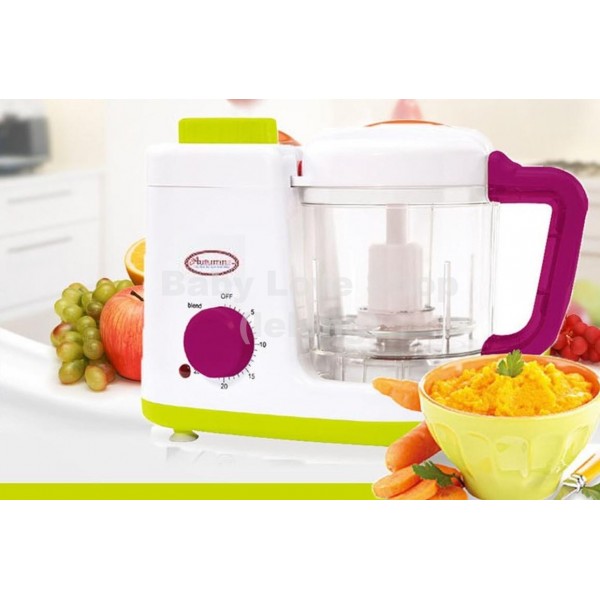
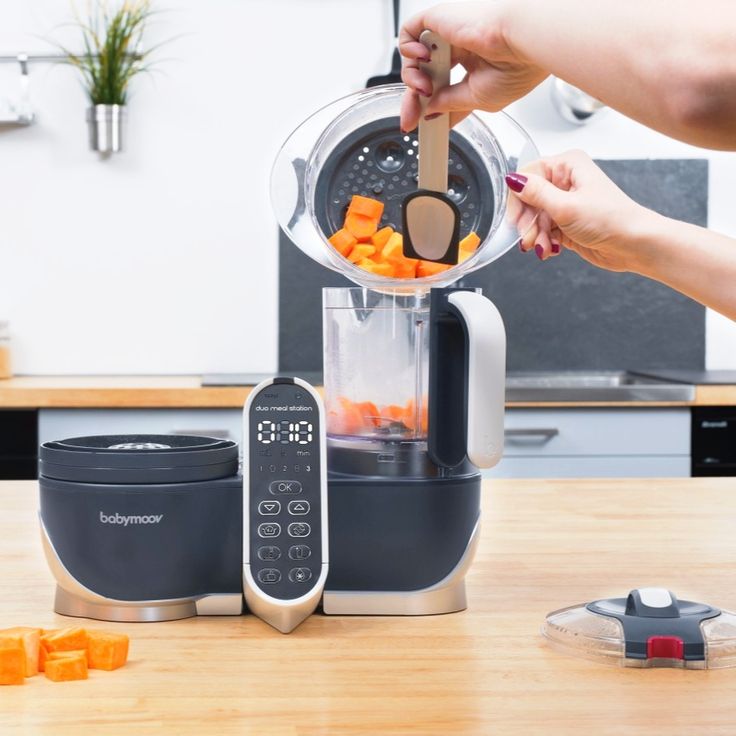
Autumnz 8 in 1 Multifunctional Baby Food Processor / Maker (Steam & Blend) + FREE GIFT
FREE Munchkin Soft-Tip Infant Spoon x 1
Autumnz 8-in-1 Multifunctional Baby Food Processor is all you require to prepare the best food for your baby. Prepare homemade food for your baby using its 8 available settings:
- Steaming food
- Making vegetables & fruits puree for your loved one
- Steaming & blending boneless meat. Make sure the meat is defrosted and cut into small cubes before steaming and blending
- Auto function to blend food when the preset steaming time is up
- Warming up cooked food with adjustable time according to the food amount
- Further blending to achieve finer consistency of baby food
- Sterilization of small size feeding bottles and feeding accessories
- Self-cleaning the jug at a preset time of 10 minutes when required
FEATURES
- 8-in-1 is all you need from a food processor for your baby: Steam, Puree, Meat, Auto, Warm, Blend, Sterilise and Self-Clean
- Easy To Use: The food processor comes with preset programs.
 Prepare your ingredients, choose the function required and let the food processor do the rest. You can also adjust the timing of certain functions according to the amount of food.
 - Ideal for all food types: Suitable for fruits, vegetables, meat, poultry, and fish
- Simple and easy operation: With TOUCH KEYS and LED screen display
- Durable & safe: comes with BPA Free Tritan™ Processing Jug. Also comes with a safety lock to keep the machine from operating if the jug and lid are not properly in place in the food processor
- 1 Year warranty
Specification:
Input Voltage : 230V ~50Hz
Heating Power: 300W
Blending Power: 150W
Reviews (0)
view all
back
0 reviews
What's in the box
Refer to choice
BestsellersMore
LatestMore
Favourite Brands
Autumnz 2-In-1 Baby Food Processor (Steam Blend) *TURQUOISE*
- Product
- Description
- Reviews (0)
- What's in the box
Description
Highlight
- 2 in 1 Steam & Blend
- Autumnz Baby Food Processor is an essential kitchen appliance for today's busy parents, offering a quick and efficient way to prepare and cook healthy, tasty and nutritious meals not just for the baby, but for the whole family.
- Parents can prepare nutritious and delicious meals in minutes with Autumnz Baby Food Processor.
- Practical - Versatile 2-in1 appliance that steams and blends food, preserving the natural nutrients to create healthy and tasty dishes
- Easy to use - One dial controls all functions making it simple to use
- Ideal for all food types - suitable for fruits, vegetables, meat, poultry, fish, etc
- Value for money - help parents give their children nutritious homemade meals while offering savings of time and money on meal preparation
- Durable & safe - comes with BPA Free Tritan Processing Bowl
Autumnz Baby Food Processor is an essential kitchen appliance for today's busy parents, offering a quick and efficient way to prepare and cook healthy, tasty and nutritious meals not just for the baby, but for the whole family. Parents can prepare nutritious and delicious meals in minutes with Autumnz Baby Food Processor.
Features: Practical - Versatile 2-in1 appliance that steams and blends food, preserving the natural nutrients to create healthy and tasty dishes Easy to use - one dial controls all functions making it simple to use Ideal for all food types - suitable for fruits, vegetables, meat, poultry, fish, etc Value for money - help parents give their children nutritious homemade meals while offering savings of time and money on meal preparation Durable & safe - comes with BPA Free Tritan Processing Bowl
Specifications: With its 250W heating element and powerful 150W blending motor, you can steam and blend anything, from fruits and vegetables, to meat, poultry and fish quickly and conveniently, and in one easy step. The device features a built-in 190m water storage tank for the steaming function, and its food bowl can make up to 500ml of food at one time, so you can make small batches and save some for later! It features a 30 minute timer, a heating indication light and sticky rubber feet for extra stability during use. It is compact, easy to carry and easy to use.
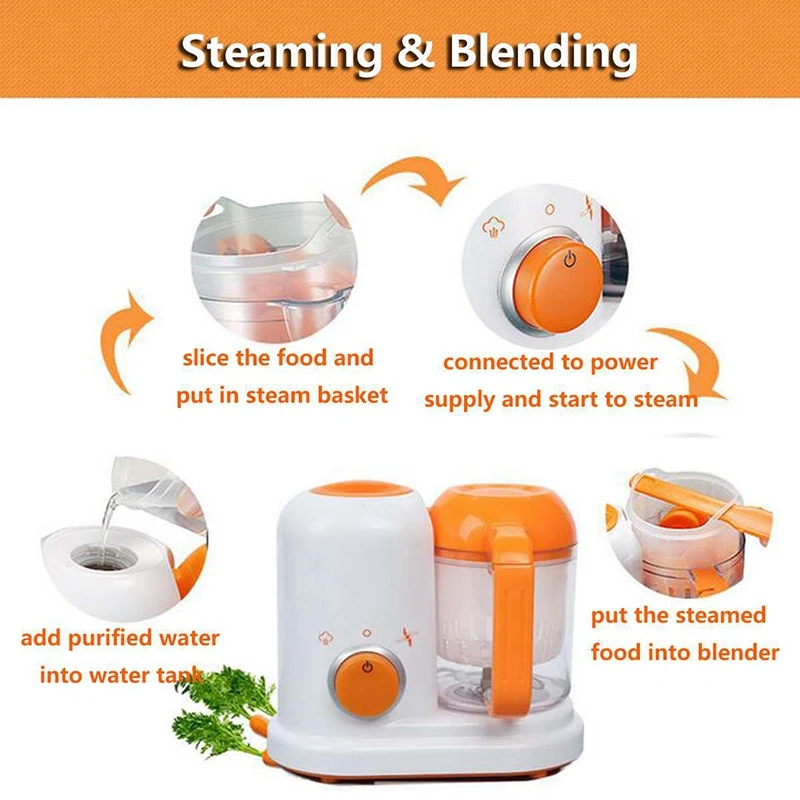
How To Operate The Baby Food Cooker
Add ingredients to the ceramic pot with the appropriate amount of water (up to not more than 80% full). Then place the ceramic pot into the aluminium pot. Cover with glass lid.
Set the "heat selector" switch to OFF position before connecting to power supply. After that, turn the switch to the LOW, HIGH, or AUTO position. The red indicator light will turn on.
Start the cooking process by switching to HIGH position until the food boils. Then adjust to ether LOW or AUTO position according to the nature of the food and its cooking time required.
LOW = food cooked at low temperature / to keep food warm after cooking
HIGH = food cooked at high temperature with shorter cooking time
AUTO = food cooked at high temperature first and will switch down to lower temperature by itself food cooked at high temperature with shorter cooking time.
After cooking, switch off and unplug the appliance
Tips: With 80% full, it takes approximately 5. 5-6.0 hours to cook porridge u
Reviews (0)
view all
back
0 reviews
What's in the box
1 x Autumnz 2-In-1 Baby Food Processor (Steam Blend) *TURQUOISE*
How to use a food processor correctly: 10 tips
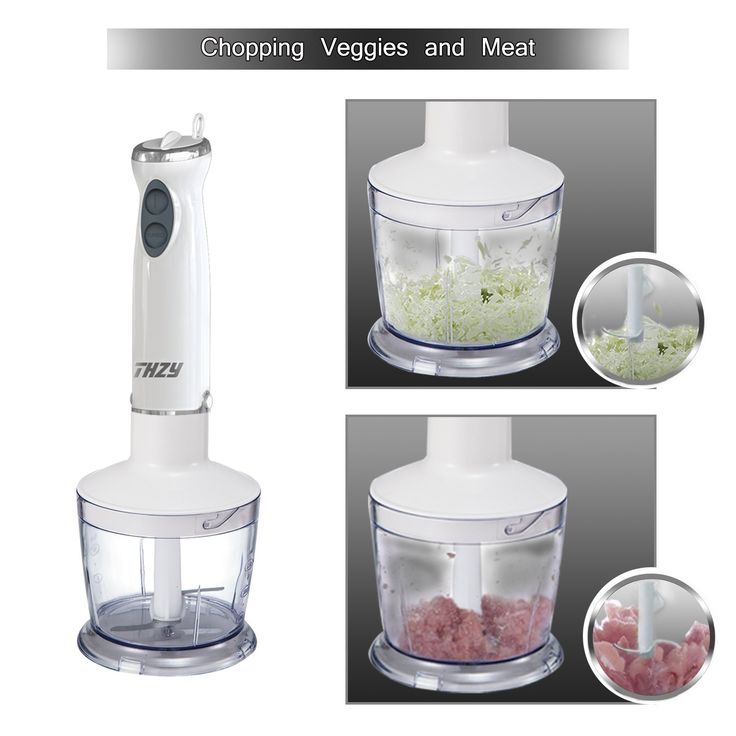
A food processor is a valuable helper for modern housewives. He can:
- Shred products;
- Mix components;
- Knead the dough;
- Cook minced meat;
- Beat egg whites.
And a lot of other useful things. Therefore, it is very disappointing when, due to ignorance of the basics of using the device, such a necessary device in the kitchen fails.
In order for the unit to serve faithfully for many years, it is worth adhering to simple rules for its operation and cleaning. Which ones? Described in the article.
Read also: 4 reasons why you need a food processor: details about the gadget
How to use a food processor correctly?
Devices are often easy to operate (for example, the device from Philips), all the details of their setup and operation are reflected in the instructions. However, before you start creating a culinary masterpiece, you should use the following recommendations.
Tip #1. Only use accessories for the intended purpose. Knives, whisks, graters should be used for a certain type of raw material (meat, vegetables, egg whites, etc.). For example, sharp blades come in handy when you need to grind the solid components of a future meal. Slightly blunt - for mixing products.
Tip #2. Do not use the units continuously. The machine can be disabled by overheating the motor if a large amount of raw material is processed without pauses. Information about how much “rest” the unit needs is usually indicated in the instructions, if this data is not available, about 30 seconds of a break is needed for every 3-7 minutes.
Tip #3. Grind components before loading into the device. Regardless of the power of the device, it is imperative to cut vegetables and fruits into cubes, circles, any shapes before processing in the unit. Pieces that are too large can weaken or damage the engine or even shorten its life.
Tip #4 . Close the cover of the unit tightly. This will prevent leakage while the ingredients are being processed. Most appliances make a clicking sound when the lid is well closed. Also, some specimens have a seal on the lid for better tightness of the device (for example, Gorenje SBR 1000BE).
You may be interested in: TOP 10 best food processors
Tip #5. Do not open the lid until the end of the work process. This can lead to injury to the user (for example, with a rotating knife), splashing of ingredients in different directions, failure of the unit.
Tip #6. Wash all containers of the instrument thoroughly after use. Then dry all nozzles. Dried food residues on the knives will lead to premature blunting of the blades, and not dried moisture can not only spoil the components being mixed, but also affect the performance of the device.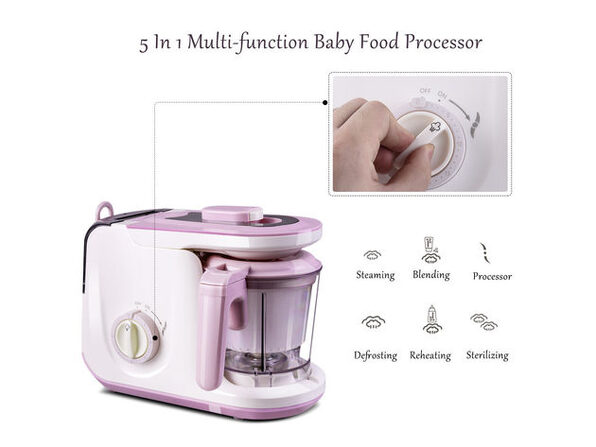
Tip #7. Do not "fit" accessories to your machine to replace lost or damaged ones. You do not need to grind nozzles yourself or purchase similar ones, take them from other devices. It is necessary to use only branded components that correspond to the model of the device. Cheap analogues will only aggravate the situation and can lead to irreparable damage to the kitchen appliance, not to mention the lost warranty.
These simple tips on how to properly use your food processor will help prolong the life of your appliance and eliminate the need to spend money on repairs or buying a new one to replace a damaged unit.
Good to know: How to choose a food processor: 9 steps
How to clean a food processor?
After finishing the cooking process, it is essential to clean the unit (outside and inside).
How to do it right:
- Tip #1 . Find out if the device can be washed in the dishwasher, and, if so, which specific parts of it.
 Such information is in the instructions for the unit. If yes, this is very convenient, because the high temperature and detergents remove all food residues from the machine nozzles by 100%. No - you should not risk the performance of the device, it is better to wash all parts by hand in warm water, and do not forget to wipe the nozzles dry.
 - Tip #2 . The case and non-removable elements of the device should be wiped with a damp cloth or napkin. At the same time, it is important not to allow water to flow inward. The procedure should be carried out at least 1 time in 7 days. Even if the unit is not in use, dust settles on its surface, small debris accumulates, all this can damage important parts of the combine.
- Tip #3. Do not start cleaning the device until the end of its operation. While the device is connected to the mains, it is forbidden to wash or wipe it. Moisture can lead to a short circuit, which will disable the unit and is generally dangerous.
Before using the device, it is also not superfluous to tidy up all the details, especially if the unit has been inactive for a long time.
Interesting article: What is the difference between a food processor and a kitchen machine: differences between 2 appliances
A kitchen processor is a useful piece of equipment that, with proper care, will last for many years (as an option, Sencor STM3700 WH). One has only to remember that you need to tightly close the lid during cooking, prevent the motor from overheating, chop the ingredients and use the right products for a certain mode. In care, the unit is very unpretentious - either washing in the dishwasher, or manual wiping from dust and dirt. A damp cloth and standard detergents are enough for self-cleaning of the kitchen device.
Sour cream cake Monastic hut with cherries recipe with photo step by step
Sour cream cake Monastic hut with cherries
Unfortunately, Javascript is not working for you . To work with most of the functions on our site, this is a necessary element. Contact your administrator to resolve this issue.
Composition/ingredients
12
Change composition
servings:
Step by step cooking
Cooking time: 2 h 30 min PT2h40M-
Step 1:
How to make a cake Monastic hut with cherries according to the classic recipe? First of all, let's prepare the necessary products.
-
Step 2:
Let's start with the dough. If you have a food processor with knives, it will take only a few minutes to prepare the dough, just load all the ingredients for the dough into a bowl and mix, but my food processor has been refusing to work lately, so I kneaded by hand. To do this, sift 3 cups of flour into a bowl and grind the butter with flour to the state of fine crumbs (we take the butter immediately from the refrigerator).
-
Step 3:
Lightly beat the egg with the sugar, you don't have to add it, but then increase the amount of sour cream.
In butter crumbs we send sour cream and an egg with sugar.
-
Step 4:
Knead the dough
-
Step 5:
If the dough is too tight, add a little sour cream, and if the dough is sticky - flour, focus on the dough itself, it should be soft not too tight, kneaded wrap in cling film and place in the refrigerator for 30 minutes.
-
Step 6:
While the dough is resting, pitted cherries (either frozen or canned) are thrown into a sieve, if it is sour, then add a couple of tablespoons of sugar, focus on taste and leave to drain excess juice.
-
Step 7:
We take out our dough from the refrigerator, divide it into several pieces. We roll out a piece into a layer, about 3 mm thick.
-
Step 8:
We adjust the layer to the size of future tubes.
-
Step 9:
Cut the layer into strips for straws about 4-5 cm wide (dimensions depend on the size of the berry).
-
Step 10:
Lay a berry in one row on each strip and pinch the edges (if the dough breaks somewhere, it's okay).
-
Step 11:
Put our tubes on the deco (I made 21 tubes from this amount of dough) and bake in a preheated oven at 200 C for about 15 minutes, until light golden.
-
Step 12:
We leave our straws to cool down and start making sour cream.
-
Step 13:
For the cream, I used heavy homemade sour cream, which can be replaced with heavy cream.
-
Step 14:
Add sugar and vanilla sugar to the sour cream and beat lightly until the sugar dissolves.
-
Step 15:
When the sticks are completely cool, start assembling the cake.
-
Step 16:
To begin with, put a spoonful of cream on the dish and spread it, this is so that the tubules do not run away from the dish.
-
Step 17:
Now lay out 6 tubes and grease them with sour cream on top, then 5 tubes and again with cream, etc.
Learn more