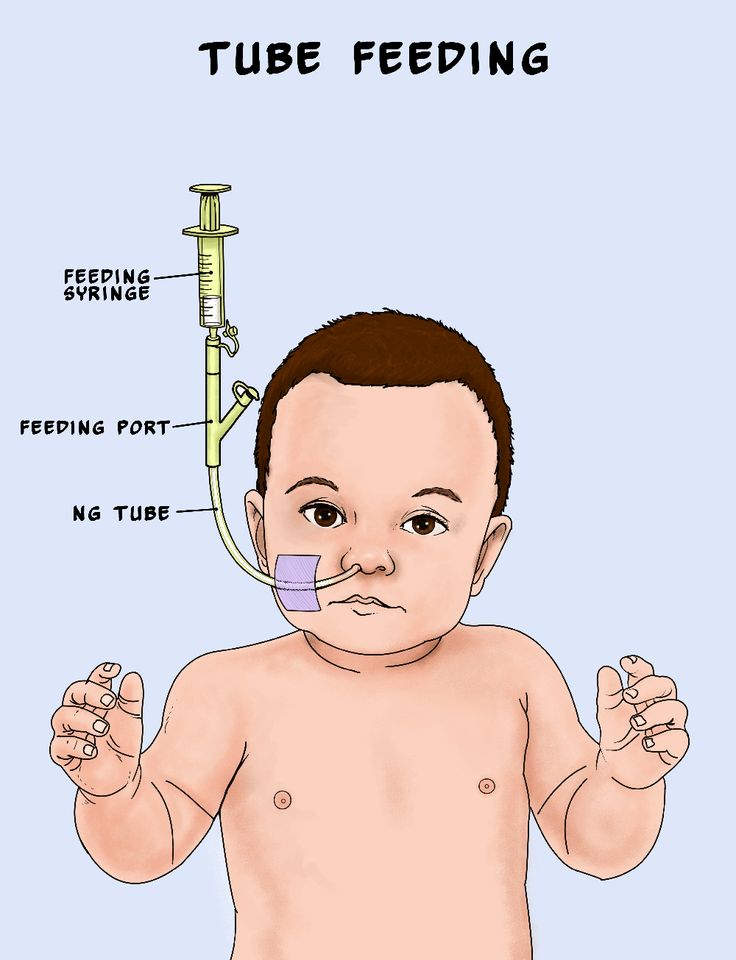
Nasogastric tube feeding baby
Tube feeding | Bliss
Your baby may be fed using tube feeding while on the neonatal unit. Find out why this might be and information about caring for your baby while they are being tube fed.
What is tube feeding?
During tube feeding, breast milk or formula is given through a tube passed into your baby’s nose or mouth to their stomach. Types of tube feeding include the following:
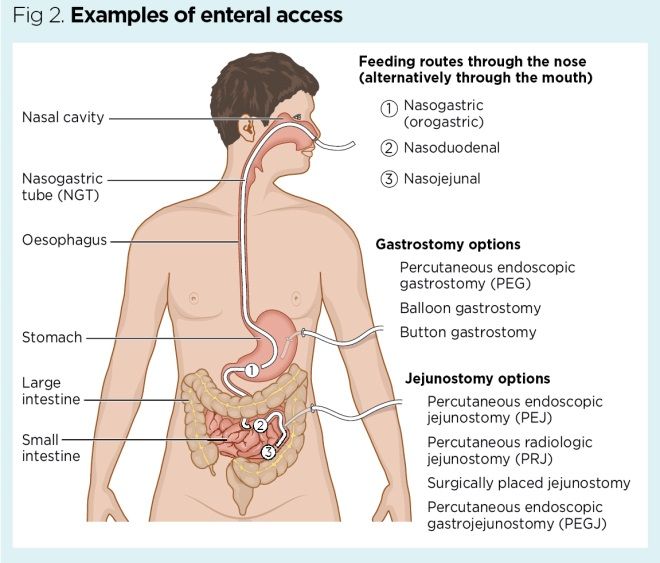
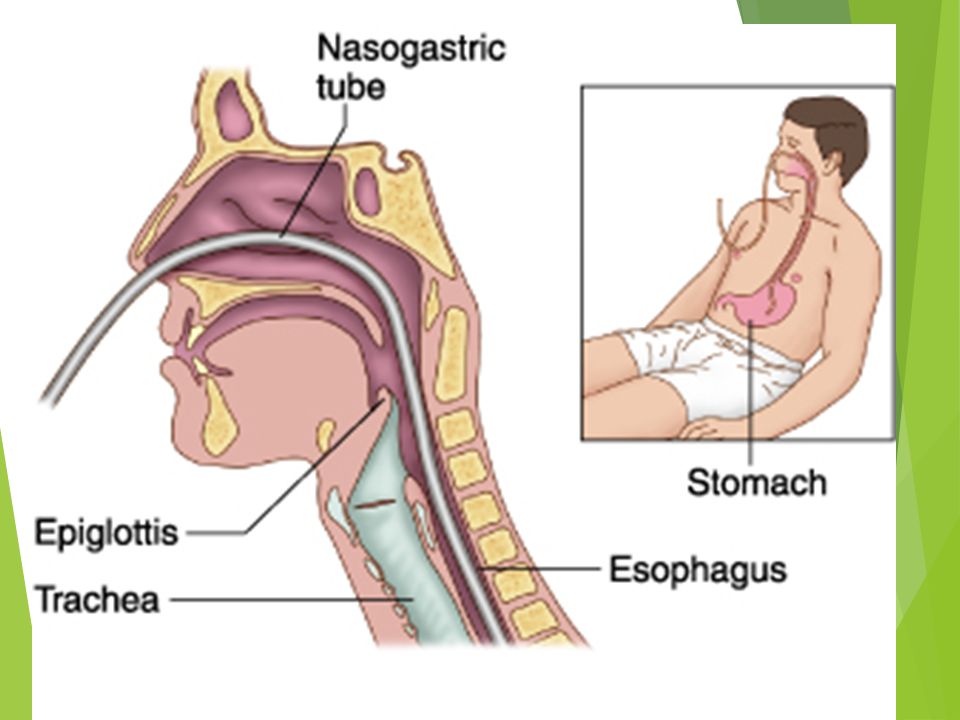
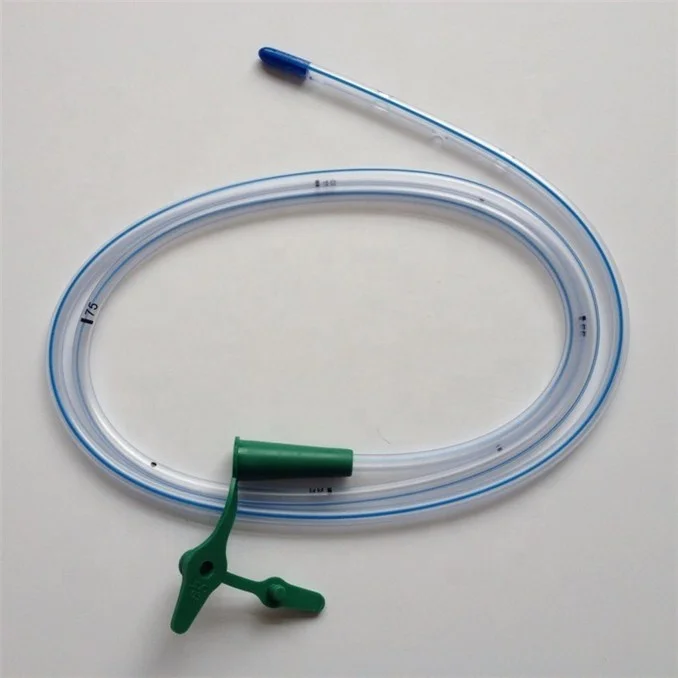
- Nasogastric tube feeding (also called an NG tube) - This is when a baby is fed through a small soft tube, which is placed in the nose and runs down the back of the throat, through the food pipe (oesophagus) and into the stomach.
- Orogastric tube feeding - This is when a baby is fed through a small soft tube, which is placed in the mouth and runs down the back of the throat, through the food pipe (oesophagus) and into the stomach.
Babies who are very premature or sick may need to be fed using parenteral nutrition (PN) at first.
Why does my baby need to be fed using tube feeding?
Tube feeding is often used to feed premature and sick babies as they can be too small and sick to breastfeed or bottle feed at first. Babies born premature or sick have a low supply of energy and nutrients, so it is important that they are able to have small nutritional feeds often, without lowering their energy levels.
In babies born premature, the coordination of sucking, swallowing and breathing needed for effective feeding is usually not fully established until about 32 to 34 weeks’ gestation (although this is different for different babies). Babies born at term and sick may also take longer to co-ordinate feeding. Tube feeding will help your baby receive enough nutrition to grow and develop.
Can I be involved in caring for my baby if they are being tube fed?
Yes, you can. Staff on the neonatal unit will encourage you to be as involved as possible in the care of your baby on the neonatal unit.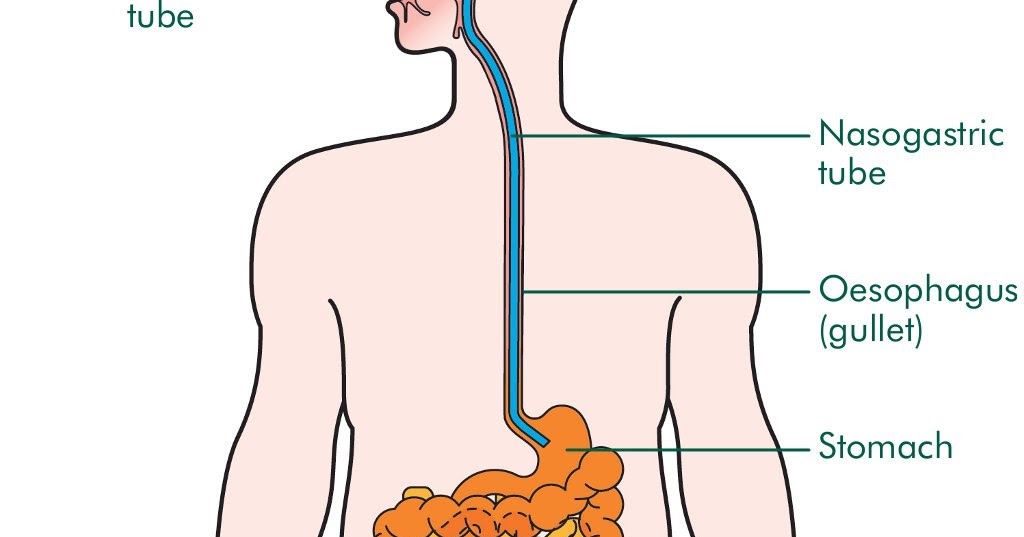 If you feel comfortable doing so, they should show you and your partner how to give tube feeds. Staff on the neonatal unit will explain how tube feeding works and will teach you how to:
- Check the tube is in the correct position before feeding
- Prepare the milk and fill the syringe that is connected to the feeding tube
- Position your baby correctly for tube feeds
- Give the milk slowly to support comfortable digestion
- Know what to look for during a feed.
This can feel quite scary at first, but with practice you should gain confidence. You will have the time to give the milk very slowly which helps your baby to digest more comfortably.
If your baby is well enough to come out of the incubator, you and your partner can also practice skin-to-skin contact with your baby while they are tube feeding. Skin-to-skin contact has lots of benefits for you and your baby, and helps parents to feel closer to their baby and more confident in caring for them.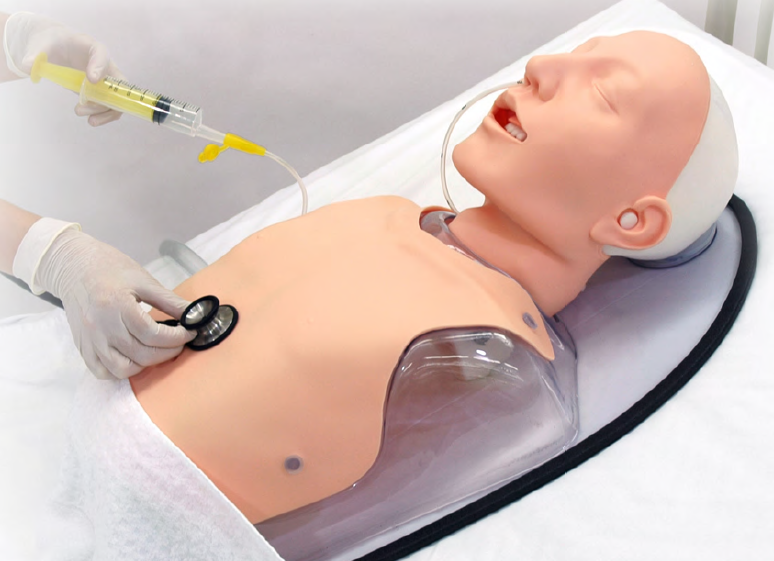
When can my baby stop tube feeding?
In time, you may notice your baby demonstrating feeding cues during a tube feed. For example, they may open and close their mouth, put out their tongue or suck their fingers during a tube feed. This shows that they might be ready to practise breastfeeding or bottle feeding.
If you are planning to breastfeed and your baby is well enough to come out of the incubator, giving them lots of opportunities to be close to the breast may help them to learn to breastfeed. During a tube feed may be a good time to do this. When they are more mature and interested enough, some babies will start licking milk and in time practice sucking. As your baby starts to take more breast and bottle feeds, they will not need as many top-ups of milk from the feeding tube. This will depend on your baby’s energy levels and their ability to coordinate sucking, swallowing and breathing.
Some parents have concerns about their baby changing from tube feeding to breastfeeding, as it is more difficult to measure how much milk their baby is having. Your baby will show signs that they are receiving enough milk, such as feeding cues and wet and dirty nappies. The healthcare team supporting you will monitor your baby’s feeding and will manage any top-ups that might be needed. Talk to a member of staff on your unit if you have any concerns.
What will happen if my baby needs to go home from the neonatal unit with a feeding tube?
If your baby is going home with a feeding tube, a member of unit staff will show you how to feed and care for the tube yourself. It may be you or your community neonatal nurse who will replace the tube when you go home. This will depend on your baby’s needs, your preferences, and the support the unit provides.
Support will always be available if you do not feel comfortable with replacing the tube yourself. If you have any questions or concerns, talk to the unit staff.
Related content
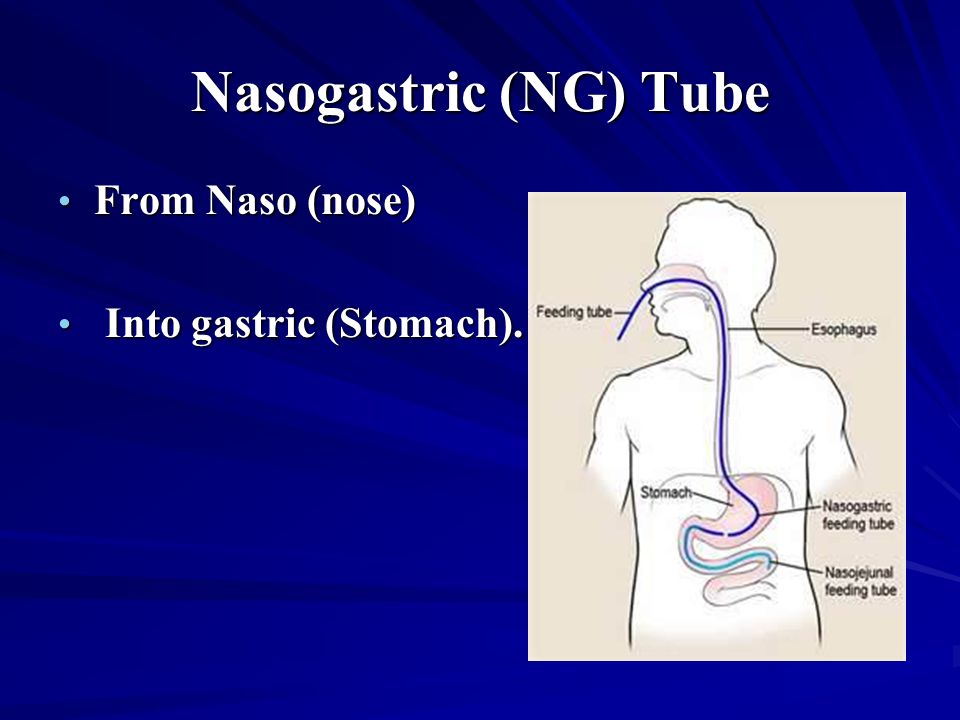
Nasogastric (NG) Tube Feeding
Article Translations: (Spanish) (Somali)
What is a nasogastric tube feeding?
A nasogastric (NG) tube is a small tube that goes into the stomach through the nose. Breast milk, formula, or liquid food is given through the tube directly into the stomach, giving your child extra calories. Feeding this way helps your child get enough nutrition to grow, develop, recover from illness, play, and learn.
Tube feeding can be done for children of any age. Some children will depend on tube feeding only until they are able to eat by mouth. Using the gastrointestinal (GI) tract for feeding keeps it healthy and working normally.
Other children can continue to eat as usual, and also get tube feedings for extra calories.
There are several ways to give NG feeding. The type of tube, how often it needs to be changed, type and amount of formula, and length of feeding time will be decided by the doctor and dietitian, depending on your child's needs.
Follow only the checked instructions in this sheet.
Your child's special instructions:Type and size of feeding tube: ___ Change the feeding tube every: ___ Do not change the feeding tube yourself. What to feed: Amount to feed: How often to feed: Method: ___ bolus ___ continuous Type of pump: Rate of feeding: Flush the feeding tube at the end of each feeding with ml of warm water. Other: Measurement: Marking at nostril: _____cm Nostril to beginning of the hub: _____cm Care of feeding bag and tubing:___ Change every day. If the bag and tubing do not clean easily, try using a solution made of equal amounts of white vinegar and cool water (for example 1 cup vinegar with 1 cup water). Rinse well and store in refrigerator. Throw away the feeding bag and tubing after 1 week; sooner if you cannot get it clean or if it begins to leak. |
Definitions
| aspiration | getting fluid (stomach contents for formula) into the lungs, which can cause trouble breathing |
| bolus | feeding over a short time |
| continuous | feeding over an extended time at a slower rate |
| GI tract | the esophagus, stomach, and intestines |
| lubricant | water-soluble substance such as K-Y® jelly, used to help the tube slip in more easily - do not use Vaseline® |
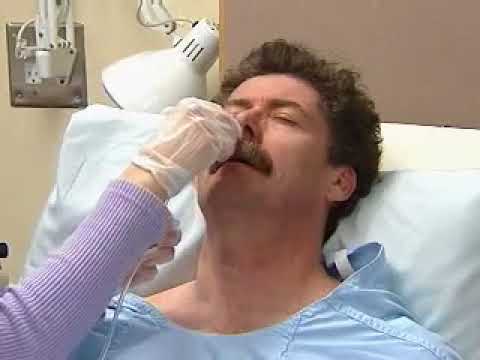
___ Inserting the feeding tube
It takes time and practice to learn how to insert the tube, so be patient with yourself.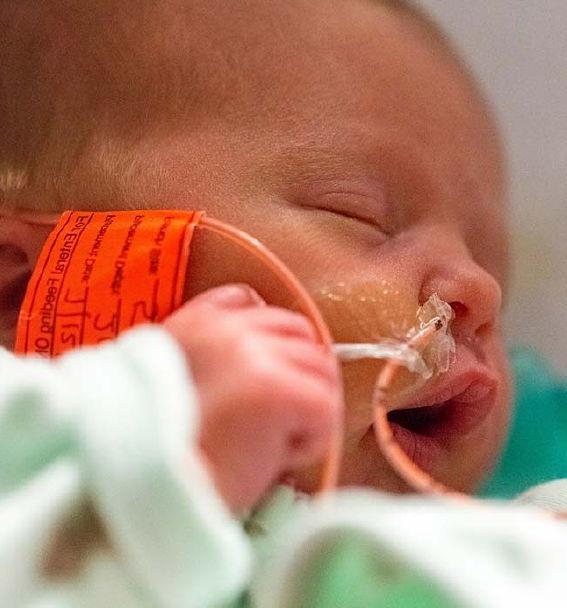 Do this by yourself only after you have done it successfully with the nurse present.
Get ready:
- Wash your hands.
- Gather supplies:
- feeding tube
- tape measure
- With your fingers, find your child's sternum (breastbone). Gently feel the bone in the center of the chest, and then find its bottom edge. It will be below nipple level, and you will feel the bottom of the rib cage curving away to each side.
- Now imagine a spot on your child's belly that is midway between the belly button and the bottom edge of the breastbone. Keep that spot in mind.
- Using a tape measure, measure from the tip of your child's nose to the bottom of the earlobe, then down to that spot midway between belly button and breastbone edge. Write that number down: we will call it "your child's measurement." Measurement:
In this picture, the child's measurement is 12 inches (3 inches from nose to ear, plus another 9 inches down).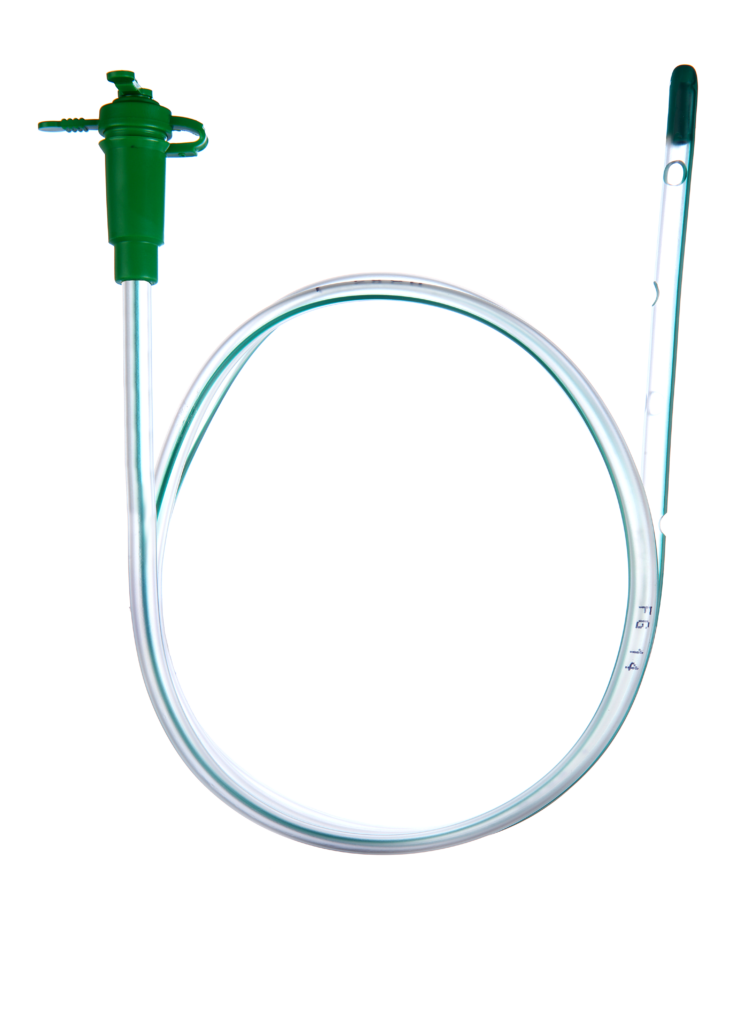
- Now, from the tip of the tube, measure the distance of your child's measurement (in the pictured example this would be 12 inches). Mark that spot on the tube using a permanent marker. Now you are ready to insert the feeding tube.
- Now, measure from the mark you made to the beginning of the hub. That is the Extra Tube Length.
Insert the tube:
- Wash your hands.
- Gather equipment:
- feeding tube
- formula
- gauze if needed
- water for lubrication or other lubricant
- pH testing strips
- syringe, size:
- tape, type:
- water for rinsing if needed
- Position the child.
___ Swaddle an infant (wrap with the arms secured in a blanket). Put your infant on their back, either in an infant seat or on a bed, with the head raised.
___ Older children should be placed in a comfortable position, and may be held by an adult if they wish. Some children may vomit when the tube is put in. Be sure the child can be turned easily if this happens.
 - Lubricate the tube with water or put a small amount of lubricant on the end of the tube if you have been taught to do so. Most tubes have a coating that is activated with water, making the tube easier to slide in.
- Insert the tube into the nostril, pushing the tube gently down until the mark on the tube is at the tip of the nose. Older children can drink or swallow to help the tube go down. Infants may suck on a pacifier or your fingers during tube insertion. This can be uncomfortable for your child and it is normal for them to cough or sneeze while the tube is being inserted. It may be best to have someone help you.
After the tube is inserted, remove the tube right away if:
- coughing
- gagging
- sneezing
- vomiting
- wheezing
- changing color
- cannot catch a breath
- change in respiratory rate
- change in oxygen needs
- decrease in pulse oximeter readings
- increased restlessness
- unexplained irritability, discomfort, or abdominal pain
- or you see the tube coming out of the mouth
- Cuddle and comfort your child for a few minutes, and try again.

- Once the tube is in place, secure it with tape as shown by the nurse.
- Check the tube placement (see below).
Checking the tube placement
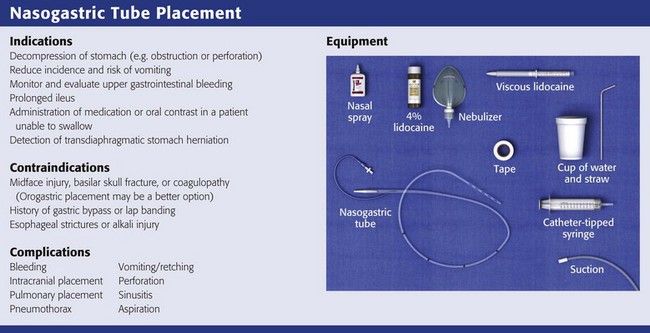
To prevent aspiration, you must check the tube placement before each feeding, to be sure it has not moved. The stomach should be as empty as possible when checking for placement, so plan each placement check before medicine or feedings.
- Look at your child. Is your child comfortable and breathing normally? If your child appears distressed, gagging, sneezing, vomiting, wheezing, changing color, cannot catch a breath, change in respiratory rate, change in oxygen needs, decrease in pulse oximeter readings, increased restlessness, unexplained irritability, discomfort, or abdominal pain, cannot talk, or you see the tube coming out of the mouth: Do not start the feeding.
- Make sure that the mark on the tube is at the nostril. Measure the tube from the mark at the nostril to the beginning of the hub and make sure it matches the "extra tube length" number you wrote down earlier.
 (See "Get ready," step 7, above.) If you cannot see the mark or the length has changed, do not start the feeding.
 - Check placement with a pH strip. Try to pull out some stomach fluids with the syringe. Using a small syringe (3 to 5 ml) will make this easier. Test the acidity of the stomach fluids with a pH strip. A pH between 1-5.5 indicates proper placement. A pH of 6 or higher may indicate incorrect placement. If you get a pH of 6 or higher, DO NOT START THE FEEDING. Call Children’s Home Care to have the tube replaced.
- If having trouble getting pH, place your child on their left side for 15 minutes to allow stomach fluids to pool at the end of the tube.
- Write down pH level.
- Gently flush the tube with the amount of water prescribed by your provider.
- If unable to obtain pH but length, measurement and child's condition are unchanged, you may start the feeding.
Paying careful attention to these signs will help you to be sure the tube is placed correctly.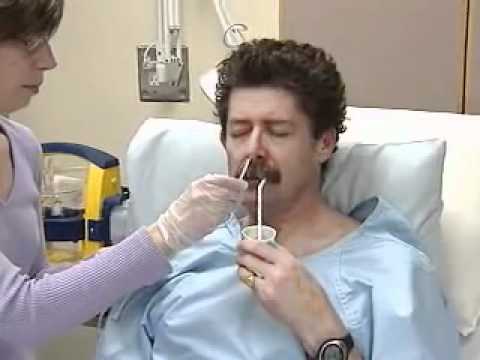 If you have any doubts, it is best to remove the tube and replace it.
Safety Precautions
- Be aware the feeding set tubing can get wrapped around a child's neck, which could lead to strangulation or death.
- When running a feeding for your child, place the tubing in a way the tubing cannot get tangled around your infant or child. Place the tubing through your child's clothing or towards the foot of the bed. This will help the tubing from getting wrapped around your child's neck if they are to turn or move.
- If your child is injured by feeding set tubing, report the event to the FDA at [email protected] or call 1-800-638-2041.
Giving the feedings
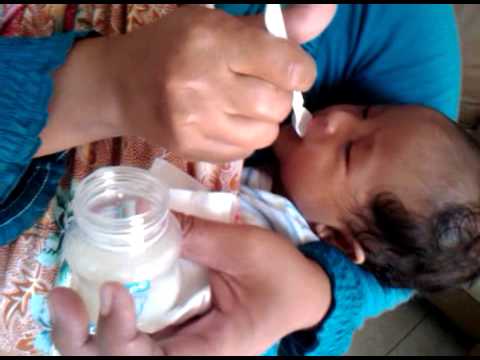
___ Bolus feeding
It may be helpful to have 2 people to do this type of tube feeding. One person can hold and comfort the child while the other gives the feeding.
- Wash your hands.
- Measure the correct amount of formula and warm it to the desired temperature.
 Do not use the microwave to warm the feeding.
 - Check tube placement as above (observing mark on NG tube and pH testing).
- Pinch the tube.
- Attach a syringe to the feeding tube.
- Pour the formula into the syringe.
- Unpinch the tube.
- Allow the formula to run for the same amount of time as it would take the child to drink it by mouth, or as prescribed by the doctor.
- Ways to help the feeding flow:
Try to start the feeding when the child is calm. You may have to "push" the feeding to get it started. To do this, place a plunger into the syringe and push slightly. Remove the plunger gently and allow the formula to flow in by gravity. If your child is crying, you may need to repeat the push several times.
___ A pacifier may help calm a young child and also helps to connect sucking with stomach-filling.
___ For older children, use activities to distract them, or involve the child with the feeding, such as holding the syringe.
- During the feeding, keep the bottom of the syringe no higher than 6 inches above the child's stomach. The height of the syringe controls the feeding rate or speed.
- Continue adding formula into the syringe until the prescribed amount is given.
- When the syringe is empty, flush the tube with the prescribed amount of warm water.
- After the feeding:
___ Close the cap on the tube.
___ Leave the tube open to air. Tape a piece of gauze over the syringe to keep fluids from splashing out.
___ Burp your child.
___ Infants and young children may be most comfortable with their head and upper body raised, or lying on their left side.
___ Older children may be up and playing.
___ Continuous feeding with a feeding pump
- Wash your hands.
- Measure enough formula for 4 hours and warm it if needed. Do not use the microwave to warm feeding.
- Pour formula into the feeding bag. Run formula to the end of the pump tubing.
- Set up the pump and pump tubing according to the directions from the medical supply company. Be sure the rate is set correctly.
- If a new feeding tube is to be inserted, see "Getting ready to insert the tube" and "Inserting the tube."
- Check placement if external tube length measurement is unchanged, exit site mark is visible and there are no changes in your child's condition, continue feedings without interruption (see "Checking the tube placement"). If vomiting or respiratory distress occurs at any time, tube placement should be verified.
- Connect the pump tubing to the child's feeding tube.
- Turn on the pump. Check to make sure the formula is dripping.
- As the bag empties every 4 hours, add more formula.
- Hold and/or talk to your child often during waking hours. Have your child's head raised during the entire feeding.
- Watch your child carefully to make sure there is no change in breathing or behavior. Make sure the mark on the tube is still at the nostril.
 It is also a good idea to measure it every few hours, because sometimes the tube can slip under the tape. Stop the feeding if the mark changes and recheck placement.
 - If your doctor tells you to, after the feeding period, flush the tube with the prescribed amount of warm water.
- If you are told to stop the continuous feeding:
___ Plug or clamp the tube.
___ Leave the tube open to air. Tape a piece of gauze over the syringe to keep fluids from splashing out.
___ Burp your child.
___ Have child's head raised for about 30 minutes after the feeding is done.
___ Removing the feeding tube (if ordered)
- Remove the tape.
- Pinch the tubing and pull the tube out in one quick motion.
- Hold, cuddle, and comfort your child. If your child is an infant, burp him or her.
Skin care
Clean your child's skin around the tube often with warm water, removing any secretions. If the nostril is reddened or the skin is irritated, remove the tube and replace it in the other nostril, if possible.
If you have used a transparent dressing on your child's face, remove it by loosening it with mineral oil and gently working the dressing off. If you use adhesive remover to loosen the dressing, be sure to wash the skin with water to remove all residue, as this can be very irritating.
Problem solving
| Problem | What to do |
| Clogged or plugged feeding tube (follow only the checked instructions) |
|
| Feeding tube falls out |
|
| Coughing while tube is in place |
|
| Diarrhea and cramping |
|
| Nausea (upset stomach) or vomiting (throwing up) |
|
| Skin around the nose is irritated |
|
| Cannot obtain pH reading |
|

When should I call the doctor?
- fever
- vomiting or diarrhea that does not stop
- fussiness, hard to console
- pain or unusual distension in abdomen
- questions about using the tube
- trouble breathing - call 911
If you are concerned about your child for any reason, call your doctor to discuss the symptoms.
Questions?
This is not specific to your child, but provides general information. If you have any questions, please call your doctor, home care nurse, or dietitian.
Children's Minnesota
Reviewed 10/2022
Back To Top
Bolus Feeding Using a Syringe)
Your child is discharged from the hospital with a nasogastric (NG) feeding tube in place. The tube is a thin, soft tube that is inserted into the baby's stomach through the nose. This tube delivers liquid food directly to the stomach. Before your baby was released from the hospital, you were shown how to feed with a nasogastric tube. This memo will help you remember the necessary procedure for feeding at home. You can also get help from a district nurse at your home. nine0005
NOTE: There are many different types of nasogastric tubes, feeding syringes, and pumps. The appearance and function of the nasogastric tube and accessories prescribed for your child may differ from those shown and described below. Always follow the advice of your child's primary care physician or district nurse. Write down their phone numbers in case you need help. Also write down the phone number of the facility that supplies medical equipment for your child. In the future, you will need to order additional accessories that your child may need. Write down all the phone numbers you need in the spaces below. nine0005
Healthcare provider phone number: _________________________________________________________
Home health nurse phone number: _________________________________________________
Medical supply company phone number: ______________________
Types of feeding
nine0019Two types of feeding can be performed with a nasogastric tube:
-
bolus feeding. Several times a day, an amount of liquid food, commensurate with one meal, is fed through the tube. Bolus feeding is done with a syringe or pump;
- nine0002 continuous feeding.
 Liquid food drips slowly through the tube. Continuous power is supplied by a pump.
Your child may be prescribed one or both types of food. Detailed instructions for each type of food are given below.
Syringe Bolus
Your child's doctor or district nurse will tell you how much liquid food to use with each bolus. You will also be told how many times a day to feed your baby. Record this information below.
How much to give at each feeding: _____________
Number of feedings per day (How often to feed): __________________________
nine0017 AccessoriesActions
-
Wash your hands with soap and water.
-
Make sure the tube is in the stomach (as you were shown in the hospital).
 Be sure to perform this step BEFORE feeding begins.
 -
Check liquid food label and expiration date. Never use jars (or bags) with food that have already expired. In this case, you must use a new jar (or bag) with food. nine0005
-
Open the hole plug at the end of the food probe.
-
Remove the plunger of the feeding syringe.
-
Connect the feeding syringe to the feeding port of the probe.
-
Gently bend or squeeze the probe with one hand. While holding the tube bent or pinched, slowly draw the liquid food into the feeding syringe with your free hand. In this case, the food will not flow through the probe, which will allow you to measure its amount. nine0005
-
Fill the feeding syringe to the level prescribed by the child's healthcare provider.
-
The probe can now be released.
-
Hold the feeding syringe straight. In this case, the food will pass through the probe by gravity without additional pressure. Adjust the angle of the feeding syringe to control the rate of fluid flow. nine0005
-
If the food flows too slowly or does not flow at all, insert the plunger into the syringe. Gently, lightly press the piston. This will remove any particles blocking or clogging the probe. Do not push the syringe plunger all the way or with force.
-
Refill the feeding syringe with food if necessary. Repeat the above steps until the child receives the prescribed amount of food. nine0005
-
After feeding, rinse the tube with water (as you were shown in the hospital).
-
Disconnect the feeding syringe.
-
Close the cap on the food inlet of the probe.
| nine0002 AddiAdditional instructions:_________________________________________________________________________________ ________________________________________________________________________________________________ ________________________________________________________________________________________________ ________________________________________________________________________________________________ |
Call your doctor right away if you experience any of the following.
-
The child has trouble breathing.

-
Formation of redness, swelling (swelling), leakage (leakage), ulcers (sores) or suppuration (pus) on the skin in the area of the probe.
nine0029 -
Presence of blood (blood) around the probe, in the child's stool or stomach contents.
-
Baby coughing (cough), shortness of breath (choke) or vomiting (vomit) while feeding.
-
Urebenka swollen (bloated abdomen) or hard abdomen (rigid abdomen) (abdomen hard with light pressure).
nine0029 -
Child diarrhea (diarrhea) or constipation (constipation).
-
Child temperature (fever) 38˚C ( 100.4° F) or higher.
© 2000-2022 The StayWell Company, LLC. All rights reserved. This information is not intended as a substitute for professional medical care. Always follow your healthcare professional's instructions. nine0005
Was this helpful?
Yes no
Tell us more.
Check all that apply.
Wrong topic—not what I was looking for.
It was hard to understand. nine0005
It didn't answer any of my questions.
I still don't know what to do next.
other.
NEXT ▶
nine0017 Last question: How confident are you filling out medical forms by yourself? Not at all A little Somewhat Quite a bit Extremely
Continuous milk feeding via nasogastric tube versus intermittent bolus milk feeding in preterm infants weighing less than 1500 g
Review question
Is continuous tube feeding through the nose or mouth better than tube feeding every two to three hours in very low birth weight preterm infants?
Relevance
Premature babies born weighing less than 1500 grams are unable to coordinate sucking, swallowing and breathing.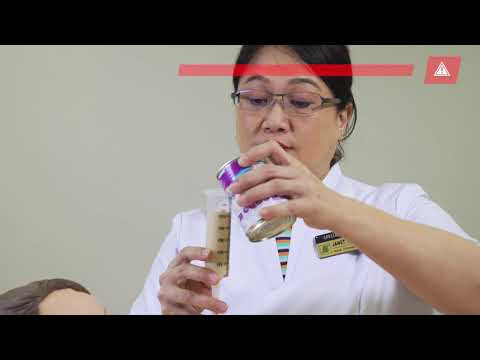 Feeding through the gastrointestinal tract (enteral nutrition) promotes the development of the digestive system and the growth of the child. Therefore, in addition to feeding through an intravenous catheter (parenteral nutrition), premature babies can be fed milk through a tube inserted through the nose into the stomach (nasogastric feeding) or through the mouth into the stomach (orogastric feeding). Typically, a predetermined amount of milk is given over 10-20 minutes every two to three hours (intermittent bolus feeding). Some doctors prefer to feed premature babies continuously. Each feeding method has potentially beneficial effects, but can also have harmful effects. nine0005
Study profile
We included nine studies with 919 infants. Another study is pending classification. Seven of the nine included studies reported data on infants with a maximum weight of 1000 to 1400 grams. Two of the nine studies included infants weighing up to 1500 grams.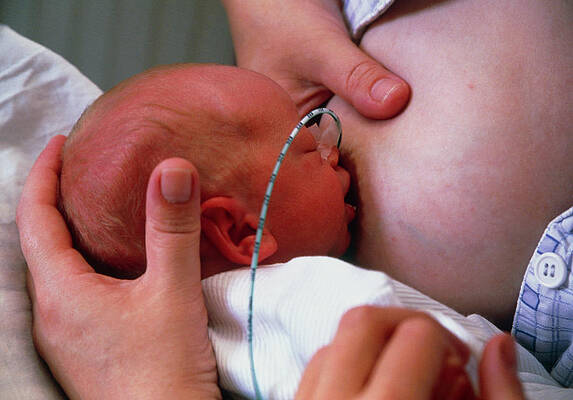 The search is current as of July 17, 2020.
Main results
Infants receiving continuous feeding may achieve complete enteral nutrition slightly later than infants receiving intermittent feeding. Total enteral nutrition is defined as the intake of a given volume of breast milk or formula by the infant in the required manner. This promotes the development of the gastrointestinal tract, reduces the risk of infection from intravenous catheters used to provide parenteral nutrition, and may shorten hospital stays. nine0005
It is not known whether there is a difference between continuous and intermittent feeding in terms of the number of days needed to regain birth weight, days of feeding interruption, and rate of weight gain.
Continuous feeding may result in little or no difference in rate of increase in body length or head circumference compared to intermittent feeding.
It is not known whether continuous feeding affects the risk of developing necrotizing enterocolitis (a common and serious bowel disease in preterm infants) compared with intermittent feeding.