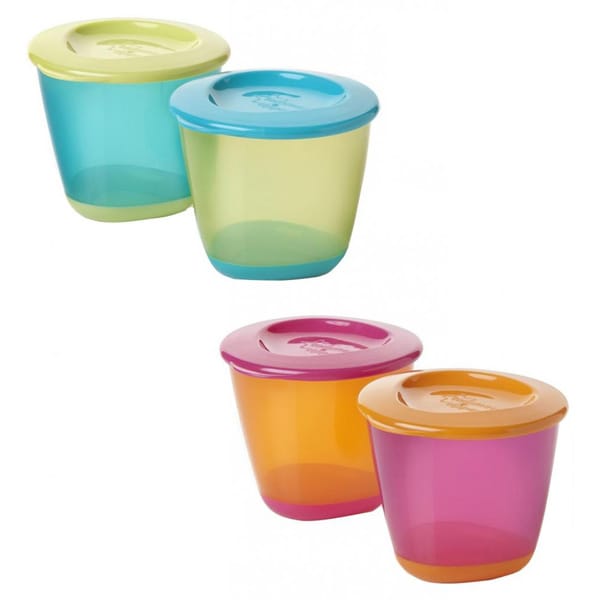
Tommee tippee explora baby food steamer blender
Baby Food Steamer Blender Product Support
Category
- Getting Started
- Cleaning & Maintenance
- Troubleshooting
- How to videos
Getting Started
Great to see that you’ve purchased a Tommee Tippee baby food steamer blender. To help you get started and to keep it working effectively, we’ve added all the guidance you should need, plus some handy hint, tips and troubleshooting advice.
PARTS GUIDE
A step by step guide to all the component parts with how they should be fitted together and what the monitor functionalities are.
SETTING UP YOUR STEAMER BLENDER FOR FIRST USE
It’s important to not just assemble the parts together before first use, but to clean it also. Here’s a guide for you to follow, which gives you a full rundown on what’s needed:
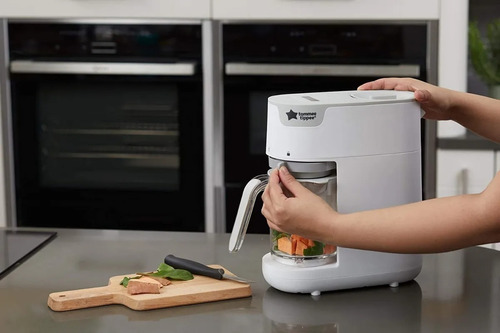
- Wash blade, container and lid in soapy water, dry and place machine on a clean, dry kitchen work surface. To remove blade, hold the blade tab inside the machine whilst turning the locking ring on the bottom of the container (I). This will remove the locking ring and the blade will split into two parts. To re-assemble, reverse these steps. WARNING! Handle the knife blade carefully as it is extremely sharp. Care needs to be taken when handling the sharp cutting blades, emptying the bowl and during cleaning. Place contrainer with lid into the machine and lock in place using the locking dial (B + C).
- Fill water tank with 450ml of cold water and replace the cap (D).
- Plug machine into mains power supply, the power button LED will be flashing.
 Press the power button to turn on the machine. The power button LED will continue to flash and the LCD display will illuminate (E).
 - Press the steam button and set the steam time to 30 minutes using the + buttons (F).
- Press the blend button and set the blend time to 30 seconds using the + buttons (G).
- Press the power button to start (H). The machine will now run the steam and blend cycle automatically.
- When the cycle has finished the machine will beep, the LCD display will turn off and the power button will flash. Turn off at the power supply, unplug the machine and allow the machine to cool completely. Unlock container and remove residual water and clean container following instructions in the cleaning section. Discard any remaining water from the water tank by tipping the machine sideways over a sink.
- The machine is now ready to use.
What can I use the machine for?
The machine is only intended to be used for steaming and blending fresh meat, fish, vegetables and fruit. It isn’t suitable for:
- Cooking rice, noodles and pasta
- Heating liquids, soup or water
- Chopping hard ingredients such as ice cubes and sugar lumps
- Cooking frozen foods
- Defrosting and reheating food or keeping food warm
- Heating baby food jars
- Heating bottles
Can I add hot water to the tank, or does it have to be cold?
We recommend that you only add cold water to the steamer blender.
How do I ensure that my little one's blended food is lump free?
If just blending food and not steaming first, try adding a little bit of cooled water when blending, to help give a smoother consistency. If you’re following a steam and blend cycle, you can use some of the water that will remain in the jug, although remember the pause the machine in between the steam and blend cycle, so you can choose the amount of water you want to use.
Can I use the blender for large batches of food?
The blender is ideally suited to small batches of food and is recommended for use in short pulse bursts. We recommend pulsing for 1-minute, then letting the machine cool for 2-minutes. After operating 4 cycles, please let it cool down to room temperature before operating it again.
USING YOUR MACHINE:
- Place the machine onto a dry kitchen work surface. Place the container with diced food into the preparation area (B) and lock in to place using the locking dial (C). It’s important that you only steam up to 200 grams in one cycle, anything over this will overfill it. Fill the water tank with 450ml of cold water and replace the cap (D).
- Plug the machine into the mains power supply - the power button LED will be flashing. Press the power button to turn on. The power button LED will continue to flash and the LCD display will illuminate (E).
- Setting cycle options:
A) SETTING AN AUTOMATIC STEAM CYCLE
• Press the steam button and set the steam time using the +/- buttons.
 Maximum steam time of 30 minutes (F).
• Press the blend button and set the blend time using the +/- buttons. Maximum blend time of 5 minutes (G).
• Press the power button to start. The machine will now run the steam and blend cycle automatically.When setting the automatic cycle, the blend time can be set first, but the machine will always start with the steam cycle first. During the automatic steam and blend cycle, the blades will rotate once every 2 minutes to move food around the container. When cooking meat, it’s extremely important to pause the machine every 10 minutes and stir the food thoroughly. This is to ensure even cooking.
The blend time can be set for 2, 4, 6, 8 or 10 seconds to control the texture of the food.
**For your child’s safety always check food temperature before feeding**
B) Setting a steam cycle only
• Press the steam button and set the steam time using the +/- buttons.
 Maximum steam time of 30 minutes (F).
• Press the power button to start. The machine will now run a steam cycle. To remove the blade, hold the blade tab inside the jug whilst turning the locking ring on the bottom of the container (I). This will remove the locking ring and the blade will split into two parts.WARNING! Handle the knife blade carefully as it is extremely sharp.
Care shall be taken when handling the sharp cutting blades, emptying the bowl and during cleaning.
C) Setting a blend only cycle
• Press the blend button and set the blend time using the +/- buttons. Maximum blend time of 5 minutes (G).
• Press the power button to start. The machine will now run a blend cycle. The blend time can be set for 2, 4, 6, 8 or 10 seconds to control the texture of the food. - When the cycle has finished, the machine will beep, the LCD display will turn off and the power button will flash.
 During steaming, water will collect in the jug. This water can be left in with the food or removed depending on your preference. Leave the machine to stand for 2 minutes before unlocking the jug and removing the food. Take care when removing the jug and lid, as steam may still be present and the container may be hot to touch.
**For your child’s safety always check food temperature before feeding**
- Turn the machine off at the power supply and unplug the machine. Disassemble the blade from the jug and lid and wash all parts in warm soapy water. To remove the blade, hold the blade tab inside the jug whilst turning the locking ring on the bottom of the container (I). This will remove the locking ring and the blade will split into two parts. To re-assemble, reverse these steps.
WARNING! Handle the knife blade carefully as it is extremely sharp.
Care shall be taken when handling the sharp cutting blades, emptying the bowl and during cleaning.
- Allow machine to cool down completely before discarding remaining water from the water tank.
 You can discard the water by tipping the machine sideways over a sink.
 - If preparing another batch of food straight away, make sure that you top-up the water tank with more water as it’ll need filling up again before you begin.
PAUSE FUNCTIONALITY
To pause while in mid cycle, press and hold the steam button and blend button at the same time for 3-seconds until the machine beeps - the power button will flash. This will pause the cycle indefinitely. The jug can be removed during this time.
Press the power button to continue the cycle.
CANCELLING A CYCLE
To stop while in mid cycle, press the power button for 3-seconds until the machine turns off.
Cleaning & Maintenance
Cleaning your steamer blender is naturally an important factor, as it keeps the machine working effectively for you and your little one. Here’s some simple steps for you to follow:
- Turn off at the power supply, unplug the machine and allow it to cool down completely before cleaning.

- Before first use, before each use and after every use wash the container, lid, knife blade, sealing ring and locking ring in warm soapy water and dry thoroughly. These parts are not dishwasher safe.
WARNING! Handle the knife blade carefully as it is extremely sharp.
- Care needs to be taken when handling the sharp cutting blades, emptying the bowl and during cleaning.
- After every use wipe the entire base with a damp cloth but do not submerge in water.
- Do not clean with abrasive cleaners or allow to come in to contact with solvents or harsh chemicals as damage could result and we don’t want this to happen!
Can I clean my Steamer Blender parts in the dishwasher?
The jug can be cleaned on the top shelf of your dishwasher but the blade and other parts need a bit more TLC, so they need to hand washed.
Can I disassemble the blade for cleaning?
Yep! But please take care to reassemble the parts correctly as per the setup guide we’ve given you.
How to descale your Steamer Blender?
Descaling your machine will help keep everything in working order. We recommend to descale approximately every 4-weeks, however if you notice limescale earlier than this due to living in a hard water area or due to you loving your machine so much that you use it several times a day, just like your kettle, you may need to descale sooner – the 4-weeks is purely a guide.
Living in a hard water area can produce limescale quicker than other areas. If you’re not sure of your water quality, you can check this out through your water provider.
Thankfully, descaling is quick and easy. Simply wait for the tank to cool, then empty any remaining water from the tank (to remove the water, tip the machine over the sink).
- Pour in 250ml of clear/ white vinegar (cleaning or food grade vinegar will do the trick)
- Leave for at least 30 minutes, or up to 24-hours depending on the amount of limescale.
- Pour the white vinegar liquid down the sink.
 Rinse the water tank with clean cool water to remove any build up that came loose as a result of the descaling process and pour liquid down the sink. You may like to repeat this process to remove any residual build up or white vinegar.
 - Follow instructions under 'Set up' to perform a final cleaning cycle.
What does descaling do?
The descaling process removes deposits of calcium and other minerals within the system that may affect its performance.
Troubleshooting
E001 has appeared on the screen - what does it mean?
This is telling you that the water tank has boiled dry. If this happens, start a new cycle and replace the food. Unplug the machine, allowing it to stand for 2 minutes before filling the water tank with 450ml of cold water. Re-set the cycle following the instructions in the ‘usage section’.
I don't think there's enough steam - what can I do?
A lack of steam is usually an indication of the water tank needing to be descaled.
Descaling your machine will help keep everything in working order. We recommend to descale approximately every 4-weeks, however if you notice limescale earlier than this due to living in a hard water area or due to you loving your machine so much that you use it several times a day, just like your kettle, you may need to descale sooner – the 4-weeks is purely a guide.
Living in a hard water area can produce limescale quicker than other areas. If you’re not sure of your water quality, you can check this out through your water provider.
Thankfully, descaling is quick and easy. Simply wait for the tank to cool, then empty any remaining water from the tank (to remove the water, tip the machine over the sink).
- Pour in 250ml of clear/ white vinegar (cleaning or food grade vinegar will do the trick)
- Leave for at least 30 minutes, or up to 24-hours depending on the amount of limescale.
- Pour the white vinegar liquid down the sink. Rinse the water tank with clean cool water to remove any build up that came loose as a result of the descaling process and pour liquid down the sink.
 You may like to repeat this process to remove any residual build up or white vinegar.
 - Follow instructions under 'Set up' to perform a final cleaning cycle.
**You may need to repeat the process f you have stubborn bits of limescale that weren’t cleared the first time**
The machine is making a continuous beep. What can I do to fix this?
It sounds like the jug and lid aren’t assembled correctly. Simply remove the jug and ensure the lid is locked in, then place the jug back in the machine and lock in place using the locking dial. This should do the trick.
Why are there still lumps in the food?
If you’re finding that lumps are still in the food after blending, try adding some cooled water and blending for a short time again. To prevent this happening on the next blend cycle, add the desired amount of water before you begin.
The blade's moving during a steam cycle - is this normal?
It’s perfectly normal for the blade to turn during a cycle. It does this to encourage the food to circulate, so that the food is steamed evenly.
My jug looks cracked - can I get a new one?
Under general use - marks, which look like hairline cracks in the base of the jug, can appear. These marks are known as ‘flow marks’. The cracks situated on the underside of the jug are caused in part because of the heat and vibration that it’s subjected to through it’s normal lifecycle.
To identify if cracks are in fact flow marks, whilst taking care, gently feel the affected area (please be extremely cautious here as if they are cracks, they may be sharp). If the crack cannot be felt when touched, they’ll be flow marks, which means that you can keep using the machine as normal. If you can feel a crack, or if it’s obvious without touching the area, come and chat to us in your preferred way – you can choose one of the 3 options in our contact area.
How to use the Baby Food Steamer Blender
Tommee Tippee Explora Baby Food Blender, Babies & Kids, Nursing & Feeding, Weaning & Toddler Feeding on Carousell
Babies & Kids
Nursing & Feeding
Weaning & Toddler Feeding
Tommee Tippee Explora Baby Food Blender
Used
Mailing · Meetup
Singapore
Description
Posted
6 years ago
Used twice- just blender carrots Malay family if you are looking for baby blender coming from a muslim home Instructions leaflet available
Meet-up
Meet the seller
Lina Atan
@naked_mondaysJoined 7 years ago
Verified
Reviews for @naked_mondays
5.0
(
36
)
@brick_of_life∙11 months ago
Highly recommend. Very easy-going and understanding buyer. Decisive and made payment quickly. Really appreciate your deal and hope to deal again next time!
@broccoliandbrendy∙2 years ago
fast transaction & very prompt replies ! thank you for the smooth deal !
@papafcb∙2 years ago
seller was very helpful in giving pictures and good deal. really nice! items are clean and in great condition. Trust worthy and highly recommended 👍
Moony Tape Diaper L Size
S$20
Read all reviewsLina Atan@naked_mondays
5.0
(36 reviews)
Follow us
Blog
Carousell College
Cars & Property
Cars
Car Accessories
Property
Motorcycles
Jobs & Services
Jobs
Lifestyle Services
Business Services
Home Services
Learning & Enrichment
Fashion
Women's Fashion
Luxury
Men's Fashion
Beauty & Personal Care
Others
Everything Else
Bulletin Board
Following
Free Items
Home & Living
Furniture & Home Living
Babies & Kids
Health & Nutrition
Food & Drinks
Pet Supplies
Electronics & Mobiles
Computers & Tech
Video Gaming
Mobile Phones & Gadgets
Audio
Photography
TV & Home Appliances
Hobbies & Games
Toys & Games
Music & Media
Books & Magazines
Stationery & Craft
Memorabilia & Collectibles
Travel
Sports Equipment
Tickets & Vouchers
© 2022 Carousell
Help Centre
Contact Us
Press
Jobs
Advertise with Us
Terms
Privacy
English繁體中文 (台灣)繁體中文 (香港)Bahasa Indonesia
Tommee Tippee Baby Food Steamer Blender Instruction Instruction Instruction
9000 27 2021
Leave a comment for the Tommee Tippee Baby Power 9000
Build BY USE
IMPORTANT NOTICE FOR CLEANING AND REASSEMBLY
Do not clean the knife, o-ring and circlip in the dishwasher. If you notice any wear and tear on your device, please stop using it and contact us at www.tommeetippee.com
IMPORTANT WARNINGS!.
These instructions can also be found at www.tommeetippee.com
Please keep these instructions for future reference as they contain important information.
This appliance is intended for domestic use only. Do not use outdoors.
Before connecting the steamer blender for the first time, check that the tage is compatible with your electrical system, check the label on the base of the appliance.
Before switching on, make sure that water has been added to the device.
Do not immerse in water to prevent fire, electric shock and personal injury. Do not immerse the cord, plugs or other parts of the device in water or other liquid. Improper use of the product may result in fire, electric shock and/or injury.
This appliance must not be used by children. Keep the appliance and power cord out of the reach of children.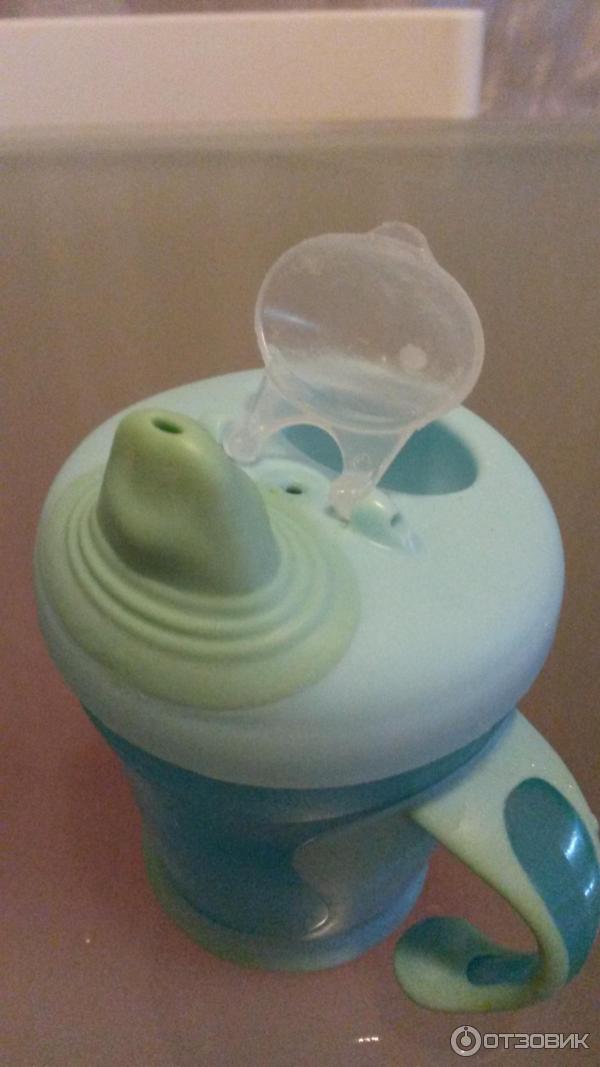 Make sure the cord does not hang over the edge of the kitchen worktop or touch hot surfaces. The product is equipped with a winding cord at the base of the device so that you can safely adjust the length of the cord. It is recommended that the cord be as short as possible.
The devices may be used by persons with reduced physical, sensory or mental capabilities, or lack of experience and knowledge, if they are supervised or instructed in the safe use of the device and understand the dangers involved.
Do not allow children to play with this device.
This product does not require any maintenance other than cleaning and descaling. Children should not carry out cleaning and maintenance.
Surfaces may become hot during use.
After use, the surface of the heating element is exposed to residual heat.
Do not touch hot surfaces, use handles and handles.
Steam blender contains hot water and steam when used. Keep your hands away from the steam holes as this can cause burns and burns. Use in a well ventilated area. Be careful if hot liquid is poured into the blender, as it may fly out of the appliance due to the sudden release of steam.
Follow the heating recommendations so that the food does not heat up for too long.
Always check food temperature before feeding. Always stir heated food to ensure even heat distribution and check the temperature before serving.
Do not use the appliance with a damaged cord or plug, or after the appliance has malfunctioned or been damaged in any way. If the power cord is damaged, it must be replaced by a qualified person to avoid a hazard.
Always use on a flat heat resistant surface.
Do not move the instrument while it is in use.
Do not use any accessories other than those supplied with this device. Always unplug the instrument from the power source when it is left unattended and before assembling, disassembling or cleaning. Turn the appliance off and unplug it from the mains before changing accessories or near moving parts. Allow to cool before removing or putting on parts and before cleaning the appliance.
Handle the knife blade with care as it is very sharp. Be careful when handling sharp cutting blades, when emptying the bowl, and when cleaning.
Before first use, before each use and after each use, wash the bowl and lid in warm soapy water or use the dishwasher (top shelf only) and dry thoroughly. Wash the knife blade in warm soapy water and dry thoroughly. The knife blade cannot be washed in the dishwasher.
Do not fill above the maximum fill level indicated on the Max product, 500 ml.
Any questions? Visit our website www.tommeetippee.com
report this ad
INSTALLATION
Please read the instructions before use and remember to clean and descale regularly.
- Wash the blade, container and lid in soapy water, dry and place the instrument on a clean, dry work surface.
 To remove the blade, hold the blade tab inside the block by turning the retaining ring on the bottom of the container. (I) This will remove the retaining ring and the blade will split in two. To reassemble, follow these steps in reverse order.
WARNING! Handle the knife blade with care as it is very sharp. Be careful when handling sharp cutting blades, when emptying the bowl, and when cleaning.
Insert the container with the lid into the device and secure it with the fixing disk. (B + C) - Fill the water tank with 450 ml of cold water and close the lid. (D)
- Connect the device to the mains, the power button light will flash. Press the power button to turn on the device. The power button LED will continue to flash and the LCD will light up. (E)
- Press the steam button and set the steam time to 30 minutes using the + buttons. (F)
- Press the mixing button and set the mixing time to 30 seconds using the + buttons. (GRAM)
- Press the power button to start.
 (HOUR)
The appliance will now automatically start the steam and mix cycle. - At the end of the cycle, the machine will beep, the LCD will turn off, and the power button will flash.
Switch off the power supply, unplug the instrument and allow it to cool completely. Unblock the container, remove any remaining water and clean the container following the instructions in the cleaning section. Drain any remaining water from the water tank by tilting the unit sideways over a sink. - The device is now ready for use.
CLEANING AND DESCALING
The descaling process removes calcium deposits and other minerals from the system that can affect its operation.
CLEANING
Switch off the power supply, unplug the appliance and allow it to cool completely before cleaning. Before first use, before each use and after each use, wash the container and lid in warm soapy water or use the dishwasher (top shelf only) and dry thoroughly. Wash the blade, o-ring and retaining ring in warm soapy water and dry thoroughly.
PLEASE NOTE THE BLADE, O-RING AND RETAINING RING DO NOT dishwasher safe.
WARNING! Handle the knife blade with care as it is very sharp. Be careful when handling sharp cutting blades, when emptying the bowl, and when cleaning.
After each use, wipes the entire base with advertising.amp cloth, but does not submerge in water.
Do not clean with abrasive cleaners and avoid contact with solvents or harsh chemicals as damage may result.
DESCALING
We recommend descaling every 4 weeks. If you notice limescale earlier than 4 weeks, you may need to clean it up sooner. If you live in an area with hard water, scale builds up faster than in other places. You can check the quality of your water with your water supplier.
When descaling after a steam cycle, allow the appliance to cool completely before descaling.
- Drain the remaining water from the water tank by tilting the unit sideways over a sink.
- Pour in 250 ml of white vinegar.
- Leave for at least 30 minutes or up to 24 hours, depending on the degree of limescale.
- Pour white vinegar down the sink. Rinse the water tank with cool water to remove any buildup left by the descaling and drain the liquid down the sink. You can repeat this process to remove any remaining plaque or white vinegar.
- Follow the instructions in the Setup section to complete the final cleaning cycle.
You may need to repeat this process if you find that limescale is still present.
USING
For your baby's safety, always check food temperature before feeding.
This unit can steam and mix vegetables, fruits (peeled and de-pitted/pitted), meat and fish (boneless). All foods must be cut into cubes of approximately 2-3 cm before being placed in the cooking container. Cooking times can be found in these instructions, as well as on the recipe site. tommeetippee.com
- Place the appliance on a dry kitchen worktop.
 Place the container of diced food into the block (B) and lock in place with the locking disc. (C) Steam no more than 200g per cycle. Fill the water tank with 450 ml of cold water and close the lid. (D)
 - Connect the device to the mains, the power button LED will blink. Press the power button to turn on the device. The power button LED will continue to flash and the LCD will light up. (E)
3. CYCLE OPTIONS
3.1 TO SET THE AUTOMATIC STEAM MIXING CYCLE:
i. Press the steam button and set the steam time using the +/- buttons. The maximum steaming time is 30 minutes. (F)
II. Press the mixing button and set the mixing time using the +/- buttons. The maximum mixing time is 5 minutes. (GRAMS)
iii. Press the power button to start. The device will now automatically start the steam and mix cycle.
When setting up an automatic cycle, you can set the mixing time first, but the unit will always start the steam cycle first. During the automatic steam and mix cycle, the paddles will rotate every 2 minutes to move the food around the container. When cooking meat, it is extremely important to stop the machine every 10 minutes and mix the food thoroughly. This is necessary for even cooking.
Mixing time can be set to 2, 4, 6, 8 or 10 seconds to control product texture.
3.2 HOW TO SET THE CYCLE FOR STEAM ONLY:
i. Press the steam button and set the steam time using the +/- buttons. The maximum steaming time is 30 minutes. (F)
II. Press the power button to start. The unit will now operate on a steam cycle.
To remove the blade, hold the blade tab inside the block by turning the retaining ring on the bottom of the container. (I) This will remove the retaining ring and the blade will split in two.
WARNING! Handle the knife blade with care as it is very sharp. Be careful when handling sharp cutting blades, when emptying the bowl, and when cleaning.
3.3 HOW TO SET THE CYCLE FOR MIX ONLY:
i. Press the mixing button and set the mixing time using the +/- buttons. The maximum mixing time is 5 minutes. (GRAM)
II. Press the power button to start. The device will now start the mixing cycle.
Mixing time can be set to 2, 4, 6, 8 or 10 seconds to control product texture.
4. At the end of the cycle, the machine will beep, the LCD will turn off, and the power button will flash.
Water will collect in the container during steam cooking. In stage 1 weaning, when the consistency of the food should be uniform, we recommend that you stir this nutrient-rich water. In later weaningtags, i.e. when thicker textures are required, we recommend removing some/all of this water depending on your baby's preference. . Leave the device for 2 minutes before opening the container and pouring food into storage. Be careful when removing the container and lid, as steam may still be present and the container may feel hot to the touch.
5. Switch off the device from the power supply and remove the plug from the socket.
Remove blade from container and lid and wash all parts with warm soapy water. To remove the blade, hold the blade tab inside the block by turning the retaining ring on the bottom of the container. (I) This will remove the retaining ring and the blade will split in two. To reassemble, follow these steps in reverse order.
WARNING! Handle the knife blade with care as it is very sharp. Be careful when handling sharp cutting blades, when emptying the bowl, and when cleaning.
6. If you are cooking another batch of food immediately, be sure to add more water to the water tank.
ADDITIONAL FEATURES
PAUSE
To pause in the middle of a cycle, press and hold the steam button and mix buttons simultaneously for three seconds until the unit beeps. The power button will flash. This will pause the cycle indefinitely. During this time, the container can be removed. Press the power button to continue the cycle.
CANCEL
To stop a cycle in the middle of a cycle, press the power button for three seconds until the device turns off.
SOLUTION
1. Do not use the device for any purpose other than that intended. This unit is not suitable for:
- Cooking rice, noodles and pasta
- Heating liquids, soup or water
- Grinding solid ingredients such as ice cubes and sugar cubes.
- Frozen food preparation
- Defrosting and reheating or keeping food warm
- Heating baby food jars
- Heating bottles
3. During the automatic steam and mix cycle, the blades will rotate to circulate the food. The device is designed for this and is a normal part of the cycle.
4. After setting a single steam and mix cycle, steam only or mix, if the container was not assembled correctly and the power button was pressed to start the cycle, a continuous beep will sound.
5. The device will not start working if the lid is not closed on the container until it is fixed.
6. If the container is loosened or removed from the device during a cycle, it will automatically stop and an audible signal will sound for 10 seconds. The cycle will pause and the instrument will return to standby until the container is returned and locked in place. To continue the cycle, press the power button.
7. In the unlikely event that the water tank boils over during steam cooking, the unit will beep, stop automatically and display "E001" on the LCD. If this happens, start a new cycle and change the food. Unplug the appliance, let it stand for 2 minutes before filling the water tank with 450 ml of cold water. Reinstall the cycle following the instructions in the usage section.
8. Quickly set the timer by holding the + and - buttons.
9. If you find that your machine is not working as efficiently as it used to, we recommend that you carry out the descaling process, as limescale may form on it.
Model number: 1120. Voltage: 220-240V, 50/60Hz, 630W. ~
Copyright © Jackel International Limited 2015-17.
Jackel International Limited trading as Mayborn Group
Northumberland Business Park West
Cramlington Northumberland
NE23 7RH, UK
Tommy Tippy is a registered trademark of Jackel International Limited. Jackel International Limited reserves all intellectual property rights in this product, packaging and printed or electronic media, including all 2D and 3D designs, graphics, logos and text. Jackel International Limited is registered in England and Wales under company number 01894022.
Any production, publication, copying, hire, provision or reproduction of any material is strictly prohibited and constitutes a violation of rights.
International patent applications are pending.
Waste Electrical and Electronic Equipment (WEEE) Information This symbol on products and accompanying documents indicates that used electrical and electronic products should not be mixed with general household waste. For proper disposal for processing, recovery and recycling, please take these products to designated collection points where they will be accepted free of charge. In some countries, you may be able to return your products to your local retailer after purchasing a new product.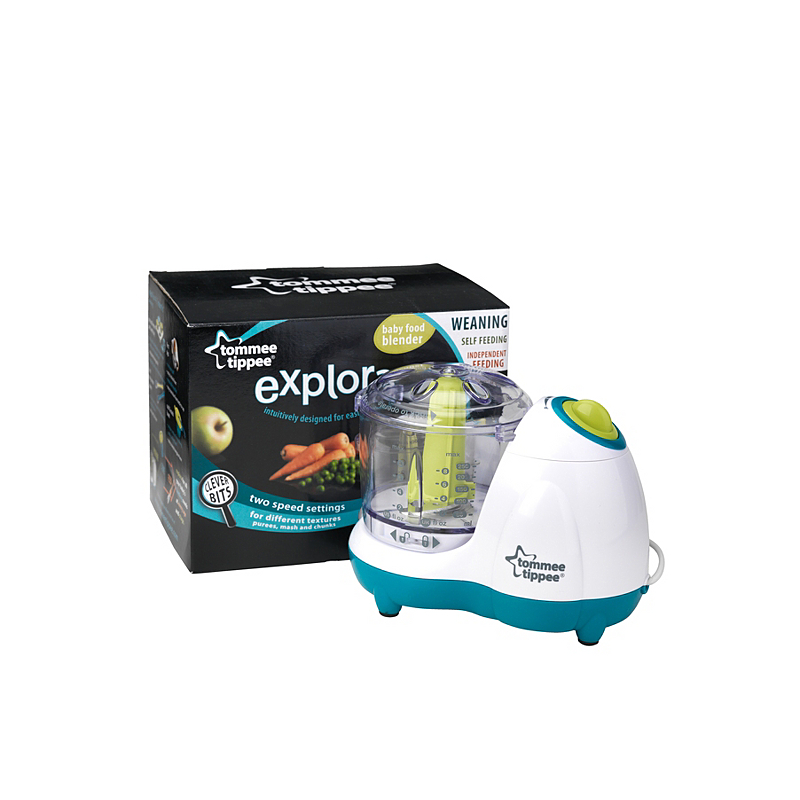 Proper disposal of this product will help you save valuable resources and prevent any potential impact on human health and the environment that could otherwise result from inappropriate waste handling. Please contact your local authorities for more information on your nearest WEEE collection point. Penalties may apply for improper disposal of this product in accordance with national laws. The product is equipped with a 13A fused BS 1363 mains plug. If it ever becomes necessary to replace a fuse, use only fuses marked BS 1362 with a rating of 13A. In the unlikely event that this plug does not fit the outlets in your home, remove it and install a suitable plug as follows: The wires of the power cord are colored according to the following code: GREEN AND YELLOW - EARTH. BLUE - NEUTRAL. BROWN - LIVE Since these colors may not match the color codes sometimes used to identify the terminals in the plug, connect them as follows. The wire colored GREEN YELLOW must be connected to the terminal marked E or the earth symbol, or colored GREEN or GREEN YELLOW.
 The BLUE wire must be connected to the terminal marked N or BLACK. The BROWN wire must be connected to the terminal marked L or colored RED. If in doubt about how to safely connect the plug or replace the fuse, consult a qualified electrician.
5. PREP AND MIX TIME
Every moment you spend with your baby is precious, so hours spent cooking and cleaning may not be on your list.
To help you through the weaning process, for more information on the Tommee Tippee Baby Food Steamer and recipes, go to www.tommeetippee.com
The Department of Health recommends not introducing solid foods until after 6 months.
Although you can start earlier (but not before 4 months) if your doctor or therapist advises.
Any questions?
Visit our website www.tommeetippee.com
Please read and save this important information for future reference.
Brochure # 0440055
report this ad
Tommee Tippee Steamer Baby Food Instruction Manual - Download [Optimized]
Tommee Tippee Steamer Baby Food Blender Instruction Manual - Download 9Tommee Tippee Filter by
View product list Cheapest at the top
%
https://pigu. lt/en/t/pigueurai'> RETURN PIGU-EURO
18 99 €
Add to cart
4.9/5
PICK UP TOMORROW
TOMMEE TIPPEE milk formula filter...
Brand: Tommee Tippee
%
https://pigu.lt/en/t/pigueurai'> RETURN PIGU-EURO
7 66 € / month 58 49 €
Add to cart
Thomson THFS219DX
Trademark: Not specified
%
https://pigu.lt/en/t/pigueurai'> RETURN PIGU-EURO
5 20 € / month 39 68 €
Add to cart
Kiwi 400W
Brand: Kiwi
It is very important for all parents that their child grows up healthy and active, and this, first of all, depends on proper and nutritious nutrition, which is enriched with vitamins and minerals. Therefore, to make it easier for you to prepare healthy and nutritious meals for your child, manufacturers of children's products recommend purchasing specially designed devices that have a lot of useful functions, properties, and are also very compact and high quality.
Steamer-Blender
Compact and great helper for parents of small children, as it can be used to prepare healthy food for steaming, as well as grind food to a puree state, which is very important when feeding babies, especially if this is the first food. Now the Philips Avent steamer is very popular , which is easy to use and the whole cooking process takes place in one jug. First, steamed products are cooked in this jug, and then, lifting and turning the jug, the cooked products are crushed to the desired consistency;
Multifunctional cooking devices
These devices not only steam and grind healthy food, but also perform functions such as cooling, heating and sterilization.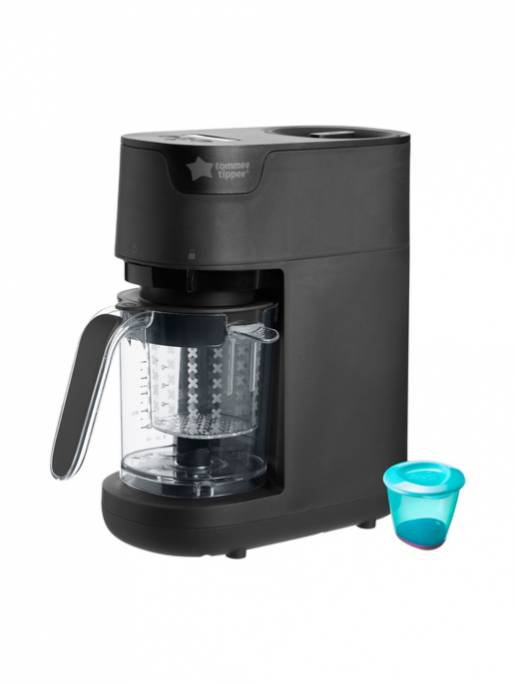 Among such devices, manufacturers such as: Philips Avent, Miniland and Badabulle are popular;
Milk formula maker
With this device, you can prepare milk for your baby, the desired consistency and temperature, in less than 2 minutes. Also, this machine kills all bacteria in the water during the preparation of milk formula, is easy to use, easy to clean and suitable for all types and volumes of bottles.
Are you looking for a steamer blender for baby food? Or maybe you are interested in multifunctional devices? Then we recommend that you familiarize yourself with our range, in which you will find high-quality and reliable devices that will become your main assistants in the kitchen. We offer products from well-known manufacturers ( Philips Avent, Tommee Tippee, Babymoov, Badabulle, Miniland ) at affordable prices, and you also have the opportunity to choose convenient home delivery, thereby saving your time and getting your purchase in the shortest possible time.