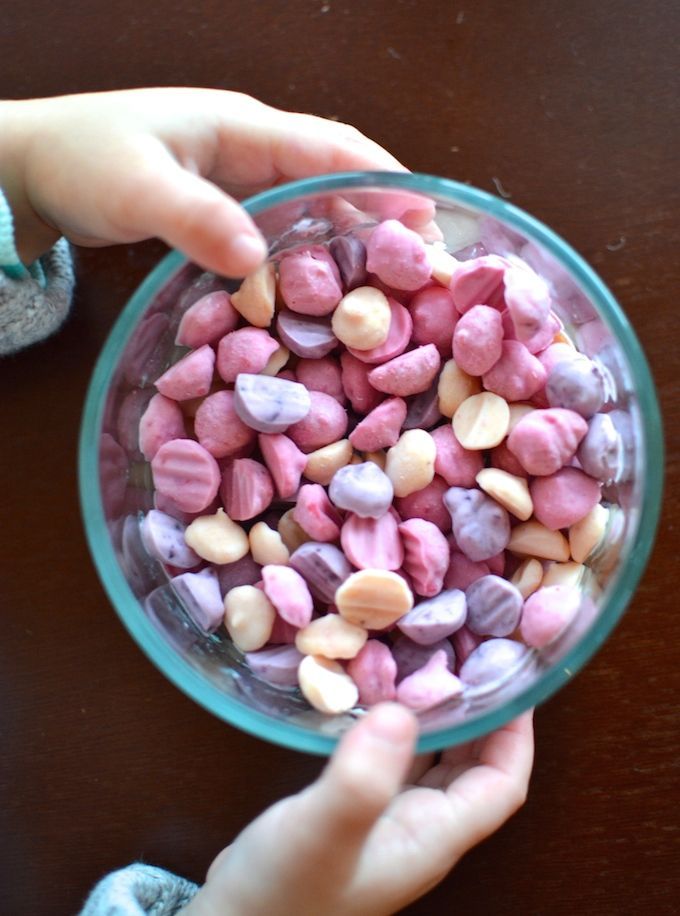
Baby food drops
Frozen Baby Food Dots Recipe
Posts may contain affiliate links, meaning that I may earn a commission if you use a link provided.
Jump to RecipeThis frozen baby food dots recipe post was sponsored by Beech-Nut® Naturals™.
Frozen baby food dots are an easy finger food idea perfect for teething toddlers and self-feeders.
This baby food hack has been a total game changer in our house, so I wanted to take a minute to share it with you all today.
These frozen fruit and vegetable dots couldn’t be any easier to make, made with just one household staple – Beech-Nut® Naturals™ baby food purees.
Finger Food for Toddlers
If your toddler is anything like my little guy, he would much rather feed himself than have mommy or daddy spoon feed him.
While he gets plenty of practice feeding himself, there are times when we would rather avoid the inevitable mess that goes along with learning how to use to spoon.
That is why I love these baby food dots. They are the perfect finger-food for self-feeders like our little guy.
Easy Way to Get Your Toddler to Eat More Veggies
It doesn’t hurt that baby food dots are also a great way to sneak more vegetables into our son’s diet.
Nathaniel typically refuses vegetables such as zucchini, peas, and carrots, but he will happily eat any flavor of Beech-Nut® Naturals™, which are purees made with real fruits and vegetables without anything artificial. I literally have yet to find a variety that he doesn’t enjoy.
Turning a jar of baby food into frozen dots is such an easy way to make sure he is getting the nutrient-rich veggies that his little body needs.
Great Way to Use Up Extra Baby Food
Has your toddler started refusing baby food now that they moved up to finger foods?
Luckily, our son still loves his baby food purees, but I know some babies begin to refuse purees one they start self-feeding.
Making a few batches of frozen baby food dots would be a great way to use your jars of baby food to make something that your child can feed themselves.
Great for Teething
I have also found that these frozen fruit and veggie dots are an awesome treat for when my son is teething.
The cold baby food dots must feel great on his sore little gums, and likely help to give him some relief.
How to Make Frozen Baby Food Dots
As I said, making these baby food dots really couldn’t be any easier. All you need are some supplies that you most likely have at home and one ingredient — baby food.
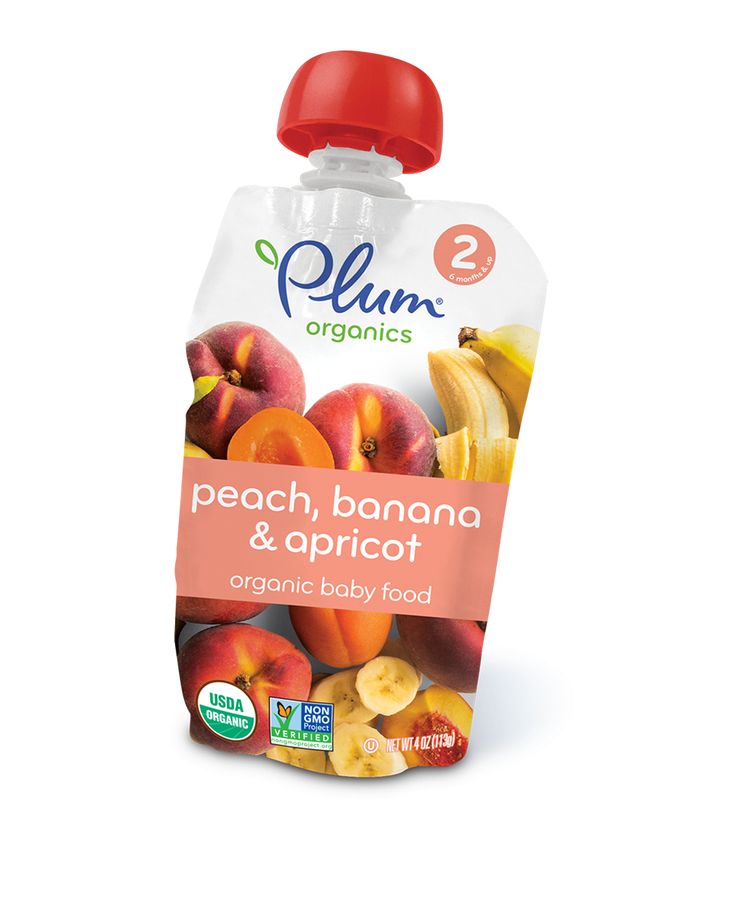
In our home, we love Beech-Nut® Naturals™ — their delicious baby food purees are 100% natural, nothing artificial.
Inspired by homemade, Beech-Nut® Naturals™ are made with real fruits and vegetables, just like you would use at home.
Some of our favorite Beech-Nut® Naturals™ varieties for making frozen baby food dots are:
- Just Carrot, Corn, & Pumpkin
- Just Pear & Blueberry
- Just Spinach, Zucchini, & Peas
- Just Apple & Kale
- Just Sweet Corn & Green Beans
But feel free to use whatever varieties you like!
As far as supplies, here is everything that you will need:
- sandwich baggie
- scissors
- wax paper or parchment paper
- baking sheet
Start by lining your baking sheet with wax paper.
Then, spoon the baby food into a sandwich baggie.
Tip: place the baggie in a mason jar to hold it open
Use scissor to clip off just the corner of the baggie. Be careful not to cut too much!
Pipe small dots of baby food onto the lined baking sheet. Each dot should be just a little bit larger than a chocolate chip.
Once you have finished piping, place baking sheet in the freezer to let the dots freeze up. Once frozen, transfer to an airtight container and store in freezer. Remove as needed and serve immediately.
The dots do begin to melt quickly after being removed from the freezer, so I like to remove just a couple at a time, then go back and grab more as he finishes them up.
One 4 oz jar of Beech-Nut® Naturals™ will make approx. 50 frozen baby food dots.
I hope your little one enjoys these tasty snacks!
Remember, always consult with your pediatrician before introducing new foods to you baby. Only a medical professional can determine whether a food is age appropriate and safe for your baby.
Ingredients
- 4-oz jar Beech-Nut® Naturals™ (any variety)
Instructions
- Line a baking sheet with wax paper.
- Spoon baby food into sandwich baggie and snip the corner very slightly.
- Pipe small baby food dots onto lined baking sheet.
- Place baking sheet in freezer until dots are frozen, at least 1 hour.
- Quickly transfer to an airtight container or baggie and place back in freezer. Remove as needed for serving.
Easy Yogurt Melts for Baby (plus, 4 feeding tips!)
These 2-Ingredient Yogurt Melts are great for your baby and toddler! Serve as a cold refreshing treat, as a gumming tool to help ease teething pain, or for a quick yummy snack! These melts are easy to make and full of essential nutrients for growing baby. Great for 8+ months!
Medically reviewed and co-written by Jamie Johnson, Registered Dietitian Nutritionist (RDN), and Lauren Braaten, Pediatric Occupational Therapist (OT).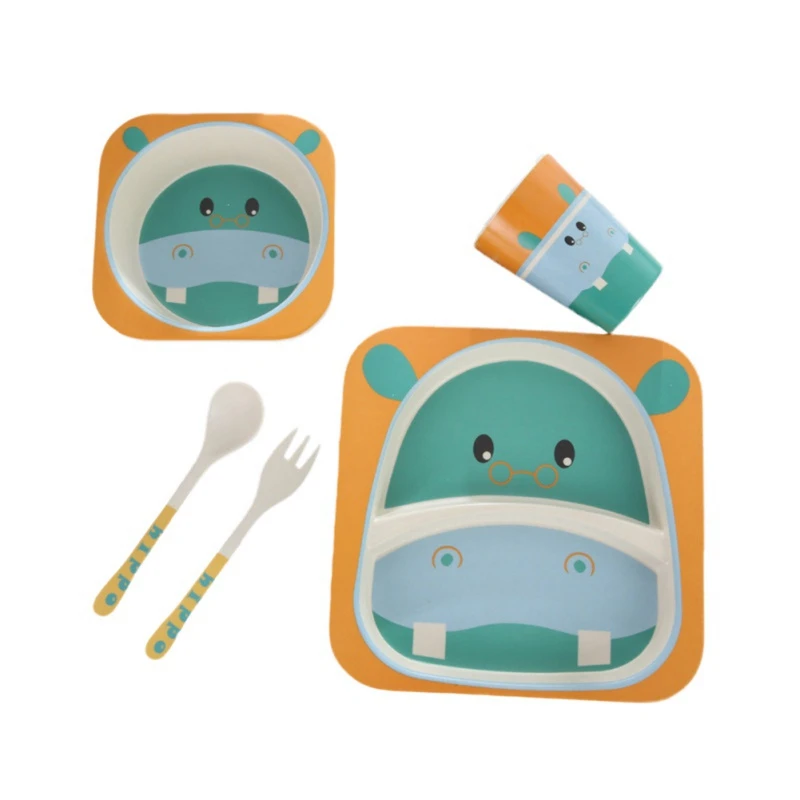
Baby Yogurt Melts
Looking for an easy DIY version of the store bought yogurt melts for your baby?
Then this recipe is for you!
These melts only require 2 ingredients and take 10 minutes to make! They are not the same freeze-dried melts that you will find at the store, but to me these yogurt melts are so much better! These yogurt melts are made with fresh ingredients and are great for babies and toddlers to help work on their pincer grasp, ease teething pains, and are a deliciously tasty bite for a snack or part of a meal.
Yogurt Melt Video
Watch this video to see how easy it is to make these homemade yogurt melts!
Just getting started on making your own baby food? Then, I would suggest that you start by reading my very in-depth Guide on how to Make Homemade Baby Food – which goes over all the important information such as the best cooking tools to have on hand, safe storage, how to know when baby is ready for solids, how to introduce purees, the best first foods for baby, and more! If you are doing Baby-Led Weaning, then be sure to check out my Complete Guide to Baby-Led Weaning – which covers what exactly is baby-led weaning, to every parent’s concern of baby-led weaning and choking, this guide goes over it all. I will also share how to know when baby is ready for BLW, the top 10 best first foods, a helpful sample blw feeding schedule, helpful tools to have on hand, and much much more!
Want more information? Then make sure to check out my best-selling cookbook for even more information and recipes!
Reasons to Love these Frozen Yogurt Melts
- Simple 2-ingredient recipe
- Cold treats for soothing teething pain for babies or toddlers
- Healthy – with no added sugar
- Helps older babies and toddlers work on their pincer grasp
- Easy to change up flavors
- Great for picky eaters
- Easy to make a big batch and freeze for quick snacks
- Can be made dairy-free as needed
Ingredients
Make sure to read the recipe card below for full ingredients and instructions!
- Yogurt: try to use a thicker plain whole milk yogurt such as Greek or Australian style, so the melts will stay in their disc shapes while freezing.
 You can also use a plant-based yogurt if you prefer. If your yogurt gets too thin while working with it, simply put it back into the fridge for 10-15 minutes to firm back up.
 - Baby Puree: you can use any store-bought or homemade baby food purees that you like.
Health Benefits of Yogurt for Babies
Yogurt boasts many health benefits for babies since it is full of nutrients babies need for healthy development.
- Calcium- which is needed for growing bones and teeth
- Full of fat (if buying full fat or whole milk yogurt, which is recommended)- essential for brain development, metabolism and the immune system
- Probiotics- helps to establish a healthy microbiome in baby’s rapidly developing gut
- Protein- to help support muscle growth and development
Step-by-Step Instructions
- Line a baking sheet with parchment paper or a silicone mat.
- In a small bowl, mix the yogurt and baby food puree until completely incorporated.
- Spoon the yogurt mixture into a resealable baggie or piping bag and cut the very end of the bag off. At any point your yogurt blend becomes too thin or runny; simply put the baggie back into the fridge for a couple of minutes to harden back up.
- Squeeze small round discs into rows onto the baking sheet. When the baking sheet is full, place the baking sheet into the freezer for 4 hours or overnight.
- Pop the melts off of the parchment paper and store them in an air-tight container. These melts do melt rather quickly so it’s best to only take out a couple at a time.
Feeding Tips for Baby
- Let the yogurt melts sit at room temperature for 1-2 minutes to thaw a little before giving them to your baby. If the yogurt melts are too solid, there is a risk of choking. You can also check and see how quickly they melt in your mouth before giving them to your baby.
- You can also put a few melts in a mesh or silicone teether.
- Offer your baby plenty of opportunities for teething toys, as these encourage jaw and tongue movements necessary for chewing.
 And getting into the habit of brushing teeth regularly not only helps with good oral health, but also provides sensory awareness for oral motor skills.
 - Start setting up consistency and structure for meal times from the beginning. This can include when (timing) and where you offer foods, as well as providing a variety in what you offer. These will help your baby develop the foundation for recognizing hunger and fullness cues.
Frequently Asked Questions
Are yogurt melts good for babies?
Yes! These two ingredient yogurt melts have no added sugar, plus they are a cold treat that can help ease teething pain. They are perfect for babies around 8+ months.
Can baby choke on yogurt melts?
As with any food for your baby, always supervise when giving yogurt melts. We recommend letting the yogurt melts sit at room temperature for 1-2 minutes to thaw a little before giving them to your baby. If the melts are too solid, there is a risk of choking. You can check and see how quickly they melt in your own mouth before giving them to your baby.
Can toddlers eat yogurt melts?
Yes! In fact, yogurt melts can be a fun and subtle way to introduce new flavors to a toddler who’s in the midst of a picky eating phase. You can create all kinds of fun colors and flavor combinations, like spinach + banana or mixed berry.
How to Store Yogurt Melts
Yogurt melts should be stored in an air-tight container in the freezer for up to 4 months.
Purees you Can Use for this Recipe
The wonderful thing about these baby yogurt melts is that you can use leftover homemade baby food puree. Or you can make the process even easier and use store-bought purees. Here are some of our favorite homemade baby food purees:
- Peach Baby Puree
- Creamy Mango-licious Baby Food Puree
- Spinach + Apple Baby Food Puree
- Blueberry Baby Food Puree
- Apple, Raspberry + Vanilla Baby Food Puree
- Banana, Cherry + Beet Baby Food Puree
The flavors I used for these yogurt melts are:
- Red: steamed beets and strawberries
- Orange: steamed carrots and mango
- Yellow: mango and banana
- Green: steamed apples and kale
- Purple: steamed apples and blueberries
Recipe Tips
- For toddlers over the age of one, you can add in a teaspoon of honey for a sweeter treat.
- Use a spatula instead of your hands to help avoid melting while transferring to a freezer-safe container.
- These creamy treats do melt rather quickly, so it’s best to take out only a few at a time when eating.
- 1/2 cup plain whole milk yogurt
- 1-2 tbsp baby food puree, homemade or store-bought
Prep: Line a baking sheet with parchment paper or use a silicone mat.
Mix: In a small bowl, mix together the Greek yogurt and baby food puree until completely incorporated.
Prep Pipping Bag: Spoon the yogurt mixture into a resealable baggie or piping bag and cut the very end of the bag off.
 At any point your yogurt blend becomes too thin or runny, simply put the baggie back into the fridge for a couple of minutes to harden back up.
Dot: Squeeze small round discs into rows onto the baking sheet. When the baking sheet is full, place the baking sheet into the freezer for 4 hours or overnight to harden.
Store: Pop the melts off of the baking tray and store them in an air-tight container. These melts do melt rather quickly so it's best to only take out a couple at a time.
Age: 8+ months. For toddlers over the age of one, you can add in a teaspoon of honey for a sweeter treat.
Flavors: I made several different flavors of these melts at the same time, but you can easily stick with one flavor of melts to save you time and make less dishes.
Storage: in an air-tight container in the freezer for up to 4 months
Nordic Ware Baking Sheet
Bumkins Baby Bowl
Bumkins Sleeved Bib
Did you make this recipe?
Tag @babyfoode on Instagram and hashtag it #babyfoode!
Pin <em>Recipe</em> Email <em>a Friend</em>
First aid kit on holiday with children
Neuroprofi
Publications
Vacation first aid kit
For kids Author: Vinogradova Marina Valerievna
Pediatrician. Doctor of the highest category
Dear mothers, the long-awaited moment has come when you are going on vacation with your baby. Things are packed, but, as always, at the last moment we remember the first aid kit. Moreover, it is necessary to take care not only of the baby, but also of the parents. Departure in the morning, most of the pharmacies are already closed, and you need to take a lot on the road. Many hope for insurance, but we are going on vacation, and in order not to overshadow the rest, let's take everything we need with us, prepare everything in advance, without fuss, for all emergency situations. nine0003
- Antipyretics : nurofen, paracetamol (efferalgan, cefecon). These drugs have both analgesic and anti-inflammatory effects. Allowed from 3 months. Moreover, an increase in temperature on vacation can be both a consequence of heat or sunstroke, and against the background of a viral (bacterial) infection. As a rule, all modern dosage forms have special dispensers designed for the weight of the child. They can be in a variety of dosage forms: syrups, suppositories, tablets, capsules. Combined forms (ibuklin) are very convenient. If you are confused, then paracetamol is prescribed at a dose of 10-15 mg / kg. after 4-6 hours, and Nurofen - 5-10 mg / kg. after 6-8 hours. Therefore, combined forms are more convenient. Paracetamol works faster and Nurofen lasts longer.
 We take only one drug! nine0022
 - Don't forget to take thermometer !
- Antiallergics . It must be remembered that they are also available in various forms: syrups, tablets, gels, drops, ointments ... the active ingredient is 1-cetirizine, the names of the drugs are different: cetrin, zodak, zyrtec. They are given 1 time per day, they are of prolonged action.
Loratadine (Claritin), desloratadine (Erius) others, Zyrtec, Zodak - from 6 months. But fenistil is allowed from the first month. We take one drug. nine0030 I would recommend moms to take suprastin too. This is a first-generation drug, in emergency situations it works quickly, though it has a sedative effect. As a doctor, I always take an ampoule of dexamethasone and a syringe with me, in case of urticaria, Quincke's edema, we immediately inject it into / m, and do not be afraid to make a mistake with the dose, because the range goes from 2-3, and in severe cases up to 8 mg /kg weight. We need to provide only emergency assistance, the doctor will prescribe the rest.
- If a situation arises with external manifestations of allergies, a rash, we use bepanten, fenistil gel, and older ones - advantan, triderm, pimafucourt, elidel, la cree . We take one thing, preference for what the child used at home.
- Be sure to take the baby daily moisturizing cosmetics , from the Lipikar, Mustella, from the La Roche Pose series. We also take only one drug. We are going to rest, not to be treated.
- Tummy ache, nausea, vomiting, diarrhea? Be sure to collect sorbents and preparations for oral rehydration in the first-aid kit (we take only one preparation). Do not burden yourself, you can always buy more. Of the sorbents, we give preference to enterosgel, smectite, polysorb. For rehydration, rehydron, human electrolyte, biogaya ORS are suitable, solder slowly, gradually, in doses, 1 tsp every 5 minutes. We follow a dairy-free diet. Drinking plentiful, at the rate of 20-30 ml. per kg of weight. If the child does not retain water, vomiting continues, call an ambulance, infusion therapy is needed, there is a risk of dehydration.
 This is an emergency. nine0022
 - Stopped vomiting, but liquid unstable stools persist - we take enetrofuril, enterol . I would also advise taking enzymes (creon or microzyme), probiotics (normobact, baxet, florc. linex ...) They are in the form of drops, sachets, capsules. When packaging probiotics, refer to the packaging for storage conditions. Many drugs require temperatures up to 15 degrees Celsius.
- This can be put in the trunk. But with you on a plane or in a car, you need to take dramin (air-sea) . Dramina can be used from the age of 3. At the same time, during takeoff and landing, an infant can be given breast milk, an older child can be sucked on lollipops, for ear pain, otipax is dripped, and vasoconstrictor drops are used in the nose. Just distract the child, talk calmly, confidently.
- So we come to the topic of drops. Be sure to put in the first aid kit vasoconstrictor drops in the nose (Nazivin, Otrivin, Tizin ...), drops in the ears (Otipax, Anauran .
 ..), drops in the eyes (sulfacyl sodium, Vizin, Tobradex ...). There was a situation when a child developed a clinic of contact conjunctivitis on the 1st day from a long stay in the pool, the sea. The family is abroad, it's a day off, it's a long way to the nearest pharmacy, the doctor will only come in the evening. I had to work as a pediatrician. nine0022
 - And now the most important thing - antiseptics . Miramistin. Chlorhexidine. Can be used externally and on mucous membranes. I really love hydrogen peroxide, but, according to some sources, storage conditions are limited - in a dark place, at temperatures up to 15 degrees Celsius. Although the retail network drew attention to the fact that it is allowed to store at room temperature.
- Of course, in the first aid kit alcohol wipes, cotton pads, bandage . Earlier, in my student years, iodine and brilliant green, fukartsin were popular. And later they began to be produced in the form of pencils. I'm not very comfortable.
 Didn't gain popularity. But non-alcohol-containing betadine, methylene blue work with a bang. It is convenient to put a few tablets of furacillin, and they take up little space, dissolved in water - a ready-made antiseptic. nine0022
 - What if the child has a closed injury? First aid - cold at the site of impact . The main thing is not to get lost. There is a way out of any situation. If you are on the street, run into a stall, any freezer has ice, a cold bottle of a drink. And then - traumeel, arnica, heparin ointment. If there is an open injury, stop the bleeding. If capillary bleeding is enough finger pressure, treat with an antiseptic. In other cases, an emergency call. Do not take responsibility for yourself, do not rely on chance. If the open wound is deep, it is better to sew it up in the first 2 hours, otherwise tissue edema and the risk of secondary infection develop later. nine0022
- Dear mothers, on vacation, in no case should you shift the responsibility for your child to animators, instructors.
 Dosed exposure to the sun, in water, diet, sleep schedule are observed by parents. We are going not only to have a rest, but also to heal the children, so they should return stronger and healthier. And now the most important thing - care products. Be sure to use high-protection sunscreens (40 and above), we prefer hypoallergenic ones. It is better to check them at home, we take only reliable means. It is unacceptable to be in the sun without a hat, and it is better to take panama hats that cover your ears and neck. And the child should be in a light loose shirt. nine0022
 - Burn remedies based on panthenol, dexpanthenol. Of course, as a doctor, it’s not comme il faut for me to turn to traditional medicine, but with sunburn, ordinary fermented milk products help outwardly - low-fat yogurt, kefir, whey. All oils, sour cream are excluded. Under them, a lipid film is created and the risk of secondary infection. Plentiful drink, moistening are necessary.
- If you have a chronic illness, take your regular medications with you + 1 week extra.
 Situations are different. And health is more expensive. And put the part not in luggage, but in a travel bag. Suddenly, the luggage will go by mistake to another hotel. Of course, if the child often obstructs, you need to take an inhaler with you - a nebulizer, nebules with pulmicort (budesonide), berodual or ventolin, salbutamol. nine0022
 - I do not suggest that parents take antibiotics. Cough preparations. We are going to rest. This is a setup. The rest can be purchased as planned. And running a pharmacy that needs to be updated periodically, throwing out drugs with an expired shelf life, is not worth it.
- If you are going to the forest, maybe you should get vaccination against tick-borne encephalitis , take with you broad-spectrum antibiotic , based on amoxicillin with clavulanic acid, if an unpleasant encounter with a tick occurs. At the same time, observe all precautions. nine0022
- If you are going to the mountains, you will also need sunscreen eye drops based on vizine.
Happy holidays, positive emotions!
Author: Marina V. Vinogradova
Articles
Make an appointment: +7(495)669-66-99
Or fill out the form:
Your name*
Your phone
Desired appointment time, reason, additional information*
Protection against automatic messages
Confirm that you are not a robot*
I agree to the processing of personal data
MBUZ Dairy Kitchen, Kursk
The history of children's dairy kitchens begins at the beginning of the last century, when in 1901, on the initiative of the Russian Society for the Protection of Public Health, a drop of milk center was organized in the St. Petersburg city shelter for premature babies. In 1904, the Central Station for the preparation and receipt of milk for children was opened in St. Petersburg, from where milk was transported to pharmacies, where mothers received it on special medical certificates. But "Drops of Milk" was not widely used. nine0003
After the revolution, dairy kitchens were organized at children's consultations. The main tasks of the dairy kitchen were to help pediatricians in feeding both healthy and sick young children, serving young children as a public catering enterprise. Dairy kitchens played an important role in preserving the life and health of children during the Great Patriotic War. At railway stations and marinas, where there were dairy kitchens, milk formulas and other baby food products were prepared for the evacuated children. nine0003
After the war, children's dairy kitchens in special workshops prepared children's milk (including sour-milk) mixtures, cottage cheese and some other dietary products for feeding children under one year old, packaged juices, fruit and vegetable purees. But over time, dairy kitchens were allowed to give out factory-produced products to parents. This radically changed their functions: most dairy kitchens stopped producing their products and actually began to serve as distribution points. nine0003
In a number of regions, dairy kitchens have ceased to function, but in our city the course of formation and development of healthy lifestyle values has been going on for quite a long time thanks to the City Administration. In 2011, after a 2-year break in the MBUZ "Dairy Kitchen", after a major overhaul, the production of its own fermented milk products, children's kefir, cottage cheese and milk was resumed.
The building of the MBUZ "Dairy Kitchen", located at the address: st. Engels, 90 was designed at 1982 and already in 1983 put into operation. Initially, the premises were equipped with a forced ventilation system, water supply, sewerage, as well as a steam pipeline, which was used to heat industrial boilers.
all children of Kursk under the age of 3 years old, as well as children's departments of hospitals and children's hospitals, were provided with milk nutrition. Every day, baby food (milk, kefir, cottage cheese) was distributed, and parents received dry mixes and cereals for children every month according to age norms..jpg) Kefir was poured into glass bottles for baby food, closed with parchment paper or cotton swabs; cottage cheese was packaged in parchment paper; milk was dispensed into clean glass containers brought by parents. nine0003
Kefir was poured into glass bottles for baby food, closed with parchment paper or cotton swabs; cottage cheese was packaged in parchment paper; milk was dispensed into clean glass containers brought by parents. nine0003
In 2000, the production of dairy products in the premises located at: st. Engels, 90 stopped, and the work was moved to an adapted dairy kitchen at the address: 2nd Promyshlenny per., 13. For the production of baby food, only 1 autoclave, 2 digesters and 1 refrigerator were used. As a result, the dairy kitchen was forced to reduce the number of servings of products.
In 2008, due to a breakdown of the autoclave, the Dairy Kitchen MUSIC was forced to work with manufacturers of ready-made baby food. And until 2011, children under 2 years of age from low-income families in the city of Kursk received finished fermented milk products from the Bryansk City Dairy Plant. nine0003
Due to the fact that in recent years in our country great attention has been paid to motherhood and childhood, according to the Address of the President of the Russian Federation, the Administration of Kursk in 2010 decided to overhaul the building and restore the production of its own products.