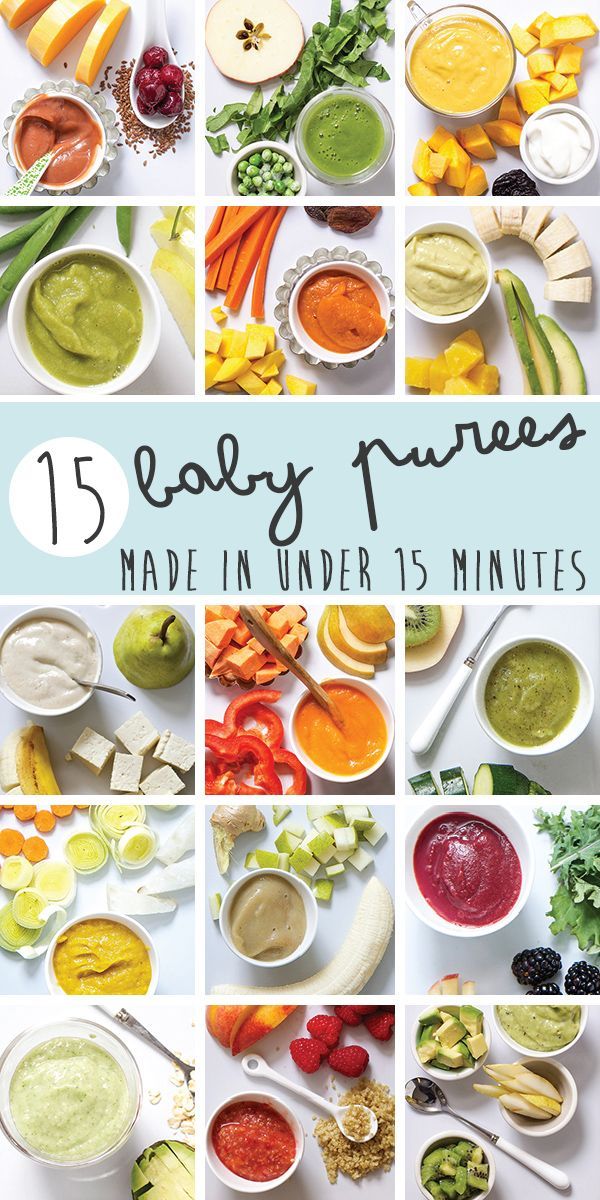
Baby healthy food recipe
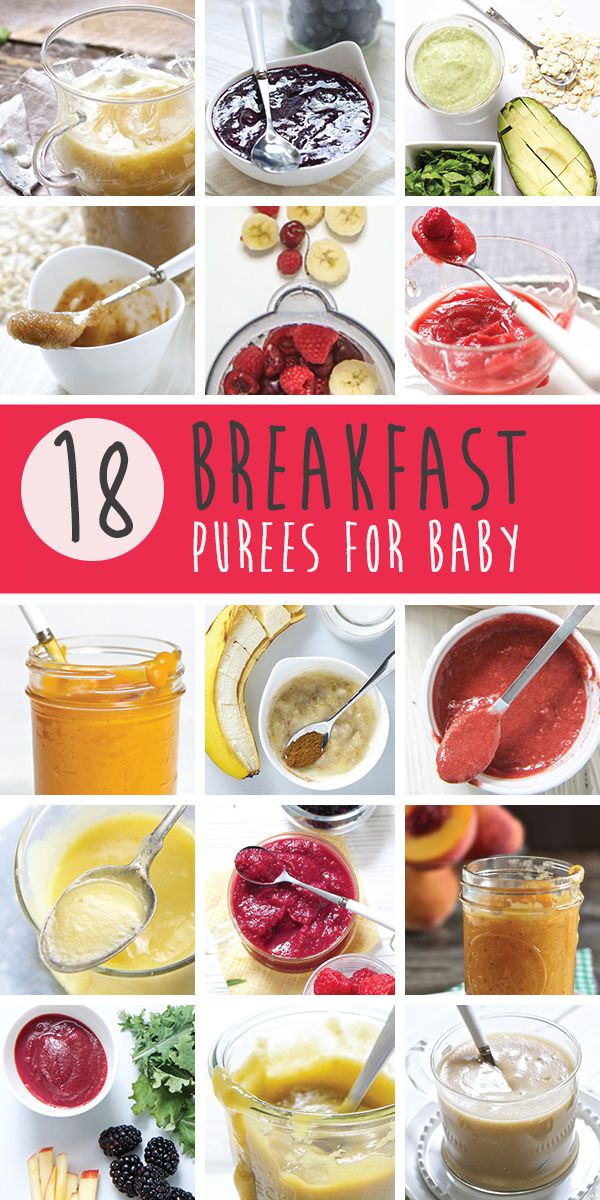
10 Easy Homemade Baby Food Ideas (No-Cook, Super Fast, Stage 1)
Learn how to make the EASIEST homemade baby food recipes (stage 1) for your little one with these super simple no-cook ideas. Plus: I have the best tips for making them ahead and freezing them so you can batch cook and simplify your days!
Homemade Baby Food
As a mom to three kids, I know firsthand how the urge to make homemade baby food can be both exciting and a little daunting. And if you have a busy schedule or other kids in the house, finding the time to actually do it can seem impossible. But, there are so many healthy foods that you can transform into stage 1 baby food purees with hardly any work or special equipment at all!
TIP: I use a regular blender for all of these recipes, so you don’t need to buy a special baby food maker unless you want to.
Baby Food Recipes for 6, 7, and 8 Month Old Babies
These homemade baby food ideas are designed for younger babies who are still eating thinner purees, but you can of course use them for older babies and toddlers too. Each can be served as is, or you can combine more than one together to create new flavors if you’re feeling creative!
TIP: If you want to add fat or protein to any of these fruit or veggie purees, simply stir in a little whole milk yogurt, coconut cream, or Avocado Puree.
Best Way to Make Baby Food
I’ve found that the easiest and most approachable way to make baby food is to simply use a blender. With fresh ingredients and a little water, breastmilk, or formula to thin it as needed, you can easily make your baby meals without investing in equipment you may not use very long.
TIP: You’ll want to start with at least 1 cup of any base ingredient to ensure that there’s enough in the blender to fully blend up.
Tools You Need to Make Homemade Baby Food
To make these baby food recipes you’ll need:
- Blender (you could also use an immersion blender if yours is very strong)
- Water, formula, or breastmilk to thin as needed
- Knife for chopping produce
- Spoon
- Bowls
- Ice cube tray
- Freezer bags for storage
- Baby food storage containers
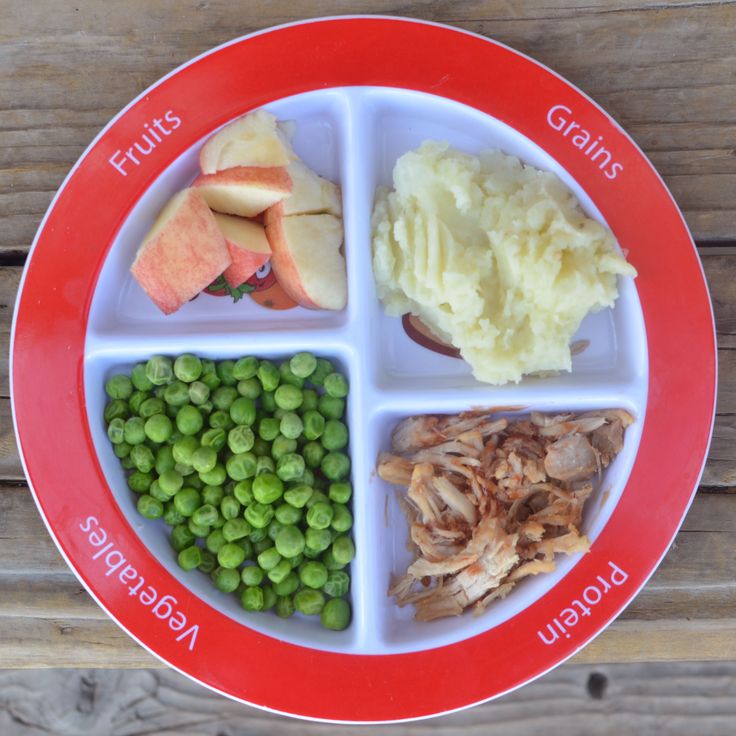
Stage 1 Baby Food
These baby foods are meant for early eaters as they are typically very thin and easy for a baby to move around in their mouths. I follow the recommendations to wait until 6 months to start solids, so I personally don’t worry excessively about this distinction as I like babies to experience some texture in their purees. (The ones you find at the store are low allergenic foods and are meant for 4+ months.)
Stage 2 Baby Food
These baby foods are typically a little bit thicker, sometimes include more than one ingredient, and offer a wider variety of ingredients. Most babies are ready for these sorts of purees around 7-8 months, or once they’ve mastered thinner purees. (Again, since I like to do a combined baby feeding approach with both baby led weaning and purees, I don’t worry too much about following the calendar to decide when to introduce these.)
TIP: As a backup to my homemade baby foods, I love the options from Amara Organic Baby Food (paid affiliate link) since you simply need to stir it together with breast milk, formula, or water and it’s ready to serve.
And now, for my ten go-to homemade baby food purees that you don’t even need to cook!
1.
 Avocado Puree
To make avocado puree for a baby, you just need a fresh avocado, a blender, and some lemon juice if you plan to store it for later. I sometimes even do this with just a fork if the avocado is super soft! It’s a perfect way to introduce a low allergenic food that’s rich in healthy fats.
TIP: Get the full recipe for Avocado Puree here.
2. Bean Puree
Baby’s early foods don’t have to be all one food group and beans are a great food to have in the mix. You can do this easy bean puree with chickpeas, pinto beans, black beans, or even white beans, thinning it as needed with water, formula, or breastmilk. This is a great puree to mix with a little sweet potato or butternut squash.
TIP: Get the full recipe for Bean Puree here.
3. Blueberry Puree
Using fresh or frozen blueberries, this easy berry puree is loaded with fresh flavor and antioxidants. It’s delicious on its own or stirred into plain whole milk yogurt or baby oatmeal.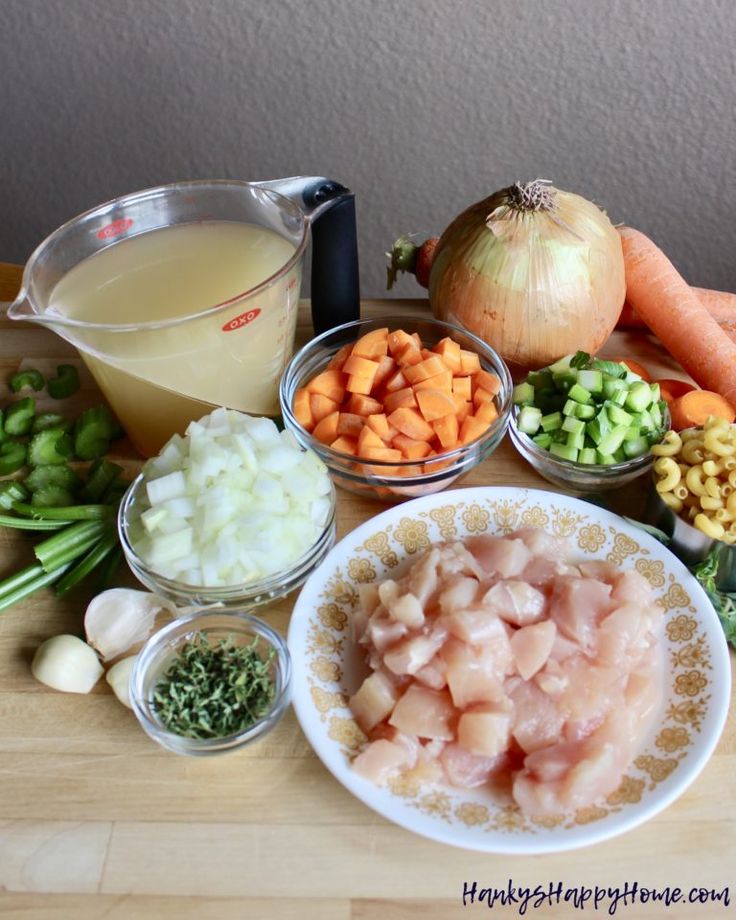 (Note that it thickens up as it sits in the fridge, so you’ll need to stir it well to serve.)
TIP: Get the full recipe for Blueberry Puree here.
4. Kiwi Puree
With a bright flavor, this puree is great for babies who seem to love flavor—and it’s a fun one to make and store for later. You’ll want to make sure that you choose very ripe and sweet kiwi and taste it before you make the puree to ensure that it’s not too tart. (If it seems tart, you can mix with banana or applesauce.)
TIP: Get the full recipe for Kiwi Puree here.
5. Mango Puree
Using fresh or thawed frozen mango, this baby puree blends up in seconds. It’s bright, flavorful, and a great source of immune-boosting vitamins. Taste your mango to be sure that it’s sweet and not too tart. (If it’s tart, you can add Applesauce or ripe Banana Puree.)
TIP: Get the full recipe for Mango Puree here.
6. Peach Puree
Turn fresh or frozen and thawed peach slices into a super smooth Stage 1 baby food with this easy blender method. You’ll want to strain out the skin since it’s hard to blend up smooth, even with a high powered blender, but that’s so easy to do! This baby food recipe is a nice alternative to applesauce.
TIP: Get the full recipe for Peach Puree here.
7. Whipped Peanut Butter
This may not have occurred to you, but whipped peanut butter is a great baby food! This is a perfect way to introduce baby to peanut butter and to offer it safely there after. You just need to stir water into unsweetened creamy peanut butter until it forms a whipped consistency like yogurt. It’s smooth, not too sticky, and packed with protein.
TIP: Get the full scoop on introducing peanuts to baby here.
8. Pineapple Puree
Blend up fresh or frozen pineapple chunks into a tropical baby food puree that’s smooth and creamy. This is yummy on its own or paired with whole milk plain yogurt. Taste your pineapple to ensure that it’s not too tart. (If it’s tart, you can add Applesauce or ripe Banana Puree.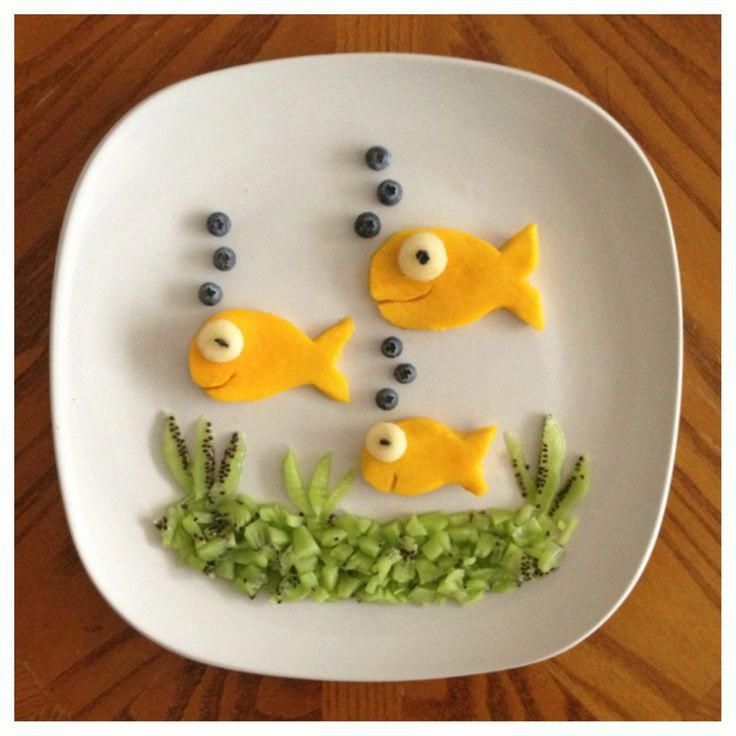 )
)
TIP: Get the full recipe for Pineapple Puree here.
9. Strawberry Puree
Fresh strawberries blend up into a perfectly smooth homemade puree without the need for any additional liquid. You can serve this as is, or mix with applesauce if desired. The flavor of your berries will determine the flavor of your puree, so be sure to taste them for sweetness.
TIP: Get the full recipe for Strawberry Puree here.
10. Banana Puree
Ripe bananas make great homemade baby food with the help of just a blender. This is a super simple baby food to make at home and it’s easy to digest as a Stage 1 baby food. Use ripe bananas with brown spots to ensure that the puree tastes sweet and is easy for baby to digest.
TIP: Get the full recipe for Banana Puree here.
Homemade Baby Food Storage
The easiest way to store homemade baby food is to add fresh purees to an ice cube tray and freeze.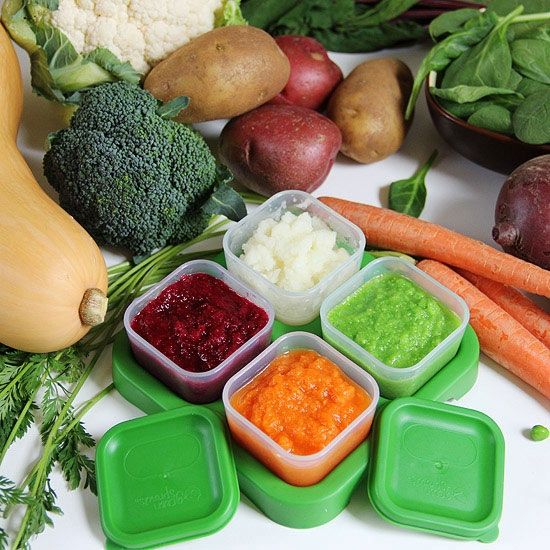 Once frozen, simply pop out the cubes and store in labeled freezer bags for up to 3 months. These are a perfect way to make it easy to send homemade baby food to daycare or to simply get ahead for the coming week.
TIP: Find more information about storing baby food—including the best small food storage containers—here.
]
Tips for Making the Best Homemade Baby Food
- Use at least 1 cup base ingredient to ensure that a blender has enough volume to blend well.
- Thin any homemade puree with water, formula, or breast milk.
- Freeze any baby food you won’t use within 3 days in an ice cube tray. Transfer frozen cubes into freezer storage bags for up to 3 months. Thaw these frozen baby food recipes in an airtight container in the fridge overnight before you plan to serve.
- Taste all fresh foods for sweetness and to ensure that your puree isn’t too tart. To tame tartness, mix any puree with Banana Puree , Avocado Puree, Applesauce, or Mashed Sweet Potato.
- If you want to add fat or protein to any of these fruit or veggie purees, simply stir in a little whole milk yogurt, coconut cream, or Avocado Puree.
- Use breastmilk or formula in place of the water if desired.
- Mix two purees together for more complex flavors.
- Add texture to any puree by stirring in baby oatmeal or hemp seeds.
- For more details on each of these, find them here: Avocado Puree; Banana Puree, Bean Puree; Blueberry Puree, Kiwi Puree, Mango Puree, Pineapple Puree, Peanut Butter Puree, Peach Puree, Strawberry Puree
I’d love to hear your feedback on this way of making simple baby food, so please comment below. I so appreciate hearing your experience with my recipes!
Prep Time 5 minutes
Cook Time 0 minutes
Total Time 5 minutes
Author Amy Palanjian
Cuisine American
Course Baby Food
Calories 42kcal
Servings 4
- ▢ 1 cup blueberries, diced strawberries, diced peaches (peeled), diced kiwi (peeled), diced pineapple (peeled), diced banana (peeled), diced mango (peeled), diced avocado (peeled), OR beans (rinsed and drained)
- ▢ water, formula, or breast milk (as needed)
Choose one fruit, the avocado, or beans and add to a blender.
If making the puree with blueberries, strawberries, peaches, kiwi, pineapple, mango, or beans, add ¼ cup water and blend, adding more water as desired to make a thin, very smooth puree. If making avocado or banana, just blend (without water) until very smooth.
Serve or store in an airtight container for 3-5 days in the fridge, or up to 3 months in the freezer.
Vitamix Blender
Storage Containers
Silicone Ice Cube Tray
- Use at least 1 cup base ingredient to ensure that a blender has enough volume to blend well.
- Thin any homemade puree with water, formula, or breast milk.
- Freeze any baby food you won't use within 3 days in an ice cube tray. Transfer frozen cubes into freezer storage bags for up to 3 months. Thaw these frozen baby food recipes in an airtight container in the fridge overnight before you plan to serve.
- Taste all fresh foods for sweetness and to ensure that your puree isn't too tart.
 To tame tartness, mix any puree with Banana Puree , Avocado Puree, Applesauce, or Mashed Sweet Potato.
 - If you want to add fat or protein to any of these fruit or veggie purees, simply stir in a little whole milk yogurt, coconut cream, or Avocado Puree.
- Use breastmilk or formula in place of the water if desired.
- Mix two purees together for more complex flavors.
- Add texture to any puree by stirring in baby oatmeal or hemp seeds.
- For more details on each of these, find them here: Avocado Puree; Banana Puree, Bean Puree; Blueberry Puree, Kiwi Puree, Mango Puree, Pineapple Puree, Peanut Butter Puree, Peach Puree, Strawberry Puree
Serving: 0.25cup, Calories: 42kcal, Carbohydrates: 11g, Protein: 1g, Fat: 1g, Saturated Fat: 1g, Polyunsaturated Fat: 1g, Monounsaturated Fat: 1g, Sodium: 1mg, Potassium: 57mg, Fiber: 2g, Sugar: 7g, Vitamin A: 40IU, Vitamin C: 7mg, Calcium: 4mg, Iron: 1mg
Tried this recipe?Rate in the comments and tag @yummytoddlerfood on IG!
Tips on Freezing and Best Containers
Learn the secrets to storing and freezing homemade baby food for ultimate freshness—AND the best baby food storage containers to use to ensure that you never waste what you make!
Baby Food Storage
Going through the effort to make homemade baby food really only works if you have a good plan for how to store the food to ensure that it stays fresh and that baby has plenty of opportunities to enjoy it.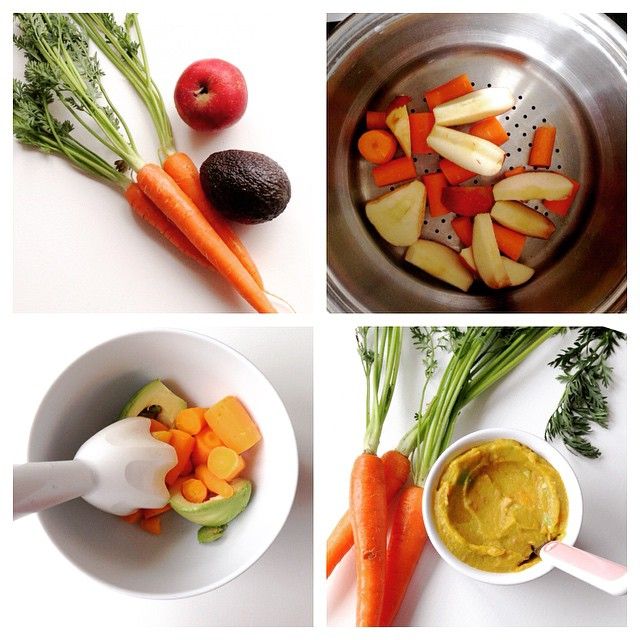 After making a LOT of baby food for my third kiddo to send with him to daycare, I got into a good routine of making and storing baby food—both in the fridge and freezer. Here’s how you can do it too.
TIP: You can find my favorite baby food recipes here.
Homemade Baby Food Storage: In the Fridge
You can store baby food in the fridge in airtight containers for up to 3 days. You can use masking tape and a Sharpie to label the containers with the contents and the date if you have a hard time keeping track of when you made something. (It’s definitely helpful to do that!)
Best Baby Food Storage Containers
I have a four favorite baby food storage containers that I use regularly.
1. Wean Green Baby Food Cubes
These are small, incredibly durable, and made from glass. They’re easy to clean and last forever. (Seriously, I’ve been using the same set for 7 years and they’re still as good as new!) $19.99 for a set of 4
2.
 Easy Lunchboxes Mini Dippers
These small containers are a perfect size for 1-2 frozen baby food cubes and they’re my go to for packing food for a baby to take to daycare. They also nest nicely when stored in the cabinet. $7.95 for a set of 8
3. Beaba Food Storage Containers
I have two sets of these and I use them regularly for larger amounts of baby food (you could probably fit 4 cubes of frozen food) and for toddler snacks. When assembled, they snap together, so they’re an easy way to stay organized. $14.95 for a set of 6
4. Oxo Tot Baby Food Blocks
This neat system is easy to keep contained in the fridge and is also made from a polypropylene body that is PVC, BPA, and phthalate free. They are dishwasher and microwave safe. $9.99 for a set of 6
Homemade Baby Food Storage: For Freezing
Storing homemade baby food in the freezer allows you to make a bigger batch at once, and then serve it to baby over the course of a few weeks or months.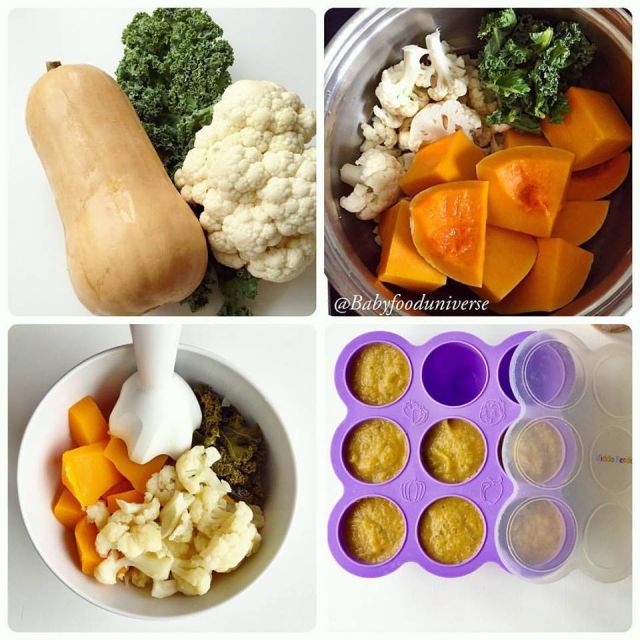 The easiest way is to use an ice cube tray, which has the added benefit of portioning out the baby food nicely.
TIP: Any ice cube tray will do. You can use silicone ice cube trays if you prefer a non-plastic option.
Baby Food Storage Without An Ice Cube Tray
If you don’t have an ice cube tray or you’d just rather not use one, you can place a predetermined amount of baby food into a pint-size freezer bag. Remove as much air as possible, press flat, and seal. Place flat in the freezer to freeze. Then you can thaw the entire bag in the fridge overnight, or break off a portion of it to thaw.
How to Store Baby Food in the Freezer Step by Step
- Place baby food into each compartment of the ice cube tray, or fill as many as you need to with the amount of baby food you have.
- Cover (if your ice cube tray has a cover) and freezer for 4-6 hours or overnight.
- Pop out frozen cubes and transfer to freezer storage bags. Label as desired with the type of baby food and the date.
- Store in the freezer for up to 3 months.
TIP: I like to have a bag of sweet fruit purees and more savory vegetable purees to avoid having too many separate bags in the freezer at any given time. Then you can combine them into baby food combinations easily!
How to Thaw Baby Food
To thaw baby food, simply remove a cube (or as many as you need) and place into airtight containers. Thaw overnight in the fridge and serve. 1 cube may be plenty for a baby aged 6-7 months and older babies may enjoy two cubes.
Tips for the Best Baby Food Storage
- Keep fresh baby food in an airtight container for up to 3 days in the fridge.
- Use a regular ice cube tray to freeze, a silicone ice cube tray with a lid, or a small freezer bag with the contents pressed flat.
- Store frozen baby food in a freezer storage bag in the freezer for up to 3 months.
- To avoid freezer burn, try to remove as much air as possible from the storage bags.
- Label your bags with the contents and the date.
- To thaw baby food, simply remove a cube (or as many as you need) and place into airtight containers. Thaw overnight in the fridge.
- Use leftover baby food to flavor yogurt, baby oatmeal, baby rice cereal, smoothies, or cottage cheese.
- See some of my favorite Baby Food Pouch recipes here for more ideas on how to serve your baby food!
I’d love to hear your feedback if you have another storage technique or container that you love, so please comment below!
Children's recipe - Encyclopedia Baby food
Victoria Levchuk©What is a children's recipe? I wonder how a children's recipe differs from an adult? A children's recipe is prepared for a baby, up to what age? How to adapt adult table dishes to children's recipes? We will try to answer these questions and even more. First, let's figure out what a recipe and a children's recipe are!
What is a prescription?
Table of contents:
Recipe is a set of instructions or a description of how to prepare a culinary dish. The word is also used in medicine or information technology. A doctor usually writes a prescription for medicines that can be obtained or bought at a pharmacy.
Prescription was originally a medical word. The recipe comes from the Latin "recipere" which means "to take". The word was first used in the 14th century as a verb rather than a noun. Only in the 16th century did the recipe become a noun and signify the recipe itself. Around the 17th century, the word recipe migrated from a medical topic to cooking and began to denote a method / instruction for preparing a dish.
The recipe consists of two main parts: the list of ingredients and the method of preparation. There are different styles of writing recipes, such as the drawn recipe. Ingredients are preceded by the name, number of servings, and serving size, if applicable. Then a list of ingredients and cooking method.
If the recipes are taken from some source and adapted, then you must indicate the source under the text of the recipe. Recipes need to be cooked before they are posted to make sure they work, the ingredients and serving sizes are right, and the food tastes amazing. If cooking is a flight of thought and inspiration, then you definitely need to take notes.
As a minimum, the prescription must contain the following information :
- name of the dish
- list of ingredients with the exact amount of each ingredient
- description of how the dish should be prepared and finished, this is called the cooking method
- Number of servings and cooking time.
Children's recipe is a way of preparing a dish, taking into account the characteristics of the child's age. Therefore, baby food is divided into age stages: 4-6 months, 7-8 months, 8-10 months, 10-12 months, 12-18 months, 18-24 months, 2-3 years, etc. The older the child becomes, the more parents move away in cooking from baby food and children's recipes towards adult cooking. The children's recipe includes dishes that are aimed at improving the child's body, which are balanced, varied and designed specifically for children. This does not mean that now it is necessary to prepare only children's recipes for children, and adults - for adults.
It's just that in baby food there are rules for cooking, which are observed until the child completely switches to an adult diet or his body is sufficiently strong. Moreover, the rules gradually decrease with the age of the child and approach the usual recommendations for proper healthy eating.
Baby Food or Baby Prescription Rules
It is up to the child's parents to follow or not follow these guidelines.
Up to 10 months (ages are approximate as parents look at their child and decide whether or not to follow this recommendation):
- Only fresh food is used for cooking, especially vegetables, fruits and dairy products.
- Children's prescription must contain foods that benefit the child's body.
- Recipe must contain complex carbohydrates.
- Children's prescription must be free of processed foods, sugar or salt, and saturated fat.
- Main meals are less than 600 calories per serving.
- For every meal, a fresh dish, freshly prepared.
- Do not store the finished product for more than 24 hours.
CLICK ON ME!!! We eat delicious. Annabelle Carmel.
- The child eats foods that he is familiar with and does not have an allergic reaction.
- The new product is introduced into the diet gradually and carefully according to the rule of waiting in 4-7 days.
- Children's recipe provides the consistency of the finished dish, based on the age of the child.
Consistency of food up to a year. Click on me!!!
- Children's dishes are best cooked by steaming, if this is not possible, then bake, in extreme cases, boil in water, and stew the last, should not be fried in oil, at least up to 3 years.
- When freezing baby food, indicate the freezing date and freezer shelf life.
- Baby food cubes can only be defrosted in the refrigerator.
- Use of semi-finished products of industrial production is not desirable until 3-5 years.
Items 6 and 7 can be removed from the age of 10-18 months, since the child's body has already adapted to food intake, is able to digest dishes prepared in the morning or even yesterday. It is already possible to introduce a new product for about 3-5 days, also due to the age of the child and its better adaptation, and the gastrointestinal tract is more ready to digest unfamiliar foods. The consistency is most likely close to adult food, so this item also goes away by about 18 months. Points 8 and 9 remain with the child until the age of 5-7, while he is getting acquainted with new products. And only the rules of healthy eating remain.
I think it's clear what principles a children's recipe is based on, it must comply with the rules of healthy eating with a discount for the child's age. Because while the baby is small, he eats complementary foods of a homogeneous consistency, the products must be super fresh, so as not to burden the gastrointestinal tract with poisoning, serve fresh, freshly prepared foods every time, do not store them. Gradually, the child grows, the consistency of baby food changes, the shelf life of the finished dish also changes. All these nuances should include a children's recipe.
Another important thing to consider are frozen baby puree cubes, which are often prepared by parents of small children. It is also important to indicate the shelf life of frozen cubes, as well as the methods of defrosting, in what form the thawed baby food will be, how to thicken it if the consistency changes.
Children's recipe consists of various nuances, parents must understand and prepare complementary foods based on these rules.
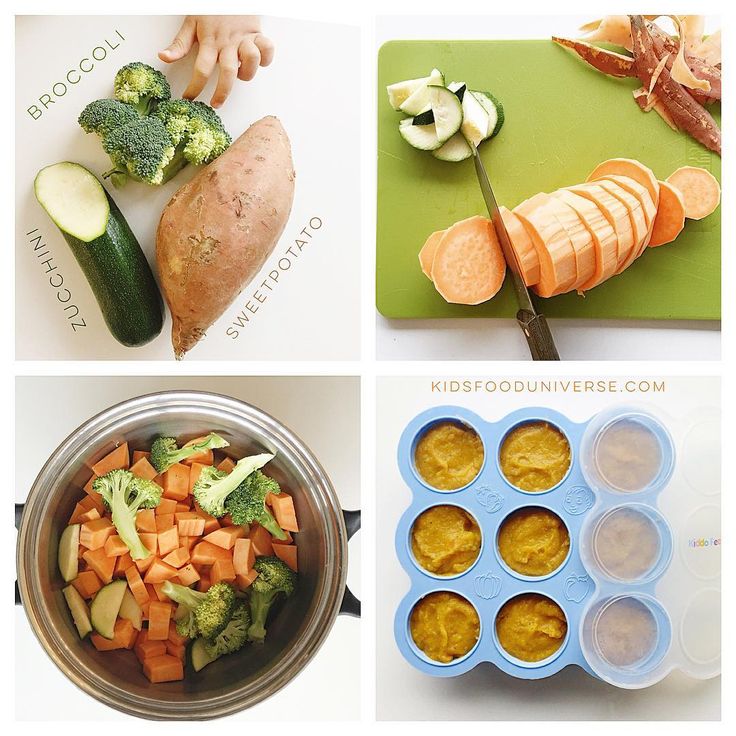
Recipes for baby purees often state that the dish can be prepared in 3-4 different ways. In order not to confuse parents, we will explain.
In the example of zucchini puree, which can be prepared in different ways, the taste of the finished product will be different, as well as the cooking time.
- Prepare for steam
- Bake
- Boil in water
- Pull out in a pan
- Defrost the zucchini cubes and heat
- Open a jar of baby food
Options for the preparation of children's recipe 9000,000,0004 It turned out 5 ways to prepare a stove puree and one super.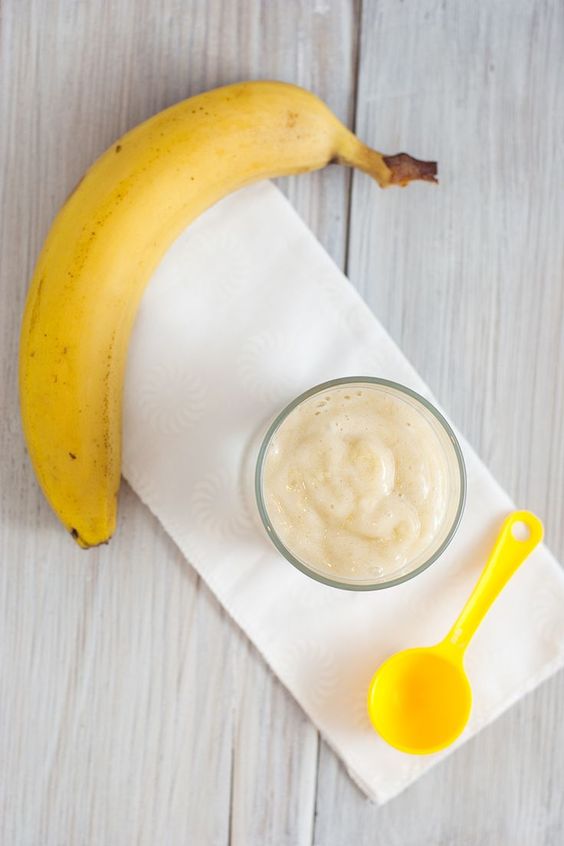 easy option. Accordingly, there will be 5 children's recipes or one recipe consisting of 5 subgroups of possibilities for cooking zucchini for a child. We also take into account the age of the child and the consistency of the product, which changes. So at the beginning of complementary foods, the baby will receive a uniform consistency, closer to 9-10 months with small pieces, by 12 months the baby will most likely be served zucchini in pieces. And a good children's recipe should include all these nuances that are important for every mother to know.
What is a balanced children's prescription?
To understand what a balanced children's recipe is, it is necessary to answer the question, what is a balanced diet?
Balanced Nutrition is a ratio of the following proportions: a quarter of protein, a quarter of carbohydrates and half of vegetables.
Six types of nutrients are essential for survival: proteins, carbohydrates, lipids (fats), vitamins, minerals and water.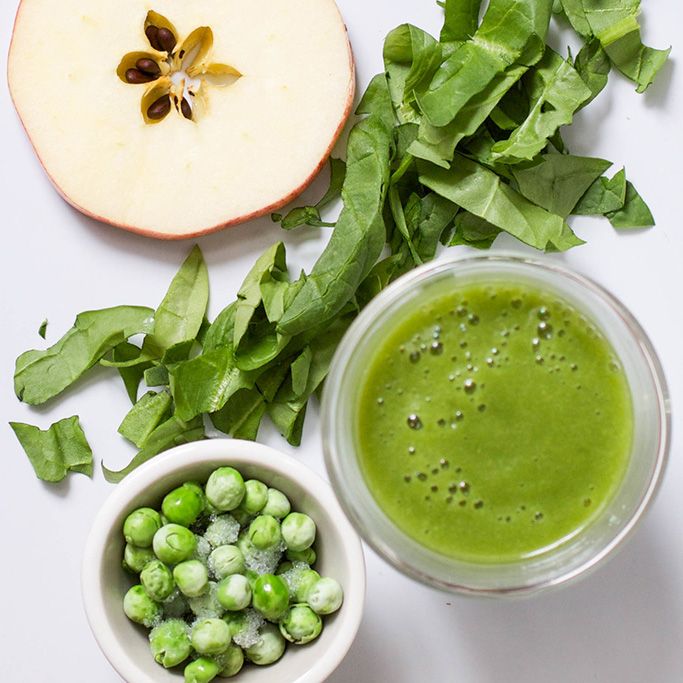 Proteins, carbohydrates and fats are macronutrients. "Macro" means that our body needs these nutrients in large quantities.
Macronutrients provide energy, measured in kilojoules or kilocalories. Vitamins and minerals are considered micronutrients because our bodies only need them in small amounts. Water is another important macronutrient because the volume of water excreted by the body through metabolic processes is much less than the amount of water we lose every day through sweating, urine, stool and breathing.
Balanced children's recipe
A balanced children's recipe should include the principles of a balanced diet. But how do you ensure your baby is balanced at the start of complementary foods? It's very simple, just feed the baby with breast milk or formula; up to a year, it is these fluids that provide the baby's body with all the important elements. Therefore, parents are advised until the child is 12 months old to expand the diet, and not increase the portion.
After 12 months, try to apply the principles of a balanced diet, but without fanaticism, focus more on intuitive eating, when a plate with a variety of food is placed in front of the child, and the child chooses what to eat and how much. As I wrote earlier in other articles, children sometimes can overeat some foods with a lack of some elements in the body, and then for a long time these foods are not eaten. It is normal for parents to give their child choices in a varied and balanced diet.
How to adapt adult dishes to children's recipes?
Adult dishes can be easily adapted to children's recipes. To do this, you need to answer a few questions:
- What products in the adult recipe are included in the baby's complementary foods?
- Which ingredients in an adult recipe can be substituted or omitted without changing the taste of the dish?
- Is it possible to use healthy cooking methods such as roasting or steaming?
- Is it possible to refuse spices and spices without changing the taste of the dish?
- Is it possible to change the consistency of a dish without changing the taste?
- Is the recipe in line with a healthy diet?
How to turn an adult dish into a children's recipe?
Of course, you can ask more questions, but these are the main ones that distinguish an adult recipe from a child's. Recipes for children under 10 months differ from adult cuisine in their one-component and consistency. At this stage of baby food, it is better not to use adult cuisine recipes, but to prepare food according to children's recipes that are recommended for a child of this age. From about 10 months old, you can cook according to family recipes, but taking into account the age of the child and the products that he has tried at the current stage. For example, we cook pilaf, but we take not the usual ingredients, but those with which the baby is familiar. So for children's pilaf we will take meat (rabbit or turkey), onions, carrots and rice, without salt and spices.
For the first pilaf, the meat is not fried, but boiled a little in water, onions and carrots are slightly sauteed, rice is soaked. Combine all ingredients in a saucepan and simmer for about 30 minutes. The perfect first pilaf cooked in a double boiler. Parents can choose the cooking method, if possible. The first pilaf will look more like boiled meat porridge with vegetables. When the body can digest pilaf, namely by about 1-2 years, depending on how the family prepares this dish, then it is given from the common table.
Until what age do we prepare children's recipes?
Until about 5-7 years of age, the child's diet is expanded, i. the child gets acquainted with various products up to about 7 years. For example, mushrooms can be given after 5 years, etc. Therefore, children's recipes are prepared up to 5-7 years. But in practice, children from the age of 2 eat from the general table, taking into account their familiarity with the products. Parents try to adjust their diet in such a way that it matches a healthy diet, which means that children are allowed to eat. Recipes for children are adapted by many parents for themselves, someone begins to eat more properly , someone reviews family meals, makes changes to them, someone cooks separately for a child, separately for adults, this is everyone's choice, no matter what recipes are used to prepare food for a child.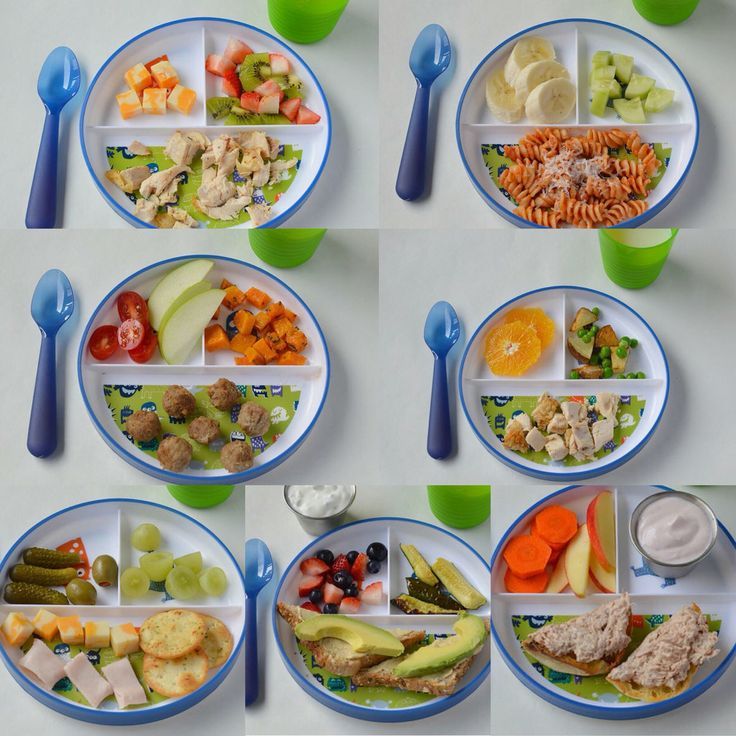 The main thing is that food is beneficial and healthy for the child's body .
Children's prescription contains
How does a children's prescription differ from an adult's?
Menu for the baby. Annabelle CarmelAdult dishes are distinguished by a large amount of fat and a cooking method - frying. Not very healthy food. Usually, before the birth of children, we eat haphazardly, do not think about a balanced diet or benefits for the body. But having a baby changes everything. Those who breastfeed early begin to understand the benefits of a healthy diet, as an extra chocolate can appear on the baby's pope in the form of red spots.
For those who have not breastfed, the benefits of healthy eating can be learned during weaning, or earlier when trying to shed the pounds gained during pregnancy. It does not matter how and when mothers understand that nutrition is the foundation of our full and healthy life , the main thing is that we are slowly introducing proper nutrition, following the principles of healthy food and teaching our children not to depend on junk food, we teach to feel our body and intuitively eat.
What dishes to include in the children's menu so that it is tasty and healthy
In winter, children's vulnerable immunity needs to be strengthened by any available means. And for this, you should add as many healthy dishes with a shock portion of vitamins to your daily diet as possible. Mostly it is vegetables in all possible variations. They are good to bake and stew, serve as a side dish, make soups and even delicious desserts based on them. This topic is dedicated to our selection of recipes.
Soup classic
Chicken soup with vegetables is the perfect embodiment of a balanced vitamin meal for a child. To prepare it, take 2 chicken thighs, pour 3 liters of water and leave to cook over low heat for half an hour. In the meantime, we will make a ruddy frying of the onion, carrot and celery stalk in a saucepan. Just don't overcook the vegetables. As soon as they soften, pour 3 potatoes into cubes and fry for another 5 minutes.
Strain the finished broth and pour the contents of the pot. When the potatoes are completely cooked, lay 50-60 g of egg noodles, salt and pepper the soup to taste, add fresh herbs. Grind the cooled chicken thighs and also pour into the pan. It remains to bring the soup to readiness and let it brew under the lid.
Peppers with a surprise
For the second, offer your child hearty stuffed peppers. Let's start with the filling first. To do this, cook until half cooked 100 g of rice. While it is quietly boiling in a saucepan, we pass the onion into cubes and grated carrots until golden brown. We mix the frying with semi-cooked rice and 300 g of any minced meat, which the child likes best. Add a little salt and dry herbs, knead the mass with your hands. We cut off the caps of 4-5 medium-sized bell peppers, remove the seeds and partitions, fill with minced meat and put upright in a wide pan.
Now let's fill it. Stir in 300 ml of hot water, 3 tbsp. l. tomato paste and thick sour cream, put salt and black pepper. Pour the stuffed peppers in a saucepan, bring to a boil and simmer over low heat under a lid for 40-45 minutes. At the end, put the bay leaf and keep the peppers without fire under the lid for a quarter of an hour.
Fish delicacy
In winter, meat in the children's diet is especially important to alternate with seafood. Grilled red fish with sauce is just what you need. We rub the lime zest on a fine grater, squeeze the juice from the fruit and mix everything. Shred 5-6 sprigs of cilantro. We cut the onion into a small cube. Mix citrus juice with zest, herbs and onions. Lubricate 5 portioned pieces of salmon with marinade, leave for 15 minutes.
It is better to cook such fish in a grill pan in order to preserve the maximum of nutrients. Fry the salmon on both sides until golden brown stripes appear. Light yogurt sauce is perfect for it. Chop as finely as possible 1 tbsp. l. capers, a clove of garlic, 2-3 sprigs of tarragon. Add 100 g of natural yogurt, juice of half a lemon, season with salt and black pepper. Little gourmets will be pleased, especially if you serve fish on wooden skewers.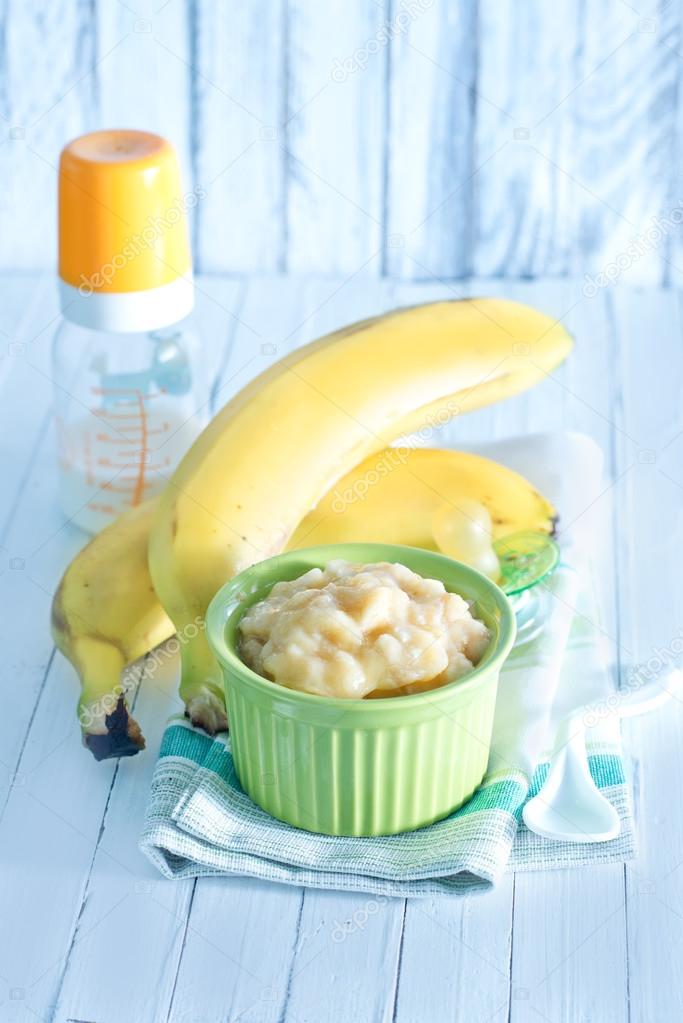
Potatoes with vegetable vitamins
Experience shows that children prefer potatoes to many other vegetables. And therefore, you won’t have to persuade them to eat baked potatoes for a long time. We wash 4 oblong tubers in water, wipe dry, grease with oil and bake whole with the skin in the oven at 220 ° C for 45-50 minutes.
Let's make the salad while the root vegetables are ready. Cut 6-8 cherry tomatoes into slices, fresh cucumber into half circles, red onion into half rings. Do not forget to pour boiling water over the onion to remove unpleasant bitterness. We chop 5-6 sprigs of parsley, mix with vegetables, salt to taste, season with Greek yogurt.
Cool the finished potato tubers, cut off the side part and remove part of the core, we will also mix it into the salad. We fill potato boats with salad and decorate with lettuce leaves.
Curd breakfast
All food for children in the cold season should be healthy, and desserts are no exception. In this regard, the traditional cottage cheese casserole is a win-win option for all occasions.
Whisk the egg vigorously with 1 tbsp. l. sugar and a pinch of salt. Add 300 g of cottage cheese with a fat content of at least 9%, 1 tbsp. l. semolina, 0.5 tsp. baking powder and a pinch of vanilla. We knead the resulting mass well and leave it for 10-15 minutes so that the semolina disperses. If desired, you can put a grated apple, a handful of raisins, banana slices or dried berries here.
Grease ceramic molds with oil, sprinkle with ground breadcrumbs and fill with curd mass. We put them in the oven at 180 ° C for about half an hour. This cottage cheese casserole can be prepared for breakfast. Just let it cool down properly, garnish with mint and serve with sour cream.
Cake with an orange mood
Even homemade cakes can be loaded with vitamins and made extremely healthy. Spicy carrot cake is just such a case.
In one container, mix 130 g flour, 1 tsp. baking powder, 70–80 g of sugar, 0.5 tsp each. cinnamon and ground ginger, a pinch of vanilla and nutmeg. In another container, beat 2 eggs with 80 ml of vegetable oil, pour 300 g of grated raw carrots. We combine dry and liquid bases, carefully knead the dough until a homogeneous consistency.
Fill buttered muffin tins with it and bake in the oven at 180°C for 40-45 minutes. When the carrot muffins cool down, they will taste even better. Serve a healthy dessert with whipped cream, and there won't be a crumb left.
Health cocktail
Practically all children drink milk with pleasure. Why don't we make a strawberry and banana milkshake?
Grind 200 g of fresh strawberries in a blender and rub the resulting mass through a sieve to get rid of small seeds. Mash a large ripe banana with a fork into a thick gruel. We combine strawberry and banana puree, add honey and vanilla sugar to taste, beat everything until a smooth consistency is obtained. Pour in 400 ml of milk and continue whisking until a fluffy foam appears.