Easter baby food jar crafts
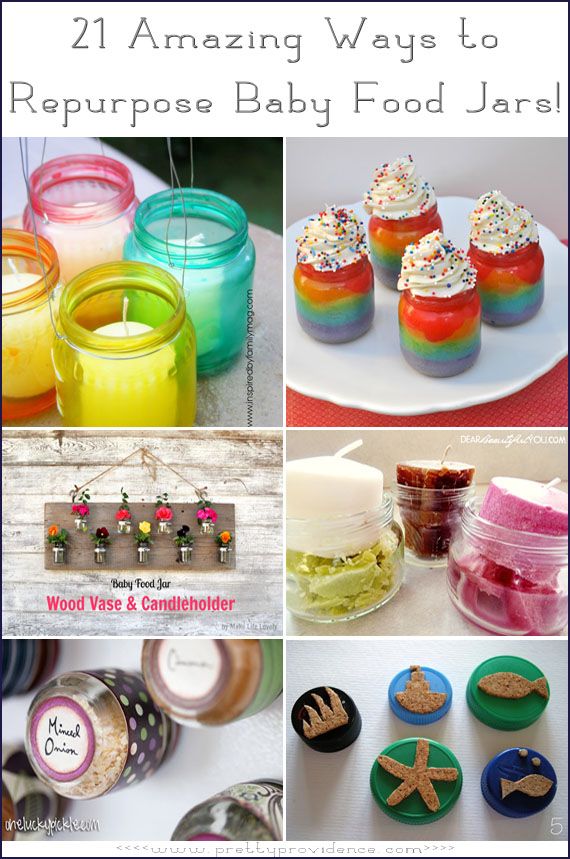
50+ Fantastic Ways to Re-Use Baby Food Jars
Home » Crafts for kids » 50+ Creative Ways to Re-Use Baby Food Jars
Last updated on
22.6Kshares
50+ baby food jar crafts and creative ways to re-use baby food jars so you don’t have to put throw them in the trash.
If you’ve had a baby in recent years, there’s a good chance you’ve acquired quite a collection of baby food jars. Baby food jars ares so cute and chubby, and such a great size. If you’re like me, you find it hard to thrown them away. If that’s the case, your baby food jar collection could be growing at an alarming rate, and you’re probably looking for things to make with all of those jars.
Well, you’re in luck! One of my Facebook followers recently asked for ways that she could re-purpose her baby food jars, and the HH community responded with dozens of great crafts made with baby food jars along with practical ways to use baby food jars in and around the home.
I’ve gathered up their best suggestions and added a few of my own favourite uses for baby food jars, and I’ve come up with this long list of ideas for you.
From the craft room to the classroom to the bathroom and beyond, here are over 50 ways for you to use leftover baby food jars so you don’t have to toss them out.
50+ Baby Food Jar Crafts
Click on the links below to see project details.
Ways to use baby food jars in the classroom or craft room:
- Crayon Caddy: Paint several baby food jars and store co-ordinating, coloured crayons in them.
- Fill baby food jars with water, and set on the art table to rinse paint brushes in.
- Give each student in the class a baby food jar filled with cream, and make homemade butter together.
- Make a mini “ocean in a jar” in a baby food jar. Pretty on classroom window sill or fun to play with.
- Soak dried out markers in baby food jars to make liquid watercolour paint.
- Make and store homemade finger paint in baby food jars.
- Baby food jars make great paint and glue pots at the easel. Lids keep them from drying out between uses.
- Punch holes in the lids (with a nail) and use jars to store and dispense glitter.
- Make I-Spy Jars in baby food jars.
- Make collection jars for the preschool classroom.
- Fill with small amounts of water for syringe transfer work trays in preschool or kindergarten
- Paint tall baby food jars with food coloring, water and glue for a frosted look. Store pens, pencils and paintbrushes in them.
Things to make for kids with baby food jars:
- Play dough jars: fill several baby food jars with different colours of homemade play dough for a kids’ gift basket.
- Set some baby food jars out in the rain and make this scented rain paint.
- In the play kitchen: fill baby food jars with flour, rice, lentils etc. Glue the lids on, and kids can pretend-cook with them.
- Bug Jars – wrap a pipe cleaner handle around the top, and go exploring in the yard.
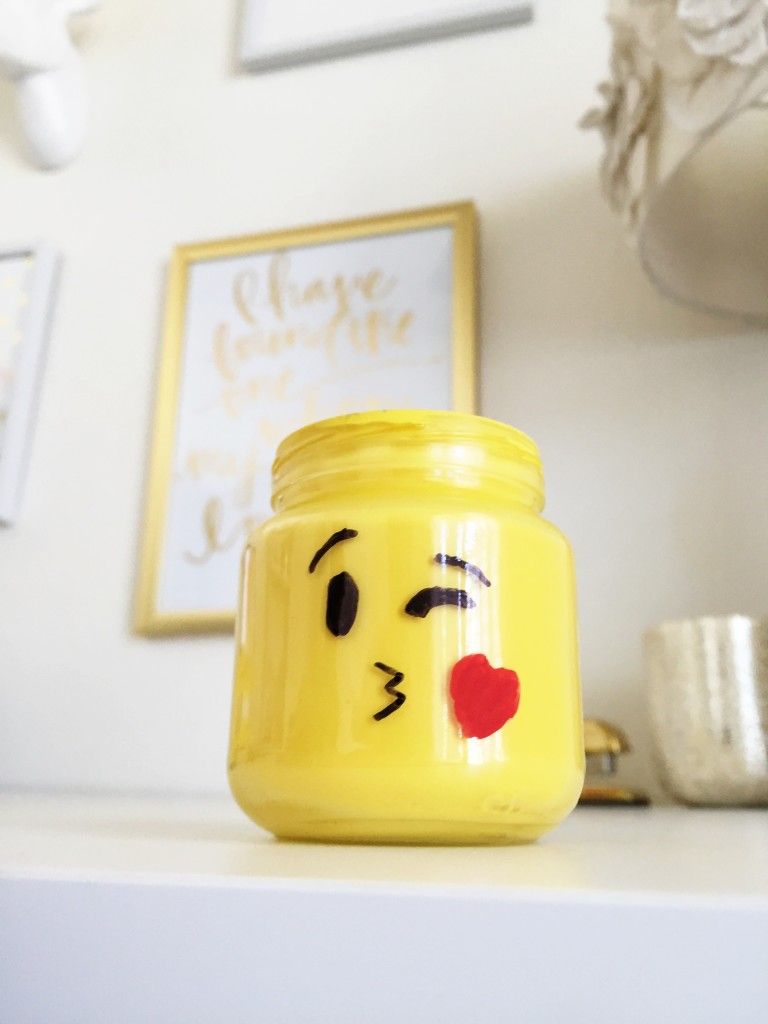
- Make these cute and quirky emoji jars for a kid’s dresser or desk.
- Glue painted toy animals on baby food jar lids, use as party favours.
- Fill with homemade slime or silly putty to put in loot bags.
- Make a tooth fairy jar.
- Teach kids how to manage their allowance with 3 tall baby food jars labeled SPEND, SAVE, BANK.
- Make an advent or countdown calendar.
- Fill baby food jars with layers of “coloured sand” (ground sidewalk chalk mixed with salt).
- Use baby food jars to make mini lava-lamps.
Ways to re-use baby food jars in the kitchen:
- Make magnetic spice jars to store on the refrigerator door
- Organize your spice drawer with baby food jars.
- Make Smore’s treats in baby food jars. Hand them out around the campfire or at a party.
- Make a window-sill herb garden with baby food jars.
- Fill baby food jars with condiments for camping or a bbq.
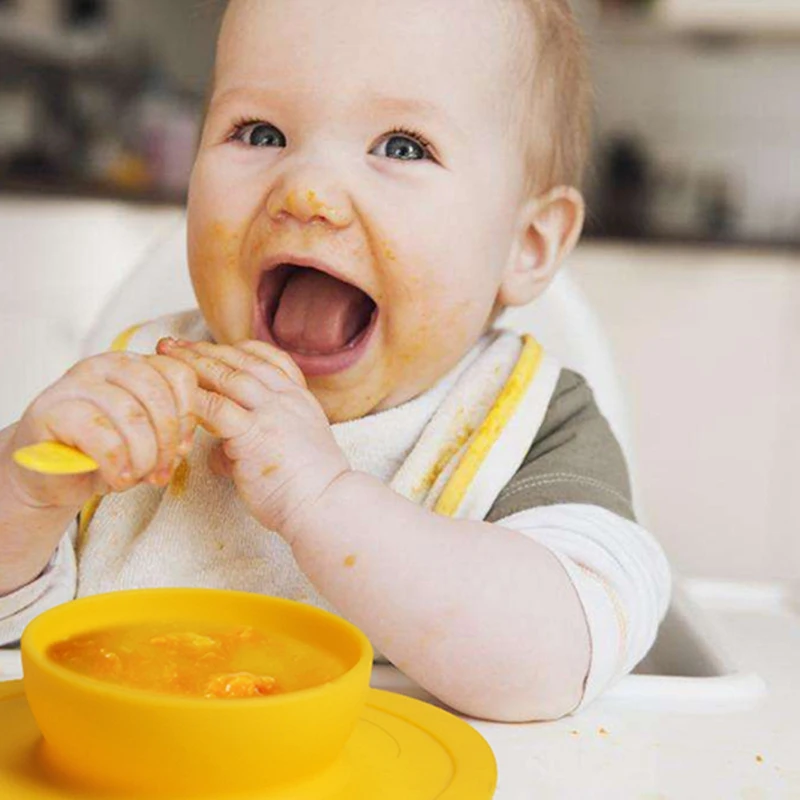
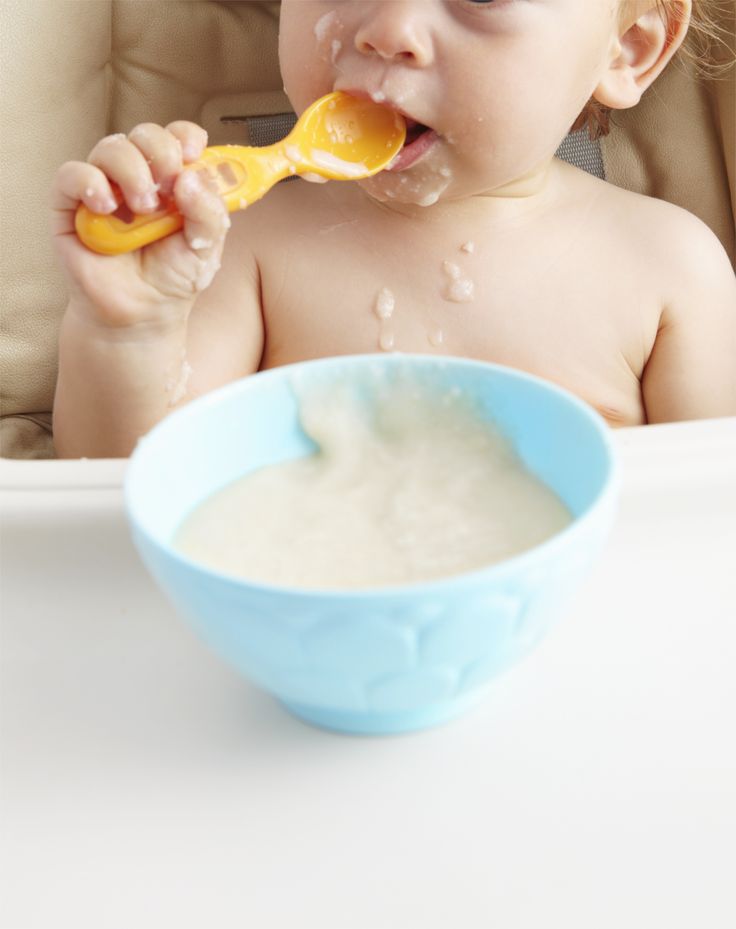
- Sterilize jars and lids, and reuse baby food jars for homemade baby food.
 The serving sizes are perfect.
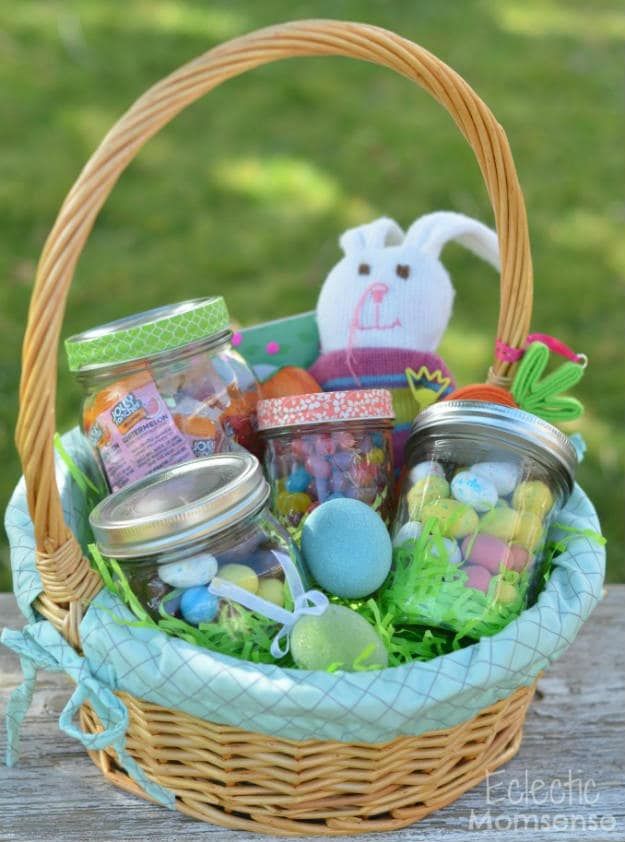
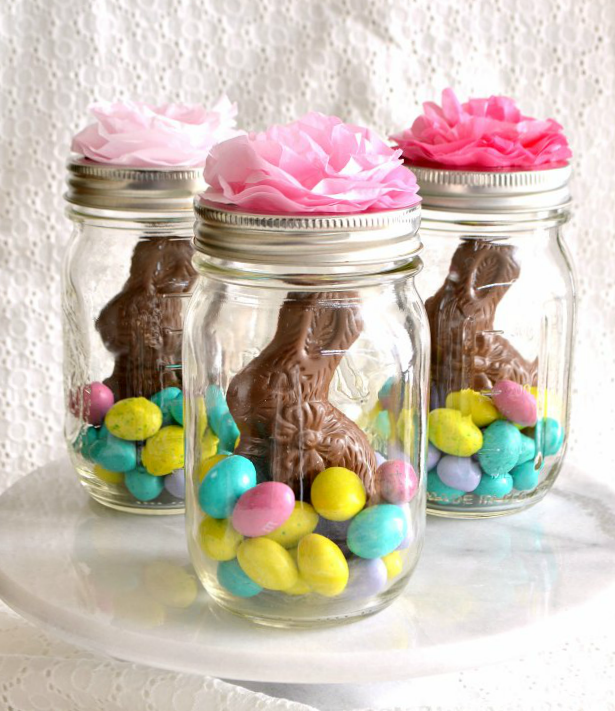
Gifts and party favours to make with baby food jars:
- Baby food jars make great wedding favours. Decorate and place at each table setting.
- These baby food jar lanterns were hung in a tree at an outdoor wedding.
- Make Lego Head Jars as party favours for a Lego party.
- Make mini calming jars for kids or co-workers
- Make a wish jars or dream jars for your family and friends.
- Give a gift of homemade bath salts or sugar scrub in a baby food jar.
- Make these cupcakes in a jar to give to teachers, neighbours and friends.
- Make a craft kit for a child by filling jars with pom poms, sequins, foam stickers, and beads.
- Hot Cocoa in a baby food jar: layer hot chocolate, shaved chocolate and mini marshmallows in a jar. Cover the lid with a swatch of fabric tied with a ribbon.
Other ways to use baby food jars around the home and garden:
- Store pony tail holders, Q-tips, and hair clips in baby food jars on the bathroom counter.
- Make a spill proof nail-polish remover kit with a baby food jar.
- Plant succulents in baby food jars to display on a porch or patio.
- Hang these colourful baby food luminaries from a tree in your yard.
- Baby food jars are great for storing seeds for the garden.
- Make Photo Globes by placing your child’s photo inside a baby food jar.
- Organize your spare change: each jar holds a different type of coin.
- Use baby food jars to hold paper clips, thumb tacks etc. on a desk or in a drawer in an office.
- Travel jewelry keeper for earrings and rings.
- A Mini sewing kit in a baby food jar is great for travel or the office.
- Fill baby food jars with Puffs, fishy crackers, Cheerios, nuts etc. Keep in the diaper bag for the kids.
- Nail the lids of baby food jars to the underside of a shelf to store screws, nails and craft supplies.
- Store several baby wipes in a baby food jar and keep in your purse or diaper bag.
Baby food jar Christmas crafts:
- Turn a baby food jar into a snowman Christmas tree ornament.
- Make festive holiday votive candle holders.
- Make sparkly tea light luminaries in baby food jars.
- Baby food jars make great miniature snow globes.
- Make Reindeer food for Christmas Eve.
What if you STILL have leftover baby food jars?
If you have more baby food jars than you could possibly ever use, even after reviewing all of the ideas, please consider giving your collection to a teacher, a crafter or a daycare provider. Most will be happy to put your little glass jars to good use.
Looking for more crafts to make with your recyclables? Check out:
Re-purposed Denim Craft Aprons
Re-purposed Denim Bibs
25 Creative Ways to Re-use your Keurig’s K-Cups
22 Ways to Re-Use Cardboard Tubes
Follow the Hooligans on Facebook!
Jackie Currie
Jackie is a mom, wife, home daycare provider, and the creative spirit behind Happy Hooligans. She specializes in kids’ crafts and activities, easy recipes, and parenting. She began blogging in 2011, and today, Happy Hooligans inspires more than 2 million parents, caregivers and Early Years Professionals all over the globe.
22.6Kshares
Reader Interactions
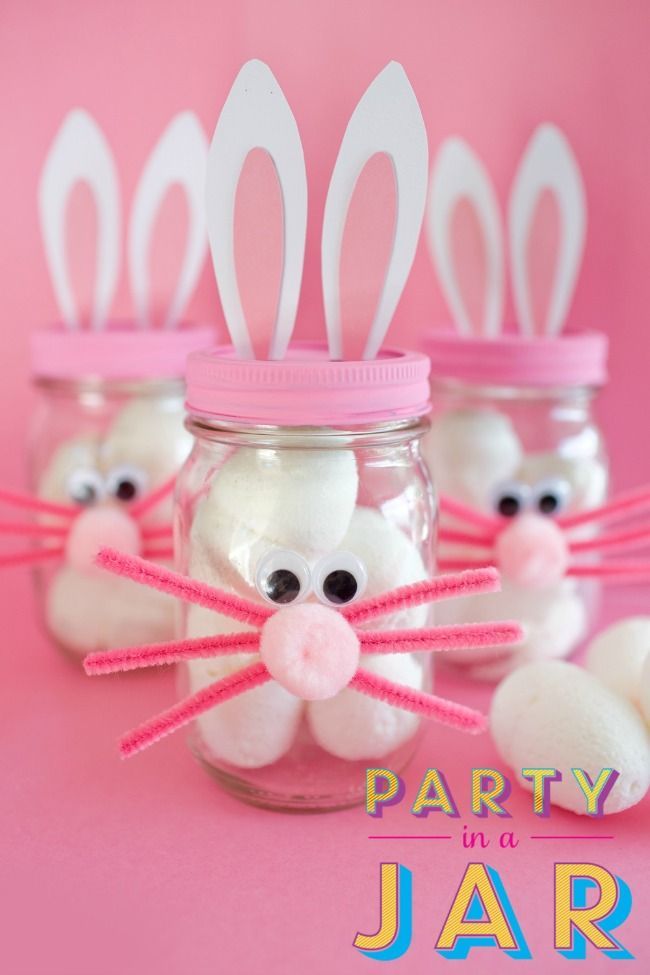
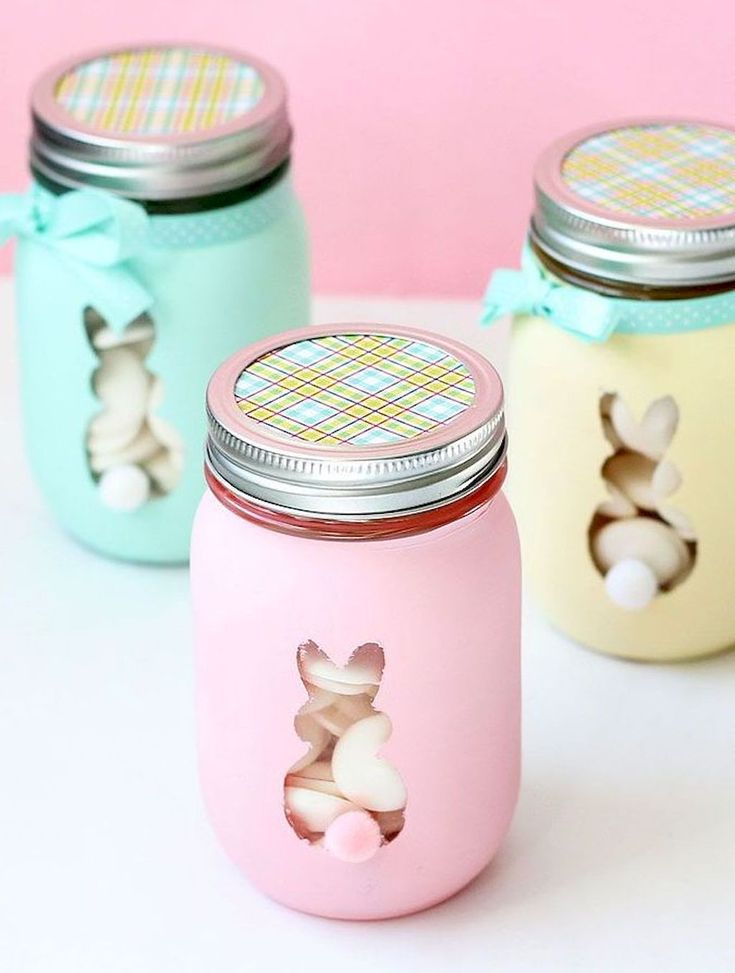
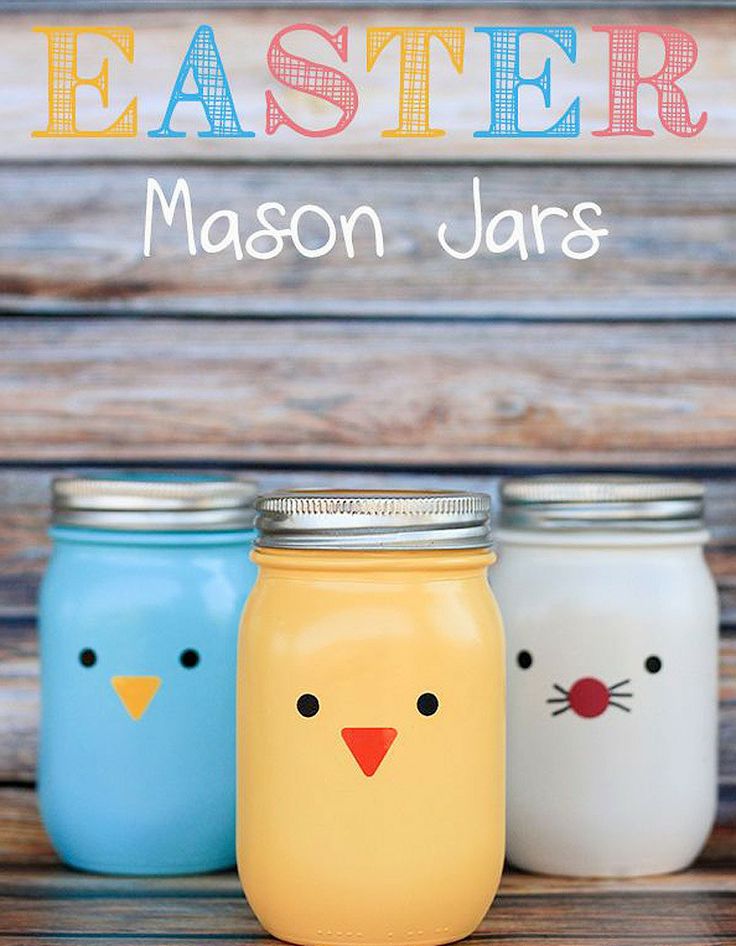
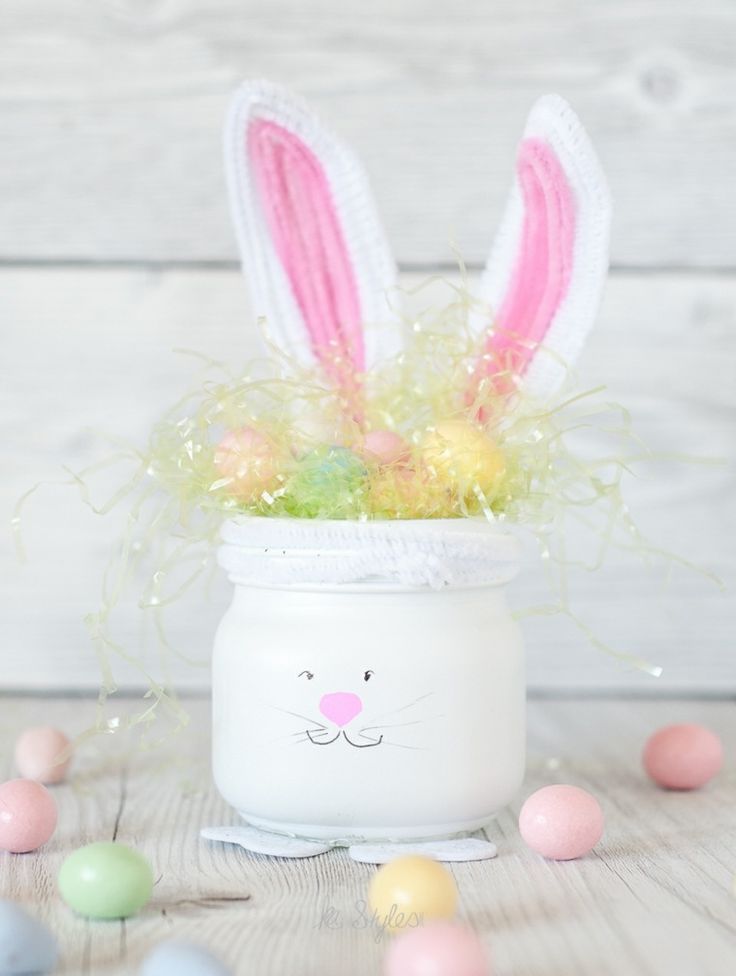
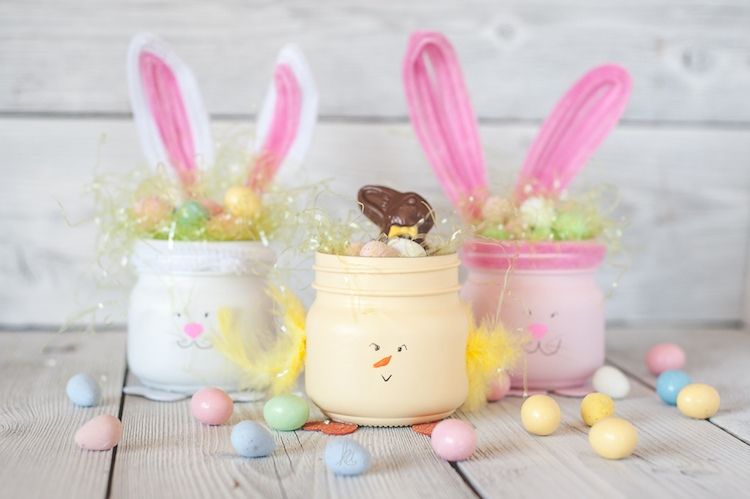
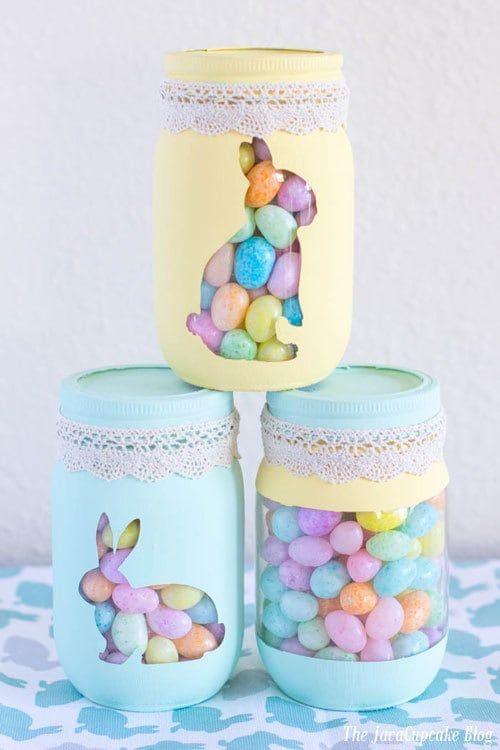
Upcycled Baby Food Jar Easter Bunny Candy Holder
Pin It
Have you ever noticed that some of the things you learned when you were very young seem to stay with you while others fade away almost immediately? I find that it happens more often these days.
I'm crediting my sister's Grandchildren for the fact that art projects from my very early childhood have recently come flooding back and are being shared with a new generation.
...Chemistry and Algebra/Trig, however, are barely a fleeting memory.
Honestly, I always knew that I wasn't ever going to use Trigonometry.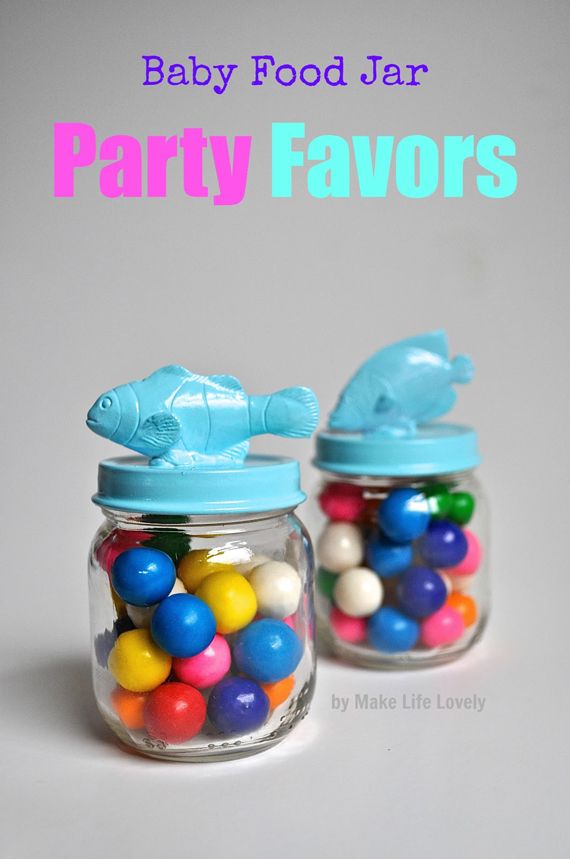 I will, however, admit that the fundamentals of Chemistry have kept me out of what could have been a couple of really bad situations involving combining things like bleach...and ammonia.
But these baby food jar bunnies...sigh. Sure, there are those in my household who think that they're silly because they don't have a practical use. But let's face it, they are darned cute and who ever said that Easter decorating had to be practical?!
I still remember the first time that I made them. It was
a hundred years ago when I was in the first or second grade. I'm not certain whether it was in our monthly Brownie or during Catholic School art class. Baby food jar crafts were a big part of both around age 6 or 7. Luckily for me, I had a younger brother and we had a ready supply of jars in every size.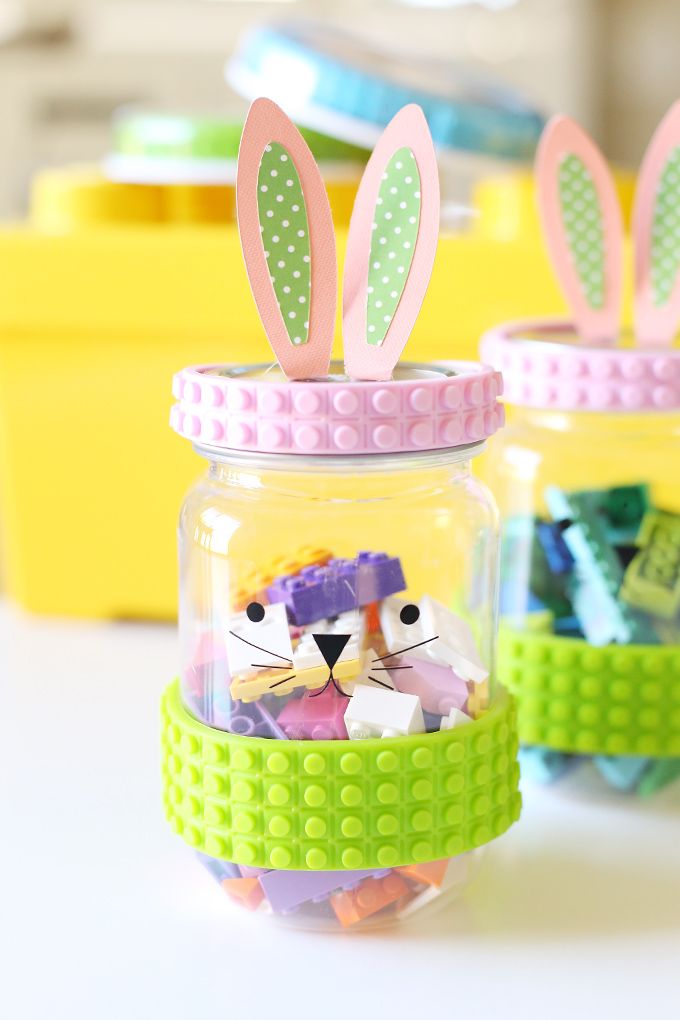
We were recycling before it was cool...Yep...I was an "upcycling" trend setter...me, the girls from Troop 51 and the boys and girls in Sister Virginie's first grade class. Who knew?!
The materials list was easy enough. An empty baby food jar, some Elmer's glue, a couple of cotton balls, some construction paper for ears, pipe cleaners for whiskers. I think that at one point, the bunnies may have had arms...and probably feet. I'm sure that we filled them with jelly beans.
Of course, I've gotten a little better at them over the years and have changed the materials slightly but, I wanted to share them with you because they're an easy project to do with young children. And they're far more fun than math. Heck, there's not even any math involved...unless you consider counting to two "math".
There are loads of tutorials out there. The materials are easily substituted and most are basically free. The bunnies don't have to be fancy and they're guaranteed to be fun. They make great place card holders. They help to empty out a box of jars that you probably have stashed somewhere....they're good for the environment...and mental health.
So what are you waiting for? Grab your children (or borrow someone else's) and make some of these adorable bunnies for your table. As always, if you do make them, send me a photo I'd love to see how they turn out and I'm happy to share them on the Serendipity Refined Facebook page!
As for me, I'm off to see if the bunnies and a little Algebra will help me to raise the balance in my checking account...
The bunnies seem to have the multiplication part all figured out!
Upcycled Baby Food Jar Bunny Candy Holders
Materials:
Clean baby food jars (any size) with the labels removed
Pom Poms (or cotton balls) for head and tail
Felt (and/or construction paper) for ears, nose, arms, feet, and banner
String (or pipe cleaners) for whiskers
Ribbon (or felt or yarn) for bow tie
Black yarn (or "googly" eyes) for eyes
Glue gun (or craft glue)
Scissors
Directions:
Glue head to the top of the lid.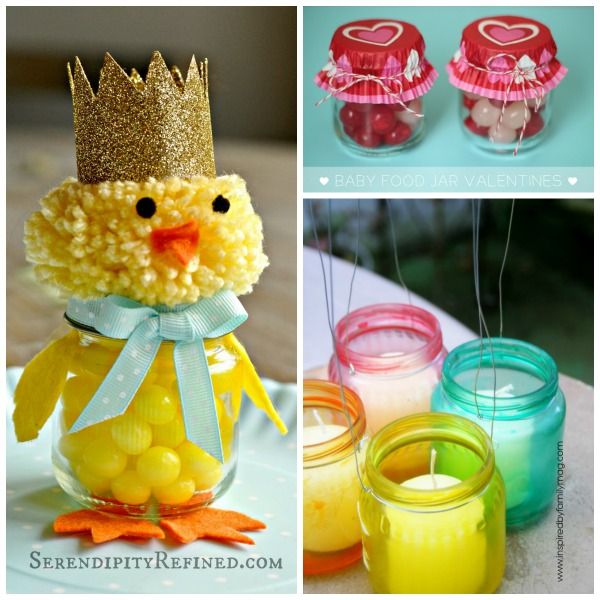
Glue a ribbon to the rim of the lid. Make and attach a bow tie.
Glue tail to the back of the glass portion of the jar.
Cut and assemble ears, nose and whiskers. Glue in place.
Make name tag or banner.
Add arms and feet (optional)
Fill with candy
xo,
Sharing this post at:
French Country Cottage
Featured at:
Fika the Dika: For a Better World: Easter
Crafts from baby food jars
Skip to content
Search for:
The kid ate the puree with pleasure, smearing its contents on all surfaces. And the jar was carefully washed out and sent to the shelf to its fellows. What to do with her?
There are a lot of ideas for using glass baby food jars. Website "Mom can do anything!" collected the most interesting of them.
- Needle cases. From glass jars it is easy to make such cute pincushions that can fit buttons and other small handicraft things.
- Houses for fairies.
 If you are fond of modeling, then you should try to make such a delightful house for fairies.
 - Aquarium. A jar is a small aquarium for a toy fish. Pour soil inside, install algae - the craft is ready. You can also mold plasticine fish together with your child and place them in a jar.
- Terrarium. Plant moss and other small, low-maintenance plants inside.
- Decorations for the holiday. Decorate the jars with glitter, make holes in the lids and install decorative elements, letters and numbers. A very original decoration is ready.
- Bird feeder. Few people realize that such delicious drinkers and bird feeders are obtained from an ordinary baby food can. In the sun, they will shimmer with all the colors of the rainbow and delight the eye.
- Storage for small items. From cans, not only beautiful things are obtained, but also very practical. Screw the lids to a wooden surface and you will get very convenient containers for storing small things.
- Candlesticks for the garden.
 Buy a lot of small candles, put each one in its own jar and hang them by ropes on tree branches. A beautiful setting for a romantic evening is ready.
 - Container for growing onions. Green onions are a storehouse of nutrients that are so lacking in the cold season. Growing such an onion is not difficult. Pour water into the jar, put the bulb on top, in a few days we will get the first shoots.
- Pots for seedlings. It is convenient to plant parsley, dill and other herbs in small jars.
- Crafts from baby food jars. Such beautiful flowers in pots are easy to make yourself with your children. We circle the palm on a green sheet of cardboard, cut it out, gluing a flower on each finger. We put it in a pot-jar - a beautiful craft is ready. Such flowers will be a great gift for mom or grandmother by March 8th.
- Storage containers. In puree jars it is very convenient to store buttons, beads, beads.
- Pencil holders.
- Night lamps.
- Snow globe.
 A can of baby food makes a delicious snow globe. Just stick the figurine on the lid. Pour the baby oil and glitter into the jar, close the lid tightly and shake.
 - Gift-treat for guests or children.
- Original frames. Just place photos inside the jar.
- Spice storage. Glass jars with screw-on lids keep spices fresh for a long time.
- Vases for flowers. Just dip the jar in the paint and get unusual vases for small flowers.
- Jelly mold. Small jars are great for making jelly. It looks beautiful and appetizing in them, one jar holds one serving, and the screw cap will help keep it in the refrigerator for a long time.
- Portion desserts. In small jars it is convenient to make portioned desserts.
- Refreshing cocktail in a jar.
- Candles. You can read how to make these candles here.
- Crafts. Small glass jars are a great base for crafts.
- Rubber storage. The advantages of transparent jars are obvious - it's easy to find the right one.
How do you use jars?
Share with friends
DIY jar crafts :: Infofonak
15 Oct, 2015 02:40 59610 Crafts
18+
Useful Tips
If you have little 9 left0082 jars of jam, baby food or something else, they should not be put in the pantry and even more so thrown away.
Of course, you can store something in such jars - spices, tea, coffee - and you can make interesting crafts out of them, and involve children in creative work.
Here are some interesting crafts that can be made from ordinary jars:0082 beautiful flower pots .
You can also make a flower vase. These buttercups were almost in bloom, so they decided to cut them off and put in a decorated water jar .
If wrap them with beautiful paper , tie a string and add a wish tag , you can create a beautiful gift or bonus to the main gift .
See also: 20 easiest crafts for everyone
Glass jar vases for the holiday
You will need:
- acrylic paint
- water
- flowers.
1. Pour some paint into the can.
2. Start turning the can a little so that the paint "draws" waves inside the can.
3. Lay the jars on their side and leave to dry overnight. Then turn the jars upside down and leave for a couple more hours for the jar to dry at the bottom.
* Different inks or inks of similar shades can be used.
* If you use a brush, you can draw patterns.
Glass jar crafts: handy nail polish remover
You will need:
- sponge
- nail polish remover.
How to make a snowball out of a glass jar
You will need:
- small jars with screw caps
- small artificial (toy can be) trees
- degreaser (if necessary)
- spray paint or acrylic paint (optional) 9003
- glycerine
- superglue
- glitter
1. Remove the label and wipe the jar with a degreaser. If there is no label on the jar, then just skip this step.
2. If desired, you can paint the lid of the jar in any color.
3. Apply a little superglue to the inside of the jar lid and to the bottom of the faux wood.
4. Leave to dry for 24 hours, then pour 1 teaspoon of glitter into a jar and fill with water, adding 5 drops of glycerin.
5. Close the lid tightly and turn the jar over (so that the tree is in the correct position).
Done!
See also: How to make a vase with your own hands
Beautiful "pumpkin" jars
You will need:
- acrylic paint
- glitter paint
- brushes.
1. Start painting the jars. It will take 2-3 coats of paint. If the theme is "Autumn" or "Halloween", then you can use orange paint (under the pumpkin).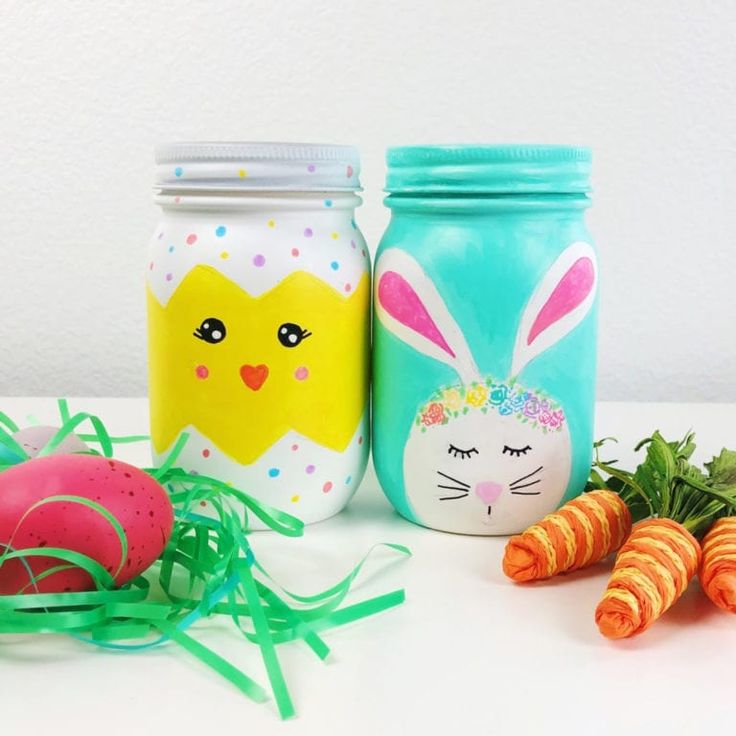
2. When the paint is dry, apply a coat of glitter paint on top.
3. You can draw eyes and mouth on the jar with a brush and black paint.
* Fill the jar with sweets and you're done!
Jar craft: wax crayon organizer
You will need:
- Round tray
- Small jars
- Spray -painting (if desired)
- glue (for glass or superclly)
- MARALLICTY
- acrylic paint of various colors.
1. Put all the jars on the tray to see how much you can fit on it. Mark where each jar will be with a piece of masking tape.
2. If desired, you can paint the tray (directly with pieces of masking tape). To better paint it with spray paint, place the tray in a box (it will protect from the wind). It's best to paint outside.
3. Choose an acrylic paint for each jar.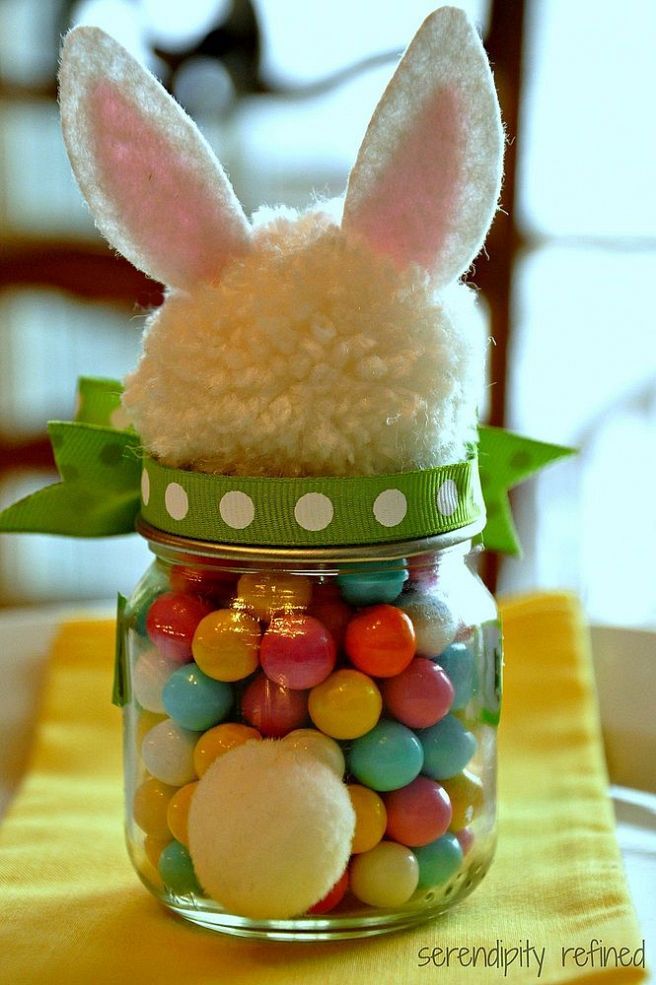 You only need to paint the inside of each jar.
To make it easier to paint the inside of the jar, you need to pour some paint inside, add a little water, close the lid and start turning the jar over so that all the paint spreads along the inner walls.
4. Turn the colored jars upside down (remove the lids) and place on a newspaper or paper towel to dry for about 1 hour.
5. Then turn each can on its side and begin to twist it so that the paint is evenly distributed along the sides of the can. The paint will need at least a day or even two days to dry.
6. Remove the masking tape from the tray, apply glue in its place and place a jar on each mark with glue.
The crayons, pencils and/or markers can now be sorted by color.
Chocolate snowmen in glass jars with screw cap
For one snowman you will need:
- 3 small clean jars (without labels) with screw caps
- hot chocolate
- small marshmallows optional)
- small twigs
- felt or a small piece of fabric (for a snowman scarf)
- embroidery thread
- decorations (in this example, star stickers)
- polymer clay (for the nose) or plasticine
- small lollipops (for buttons and hats)
- small Santa Claus hat
- glass marker
- superglue or glue gun with hot glue
- pruner or scissors (to cut off small twigs).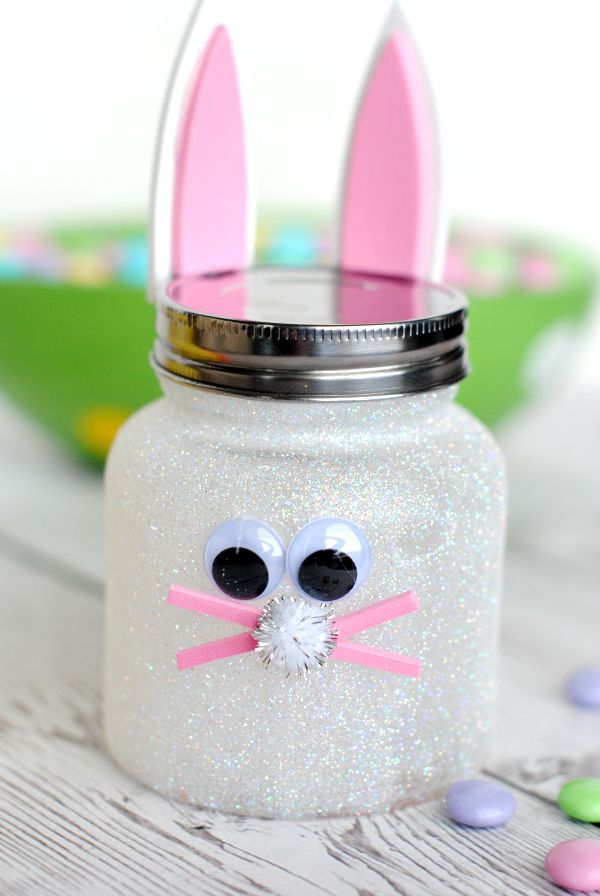
1. Fill one jar with marshmallows, another with chocolate or cocoa powder, and a third with small candies. Close covers.
2. Glue to the jar as the snowman's head, eyes and nose. You can use chocolate chips with icing, felt (brown and white for pupils) and superglue, polymer clay, plasticine, marker or acrylic paint - there are many options.
3. Use glue to attach small branches to the jar, which will be in the middle, which will act as the hands of a snowman.
4. Glue one jar to another.
5. Cut out a scarf and gloves for the snowman from the felt.
5.1. Wrap the scarf around the snowman and secure with glue.
5.2. Take a small piece of embroidery thread and glue one mitten to each end. Hang the mittens on the snowman and secure them with glue.
6. You can add various decorations to the snowman: stars, stickers, glue pieces of felt, small hats, etc.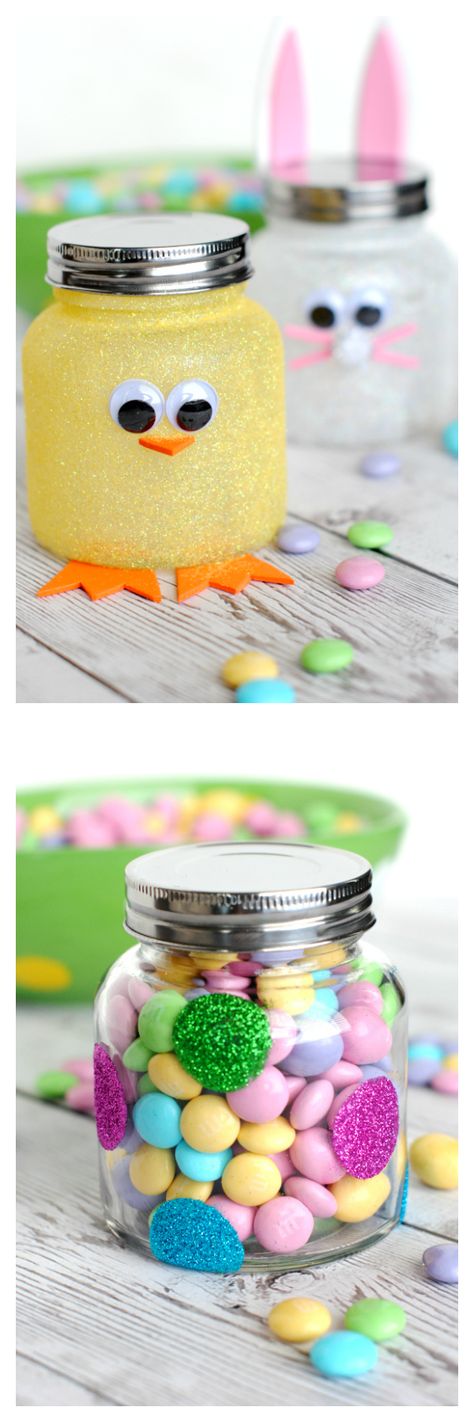
DIY jar crafts: minions
You will need:
- small jars
- yellow paint
- toy eyes (they can also be made from plasticine or painted with a marker or paints)
- colored cardboard
- superglue and/or hot glue.
1. Paint the jars yellow. You will need to apply 2-3 coats of paint.
2. After the paint has dried, cut a thin strip of black cardboard and glue it just above the middle of the jar, where the minion's eyes will be.
3. Glue the toy eyes onto the black strip, or you can use plasticine instead of plastic eyes.
4. Draw a smile with a marker or acrylic paint and you're done!
Other bottles can be decorated in a similar way, but colored paper can be used instead of paint:
You will need:
- a large branch and a pot or wood in the garden
- Decorative pebbles (you can try ordinary small pebbles)
- wire
- Pitty
- Small jars
- small candles - small candles (church) or artificial (battery-powered).