Stage 1 baby food at 4 months
Stage 1 Homemade Baby Food Recipes for Baby 4 to 6 Months and older.
Stage One Baby Foods – Commonly Offered Stage 1 Baby Foods:
Stage 1 Fruits:
Apples | Avocados | Apricots | Bananas | Mango | Nectarines & Peaches | Papaya | Pears | Plums & Prunes | Pumpkin
Stage 1 Veggies:
Beans (Green) | Carrots | Peas | Sweet Potato | Squash
Stage 1 Grains:
Rice | Oatmeal | Barley
What is a “Stage 1” baby food?
(4) 6-8 Months –
Baby Let’s Begin to Eat“Baby” cereal and soft cooked thinly pureed fruits and veggies should be baby’s first solid food experiences. Single ingredients only and at a space of 4 days apart with introducing each new food. You may skip the cereal and begin with a fruit like avocado or begin with a veggie like butternut squash or sweet potato.
Stage 1 Baby Food is a term that applies to baby foods that are highly pureed and strained. These foods are appropriate for babies who are just being introduced to solid foods. The foods in this range are targeted to babies who are between the ages of (4) 6 to 8 months old.
Stage 1 baby foods are thin and runny and are foods that are the lowest on the allergy scale. Stage 1 baby foods are typically those foods that are also more easily digested by a tiny tummy. Some of these foods include, sweet potatoes, butternut or winter squash and carrots. The term “Stage 1” was introduced by the Beechnut Baby Food Company to let parents know that these foods are appropriate for their infants who are just being introduced to solid foods.
There is a growing trend of parents skipping “stage 1” foods that are thin and runny purees. Many parents are turning to a more baby-led weaning approach and are offering soft cooked small bits of age-appropriate foods as they begin to introduce solid foods. Your baby might just be interested in this feeding approach!
Stage 1 Homemade Baby Food Recipes – Cereal, Fruits & Veggies
Rice Cereal- 1/4 c. rice powder (brown rice ground in blender or food processor)
- 1 cup water
Step 1: Bring liquid to boil in saucepan. Add the rice powder while stirring constantly.
Step 2: Simmer for 10 minutes, whisking constantly, mix in formula or breast milk and fruits if desired
Step 3: Serve warm.
Oatmeal Cereal
- 1/4 c. of ground oats (do NOT use instant or Quick Cook), ground in blender or food processor
- 3/4 c.
 water
water
Step 1: Bring liquid to boil in saucepan. Add the rice powder while stirring constantly.
Step 2: Simmer for 10 minutes, whisking constantly, mix in formula or breast milk and fruits if desired
Step 3: Serve warm.
Barley Cereal
- 1/4 c. ground barley (barley ground in blender or food processor)
- 1 cup water
Step 1: Bring liquid to a boil. Add the barley and simmer for 10 minutes, whisking constantly
Step 2: Mix in formula or breast milk or juice and add fruits if desired
Step 3: Serve warm
Did you know that baby’s first food does not have to be a commercial infant rice cereal? Many pediatric resources are acknowledging the fact that avocado, banana and sweet potato make great first foods for baby. For More Information About Homemade Baby Cereal, visit Our Homemade Baby Cereal FAQ
Feeding Baby Stage 1 Baby Foods
Start out slowly, preparing a tablespoon sized portion of whatever food you have chosen to begin with. Some parents begin offering their babies solid foods by using their (clean and washed) finger as a spoon. They say that this helps their babies take to solid foods because the “new” spoon and the “new” food all at once seem to confuse baby.
You will probably only manage to have baby eat 1/2 of the tablespoon sized portion the very first times you begin solids. Don’t fret if your baby does not “finish” a meal.
Apricot Puree 6-8 months+ (using dried un-sulphured apricots)
Vitamins: A, C, Folate
Minerals: Potassium, Phosphorus, Calcium
- 1 pound dried apricots
- 2 cups of white grape juice, pear or apple juice. Plain water is ok but the puree may be a bit bitter.
Step 1: Bring liquid and fruit to a boil and simmer for 15 minutes.
Step 2: Reserve any left over liquid to use for the puree
Step 3: Place into your choice of appliance for pureeing and begin pureeing.
Step 4: Add the reserved liquid as necessary to achieve a smooth, thin puree or
Step 5: Add cereal (if desired) to thicken up
Step 6: Note: puree will not freeze solid, but into slightly soft/slightly frozen cubes.
Have you ever Baked Fruits? If not, I highly recommend it. Baked fruits are naturally sweet, soft and oh so very yummy.
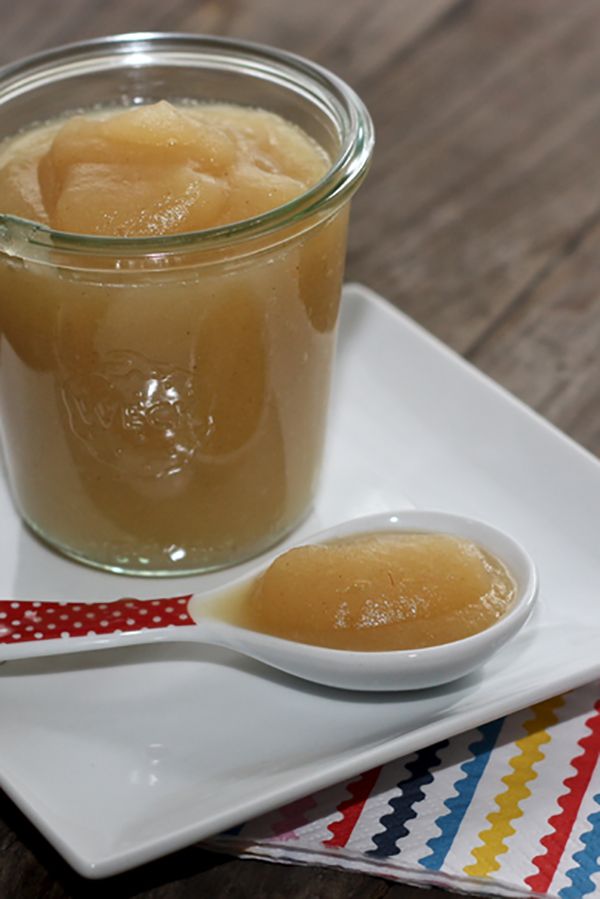
Apples/Applesauce (4)6 months+ Try Gala, Braeburn, Rome or Macs)
Vitamins: A, C, Folate
Minerals: Potassium, Magnesium, Calcium
This recipe is written so that you may use any amount of apples you wish.
Step 1: Peel, core and cut apple into slices/chunks
Step 2: Place slices or chunks into a pan with just enough water to slightly cover apples
Step 3: Boil/steam until tender; be sure to check on the water level and stir, T hat’s It. Easy Peasy.
Step 4: Apples may be mashed with a potato masher to achieve a smooth applesauce consistency. If your masher will not achieve a puree type of consistency, then follow steps 5 – 7
Step 5: Reserve any left over water to use for thinning out the apples
Step 6: Place into your choice of appliance for pureeing and begin pureeing.
Step 7: Add the reserved water as necessary to achieve a smooth, thin puree
Step 8: Add cereal (if desired) to thicken up the
Step 9: Ask your pediatrician about adding some cinnamon for new tastes.
You may also buy an “Adult” jar of Natural applesauce from your local grocers. Make sure you buy Natural Applesauce however. Read the labels if you are unsure. The only ingredients should be apples and water or just apples. A few companies may add ascorbic acid (vitamin C) or citric acid to their Natural Applesauce; this is fine.
Avocado (yes, avocado is a fruit.) (4)6 months+
Vitamins: A, C, Niacin, Folate
Minerals: Potassium, Phosphorus, Iron, Magnesium, Calcium
Step 1: Peel and take out the pit of a ripe avocado – do not cook
Step 2: Cut “meat” out and mash with a fork
Step 3: There should be no need to use a machine as just like bananas, avocados have a very soft consistency and texture. Avocados do not need to be cooked.
Visit the Avocado Baby Food page for more recipes and Information
Baked Apples 6-8 months+
Step 1: Core apple and leave peel on
Step 2: Place a wee bit of butter (if baby is ready for or has had dairy) on the inside of the cored apple (sprinkle a bit of cinnamon in the apple if your desire and if baby is ready for or has had cinnamon)
Step 3: Place in a pan with just enough water to slightly cover apples – about an inch of water
Step 4: Bake in a 400-degree oven for 30 minutes or until tender; be sure to check on the water level.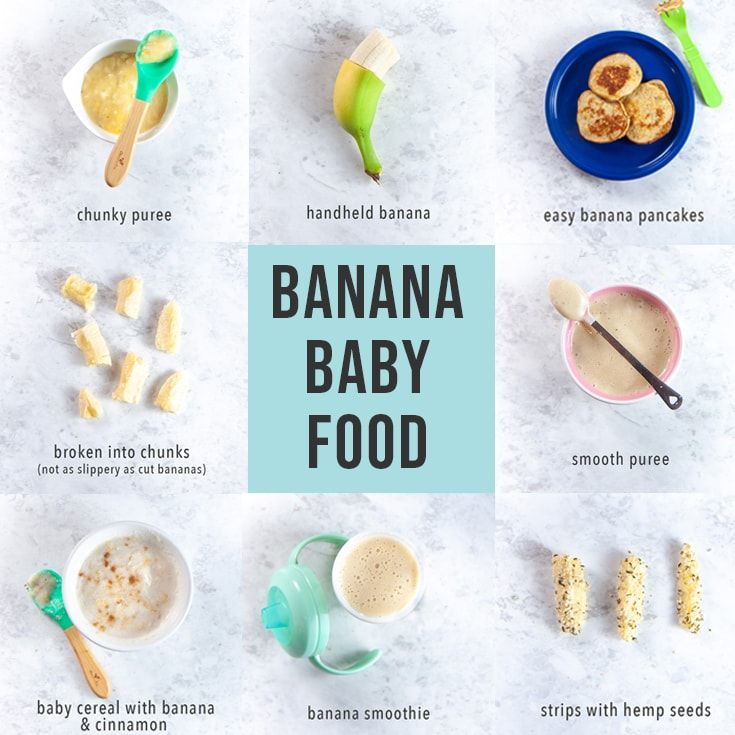
Step 5: Once baked, either cut apple into little bits and serve as a finger food or mash as directed above in the Apples/Applesauce recipe.
Banana Applesauce Mush (4)6 months+
- 1 apple
- 1 ripe banana
Step 1: Peel, core and cut apple into slices/chunks
Step 2: Place slices or chunks into a pan with just enough water to slightly cover apples
Step 3: Boil until tender; be sure to check on the water level.
Step 4: Apples may be mashed with a potato masher to achieve a smooth applesauce consistency or you can puree in an appliance as shown above
Step 5: Peel a ripe banana and mash in a bowl with a fork (heating in the microwave for approximately 20 seconds will soften the banana up if needed)
Step 6: Add applesauce to the banana and sprinkle with wheat germ* or crushed cheerios*
Step 7: Puree if necessary but mashing with a potato masher will typically get this mix smooth
*8 months+
Back to Top
Bananas (4)6 months+
Vitamins: A, C, Folate
Minerals: Potassium, Phosphorus, Selenium, Magnesium, Calcium
- 1 Banana or however many you wish
Step 1: Peel ripe banana – do not cook
Step 2: Place banana in a food processor/food mill or blender and puree
Step 3: You can also mash the banana in a bowl using a regular fork – heat in microwave for 25 seconds prior to mashing for extra softness
Step 4: Add formula/breast milk or water to thin or add cereal (if desired) to thicken up.
Mango Madness 6-8months+
Vitamins: A (1262 IU in one cup), C, E, K, Folate
Minerals: Potassium, Phosphorus, Magnesium, Calcium, Sodium
- 1 Ripe Mango
Step 1: Peel, de- seed and chunk the mango
Step 2: Place mango chunks in a blender or food processor
Step 3: Add Formula, Breast Milk, or Water and blend or mash until the proper consistency for your Infant is achieved.
How to Cut A Mango:
Cut the mango lengthwise, along the side of the mango pit. You will be cutting off its flesh from one side then repeating the same process on the other side. You will then cut the ends off the mango pit.
Cut the remaining flesh from the pit. Use a small sharp knife peel the skin from the flesh. Dice or cube as desired. It is easier to make your cubes/dices prior to removing the skin. Make sure you don’t cut through it. Once you have made your cube/dice “pattern” simply turn the skin skin inside out and slice the pieces away.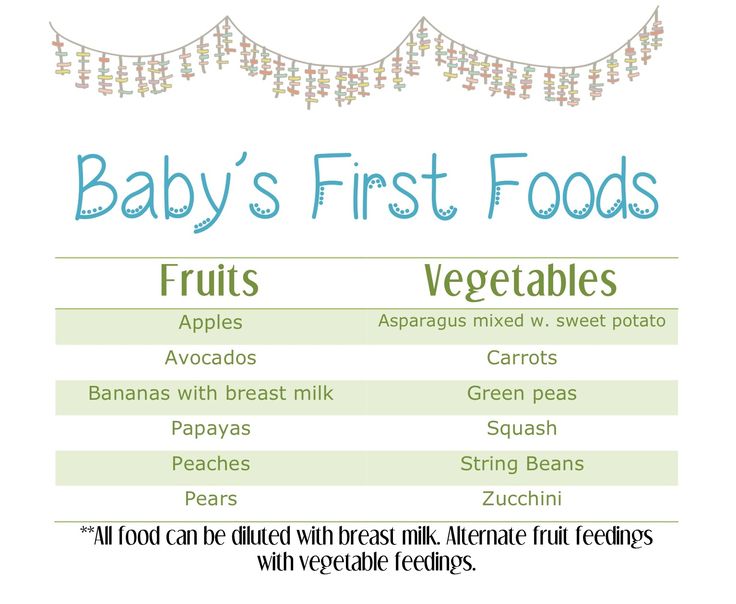
*Mango does not need to be cooked as it is typically introduced at an age where baby can tolerate raw fruits. Mango may be steamed to tender and then mashed if you prefer without harming it.
You may use mango as a great Baby Finger Foods. Simply peel, de-seed and then cut into dices or chunks that are manageable for your baby. You may wish to coat the mango pieces with “cheerio dust”, wheat germ or another cereal “dust” to help baby easily pick up the bits.
Papaya 6-8months+
Vitamins: A, C, Folate
Minerals: Potassium, Calcium
- 1 ripe papaya
Step 1: Peel, de-seed and chunk the papaya
Step 2: Place papaya chunks in a blender or food processor
Step 3: Add formula, breast milk, or water and blend or mash until the proper consistency for your Infant is achieved.
Some parents who have infants with sensitive tummies will give fruits a gentle steaming to help break down the sugars and fibers for easier digestion.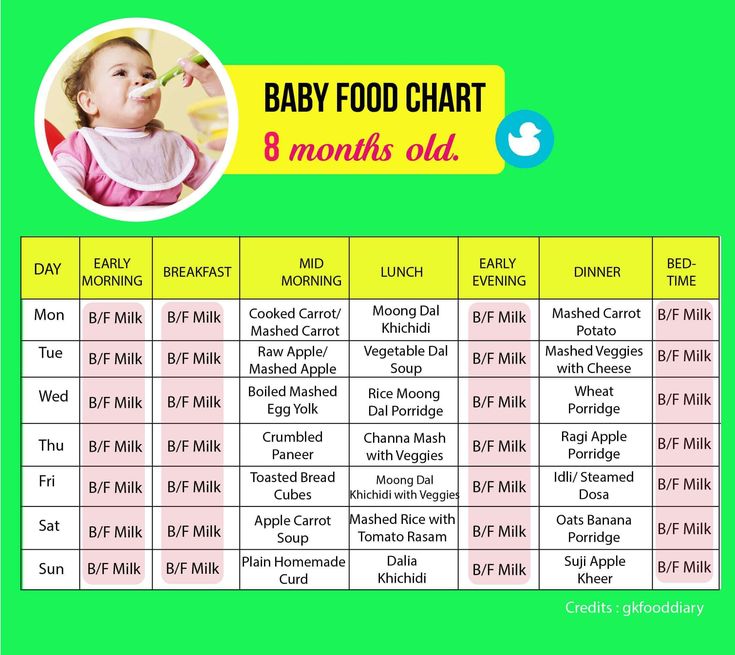 If you feel this is the case for your infant, chunk the papaya and then steam for 5-10 minutes until very soft.
Pears, Plums, Peaches and Nectarines too
Pear (Great for Constipation.) (4)6 months+Vitamins: A, C, Folate
Minerals: Potassium, Phosphorus, Magnesium, Calcium
Step 1: Peel and cut into chunks so as to avoid the little seed portion.
Step 2: Steam gently until tender if baby is under 6 months.
Step 3: Place in a blender/food processor and puree until smooth; you may be able to just use a fork!
Step 4: Use the leftover cooking water if needed but Pears tend to be very runny and watery without adding liquid.
Step 5: Add some baby cereal to thicken if needed.
Plums (4)6-8 months+
Vitamins: A, C, Folate
Minerals: Potassium, Phosphorus, Magnesium, Calcium
- 2-3 ripe plums
Step 1: Peel and pit the plums
Step 2: Cut into chunks
Step 3: Steam until tender in a scant amount of water if baby is under 6 months.
Step 4: Puree using the leftover cooking liquid.
You may need to mix in another fruit as plum purée has a tendency to be rather tart and/or bitter
Peaches (4)6-8 months+
Vitamins: A, C, Folate
Minerals: Potassium, Phosphorus, Magnesium, Calcium
You may steam or bake peaches; these methods work for nectarines, plums and pears as well. I HIGHLY recommend giving baked peaches a try at least once. You will find they are more tasty when baked.
Steam Peaches – Method 1
Step 1: Scrub fruit clean and carve an X into 1 side of the fruit
Step 2: Place X side down in a pan with an inch of water
Step 3: Bring water to a boil and steam until soft and tender
Step 4: Peel skin from fruit and remove pits and/or seeds
Step 5: Move to step #6 below
Steam Peaches – Method 2
Step 1: Peel fruit
Step 2: Pit the peach
Step 3: Cut the peach into dices
Step 4: Steam until soft and tender then
Step 5: Move to step #6 below
Bake
Step 1: Halve the fruit and place “open” side down in a pan filled with 1 inch of water
Step 2: Bake at 400F until soft and tender and/or puckering of the skin appears.
Step 3: Peel skin from fruit and remove pits and/or seeds then
Step 4: move to step #6
Step 5: Reserve any left over water to use for thinning out the fruits
Step 6: Peel off skin then place into your choice of appliance for pureeing and begin pureeing.
Step 7: Add the reserved water as necessary to achieve a smooth, thin puree
Step 8: Add cereal (if desired) to thicken up.
Back to Top
Prunes 6-8 months+
Vitamins: A, C, Folate
Minerals: Potassium, Phosphorus, Magnesium, Calcium
- 1 small bag of dried prunes (try to use unsulphured dried fruits whenever possible!)
Step 1: Soak dried prunes in warm water until they plump up or steam gently.
Step 2: Once plump and tender, toss into food processor or blender and begin to puree.
Step 3: Add liquid without sparing any. Prunes tend to become a pasty gluey consistency when pureed and the more water you add, the easier it is to puree to a texture your baby will tolerate.
Pumpkin (4)6-8months+
Read more about Pumpkin on the Pumpkin Baby Food page
Vitamins: A (12230 IU in 1 cup.), C, K, Folate, Niacin
Minerals: Potassium, Phosphorus, Magnesium, Calcium, Iron
- 1 medium sugar pumpkin, no heavier than 5 pounds
Step 1: Cut sugar pumpkin (the kind meant to be baked and eaten.) in half, scoop out seeds
Step 2: Place an inch of water in a baking pan, then place the halves “face” down in the pan. Check on water level while baking
Step 3: Bake in a 400 degree oven for 40 minutes or until the “shell/skin” puckers and halves feel soft then scoop squash “meat” out of the shell
Step 4: Place pumpkin “meat” into your choice of appliance for pureeing and begin pureeing.
Step 5: Add water as necessary to achieve a smooth, thin consistency.
Step 6: You can also peel the pumpkin, scoop out the seeds and then cut into chunks and boil/steam until tender (like when boiling potatoes for mashed potatoes) then follow steps 4 and 5.
You may also buy a can of pumpkin from your local grocers. Make sure you buy Pumpkin and NOT Pumpkin Pie mix however. Read the labels if you are unsure. The only ingredients should be pumpkin and water or just pumpkin. You do not need to cook canned pumpkin. You may thin the pumpkin with whatever liquid you prefer and then serve or warm and serve. You may also freeze canned pumpkin in ice cube trays if you wish.
Green Beans (4) 6 months+
(this method may be used for Peas as well)*
Vitamins A, C, K, Niacin, Folate
Minerals:Potassium, Sodium, Phosphorus, Iron, Magnesium, Calcium
Step 1: If using Fresh Beans, snap the ends off the beans and wash the beans. If using Fresh Peas, open the pods and scrape out the peas from the pod. If using frozen of either Peas or Green Beans, cook according to package directions.
Step 2: Place fresh beans into a steamer basket in a pan with a just enough water to slightly show through in the basket.
Step 3: Steam until very tender; be sure to check on the water level.
Step 4: Reserve any left over water to use for thinning out the beans.
Step 5: Place into your choice of appliance for pureeing and begin pureeing. It is best to use the setting that makes the finest liquid purees – green bean and pea skins are rather difficult to completely puree.
***Using a blender rather than a food processor or stick mixer might be better as well. ***
6. Add the reserved water as necessary to achieve a smooth, thin consistency
7. You may wish to push the green beans (or peas) through a sieve or mesh strainer to get rid of any remaining skins.
Carrots* 6-8 months+
Vitamins A (19,152 IU), C, Folate
Minerals:Potassium, Sodium, Phosphorous, Iron, Magnesium, Calcium
Step 1: Peel carrots and cut into small chunks
Step 2: Place chunks into a steamer pan with just enough water visible through the steamer basket
Step 3: Steam until tender
Step 4: Do not reserve any left over water to use for thinning out the carrots if baby is under 8 months old as Nitrates may seep into the cooking water
Step 5: Place into your choice of appliance for pureeing and begin pureeing.
Step 6: Add water as necessary to achieve a smooth, thin consistency
*(See Our article on Nitrates)
Garden Vegetable Combo
6-8 months+ after all vegetables have been introduced following the 4 Day Wait Rule
Green Beans, Summer Squash, Peas and Carrots
Step 1: Combine fresh or frozen green beans and peas, summer and/or zucchini squash and small pieces of chopped carrots.
Step 2: Add enough water to just cover the vegetables.
Step 3: Cook until tender, reserving water.
Step 4: Puree vegetables in blender or food processor,
Step 5: Adding reserved water from the vegetables until mixture is of the desired consistency.
Peas
Vitamins A (4533 IU), C, Niacin, Folate
Minerals: Potassium, Sodium, Selenium, Phosphorous, Iron, Magnesium, Calcium, Zinc
Step 1: If using Fresh Peas, open the pods and scrape out the peas from the pod. If using frozen type of either Peas or Green Beans, cook according to package directions.
Step 2: Place fresh peas into a steamer basket in a pan with a just enough water to slightly show through in the basket.
Step 3: Steam until very tender; be sure to check on the water level.
Step 4: Reserve any left over water to use for thinning out the peas.
Step 5: Place into your choice of appliance for pureeing and begin pureeing. It is best to use the setting that makes the finest liquid purees – green bean and pea skins are rather difficult to completely puree. Using a blender rather than a food processor or stick mixer might be better as well.
Step 6: Add the reserved water as necessary to achieve a smooth, thin consistency
Step 7: You may wish to push the peas (or green beans) through a sieve or mesh strainer to get rid of any remaining skins
Why can’t I get peas and green beans to puree smooth?
If you are using a Food Processor, try the Blender. The Blender seems to work the best for getting Peas into a more fine puree. Peas and green beans are very hard to get pureed into a very fine, smooth consistency. You can put them in a strainer and work out the “skins” if using fresh or you can use frozen for a smoother consistency and minimal effort to work out the “skins”.
Another method for getting beans and peas smoother is to immediately plunge them into ice cold water once you remove them from the stove top. Once cooled, puree as usual.
You may also use beans/legumes (kidney beans, lentils, split peas etc..) if your doctor says it is OK for baby’s age.
Please keep in mind that you will never be able to achieve the consistency equal to that of the baby food that comes in jars. Some parents choose to leave green beans and peas for later introduction, when baby enjoys texture and is able to eat them as Baby Finger Foods
Squash (Winter – Butternut, Acorn, Hubbard) (4) 6 months+
(nutrient info for squash of all types may be found at the Squash for Baby page)
- 1 medium sized butternut or acorn squash
Step 1: Cut acorn, hubbard, or butternut squash in half, scoop out seeds
Step 2: Place an inch of water in a baking pan, then place squash halves “face” down
in the pan. Check on water level while baking
Step 3: Bake in a 400 degree oven for 40 minutes or until the “shell/skin” puckers and halves feel soft then scoop squash “meat” out of the shell
Step 4: Place squash “meat” into your choice of appliance for pureeing and begin pureeing.
Step 5: Add water as necessary to achieve a smooth, thin consistency.
Step 6: You can also peel the squash, scoop out the seeds and then cut into chunks and boil/steam until tender (like when boiling potatoes for mashed potatoes) then follow steps 4 and 5
Squash (Summer/Zucchini) 6-8 months+
nutrient info for squash of all types may be found at the “Tips on Squash” page
- 3-4 small to medium sized yellow squash or zucchini
Step 1: Choose yellow squash or zucchini that are somewhat small in diameter, as these are the most tender.
Step 2: Wash squash thoroughly and cut into small slices or chunks. Do not remove skins.
*You may remove skins however an infant over the age of 8 months old should be able to digest squash puree with skins on
Step 3: Steam until tender then place into your choice of appliance for pureeing and begin pureeing.
Step 4: Add water as necessary to achieve a smooth, thin consistency
Yams/Sweet Potato (4)6 months+
Learn why a Yam really is NOT a Yam
Vitamins A (24,877 mg ), C, Folate
Minerals:Potassium, Sodium, Selenium, Phosphorous, Magnesium, Calcium
Step 1: Wash and poke holes in sweet potato with fork then wrap sweet potatoes in tin foil – do not peel for baking/microwaving (you can also do this in the microwave – only use plastic wrap and cook for 8 minutes on high or until tender).
Step 2: Place in a 400 degree oven and bake for 30 minutes or until soft
OR
Step 1: Peel sweet potatoes and cut into small chunks
Step 2: Place chunks into a pan with just enough water to slightly cover potato
Step 3: “Steam” boil until tender, be sure to check on the water level.
Step 4: Reserve any left over water to use for thinning out the sweet potatoes
Step 5: If you have baked your sweet potato, remove skins and use liquid from your preferred source
Step 6: Place sweet potato into your choice of appliance for pureeing and begin pureeing.
Step 7: Add the reserved water or other liquid as necessary to achieve a smooth, thin consistency
Remember, always consult with your pediatrician regarding introducing solid foods to your baby and specifically discuss any foods that may pose allergy risks for your baby.
These Stage 1 Homemade Baby Food Recipes are age appropriate for those babies who are between 4 and 6 months of age. Many babies start solid foods between 4 months and 6 months. Stage One fruits and veggies we have included are foods that your 4 month old baby who is a beginning eater will be able to tolerate. Of course, these recipes are also just yummy for babies who are older as well!
SHARE ON FACEBOOK SHARE ON PINTEREST
When is a child ready to start solids?
Diving into the world of solid food with your baby is a messy, adorable milestone that, let’s be honest, sometimes feels a little confusing. While some little ones happily slurp down baby cereal at 6 months, others won’t go near a mashed carrot until they’re hitting the 9-month mark — what gives?
The truth is, while solid food exposes babies to new tastes and textures, it’s not even necessary in the very beginning (yes, really).
“While the general recommendation for starting solids is between 4 and 6 months old, solids at this point are more about introducing baby to new tastes and developing oral motor function,” says Dr. Melanie Custer, a pediatrician at Deaconess Clinic in Evansville, Indiana. “Breast milk or formula should continue to be the primary source of nutrition through 12 months.”
Of course, when your baby is eyeballing your bowl of oatmeal every morning, it’s only natural to start wondering when to start baby food. Here, experts and veteran parents weigh in on the dos and don’ts of starting solids, a.k.a. Stage 1 baby foods. Ready the bibs!
What is Stage 1 baby food?
Stage 1 baby foods are single-ingredient foods that are very thin in consistency. You can either buy them at the store or make them yourself, as long as they’re a smooth puree with zero chunks and include just one ingredient so you’re introducing your baby to one new food at a time.
And remember, every child is different and develops at their own individual pace. Check with your child’s doctor for baby food recommendations during the first year.
When to start Stage 1 baby food
According to Custer, the reason it’s recommended that full-term babies wait until 6 months to try solids is because they’re losing iron stores that were built during pregnancy, and iron is important for infants’ brain development.
“Growing babies need all the nutrients they can get — and breast milk and formula are both far superior to solids when it comes to nutrients, including iron,” says Jenifer Thompson, an advanced practice dietician at Johns Hopkins in Baltimore. “It’s important to remember that solid foods are also called complementary foods because their intention is to complement the breast milk and/or formula baby is drinking.”
Thompson also notes that offering solids too early on — prior to 4 months — has been associated with excessive weight gain and adiposity (excess fat) in preschool and older ages.
Signs baby is ready to start solid food
Knowing your baby is ready for Stage 1 foods goes beyond celebrating their half-year birthday. It’s important to look out for developmental and social signals, as well.
“One of the biggest indicators that your baby is ready for solid foods is that they’re showing an interest in what other family members are eating,” says Dr. Kristen Treegoob, a pediatrician at Children’s Hospital of Philadelphia.
If you notice baby staring at your food and opening their mouth or leaning forward if food is ever offered, these are signs that solid foods have piquéd your baby’s interest, according to Thompson.
“I knew my son was ready for solids when, at 7 months, he started staring — like, really staring — at all of our food during dinner,” says mom of two Erin Henderson, of Waltham, Massachusetts. “It reached a point where we felt bad eating in front of him!”
Other signs your baby may be ready for solids, according to Custer and Thompson, include:
- They can sit up with little to no support.
- They can hold their head up without being wobbly.
- Their tongue thrust reflex has disappeared. “Before introducing solids, it’s important to make sure your baby can open their mouth for a spoon and accept food off of it, rather than pushing it away with their tongue, which is an involuntary habit until about 4 months,” says Custer.
What Stage 1 baby food to start with
According to Thompson, it’s recommended that early solid foods provide a source of iron, protein and zinc. But remember, you’re complementing your baby’s diet, not revamping it, so it’s OK to get a little creative and go with your gut.
“There is no medical evidence that solid foods must be introduced in any particular order, or that vegetables must be introduced before fruits to ensure that they don’t have a preference for sweets and will it not lead to a dislike of vegetables,” says Thompson.
And once you get going, continue to mix it up.
“There is no one-size-fits-all for solid food introduction, and we typically recommend parents introduce a variety of tastes, colors and food groups in the first few months,” says Treegoob. “That said, the American Academy of Pediatrics recommends that breastfed infants first begin with iron-rich foods, which include iron-fortified infant cereals and iron-rich pureed meats. Formula-fed infants typically get enough iron through formula, so they may have a little more flexibility at first.”
Here’s a list of first foods to try (make sure all are pureed to very thin consistency):
- Bananas.
- Avocados.
- Sweet potatoes.
- Carrots.

- Pureed meats, such as chicken and turkey.
- Butternut squash.
- Peaches.
- Applesauce.
- Grains, such as barley, oats, wheat and rice.
Custer does note that infants should not eat raw or cooked honey until 12 months, as it might contain spores that can cause infantile botulism, a serious illness that can hamper an infant’s ability to move, eat and breathe. For more tips on food storage, our experts weigh in on how long baby food lasts.
How to start Stage 1 foods safely
When your baby first starts experimenting with solids, keep in mind it’s a gradual process, and you’re still a ways off from three solid meals per day. In the beginning, it’s best to think of solids as more of a snack than a meal.
“Babies will often start with just a bite or two at first and advance to three to four tablespoons at a time,” says Custer. “When they’re first starting off around 6 months, they can have solids one or two times a day.”
“Foods should be offered one at a time when babies are starting off with solids,” says Thompson. “Then, wait between three to four days before introducing a new one, so you can properly identify an adverse reaction or intolerance.”
Here are a few more tips for feeding your baby:
- Make sure they’re sitting in an upright position, such as in a highchair, to prevent the risk of choking.
- Add a little breast milk or formula to their food. “At first, foods should be just slightly thicker than breast milk or formula to allow the infant to get used to eating,” Custer says. “Foods can get thicker as their eating skills are mastered.”
- Always feed your baby with a spoon. “Unless you’ve been advised by your pediatrician, never put solid foods, including infant cereal, in bottles with or without milk,” says Treegoob.
- Give baby breast milk or formula first. “Both of my babies were more open to trying solid foods in the beginning when they were happy and relaxed,” says mom of two Darcy McConnell of Garwood, New Jersey. “That was always after they had their bottle.
 ”
”
Also, be patient. Starting solids is a learning curve for everyone.
“If your baby turns their head away, spits out food or pushes you away with their hands when you try to feed them solid food, then they are not quite ready,” says Treegoob. “Try again in a few days.”
How baby-led weaning works
A less conventional way to start your baby on real food is baby-led weaning, which forgoes what’s thought of as Stage 1 baby food altogether, as well as a spoon.
“The baby-led weaning approach to introducing solid foods recommends that purees and traditional baby foods be omitted, and to start with finger foods, as well as self-feeding right from the beginning,” says Thompson. “This method may be preferred for some, but should always be discussed with a pediatrician since a possible concern of this method is the risk of choking, which could be minimized with appropriate food choices.”
Proponents of baby-led weaning believe that letting baby pick, choose and explore food on their own will help with appetite control overall (possibly reducing the risk of obesity later in life), as well as promote a taste for a wider range of foods. All of this said, research on baby-led weaning is still fairly scant, so it’s important to discuss it with your pediatrician if you choose to take this approach.
Ready for the next stages?
- Stage 2 baby food
- Stage 3 baby food
Rules for the introduction of complementary foods for a child 4 - 12 months: the first complementary foods, menus, diagrams, tables, principles of nutrition for a baby
Modern principles of complementary foods for children is a kind of fusion of practical experience and the latest scientific developments. They are based on the recommendations of the European Association of Pediatric Gastroenterologists, Hepatologists, Nutritionists ESPGHAN , the American Academy of Pediatrics AAP and national recommendations of relevant ministries and associations.
Complementary foods: online course
Modern recommendations are based on the analysis of the results of many studies on the composition, timing of the introduction of complementary foods in Europe for healthy full-term newborns, taking into account various aspects of the introduction of complementary foods, its impact on physical and mental development. Timely introduction of complementary foods contributes to the optimal development of all systems and organs of the child, physical parameters, psychomotor development, and the activity of the nervous system. The period of introduction of complementary foods is very important for the growth and development of the child, as well as an outstanding stage in the transition of the child from breastfeeding to feeding from the general table.
- It is inappropriate to develop separate recommendations for the introduction of complementary foods for breastfed or artificially fed children, the approaches in these cases are the same
- Breastmilk mothers remains the gold standard exclusive breastfeeding for at least 4 months (17 weeks) of an infant's life, up to 6 months (26 weeks), the standard of exclusive or predominant breastfeeding
- The digestive tract and kidney function are mature enough for a baby to accept complementary foods at 4 months of age, and between 5 and 6 months the baby develops the necessary motor skills to consume solid foods.
 Therefore, at this age, it is important to give food of the right consistency and in the right way
 - A well-nourished mother can provide all the nutrients, vitamins, and minerals her baby needs through exclusive breastfeeding up to a maximum of 6 months of age
- Some children may need iron supplementation earlier than 6 months
- It is important to continue breastfeeding in parallel with the introduction of complementary foods. This has been shown to reduce the risk of gastrointestinal and respiratory infections, as well as hospitalizations in a child
- Comparing the initiation of complementary foods at 4 or 6 months of age, no significant differences were found in the effect on growth and body weight, the development of obesity during the first 3 years of life
- At the same time, a high risk of developing overweight and obesity has been established with the introduction of complementary foods before 4 months of age
- Complementary foods (solid or liquid food other than breast milk or infant formula) should be started no earlier than 4 months and no later than 6 months
- With age, with the introduction of complementary foods, the child should be offered food varied in texture, texture, taste, smell
- Children have an innate tendency to distinguish and prefer sweet and salty foods, reluctantly eat bitter, which we cannot change.
 But we can shape and adjust the taste preferences of the child through training, systematically offering the child foods with different tastes, including sour, bitter green vegetables
 - Whole cow's milk Not recommended for infants under 12 months of age. The use of cow's milk is associated with the intake of an increased amount of energy, protein, fat, and lower - iron. Therefore, children who consumed large amounts of cow's milk at an early age had a higher risk of developing iron deficiency anemia
- Eating more protein when complementary foods increase the risk of overweight and obesity, especially in individuals with a predisposition to this, so protein intake should not exceed 15% of energy intake during the day
- The baby's need for iron is very high during the entire period of complementary feeding, so it is necessary to ensure the provision of iron-rich foods, especially for breast-fed children
- Allergenic products can be administered from the age of 4 months at any time, since it is during this period that the formation of immune tolerance to the allergen occurs.
 For example, children at high risk of developing allergic reactions to peanuts should be administered at 4-12 months of age under specialist supervision. No relationship was found between the timing of the introduction of allergenic complementary foods and the development of allergic or immunological diseases. However, this does not mean the need for early introduction of allergenic products to everyone, but it emphasizes that there is no need to postpone the introduction of allergenic products after 4 months for a longer period;
 - Gluten may be offered to a child aged 4-12 months, however large amounts of gluten should be avoided during the first weeks after initiation of its introduction, thereafter a safe amount has not been established. The type of feeding (breast/artificial) was not identified with the introduction of gluten to reduce the risk of developing celiac disease, type 1 diabetes;
- Sugar or salt should not be added to complementary foods, and sweetened drinks and juices should be avoided.
 Sugary drinks are liked by babies in the first months, but if they are not given, but after 6 months, the children no longer like them very much. Sugar affects future eating behavior. Sugar is an important factor in the development of caries - it contributes to caries, as glucans can be formed, which increase the adhesion of bacteria to tooth enamel, disrupt the diffusion balance of acid and buffer systems, which ultimately contributes to damage to the enamel.
 - Vegetarian diets are contraindicated in young children due to the risk of vitamin B12, iron, zinc, folate, long-chain fatty acid, protein and calcium deficiencies, which can lead to irreversible adverse effects and impaired cognitive development;
- Vegetarian diet can only be used under the close supervision of a doctor and nutritionist, with the obligatory additional administration of vitamins B, D, iron, zinc, calcium, proteins, PUFAs, which can ensure the appropriate growth and development of the child.
 It is important that parents should be aware of the risk of irreversible harmful consequences (mental disability, death of the child) that may develop if they do not follow the recommendations of specialists.
The General Rules for the introduction of complementary foods for children of the first year of life:
- Introduce the first feeding It is better in the morning feeding 9-11 in the morning to trace the reaction of the child to the new product.
- Without added sugar and salt .
- Give the first complementary food to the child when he is calm and not tired .
- Start with 0.5-2 teaspoons. If the child refuses, do not insist, try to give later or the next day.
- If the reaction is normal - no rash, no skin changes, no stool changes, double the dose the next day.
 Gradually bring the first complementary foods of the child to the age norm 80-200 g
 - If there is an allergic reaction or other intolerance reaction - refuse to introduce this complementary food for three days, if the adverse reaction occurs again - do not give this product, contact your pediatrician.
- Each subsequent new complementary food must be one-component only: marrow, cabbage, broccoli, buckwheat, meat, etc.
- Mixed food dish give when the child has already become acquainted with all the products separately.
- It is not advisable to introduce new foods three days before and after vaccinations.
If you are thinking about introducing complementary foods, then your child should already have certain signs of readiness for this:
- Holds head
- Able to stand alone, practically without support, sit on a special high chair with side support
- Opens mouth when a spoonful of food is brought
- Turns away from a spoonful of food when not hungry
- Closes mouth with spoon in mouth holds food in mouth and then swallows rather than pushing or spitting it out
The first complementary foods at 4 months
The age of 4 months as the minimum for the introduction of complementary foods was also chosen because at 4 months the child's gastrointestinal tract becomes more mature: the initially increased permeability of the small intestine mucosa decreases, the number of digestive enzymes, a sufficient level of local immunity is formed, the child acquires the ability to swallow semi-liquid and thicker food, associated with the extinction of the “spoon ejection reflex”.
Therefore, to the question whether it is necessary to give complementary foods to a 3-month-old baby , one can unequivocally answer: no, it's too early!
But 4 months, this is the time when you can think about the introduction of complementary foods. At the same time, it should be remembered that at the age of 4 months, the child has enough mother's milk or a highly adapted milk formula for its full development. In addition, when they talk about complementary foods at 4 months, they usually mean the end of the 4th month of life. It is important to continue breastfeeding in parallel with the introduction of complementary foods.
Video: Body in 4 months
If you introduce complementary foods at the 4th month of the child -usually one-component vegetable or fruit puree if the child does not gain weight well enough well , then it can be gluten-free porridges: rice and buckwheat . It is better to start with vegetable puree. Kids are smart and if he tries a sweeter fruit puree, he can refuse vegetable puree for quite some time and you may have difficulty introducing this very healthy dish.
What is useful in vegetable supplements and what is the best way to prepare it?
Vegetable puree - for the first feeding can be prepared from cauliflower, zucchini, pumpkin, broccoli - these are low-allergenic foods, are among the ten most useful vegetables in the diet of children, contain a large amount of healthy proteins, fiber and vitamins, microelements ! Fiber helps move food through the digestive tract and promote beneficial microflora in the gut. Pectins absorb and remove toxins from the baby's body. Vegetables have a positive effect on the acid-base balance of the body, creating conditions for the proper functioning of all organs and systems.
Cauliflower - is a good source of fiber, protein, minerals and vitamins: A, B1, B2, B3 (PP), B6, as well as a small amount of vitamins K, D and tocopherol (vitamin E). In the inflorescences of cabbage there is a lot of magnesium, sodium, potassium, phosphorus, calcium, iron. It contains twice as much iron as green peas, peppers and lettuce. Cauliflower protein is easily digestible and its content is quite high. Cauliflower protein contains essential vitamin U (methionine). It is one of the essential amino acids that cannot be synthesized by the human body. Other essential amino acids are also present in a small amount: arginine, tryptophan.
Zucchini - rich in vitamins and microelements. It contains potassium, magnesium, phosphorus, calcium, vitamins C, B1 and B2 and others, folic acid. Which plays an important role in the processes of hematopoiesis. Zucchini is rich in such important trace elements as iron and copper. They are necessary for the formation of nervous tissue, normalization of metabolism, as well as for the formation of hemoglobin, which is a good prevention of anemia.
Broccoli is a very healthy vegetable that is a type of cauliflower. Pleasant soft taste and good digestibility of the product, unique composition have a beneficial effect on the health of both adults and children. Eat unopened cabbage inflorescences. This is also a low-allergenic vegetable, rich in protein, fiber, vitamins, calcium, iron, trace elements and even phytoncides. The content of calcium and magnesium is sufficient to balance the functioning of the nervous system, ensure the normal regulation of the child's sleep and wake cycle, and good stress resistance. A child with such nutrition becomes calmer, less excited and naughty.
Broccoli is the leader in choline and methionine content. Only 50 g of broccoli provides the baby with a full set of nutrients for a day.
Pumpkin - the largest vegetable on Earth. It is one of the ten most useful vegetables in the diet of children, contains a large amount of useful proteins, fiber and vitamins, including beta-carotene, vitamin C, E, K, iron, potassium, magnesium, trace elements that are indispensable for children's nutrition, as they strengthen immunity and help fight inflammation, have a beneficial effect on the nervous system. By the content of carotene, pumpkin exceeds carrots by 5 times.
Vitamins and microelements contained in pumpkin help the child grow, provide healthy sleep, are responsible for the condition of the skin and eyes, improve metabolic processes, and accelerate the removal of harmful substances from the child's body. Due to its beneficial qualities, pumpkin can be one of the first types of complementary foods for an infant.
All vegetable purees have a specific vegetable smell, this is absolutely normal
0006
Introduction of vegetable puree
Vegetables should be introduced into the child's menu gradually. Start giving each new vegetable in the form of a monocomponent puree in the amount of ½ teaspoon, preferably at breakfast, so you can track the manifestations of food allergies or intolerance reactions to this product. If all is well, then the next day, offer him a teaspoon. So gradually you need to bring the portion to 50-100 grams.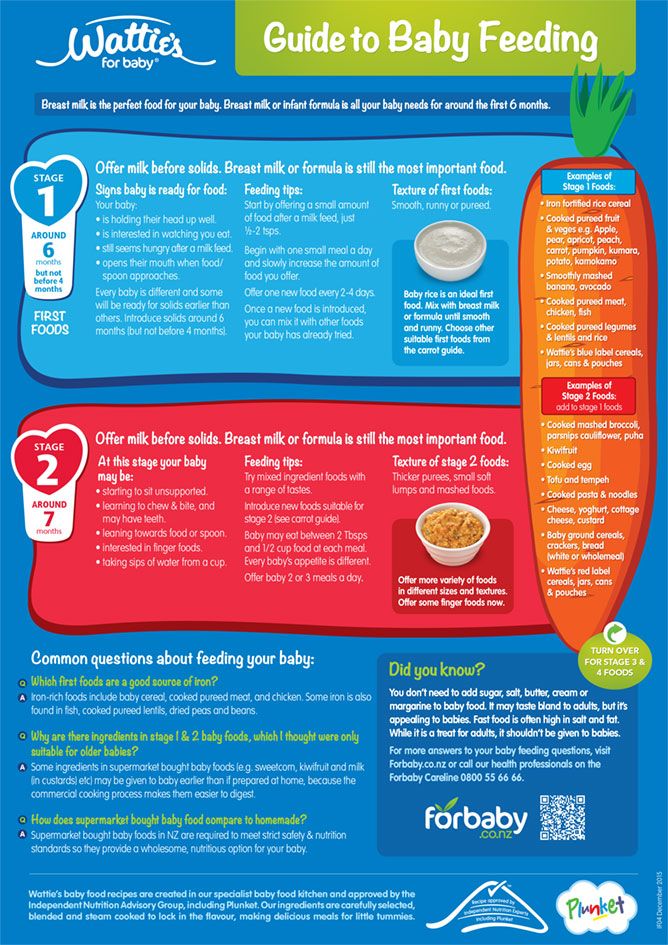 A serving of vegetable puree per day for an 8-month-old baby is approximately 80 grams. In a year, you can increase up to 150 grams. The next product can be administered no earlier than 4-5 days later. If a child has skin rashes, his stool has changed, then you need to remove the product from the diet and consult a pediatrician.
If the child does not like the dish, for example, broccoli, do not give up and continue to offer this vegetable in small quantities - 1-2 spoons a day, maybe not even once, but 2-3 times before meals, and after 7 - 10, and sometimes 15 days, the baby will get used to the new taste. This diversifies the diet, will help form the right taste habits in the child.
Fruit puree introduction
Fruit puree is a definite alternative and addition to vegetables. It can be made from apples, bananas - by the way, do you know what a berry is?, sweet varieties of pears. These fruits contain substances useful for babies, vitamins and minerals, including iron, which is extremely necessary for children. Prune puree is somewhat separate, it has a good effect on the baby's digestion, especially with a tendency to constipation, and, of course, also contains many useful substances.
Porridges in the nutrition of a child in the first year of life.
Porridge can be introduced into the baby's diet at the end of 4 months or at the fifth, sixth month of life. As a rule, they go as a second food after vegetable or fruit puree. But if your child is not gaining weight very well, or you have been feeding your child with breast milk or infant formula until almost the end of 6 months, then complementary foods can be started with the introduction of cereals.
It is important to start with one-component, low-allergenic cereals which does not contain gluten : this is buckwheat, rice, corn porridge .
gluten-containing cereals include: wheat, oats, rye, barley, millet .
According to modern data , the period of introduction of gluten into the child's diet is not of fundamental importance, but the latest recommendations draw attention to the fact that its amount in the baby's diet should not be large. Therefore, it is better to add semolina and oatmeal to other porridge in a limited amount, and not to give it on its own. No relationship was found between the timing of the start of complementary foods that contain gluten and the development of celiac disease in a child. If your child hasn't tried porridge yet, start with a dairy-free, gluten-free, one-ingredient buckwheat or rice porridge.
Rice - very useful for growing baby. It has a low content of vegetable proteins, therefore it is easily digested and is especially useful for toddlers with unstable stools. Rice has a high nutritional value and, to a certain extent, protects the delicate intestines of the baby due to its enveloping effect.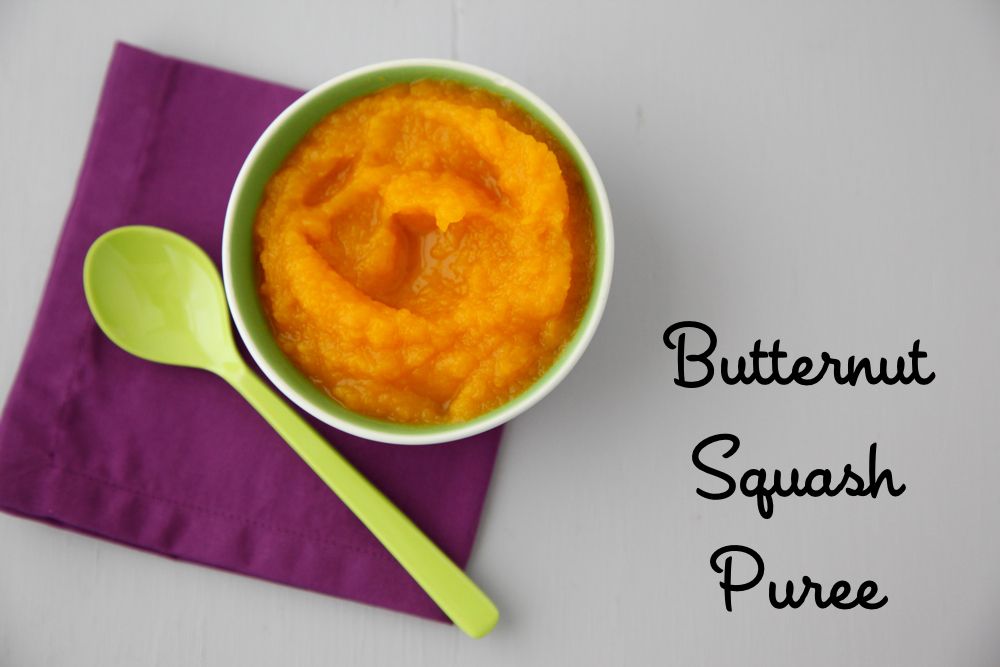 This is a hearty and nutritious dish with a good content of carbohydrates and proteins, potassium and magnesium, calcium and phosphorus, beneficial amino acids and vitamins. It replenishes energy costs, energizes and gives strength. Rice is not recommended for overweight children and those who suffer from severe constipation.
Gluten-free buckwheat porridge - very nutritious and rich in iron, fiber, rich in various vitamins and microelements. This is also a good option for starting a child's acquaintance with adult food. These porridges can be prepared with water, breast milk, milk formula, which your child is used to. No need to add salt and sugar.
Rules for introducing porridge into baby food
If the child already eats porridge from 5 months, then at 6 months you can offer a more complex porridge - for example, rice porridge with apricot or raspberries, rice porridge with banana (this is very successful a combination both in taste and in its properties) or even more complex porridge - corn-rice with banana.
Over time, you can start adding apple, banana, pear, plum and prunes, apricot and dried apricots, broccoli, carrots, berries to porridge, , provided that the child is not allergic to them.
The rules for introducing cereals are the same as for vegetable puree. In order for the child to get used to the new product and its consistency more easily, first prepare 5% porridge (5 g of cereal per 100 g of water), if you make it yourself. Porridge is usually cooked with water, but can be made with breast milk, infant formula. First, give the baby one teaspoon, then, within 7-10 days, bring the volume of porridge of the same percentage to the full volume of feeding (150 g). If all this time the porridge is well tolerated, i.e. there are no skin rashes, the child has stable stools, they switch to a gradual (starting from 20-30 g) introduction of porridge of the same cereal, but already at a 10% concentration (10 g of cereal per 100 g of water).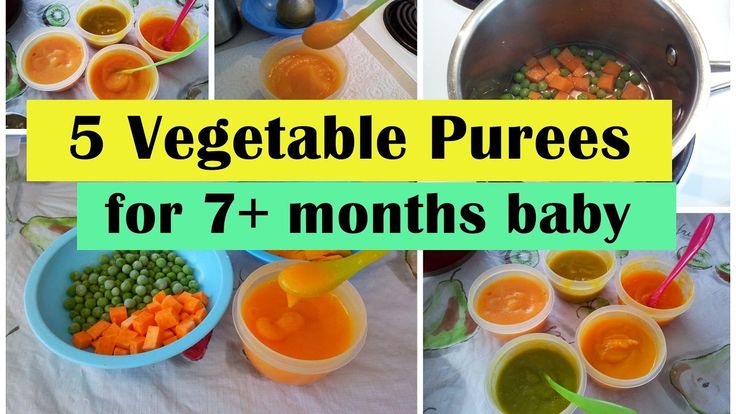 In other words, a thicker porridge is administered no earlier than 7-10 days from the beginning of the introduction of porridge. The complete introduction of 10% porridge to the baby is also carried out in 7-10 days. The third week falls on the complete addiction of the child to a new dish. Only after that you can introduce a new cereal (in the form of 10% porridge) or the next complementary foods.
Video: feeding porridge
You need to give porridge from a spoon, better in the morning for breakfast. After porridge at the stage of its introduction, the child should be offered breast or milk formula. With artificial feeding, the volume of the mixture after a portion of porridge should be such that, together with porridge, it is 200 ml with five meals a day.
Norms for the introduction of cereals
In the future, the volume of the portion of porridge gradually increases, amounting to:
- 7-8 months - 160-170 ml
- 8-9 months - 170-180 ml
- 9-12 months - up to 200 ml (there is a complete replacement of one feeding of the child with complementary foods.
 )
)
Cereal schedule
- Day 1 – 1 teaspoon (5 g)
- Day 2 - 2 teaspoons (10 g)
- Day 3 - 3 teaspoons (15 g)
- Day 4 - 4 teaspoons (20 g)
- Day 5 - 50 ml (50 g)
- Day 6 - 100 ml (100 g)
- Day 7 - 150 ml (150 g)
Meat complementary foods - the rules for introducing meat into the child's diet
Meat is usually the third, very important product of complementary foods, after vegetables and cereals. The meat contains amino acids, complete animal protein, B vitamins (B1, B2, B6 and B12), heme iron, potassium, calcium, zinc, phosphorus, which are necessary for the growth and development of the child. It is very important to understand that mashed meat contains iron, which is easily absorbed. And the addition of meat to vegetables improves the absorption of iron from them, from vegetables.
Iron deficiency can seriously affect the intellectual development of a child, his immunity, hematopoiesis. Since your task is to raise a healthy and intelligent child, meat complementary foods must be introduced without fail and in a timely manner.
Heme iron - found in meat products and easily digestible (red meat-veal, liver), absorption is about 25%.
Non-heme iron - found in plant foods (beans, beans, lentils, peas, nuts, tomatoes, cauliflower, green leafy vegetables, apples, dried fruits, but it is absorbed much worse from plants - only 3-5% Iron absorption from other animal products (eggs, fish) is 10-15%.0013
It is important to know that human milk enhances , while cow's milk reduces iron absorption .
Timing of the introduction of meat complementary foods
It is advisable to introduce meat puree to a child aged 6-8 months . This, to some extent, depends on when cereals and vegetable/fruit purees were introduced. if your baby has been eating vegetables and cereals since 4 months, meat can be introduced at 6 months. From 7 months it can be administered if the child is not gaining weight. From 8 months to children who started complementary foods at 6 months.
For children at risk for the development of anemia, an earlier introduction of meat at the age of 5 - 6 months is recommended.
It has been proven that only daily use of children's enriched porridge and meat puree can fully meet the needs of children in iron, zinc and other micronutrients.
You can start meat complementary foods with lean beef, veal , but better with less allergenic poultry meat ( turkey, chicken ), or rabbit, these are the most easily digestible meats.
Goose and pork are fatty for the baby, and the meat of duck and other birds of the reservoirs is also not suitable for the first feeding. They are recommended to give only after 3 years;
Horse Meat is perfect for your little one. The product is rich in carbohydrates and proteins, but it is almost impossible to find horse meat for sale.
Meat should be introduced into the child's diet gradually, at lunchtime, first a quarter of a teaspoon and, gradually adding, bring it up to the daily norm: At 8 months, about 50 g, at 9months-60-70 g.
Video: Power feeding meat
Scheme for the introduction of puree
- 1 day ¼ of the vegetables
- Day 2 - ½ teaspoon
- Day 3 - 1 teaspoon
- Day 4 - 2 teaspoons
- Day 5 - 3 teaspoons
- Day 6 3-4 teaspoons + vegetables
At first, it is better to give meat with vegetable puree, which the child has already eaten, so that he adapts better to the new product, and iron is better absorbed. Children at the end of the first year of life can already be given 3 varieties of mashed meat.
Baby menu at 7-8 months
At 7-8 months you can start giving children 0 baby cottage cheese 9000 Start with 1/2 teaspoon. Within a month, the daily volume of cottage cheese consumption by a baby can be increased to 30-40 g. In addition, a child of 8 months is recommended to give sour-milk infant formula. But ordinary yogurt from the store should not be given. At this age, the child should receive 5 g of butter and 5 g (1 teaspoon) of vegetable oil, ¼- yolk - 2-3 times a week.
Baby's menu at 9 months
At the age of 9 months Your baby is already familiar at this age already usually familiar: , egg yolk . You may have already met meat . Therefore, at this age, they usually give already more complex purees and porridges, less homogenized, of various tastes , gradually preparing him for adult nutrition, increasing the variety and quantity of complementary foods. It is desirable to feed the baby at the table with other family members, he must see how his parents eat with pleasure, he learns from them. The amount of food offered should be based on the principles of actively encouraging the baby to eat, it is necessary to continue to gradually change the consistency and increase the variety of complementary foods, adhering to the recommended frequency of introducing complementary foods.
At this age, the child usually gets complementary foods 3 times a day . His diet depends on the age of the start of complementary foods. If the baby began to give new food at 4-5 months, the list of allowed foods will be much wider than if this happened at 6-7 months. Therefore, all this is very individual, there are no absolutely rigid frameworks and recommendations. On the Internet you will find a lot of different advice on baby food, if you are not sure about something, it is better to consult your pediatrician.
From vegetables the baby can be given what he ate before, mixing them: pumpkin, zucchini, cauliflower, broccoli, carrots and others, adding 1 tsp. vegetable oil . If the baby does not have skin reactions, then you can give beets . It is also possible to give two-, three-component vegetable purees and soups , but only on condition that he is already familiar with these products and he has not had a reaction to them.
If you have introduced complementary foods, then you need to remember that water is an important part of baby food. You can use purified water or special water for children .
In addition, at 9 months you can give special baby wheat cookies , which the baby will be happy to eat on his own as an adult, white wheat bread, this improves hand motility, improves eating skills, but at the same time he must be supervised.
At this age, you can start giving fish puree from low-fat varieties: river perch, pollock, hake, haddock, zander, pollack - start with ½ teaspoon, bringing up to 40-50 g , watching the reaction of the child , give at lunchtime instead of mashed meat, 1-2 times a week.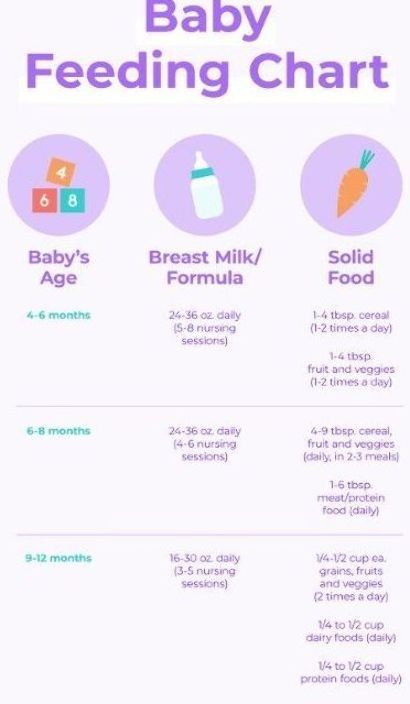 But a number of pediatricians do not advise giving it up to a year, it is a useful, but highly allergenic product.
Baby menu at 10 months
B 10 months usually 2 times a day the child receives the mother's breast or special milk formulas . Various cereals: buckwheat, rice, corn, oatmeal, wheat, semolina porridge . add 5-10 g of butter to cereals. At this age, it is already possible to make complex cereals from 2-3 cereals with which the child is familiar, add various fruits, vegetables: apple, banana, pear, plum and prunes, apricot and dried apricots, broccoli, carrots, berries , provided that the child is not allergic to them, or use ready-made cereals with fruit.
From vegetables the baby can be given what he ate earlier, mixing them: pumpkin, zucchini, cauliflower, broccoli, carrots, beets and others, adding 1 tsp.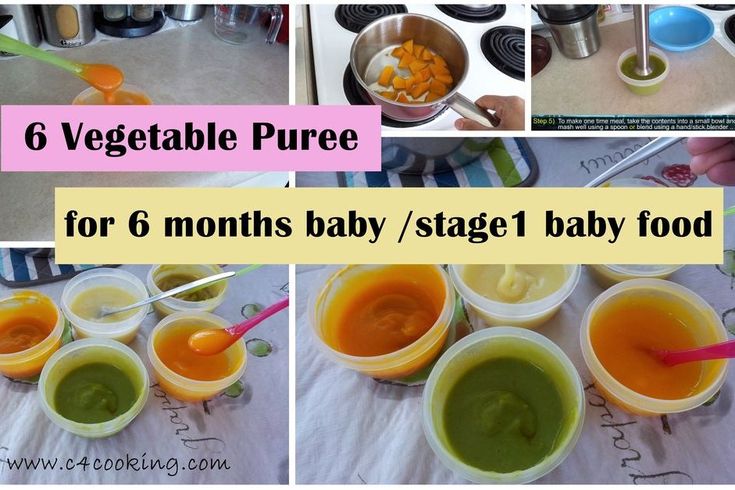 vegetable oil . It is also already possible to give two-, three-component vegetable purees and soups, but only on condition that he is already familiar with these products and he did not have a reaction to them.
At this age, the baby already usually eats about 40-50 g of baby meat puree from chicken, turkey, rabbit , with good tolerance to cow's milk proteins from veal or beef. If he has been eating meat for a month or more, you can start giving him two-component meat purees , for example from chicken and turkey.
At this age, fish puree from low-fat varieties is usually started: river perch, pollock, hake, haddock, pike perch, pollock with ½ teaspoon, bringing up to 40-50 g, following the reaction of the child, it is better to give at lunchtime instead of mashed meat, 1-2 times a week .
At 10 months, children's cottage cheese should be given 2 times a week. Start with 1/2 teaspoon if you have not given it before, the daily amount of cottage cheese at this age is 40-50 g .
It is recommended to give special sour-milk baby formulas.
At this age, a child can receive 5-10 g of butter and 5 g (1 teaspoon) of vegetable oil, and 2-3 times a week½ - yolk .
Child's menu at 1 year old
The child is one year old. He has already grown up, he already has 6-10 teeth, with which he gnaws everything he sees, he is interested in chewing food, his digestive enzymes already work well and he has already become acquainted with various products: vegetable and fruit purees, various cereal cereals, meat and fish, sour-milk mixtures. In fact, he is already prepared for the transition to a more adult diet. In a year, changing the diet involves turning to new products and gradually changing the way they are prepared and the degree of grinding.
You need to eat 5 times a day with an interval 3.5-4 hours .
semi-liquid dishes should still remain the basis of nutrition, but not only mashed dishes, but also containing small pieces of food . Too dry food should not be given to the baby yet, as he may have difficulty swallowing.
In the year the child already tries to eat with his hands and he should be encouraged to do so. Finely chopped, soft foods can be given eg: small pieces of soft fruit, vegetables, cheese, well-cooked meat, pasta , etc. and foods that dissolve quickly, children's biscuits, children's crispbread - as food with the help of hands.
It is necessary to avoid products that can enter the respiratory tract and cause asphyxia - sausages and other hard meat products , nuts (especially peanuts), grapes, raisins, raw carrots, popcorn, round candies . Hold off on this for now.
In a year, part of the children are without mother's milk. But if your baby is still not weaned - do not rush, if possible, give him a breast before bed at night. You can also breastfeed between main meals. At this age, the child receives all the main vitamins and minerals from food, but he can get a number of biologically active components from breast milk.
Dairy products
Dairy products still occupy an important place in the child's diet, it is a source of calcium, B vitamins, protein, milk sugar and fat. It is better to use special baby milk (marked with a triple on the packaging), baby fermented milk products: kefir, yogurt in total 500-600 ml per day .
Cottage cheese
The child should be given cottage cheese. The daily dose of cottage cheese after 1 year can be increased up to 70 g per day . It can be given pureed or combined with fruit puree, pudding, casserole. This contributes to the development of chewing skills.
Butter
Butter can be added to cereals or smeared on wheat bread, cookies in a dose of up to 12 g per day.
Low fat sour cream and cream
After 1 year, you can give low-fat sour cream and cream in small quantities.
Vegetables
Every year a child must be given various vegetables , it is good to combine them with protein products, meat . The vegetable diet can now be diversified with green peas, tomatoes, turnips, beets, carrots, spinach in the form of mashed potatoes. Legumes are still better not to give.
Fruits and berries
After 1 year, you can gradually introduce the baby to new fruits and berries: strawberries, cherries, cherries, kiwi, currants, gooseberries, chokeberries, sea buckthorn, raspberries, blackberries, cranberries, blueberries, lingonberries and even citrus fruits . But do it gradually, watching the reaction of the child. Berries with a dense peel (gooseberries) are best mashed, while soft juicy fruits (peaches, strawberries, apricots, kiwi) can be offered to the baby in pieces.
Daily dose of fruits - approx.
Meat products
Meat products can be given in the form of steam cutlets, meatballs, meatballs, meat soufflé and pudding in an amount up to 100 g daily - beef, veal, lean pork, rabbit, turkey, chicken.
Fish
Fish can be given once or twice a week for 30-40 g per meal as a substitute for meat dishes
Eggs
Chicken, quail eggs give boiled or in the form of omelets in milk, you can try with vegetables.
Kashi
Porridge can be cooked from rice, oatmeal, buckwheat, corn, millet, semolina. At this age, they should still have a uniform consistency, so it will be easier for him to swallow. You can use ready-made industrial, children's instant cereals, for example, various multi-cereal cereals, in which fruits, crackers, cereals have already been added. Give 1 time per day.
Water
Be sure to give the child clean water to drink, better bottled water for children, as much as he wants . In addition to her baby can drink vegetable and fruit juices, dairy products, compotes, weak tea.
No need to give:
no need to give confectionery and sweets to a child 0005 . From sweets at this age, you can sometimes give marmalade, dried fruits and cookies.
Do not give sausages and sausages , they are rarely prepared from high quality meats and are rich in various food additives
Calorie content and volume
0003 1200 ml .
Table for complementary foods by month: Download
All videos: Putting a child for a child from 4 to 12 months
9000 Let your children be healthy and successful!
Other news in category
Newborn - online course "Mom's Way: Newborn" from Professor Nyankovsky on caring for a baby in the first months of life
Baby's first litter. Porridge or vegetable puree?
Complementary foods at 4 months | Useful tips from the Tyoma brand
It is well known that the ideal time to introduce complementary foods is between 4 and 6 months of age. The presence of a child's teeth or the ability to sit are not signs of a child's readiness for complementary foods. It is important that the baby does not have a reflex of pushing the spoon with his tongue, and he can swallow food thicker than breast milk or formula well.
The pediatrician will help determine the exact start date for complementary foods, and in most cases this is the golden mean of 5-5.5 months. But there are situations when complementary foods need to be started from 4 months, including even a child who is exclusively breastfed.
In what cases are complementary foods introduced from 4 months?
- The child is not gaining weight well or is lagging behind in physical development.
- The child has functional digestive disorders (regurgitation, constipation).
- The mother has little breast milk or it is poorly absorbed.
- The child has a reduced appetite or is not digesting formula well.
- The child has signs of iron deficiency (anemia).
- The child has a pronounced food interest: he watches with interest the food of adults, reaches for food.
- The child stopped eating formula and began to demand food more often.

How to start complementary foods at 4 months?
The first product of complementary foods, regardless of the age and type of feeding of the baby (breast or artificial), should be energy-intensive foods: either porridge or vegetable puree. Porridge can be chosen first if the child has loose or unstable stools, and also if the child is underweight. After 4-5 days from the beginning of the introduction of porridge, butter can be gradually added to it (up to 5 g per serving of porridge in 150 g)
Mashed vegetables can be the first meal of the day if a child is prone to constipation, when it is better to choose zucchini, which can have a mild laxative effect on the child's stool. Starting from the 4-5th day of the introduction of vegetable puree, vegetable oil can be gradually added to it (up to 5 g per serving of vegetables in 150 g).
What foods can be introduced into the diet of a child at 4 months?
Kashi
Of the first cereals, it is better to give preference to buckwheat or rice. They must be dairy-free and can be diluted with water or breast milk, or the mixture that the baby eats. Later, you can introduce corn and oatmeal.
Vegetables
The first vegetable puree can be zucchini, broccoli, or cauliflower.
Fruit
The third type of complementary food can be fruit puree from apples or pears. Later, you can introduce mashed banana or apricot. At first, fruit puree can not be given to the child separately, but it is better to mix it with cereal or vegetables so that the child does not begin to prefer the sweet taste of fruits. When the amount of fruit puree reaches 50 g or more, it can also be given separately, for example, after the child has eaten porridge or for an afternoon snack.
Juices
Juices should not be the first feeding, in addition, they can not be introduced into the baby's first year of life at all, given their sweet taste and low nutritional value.
Can you make your own first meal?
You can prepare the first complementary foods yourself, but it is safer to use hypoallergenic monocomponent cereals or commercially produced purees prepared to high quality standards for baby food. In addition, it is important to consider that industrially produced baby cereals are often fortified with vitamins and minerals, which makes them especially useful for the first feeding.
How to start the introduction of a new product?
Complementary foods are introduced before breastfeeding or formula. The introduction of a new product should be gradual. But how is it?
- On day 1, give your baby 1 tsp. complementary foods before breastfeeding or formula
- On day 2 - 3 tsp. (15 g)
- On day 3 - 6 tsp. (30 g)
- Day 4 - 50 g
- Day 5 - 70 g
- Day 7 - 100 g
- For 8-10 days - bring to 150 g.
Please note that if complementary foods are introduced from 4 months, then the introduction of 1 new product may take longer than the introduction of complementary foods from 5 or 6 months, namely up to 10 days or more, depending on the reaction of the baby.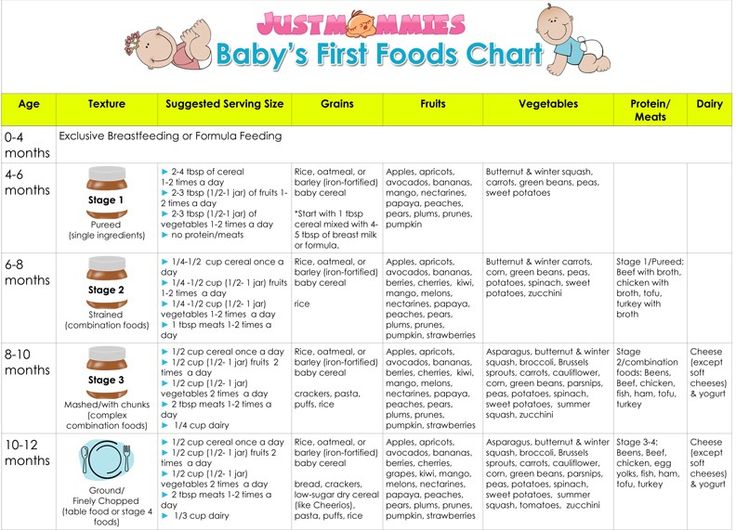
Important!
If on the 8-10th day of the introduction of a new product, the baby still cannot eat 100-150 ml of porridge or puree at once, then this amount can be divided into 2 or even 3 doses, for example, give 50 ml of porridge in the morning, 50 ml in the afternoon and 50 ml in the evening. Why do this? So that the child gradually gets used not only to the new product, but also to its quantity. In the future, you need to try to gradually increase the one-time amount of the product to the age volume.
Questions and answers
Will the amount of breast milk decrease if we start introducing complementary foods from 4 months?
Of course, with the introduction of complementary foods, breast milk will be produced less, but only by the amount of complementary foods introduced. As long as you breastfeed your baby on demand and attach him to the breast every time after giving complementary foods, as well as maintaining nightly breastfeeds, you will maintain long-term successful breastfeeding.