Sterilization of baby feeding equipment
Cleaning and sterilising baby bottles
Cleaning and sterilising baby bottles | Pregnancy Birth and Baby beginning of content4-minute read
Listen
It’s essential to properly wash and sterilise the feeding equipment when you’re bottle feeding. You'll need to clean and sterilise each bottle, teat and screw cap after every feed. It’s important that you continue sterilising everything until your baby is 12 months' old.
Why is it important to clean and sterilise my baby’s bottles?
Babies have immature immune systems so they aren’t strong enough to fight off a range of infections. One important way to support them in staying healthy is to reduce the chances of their getting sick in the first place.
Milk is the perfect medium in which bacteria can grow. This is why it’s important to sterilise all feeding equipment and keep formula cold until just before feeding your baby.
What equipment needs cleaning and how often?
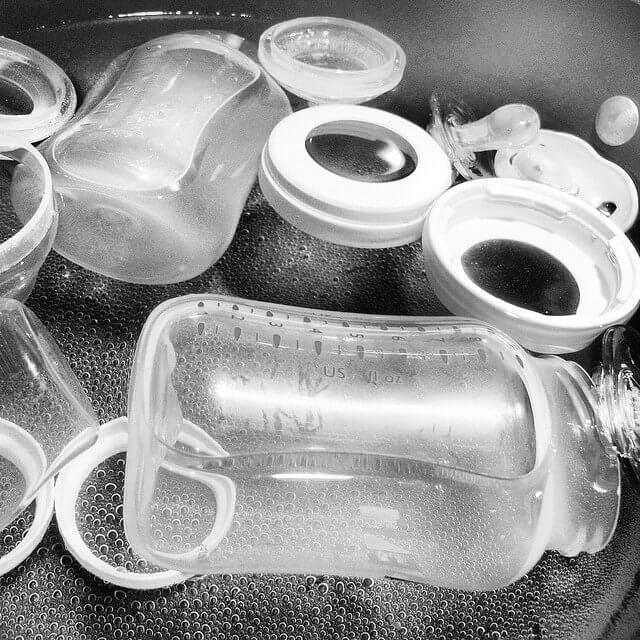
You need to clean and sterilise all bottle parts, teats and screw caps.
- Separate all parts of the bottle and pull the teat out of its screw cap.
- Use hot water and dishwashing detergent.
- Clean all areas of the bottle with a bottle brush, including the thread where the cap screws on.
- Remove any milk still sitting in the teat or the hole with a teat brush.
- Squeeze hot, soapy water through the teat hole, then do the same with clean water to rinse the teat.
- Make sure to rinse the bottles and equipment well.
Get a new bottle brush once the bristles are worn. They need to be stiff enough to remove all the milky residue from the inside of the bottle.
How to sterilise feeding equipment
Even if bottles and teats look clean, they might still carry germs to your baby so it’s essential to sterilise your feeding equipment properly.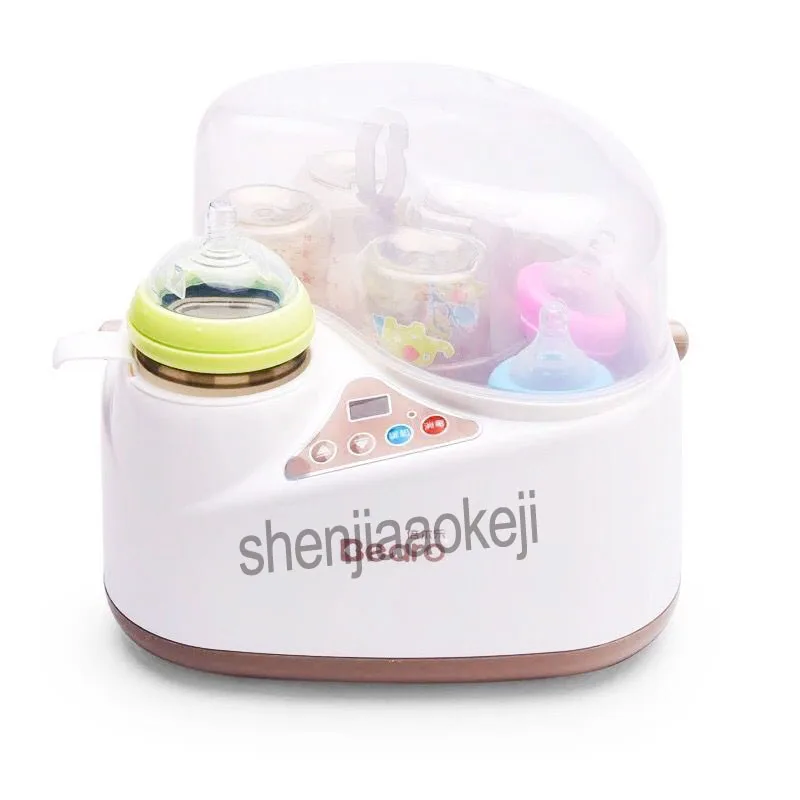
There are 3 ways to do this: boiling, steam sterilisation and chemical sterilisation.
If you’re breastfeeding and only need to sterilise a bottle occasionally, the boiling method may be good enough. It’s also cheaper than buying a steam steriliser. If you’re expressing and/or bottle feeding, then a steam steriliser might be the best option.
The boiling method
- Put all parts of the cleaned bottle, including teats, in a large saucepan.
- Cover the equipment with tap water.
- Make sure all air bubbles are out of the bottles and that they are fully submerged under the water.
- Bring the water to the boil.
- Boil for 5 minutes.
- Let the feeding equipment cool in the saucepan before taking it out.
- Place all the feeding equipment in a clean container and put it in the fridge. Make sure the container is covered firmly with a lid.
- You can store everything in the fridge for up to 24 hours.
The steam sterilisation method
Steam sterilisers are popular because they work quickly, are cheap to use and are very effective.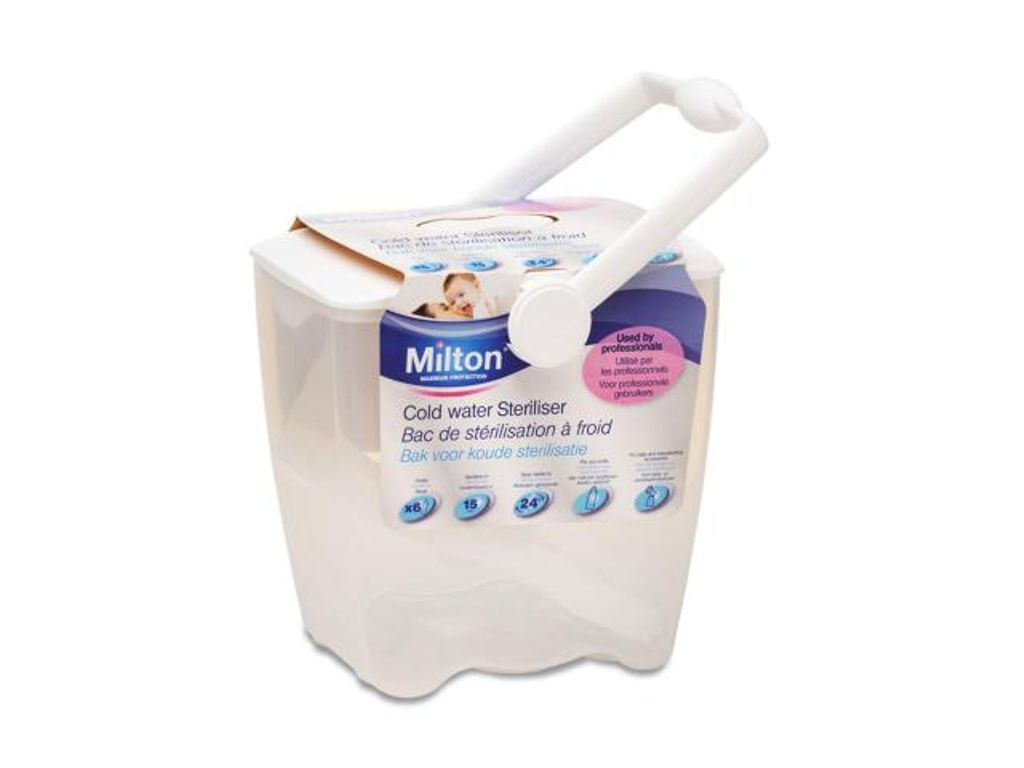 They heat water to boiling point and the steam kills the bacteria. Some steam sterilisers are designed to operate in a microwave.
- Place the clean bottles and feeding equipment in the steriliser.
- Make sure there’s enough room between each bottle, teat and screw cap for the steam to circulate around all surfaces.
- Follow the manufacturer’s directions about how much water to add.
- Turn on and push the button to start. If you’re using a microwave steriliser, place the steriliser in the microwave and turn on for the correct time.
- Wait until the sterilisation cycle has finished and the light goes off.
- Store all sterilised feeding equipment in a clean, lidded container in the fridge.
- Sterilise all equipment again if you haven’t used it within 24 hours.
The chemical sterilisation method
Be careful when using chemical sterilisation. Many methods use bleach, which can also bleach clothing and surfaces, and irritate the skin, if spilt.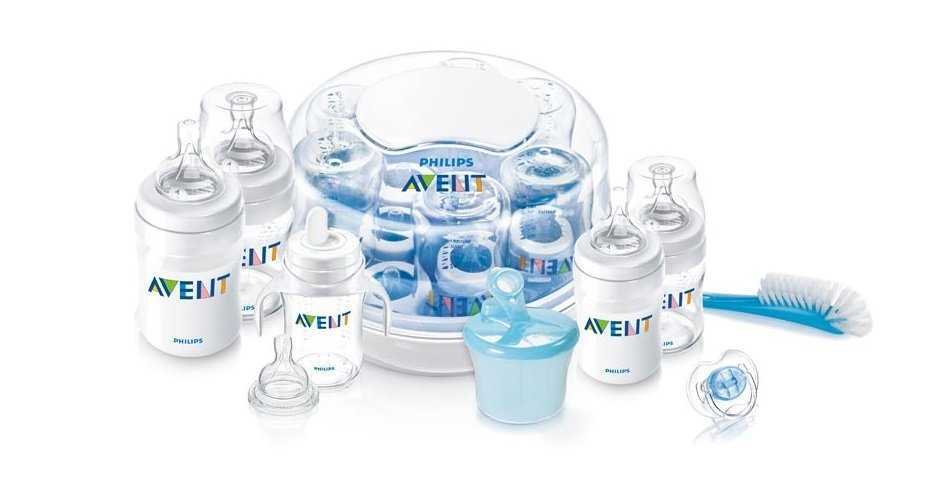
Antibacterial chemical sterilisation solutions are available in liquid and tablet form. They need to be prepared exactly as directed on the container.
- Make sure you have a container that’s large enough to hold your baby’s bottles and feeding equipment.
- Use the recommended amount of tap water to prepare the sterilising solution.
- Submerge all bottles and feeding equipment in the solution. Make sure there are no bubbles left in the bottles.
- Leave the equipment in the solution for the recommended time – there’s no need to rinse the solution off after sterilisation.
- Throw out the solution after 24 hours and wash out the container before preparing a new batch.
Wash your hands before handling sterilised feeding equipment
Make sure you wash and dry your hands before you handle sterilised bottles and teats. It’s easy to contaminate equipment just by touching it with unclean hands.
Sources:
Child and Youth Health (Feeding your baby), Raising Children Network (Bottle feeding: cleaning and sterilising equipment), Karitane (Bottle Feeding)Learn more here about the development and quality assurance of healthdirect content.
Last reviewed: September 2021
Back To Top
Related pages
- Expressing and storing breast milk
- Making formula – dos and don'ts
- Feeding your baby with formula
- Breastfeeding your baby
Need more information?
Bottle-feeding: cleaning & sterilising | Raising Children Network
Bottle-feeding your baby? Find out what equipment you need – bottles, teats, rings and caps – plus how to clean and sterilise it all.
Read more on raisingchildren.net.au website
Baby formula & bottle-feeding for babies | Raising Children Network
Baby formula is the only safe alternative to breastmilk for the first 12 months.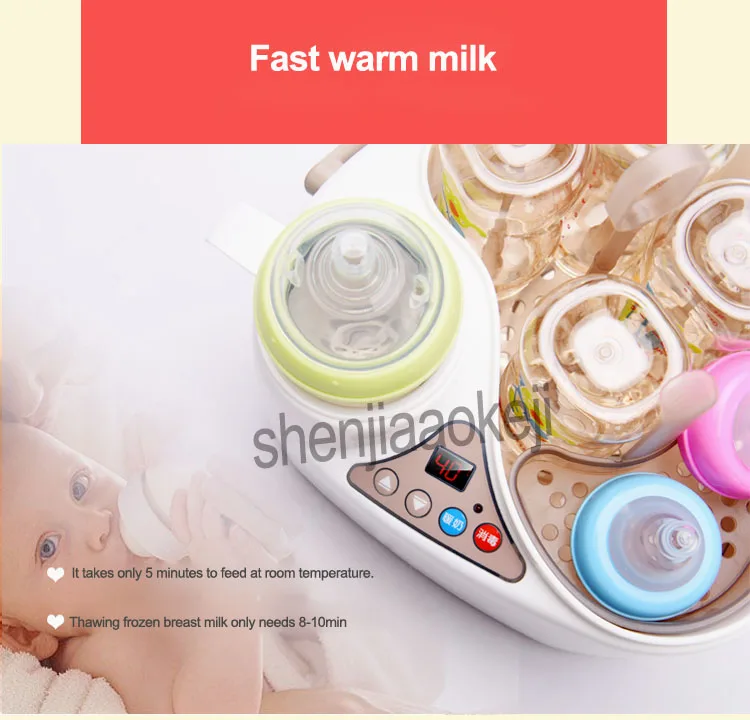 All Australian cow’s milk-based formulas meet strict standards. Read more.
Read more on raisingchildren.net.au website
Breastmilk & breastfeeding: benefits | Raising Children Network
Breastmilk – designed by nature for human babies. Breastmilk and breastfeeding have many health and practical benefits for mothers and babies. Read more.
Read more on raisingchildren.net.au website
Feeding your baby with formula
Learn about formula feeding for your baby, how is it different to breastmilk, why formula feed and what do if your baby is allergic to formula.
Read more on Pregnancy, Birth & Baby website
Dummies: advantages, disadvantages & tips | Raising Children Network
Dummies soothe some babies and help them settle. But dummies can be a hard habit to break, and babies also need help to manage them. Get tips for dummy use.
Read more on raisingchildren.net.au website
Expressing breastmilk & storing breastmilk | Raising Children Network
You can express breastmilk by hand, or with a manual or an electric pump. Store expressed breastmilk in special bags or containers in the fridge or freezer.
Read more on raisingchildren.net.au website
Disclaimer
Pregnancy, Birth and Baby is not responsible for the content and advertising on the external website you are now entering.
OKNeed further advice or guidance from our maternal child health nurses?
1800 882 436
Video call
- Contact us
- About us
- A-Z topics
- Symptom Checker
- Service Finder
- Linking to us
- Information partners
- Terms of use
- Privacy
Pregnancy, Birth and Baby is funded by the Australian Government and operated by Healthdirect Australia.
Pregnancy, Birth and Baby is provided on behalf of the Department of Health
Pregnancy, Birth and Baby’s information and advice are developed and managed within a rigorous clinical governance framework. This website is certified by the Health On The Net (HON) foundation, the standard for trustworthy health information.
This site is protected by reCAPTCHA and the Google Privacy Policy and Terms of Service apply.
This information is for your general information and use only and is not intended to be used as medical advice and should not be used to diagnose, treat, cure or prevent any medical condition, nor should it be used for therapeutic purposes.
The information is not a substitute for independent professional advice and should not be used as an alternative to professional health care. If you have a particular medical problem, please consult a healthcare professional.
Except as permitted under the Copyright Act 1968, this publication or any part of it may not be reproduced, altered, adapted, stored and/or distributed in any form or by any means without the prior written permission of Healthdirect Australia.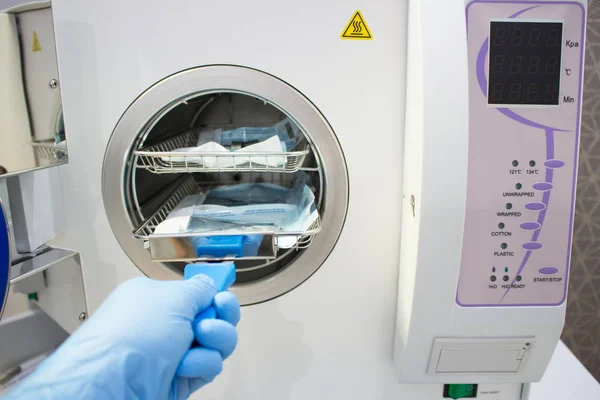
Support this browser is being discontinued for Pregnancy, Birth and Baby
Support for this browser is being discontinued for this site
- Internet Explorer 11 and lower
We currently support Microsoft Edge, Chrome, Firefox and Safari. For more information, please visit the links below:
- Chrome by Google
- Firefox by Mozilla
- Microsoft Edge
- Safari by Apple
You are welcome to continue browsing this site with this browser. Some features, tools or interaction may not work correctly.
Sterilising baby bottles - NHS
It's important to sterilise all your baby's feeding equipment, including bottles and teats, until they are at least 12 months old.
This will protect your baby against infections, in particular diarrhoea and vomiting.
Before sterilising, you need to:
- Clean bottles, teats and other feeding equipment in hot, soapy water as soon as possible after feeds.
- Use a clean bottle brush to clean bottles (only use this brush for cleaning bottles), and a small teat brush to clean the inside of teats. You can also turn teats inside out then wash them in hot soapy water. Do not use salt to clean teats, as this can be dangerous for your baby.
- You can put your baby's feeding equipment in the dishwasher to clean it if you prefer. Putting feeding equipment through the dishwasher will clean it but it does not sterilise it. Make sure bottles, lids and teats are facing downwards. You may prefer to wash teats separately by hand to make sure they are completely clean.
- Rinse all your equipment in clean, cold running water before sterilising.
The advice above applies to all your baby's feeding equipment, and whether you are using expressed breast milk or formula milk.
How to sterilise baby feeding equipment
There are several ways you can sterilise your baby's feeding equipment. These include:
- cold water sterilising solution
- steam sterilising
- boiling
Cold water sterilising solution
- Follow the manufacturer's instructions.
- Leave feeding equipment in the sterilising solution for at least 30 minutes.
- Change the sterilising solution every 24 hours.
- Make sure there are no air bubbles trapped in the bottles or teats when putting them in the sterilising solution.
- Your steriliser should have a floating cover or a plunger to keep all the equipment under the solution.
Steam sterilising (electric steriliser or microwave)
- It's important to follow the manufacturer's instructions, as there are several different types of sterilisers.
- Make sure the openings of the bottles and teats are facing downwards in the steriliser.
- Manufacturers will give guidelines on how long you can leave equipment in the steriliser before it needs to be sterilised again.
Sterilising by boiling
- Make sure the items you want to sterilise in this way are safe to boil.
- Boil the feeding equipment in a large pan of water for at least 10 minutes, making sure it all stays under the surface.

- Set a timer so you do not forget to turn the heat off.
- Remember that teats tend to get damaged faster with this method. Regularly check that teats and bottles are not torn, cracked or damaged.
After you've finished sterilising
- It's best to leave bottles and teats in the steriliser or pan until you need them.
- If you do take them out, put the teats and lids on the bottles straightaway.
- Wash and dry your hands before handling sterilised equipment. Better still, use some sterile tongs.
- Assemble the bottles on a clean, disinfected surface or the upturned lid of the steriliser.
Find out more about expressing breast milk and how to make up formula feeds.
Page last reviewed: 24 September 2019
Next review due: 24 September 2022
Sterilization of baby bottles at home
A newborn is completely defenseless against the outside world. Sterilizing feeding bottles will help protect your baby until their immune system is strong enough to cope on their own.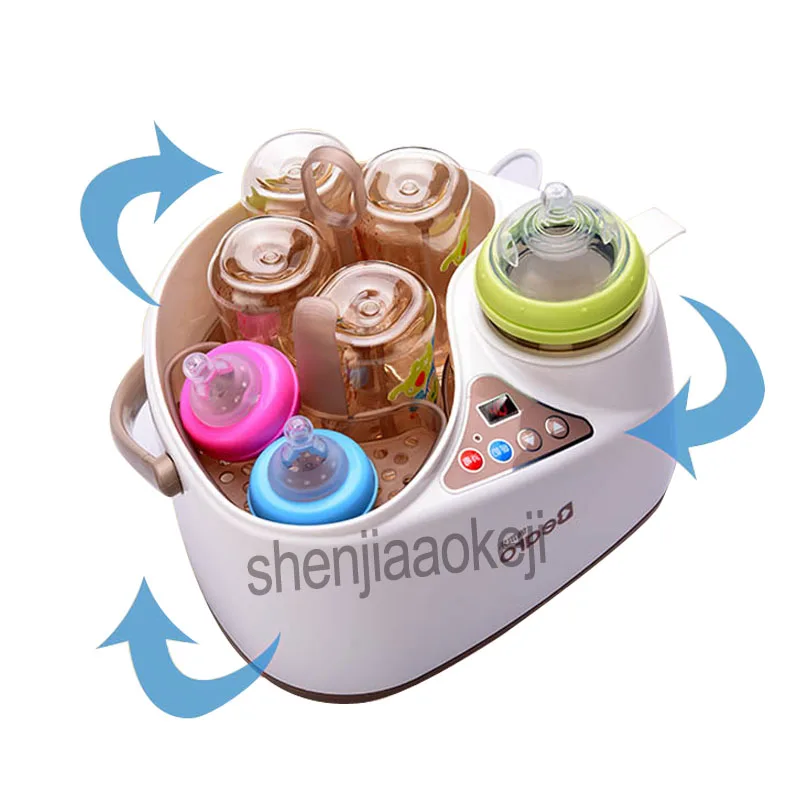 Even if the baby is breastfed and you do not need to regularly dilute infant formula, this does not mean that you will have nothing to sterilize. Fortunately, in our time there are already enough devices that turn sterilization into an easy procedure. nine0003
What should I use to sterilize baby dishes?
- Sterilization Microwave
- Sterilization in the slow cooker and steamer
- Sterilize in a saucepan
- With Electric Sterilizer
- Cold sterilization - alternative methods
- How often and until what age to sterilize
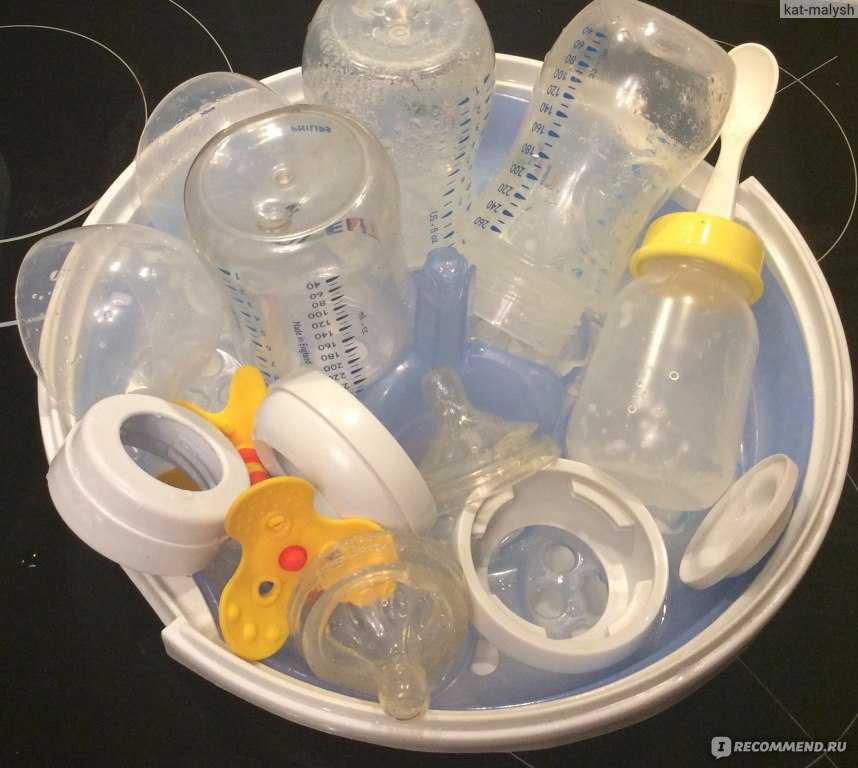
Before sterilizing feeding bottles, breast pumps or other baby items, they must be thoroughly rinsed in plenty of running water with a special baby cleaner using a brush. Instead of detergent, ordinary baking soda is suitable, which perfectly kills bacteria, neutralizes odors and is safe for the child. nine0003
Microwave for sterilization
It is convenient to disinfect bottles in the microwave oven (in the microwave) in the so-called sterilizer or in a special bag.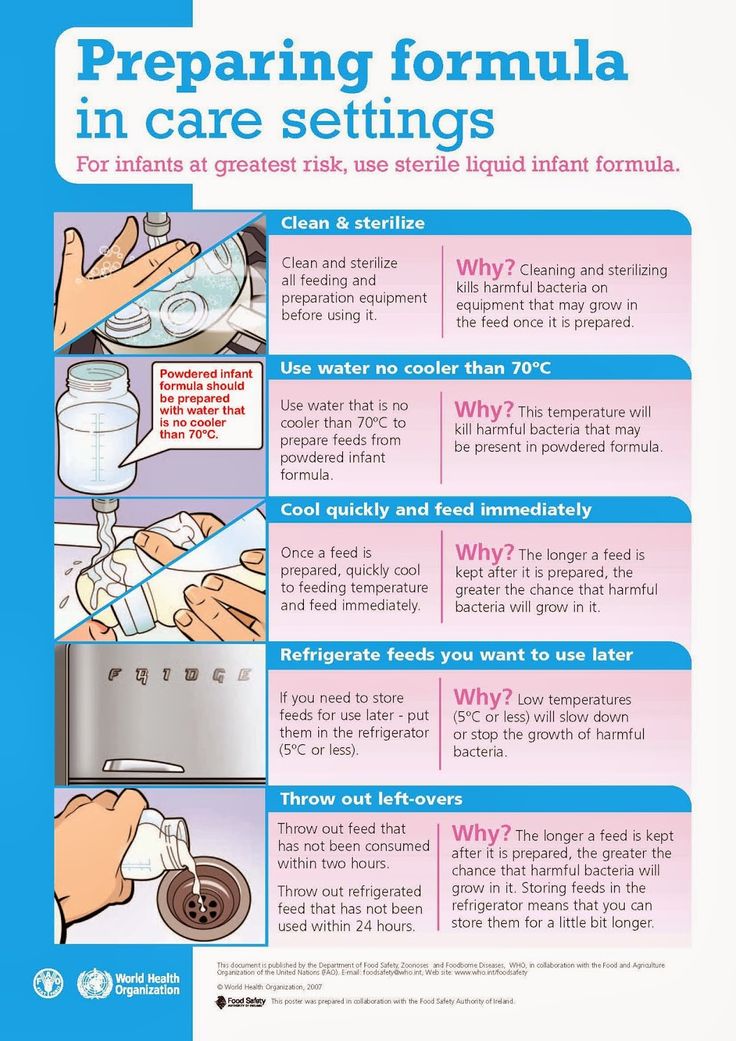 At the same time, sterilization is carried out with steam, which is much more convenient in comparison with classical boiling. No need to bring a large amount of water to a boil. For steam treatment, 100 ml of liquid is sufficient, and the entire treatment will take no more than five minutes.
The sterilizer is a plastic container with a kind of grate into which a small amount of water is poured. Then the bottles are placed neck down, the container is tightly closed with a lid. The sterilizer is placed in the microwave at medium power with a timer for five minutes. After the end of the procedure, clean bottles are removed with special tongs. Do not forget that after processing, high temperature steam accumulates under the lid, be careful when opening. nine0003
The undoubted advantage of the sterilizer is the absence of the need for additional accessories, which you will no longer have to spend money on.
Sterilization bags must be purchased periodically, although one bag can last up to 20 uses. They do not require separate storage space. This is practical, especially when you have critically little free space in the kitchen. Fewer items are placed in a special bag than in a sterilizer container, which is a minor disadvantage. nine0003
Feeding bottles are now available that can be sterilized in the microwave without any additional equipment, just fill it halfway with water, loosely cover it with a lid and place it directly in the microwave.
Sterilization in the slow cooker and steamer
Multicookers and steamers are used effectively for sterilizing baby bottles. All multicookers have a container-steamer and a steam cooking mode. And in some models there is a function for sterilizing children's dishes. The process is very simple: pour a little water (about 100 ml) into the bowl of a multicooker or double boiler, put baby bottles, nipples, pacifiers into the container and turn on the desired mode. nine0003
Sterilizing in a saucepan
Even if you don't have any special devices for sterilization, you can resort to our grandmothers' method - boiling in a saucepan. The method has been tested by time, but keep in mind that not all plastic bottles will like this procedure, and nipples and pacifiers wear out faster. If you are going to use this processing option, then choose high-quality plastic baby dishes, such as Avent plastic bottles. nine0003
Place the bottles in cold water, make sure they do not float. To do this, you can put a plate on top. It is necessary to boil for 5-10 minutes.
You can use a more gentle option for dishes: children's utensils are placed in a colander, which is placed above the pot. This is how steam processing works. The disadvantages of this method are that it is laborious, long and can quickly render children's dishes unusable.
Electric sterilizers
In addition to microwave sterilizers, there are also electric sterilizers. The principle of operation is similar to sterilization in a microwave oven, but it works as a separate device from the mains. Water is converted into steam by means of a built-in heating element.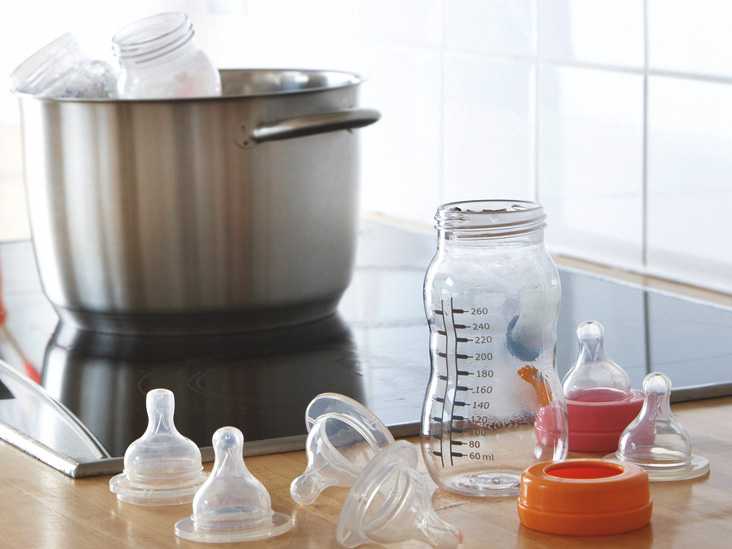
As a rule, such devices are equipped with an electronic control unit and independently select the operating mode, have the possibility of a delayed start and other useful functions. Very handy, although not cheap. nine0003
Cold sterilization - alternative methods
Recently, a new sterilization method has appeared - ultraviolet radiation treatment. This method will not adversely affect baby utensils, but UV sterilizers are not large enough to be used for baby bottles.
Another cold working method is sterilization tablets. They are ideal when there is no way to process bottles at home, for example, when traveling. The tablet dissolves in water and the dishes are immersed in this water for 30 minutes. After processing, do not forget to rinse it well, although the solution does not pose a threat to the child. The properties of the prepared solution are stored up to 24 hours. nine0003
If, after sterilization, you do not open the lid, sterility is maintained for up to three hours.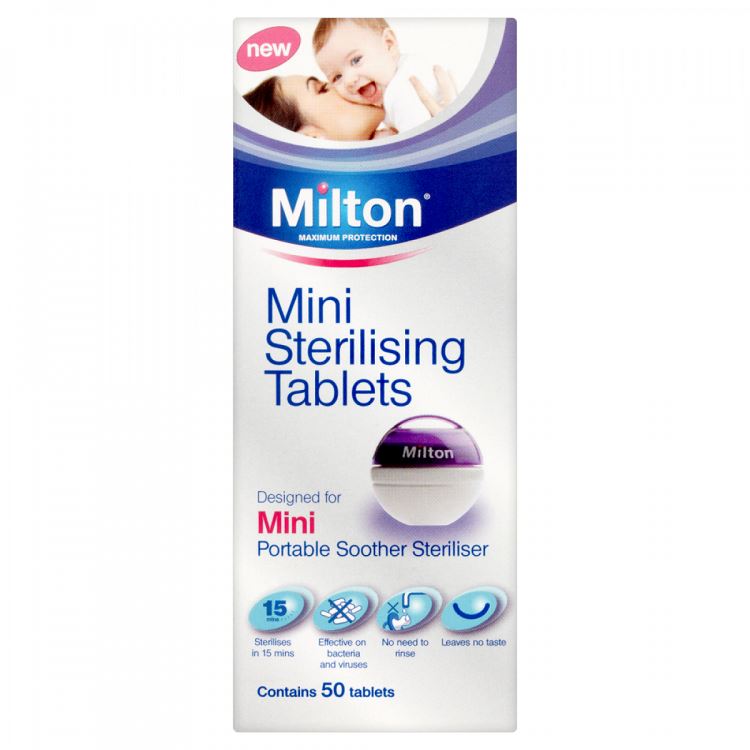 After you take out all the accessories with special tweezers, they must be dried on a special bottle dryer or covered with a clean towel.
How often and until what age to sterilize
Baby bottles, breast pumps, breast milk containers must be sterilized after each use. The age of the child up to which it is necessary to sterilize children's accessories is purely individual. Some determine the age at 6 months, while others believe that immunity is formed closer to a year. nine0003
How to sterilize baby bottles? Advice and guidance for young parents.
At some point, even mothers who happily breastfeed their babies need a feeding bottle. It can be the beginning of complementary foods, a long distance trip when you need to supplement the baby with milk, or even just a very hot summer, because of which the newborn begins to drink water. All children's dishes must be sterilized. You can use various devices or improvised means for this. Before sterilizing baby bottles, parents can choose a cleaning method and aids based on what is easier, more affordable, and more reliable for them. nine0003
Is it necessary to sterilize dishes?
Sometimes the question arises whether there is any point in sterilization. Or is this procedure a meaningless relic of the past? The answer is simple - any dishes that a child will come into contact with require special cleaning.
What sterilization gives:
- complete destruction of microbes and pathogenic bacteria;
- the entry of viruses into the baby's esophagus from the surfaces of the bottles is excluded; nine0009 reduces the risk of transmission of foodborne infections.
Primary treatment is required for new teats and bottles, as there is no guarantee that these items were in sterile conditions before being sold. Packaging particles and dust may remain on silicone and plastic. Feeding bottles also need to be sterilized regularly. Food debris that accumulates in hard-to-reach places can provoke the growth of bacteria, which will lead to indigestion.
Important! Do not strive for absolutely sterile conditions. A newborn, receiving a small "dose" of bacteria from the outside world, gradually adapts to it. The main thing is that these doses are minimal, available for absorption. nine0003
Methods for Sterilizing Baby Bottles and Cleaners
When deciding how to sterilize baby bottles, parents can choose to sterilize baby bottles or use handy tools. Effectively eliminates pollution invisible to the eye - boiling, steaming, ultraviolet. Before processing, it is worth preparing the dishes: remove old dirt, wash the walls with a sponge with detergent for baby bottles, clean hard-to-reach places with a brush, rinse with running water. What can be used for sterilization:
Boiling water
Bottles, teats and pacifiers can be boiled in water. Beforehand, all the dishes are disassembled into elements. Water is drawn into the pan, completely covering the dishes, so that nothing touches the bottom or walls. Everything is boiled for 3-7 minutes, after which it is laid out on a clean, ironed cotton towel.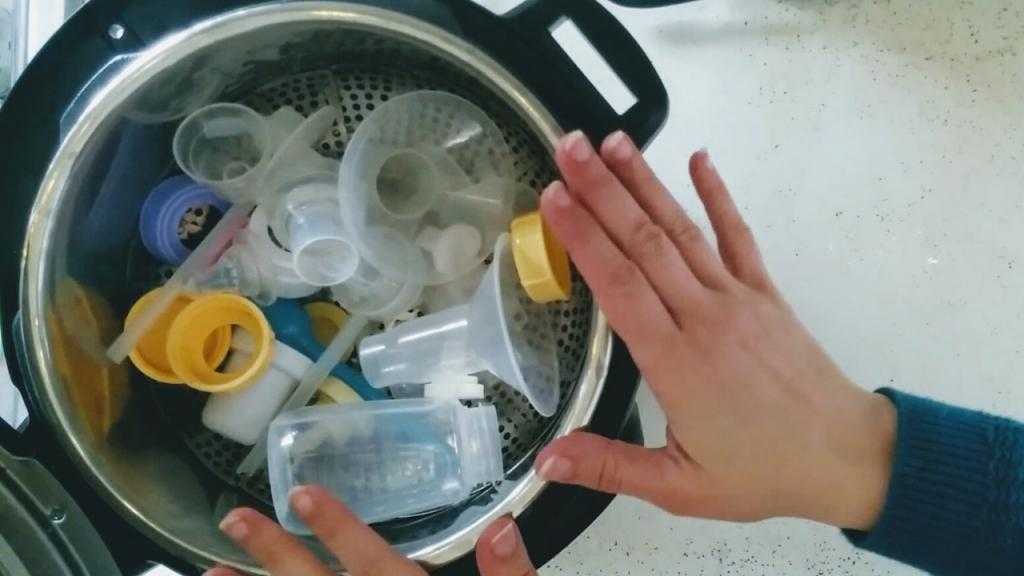
Rules to be observed:
- use filtered water;
- set aside a separate pot or ladle for sterilization; nine0010
- do not leave the dishes to boil unattended - something may burn;
- only boil bottles that can withstand high temperatures;
- do not add soda, salt or other products to the water.
Boiling is the simplest and most affordable method that does not require additional costs. The effectiveness of this method has been proven; at high temperatures, all microbes, bacteria, viruses die. But the method also has disadvantages: it is not always possible to control the long boiling process, there are no conditions for organizing boiling, dishes under the influence of boiling water can deteriorate faster. nine0003
Microwave
Microwaves inside the oven sterilize items in a relatively short period of time. But for the processing of children's dishes, water will still be required, although it does not have to be brought to a boil at all.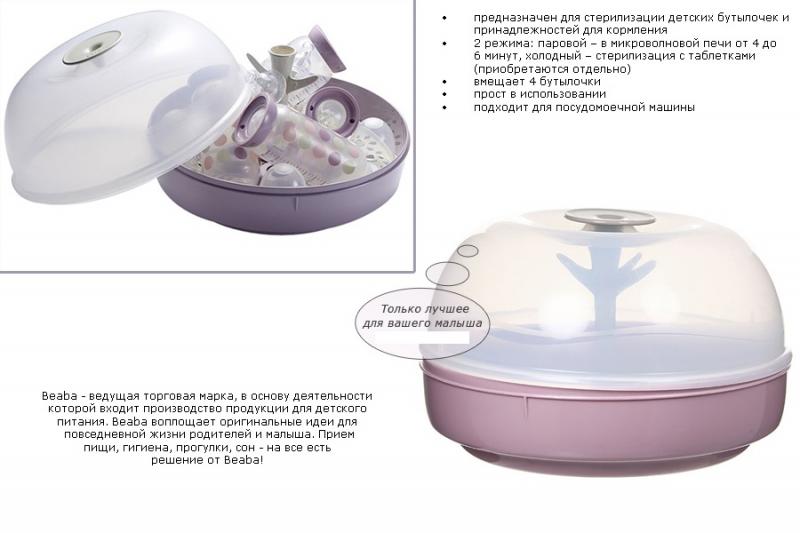 Cleaned bottles are placed in a microwave container filled with water. Cleaning is performed for 6-8 minutes at maximum power (if any, the Boiling mode is used).
After switching off, do not immediately remove the container from the microwave - delayed boiling is possible. It is necessary to wait for the water to cool, and then take out the nipples and drying bottles on a towel. For greater safety, it is better to use a microwave sterilizer. Such devices are equipped with notches for monitoring the water level, convenient nests for dishes and a lid that prevents splashing. In modern models, tweezers are immediately included in the package, which is convenient and safe to get bottles. nine0003
The advantage of the microwave oven is the prevalence of the device, they are installed in children's hospitals and mother and child rooms at railway stations. In a microwave oven, you can sterilize the elements of breast pumps, as the interior space can accommodate quite bulky items. Cons - can not be used to clean dishes with metal elements and metallized decorations.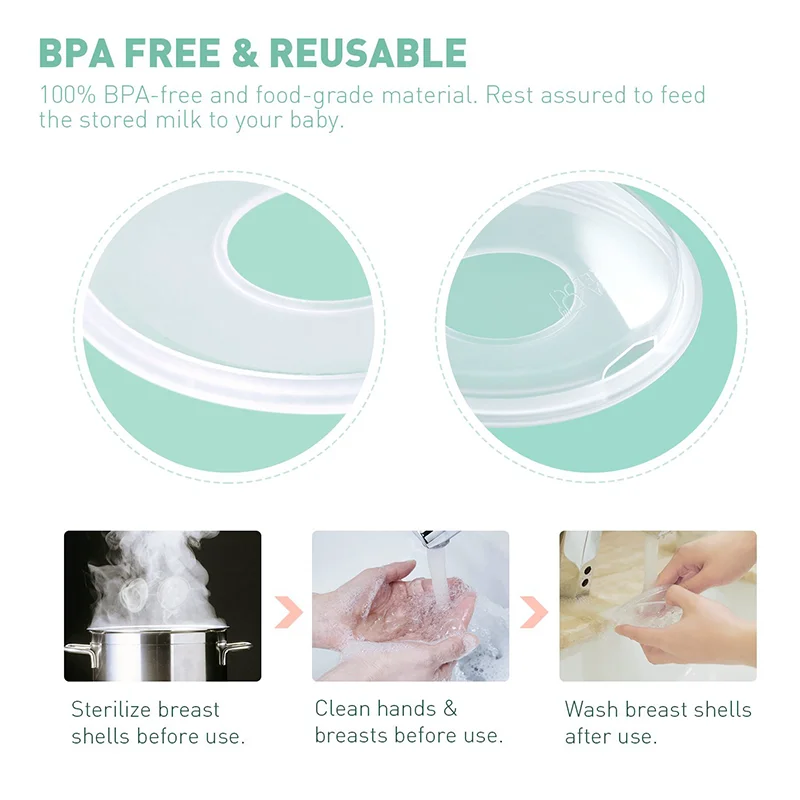
Multicooker
If you don't know how to sterilize silicone pacifiers in the microwave or boiling water, you can use the multicooker bowl. Processing of children's dishes in it can be of two types: in boiling water or steam. It is better to boil bottles and nipples in a bag of water, preventing them from sticking to the walls of the bowl. This method is only suitable as an urgent one, if there is no special plastic grill. If there is a grill, it is better to steam the pacifiers. The sequence of actions is as follows:
- place bottles, inserts, nipples and pacifiers on a special plastic grid with round holes so that objects do not touch each other;
- water is poured into the multicooker bowl - one liter;
- a grate with objects is installed, the lid is closed;
- for sterilization, the “Steam”, “Cooking” program is suitable, processing time is 5-10 minutes;
- after turning off the multicooker, leave it closed until the liquid has cooled; nine0010
- open carefully so as not to burn yourself with steam.
You can also use a steamer instead of a multicooker. The main thing is that the grid for objects should not be metal, but plastic. In this case, you do not have to worry that the rubber nipples will stick to the surface.
The advantages of the method are autonomy and simplicity. Cons - it is not always convenient to sterilize a couple of bottles, a massive multicooker is not installed everywhere.
Dishwasher
A number of modern bottles, pacifiers and nipples have models that can be sterilized in the dishwasher. Machines with high temperature, the possibility of steaming dishes, drying are suitable for cleaning. This processing method is the simplest, since it excludes preliminary cleaning, it is enough to remove food residues from the containers, place them inside the dishwasher and start the necessary cycle.
But parents also note some disadvantages: they don't want to drive the dishwasher for a small amount of dishes, special detergents for children's plates are not always available. Moreover, not every family can afford a dishwasher. nine0003
Electric steam sterilizer
Special sterilizers are best suited for processing baby bottles, as they are all prepared for this procedure. Especially convenient for young families who do not know how to sterilize children's dishes in a saucepan of boiling water. Although the principle of operation is also based on boiling and supplying steam to the dishes. Water is poured into the lower container, and objects to be processed are laid out on the grate from above. In sterilizers, it is possible to clean not only bottles and pacifiers from pathogenic bacteria, but also rubber toys, breast pumps, teethers, rattles without batteries. nine0003
Advantages of the steam sterilizer:
- several compartments for different types of dishes;
- quick offline cleaning;
- no need to look for a place to dry dishes safely;
- automatic shutdown at the end of work.
Parents can purchase models that already come with bottles and nipples. This completeness is convenient for mothers who practice breastfeeding and do not plan to buy a lot of bottles. For large families, devices designed for the simultaneous cleaning of several bottles are suitable. nine0003
The disadvantage of the electrosterilizer is the short period of its use. But such devices are quite in demand, if necessary, they can be transferred to relatives or sold.
Special tablets
Antiseptic tablets can be used for urgent sterilization of teats, bottles, pacifiers. They are convenient to use on vacation, on the road, in other conditions when it is not possible to boil the dishes. The tablet is dissolved in water, bottles are filled with liquid. The downside is the very high cost of tablets and their non-proliferation. nine0003
Bags
Special ziplock bags can be used for microwave sterilization. Pacifiers are placed in them, water is poured.