How often do you feed a wild baby bird
Hand-Feeding Baby Birds | VCA Animal Hospital
General Information
Hand-feeding baby birds is only a substitute for parents raising birds, but it does have certain advantages. Hand-raised baby birds usually make better pets, as they have been completely socialized with humans. Hand-raised babies grow up with less fear of humans or other potential dangers such as cats, dogs and young children. Hand-feeding is a huge responsibility and requires time, patience, and commitment. Hand-fed baby birds are entirely reliant on you for everything. Hand-feeding is a job best left for the experienced bird breeder or aviculturist. If you’re considering hand-feeding a baby bird, you should contact your local bird breeder or veterinarian for help. This handout is designed to provide some basic guidelines on how to hand-feed.
When do I start hand-feeding a baby bird?
A chick may be removed from its parents any time before weaning, but many suggest leaving the babies with the parents for up to 3 weeks. Older birds may prove to be more challenging in their acceptance of hand-feeding.
Where do I keep a baby bird?
Precise temperature and humidity is essential for optimum growth of newly hatched birds. Initially, relative humidity greater than 50% is required. Hatchlings (without feathers) should be maintained at 95°-97°F (35°-36°C). As the chick gets older and develops feathers, it has a greater tolerance for temperature fluctuations.
Generally, the temperature can be lowered by one degree every 2-3 days as feathering progresses. Chicks with new feathers (pinfeathers) should be fine at 75°-85°F (24°-30°C) depending on the development of the feathers. Fully feathered and weaned chicks can be maintained at room temperature. If you are raising a chick, always monitor your bird for signs of overheating or chilling. Wings extended or drooping, and panting indicate overheating. Shivering and cuddling of chicks together indicate that they’re cold.
Poor growth or poor digestion (delayed crop emptying) may indicate poor health (including presence of gastrointestinal tract infections), improper consistency/mixing of hand feeding formula, improper temperature of formula, or improper environmental temperature and humidity.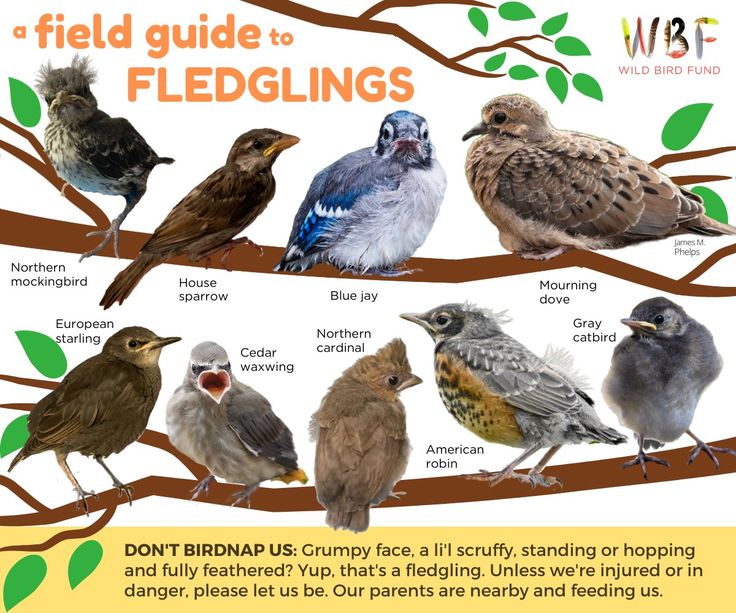 Good quality brooders are available that carefully regulate air circulation, temperature, and humidity. Paper towel, diapers, hand towels, or other soft, disposable products can be used to line the bottom of the brooder and provide secure, clean, dry footing for birds. The bottom liner must be changed frequently to keep birds clean. If the bottom texture is too smooth, chicks’ legs may splay out sideways, leading to permanent deformities. The brooder should be carefully checked to ensure that it does not contain anything for birds to get their wings or legs stuck on or that might cause injury or deformities.
What should I feed my bird?
There are numerous commercially available hand-feeding formulas for baby birds. You should choose one formula and use it until the baby is weaned. Changes in diet may be stressful on the baby's digestion. Be sure to discuss dietary choices with your veterinarian, an experienced bird breeder, or an aviculturist.
How do I feed my baby bird?
All food must be prepared fresh for every feeding. Food retained from one feeding to another is an ideal medium for the growth of harmful bacteria and yeast. Any food prepared or heated in a microwave oven must be mixed thoroughly to ensure that the food’s temperature is uniform and that there are no hot or cold spots. Food temperature should be at 102°-106°F (39°-41°C) throughout the mixture and should be measured with a thermometer. Food that is too hot may cause severe burns to the crop.
Food that is too cold may be rejected by baby birds and may slow down digestion. Hand-feeding formulas have specific directions on the packaging and explain how they should be mixed.
In general, the younger the bird, the thinner the mixture should be. A day-old chick requires a more dilute mixture (90% water), as it is still utilizing the yolk sac as a source of nutrition. Chicks older than one or two days, should have food containing approximately 70-75% liquid.
"All food must be prepared fresh for every feeding."
Syringes are probably the preferred feeding tool, but some bird owners still prefer a spoon with the sides bent up and inward. Accurate feeding volumes can be recorded with the syringe. Charting daily feedings is important. The natural feeding response of a baby bird is to rapidly bob the head in an up and down motion. This action can be stimulated with gentle finger pressure at the corners of the mouth. During this head bobbing, the trachea is closed and large amounts of food can be given relatively quickly.
If the bird is not displaying a strong feeding response, do not attempt to feed as there is an increased chance of aspiration of food into the trachea and lungs which can lead to death. The best time to feed is when the crop is empty. When full, the crop, which is the sac that hangs over the front of the chest at the base of the neck, will be visibly distended.
How often and how much do I feed?
The amount and frequency of feeding depends on the age of the bird and the formula fed. The frequency of feeding for young birds is greater than that of older birds. The following are general guidelines. With newly hatched chicks, the yolk sac is the source of nutrients for the first 12-24 hours post-hatching. Chicks less than one week old should be fed 6-10 times per day (every 2-3 hours).
During the first week of life, some birds benefit from feeding during the night. Chicks that have not yet opened their eyes may take 5-6 feedings per day (every 3-4 hours). Once birds’ eyes open, they can have 3-5 feedings (one every 5 hours). As their feathers start to grow in, they may be fed 2-3 times per day (every 6 hours). Their crops should appear full when they’re done.
Feeding between 10:00 p.m. and 6:00 a.m. is not necessary at that point when birds are sleeping. The best indication of a healthy, growing chick is a good, strong feeding response at every feeding, with the crop emptying between feedings, and the regular production of droppings (feces). Weight gain should be monitored and recorded at the same time each day using a scale that weighs in grams with 1-gram increments to detect subtle increases or decreases. Birds’ weights may fluctuate up and down daily but should trend upward over a period of days to weeks. Birds that are not gaining weight should be checked by a veterinarian as soon as possible.
When should birds be weaned off hand-feeding formula?
Deciding when to wean a bird off of formula is often a difficult decision for both the bird owner and the bird. As a bird gets older and develops a full complement of feathers, it should be encouraged to wean off formula and to eat more on its own. Some babies start weaning themselves by refusing certain feedings.
Birds should be offered a variety of foods including formulated pelleted diets as well as fresh fruits and vegetables to encourage exploration and experimentation. As food introduction continues, hand-feeding may be withheld at certain times, often starting with the mid-day feedings. As time goes on, the morning feeding may be withheld and ultimately the evening feeding. Some birds learn quicker to eat on their own by watching other birds or older babies eat.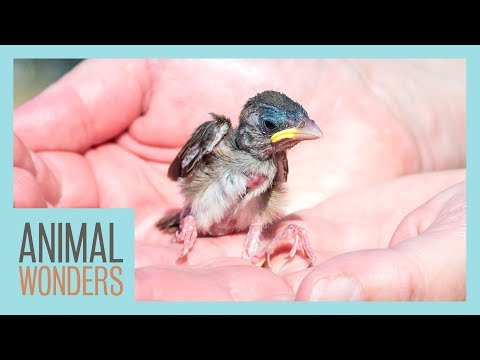
Should I be concerned about disinfection?
Baby birds have poorly developed immune systems and are more susceptible to developing infections. The brooder should be disinfected regularly. All feeding utensils must be cleaned, disinfected, and dried thoroughly between feedings. Using separate feeding utensils for every individual bird is recommended.
How do I know if something is wrong?
If you suspect something is wrong with your bird, you should immediately contact your veterinarian. Signs to watch for include:
- Chirping or crying all the time
- Fussing a lot and not sleeping
- Listless, droopy wings or head
- Not accepting food
- Lack of feeding response
- Slow or lack of crop emptying
- Poor weight gain
- Slow growth
- Abnormal posturing or abnormal wing and/or leg positions
- Abnormal or lack of droppings
- Wetness or food on skin over the crop (indicating a possible burn)
How Often Should You Feed a Baby Bird?
Have you ever came across a wounded or abandoned baby bird and took it in your care? Then you must’ve asked yourself: “How am I supposed to take care of it? How often to feed it and with what?” No worries, this article will answer all the questions you might have.
The following is the general guideline.
Younger hatchlings should be fed more frequently until they grow up a bit. New hatchlings, old up to one week, should be fed at least 6-10 times a day (every 2-3 hours). As they grow, the frequency decreases to 3-5 times a day when they open their eyes, then to 2-3 times a day when they start growing feathers.
More detailed information will be provided below.
Contents
- 1 The very beginnings
- 2 How will I know if I am doing it right?
- 3 How will I know if I’m doing it wrong?
- 4 What type of food am I allowed to feed to a baby bird?
- 5 Preparing the meals for baby birds
- 6 Feeding process
- 7 Keeping the tools clean!
- 8 Conclusion
The very beginnings
Feeding baby birds by yourself should be the last step in case of the emergency unless you ’re a bird expert. It is viewed as a substitute for birds raised by parents. Hand feeding is an enormous responsibility for which you must have a lot of time, tools, patience and total commitment.
Nowadays there are a lot of baby bird nourishments available, so what you should do is pick one of them and stick with your choice until the hatchling is weaned. The reason is that even minor changes in diet may be stressful for hatchling’s digestion system.
Frequency and the number of meals depend on the species, age, growth rate and diet of the bird. The source of nutrients for the newly hatched specimens in the first 12-24 hours is the yolk sac. A week or so old specimens should be fed every 2-3 hours or 6-10 times a day, with the addition that feeding during the night could be very beneficial.
Specimens who haven’t opened their eyes yet should be fed every 3-4 hours (5-6 feedings a day). Once they open their eyes, it could be decreased to 3-5 feedings a day (every 5 hours). As the baby bird starts to grow feathers, it should be fed 2-3 times a day (every 6 hours).
After this initial period has passed, hatchling doesn’t have to be fed between 10 p.m. and 6 a. m.
m.
How will I know if I am doing it right?
The best way to check if the hatchling is growing healthy and how it’s responding to the diet is to monitor its response to every nourishing. It should give a strong response to every nourishing and have regular production of muck.
In order to determine the actual growth, you will need to measure the hatchling every day and keep a record of its advancement. By default it is supposed to gain weight every day until the day it’s ready to fly. If you notice it’s not the case, or that it gains weight very slowly, then there is a problem. That’s why It is important to have a record so that in case there are some problems, you can notice them on time and act.
How will I know if I’m doing it wrong?
The most common symptoms that could potentially mean there is a problem are:
- Rejection of food
- Bad response to feeding
- Abnormal or shortage of droppings
- Chirping most of the time
- No sleep
- Fussing all the time
- Slow and exhausted movement of wings or head
- Unnatural growth
- Deficient weight gain
If you notice any of these symptoms, the best thing you can do is contact your veterinarian.
What type of food am I allowed to feed to a baby bird?
Unless you’re professional, feeding hatchlings should just be used in urgent situations. If you come across the hatchling that needs to be fed or cared for, you should take it to the bird rescue organization or an experienced rehabber as soon as possible. They will most likely know what is the best-suited nourishment for its species and even be able to help it learn how to find its own food source.
But if the need arises and you have to feed the baby bird, then you have to remember the following:
- Meals shouldn’t be watery, to be sure it doesn’t come to choking or in some cases drowning. It should be spumous, while hard food is supposed to be softened before feeding it to the hatchling.
- Never nourish warmed or cool food. It should always be offered at room temperature.
- Very little hatchlings should be nourished with very small bites, so try to chip or crunch food so it is relatively fitting to hatchling’s size.

- Nourish the bird very carefully. Don’t force its beak open to eat.
While every species has a different kind of nourishment, there are several types of food that can be used in urgent situations.
Also, it is very important to understand that hatchlings have very different nutritional needs than grown specimens.
The food which can be used to feed hatchlings is:
- Dampened dog or cat food
- Raw liver, without flavoring
- Hard-boiled eggs
The food which shouldn’t be fed to hatchlings is:
- Water
- Pastry
- Full-sized birdseed
- Dairy products
- Pet bird food
- Maggots
- Kitchen leftovers
Keep in mind that the more grown hatchling is, the more adult food it can consume without any harm, with longer intervals between each feeding.
However, if you don’t feel comfortable with feeding a hatchling with this kind of food and prefer more specialized products, you can try something like Nekton-Baby-Bird hand feeding formula and related products.
Preparing the meals for baby birds
The most important thing you need to remember is that all food must be prepared fresh for every nourishing! If you prepare the meals in advance for several feedings, you can expose the hatchling to potential bacteria attacks, because that kind of environment is perfect for bacteria to grow.
All food should be nourished at the room temperature, meaning that if you use the microwave to prepare the meal, you should mix that food very thoroughly in order for it to be at the optimal temperature of 39-41⁰C (102-106⁰F).
A thermometer should be used to measure the temperature. Too warm food could cause scalds and too cold food usually causes digestion problems.
Generally speaking, the batch is supposed to be more diluted the younger the bird is. The day old hatchling requires a more attenuated batch (90% water), while specimens older than one or two days call for meals with 70-75% of liquid.
Feeding process
In order for you to feed a hatchling, first you will need to obtain several tools and second, you will need to have a lot of patience and show a lot of love for the hatchling.
There are several tools that could be used for feeding hatchlings, but the most preferred is a syringe, similar to the one dentists use. Some people prefer to use a baby spoon. Using a syringe provides more precise nurture intensity and makes the whole process easier for both you and the hatchling.
The hatchling’s natural nourishment response is to quickly swing the head up and down. To jog this action you can tenderly put and press your finger at the corners of the mouth. Throughout this process, the trachea stays closed, so a large amount of food can be inserted in a short span of time.
If the hatchling isn’t showing a good response on nourishment, don’t force feed it, as there could be a higher probability of aspiration of food into the trachea and lungs, which could lead to death.
The best time to feed is when the crop is empty. The crop, which is the sack that dangles over the front of the chest at the base of the neck will be visibly inflated if it is full.
Keeping the tools clean!
From the previous text you’ve probably noticed that hatchlings are very fragile. Their immune system is poorly built and is more susceptible to infections. Therefore, you need to be very organized and meticulous.
All utensils used for nourishment must be cleaned and stored in a disinfecting solution after every nourishing, while the brooder should be disinfected on regular basis. In order to elude contamination, disinfectant should be replaced every day. In addition, you should entirely wash your tools every time prior to the next nourishing. Apart from that, it is very recommended to use separate nourishing tools for every individual hatchling
Conclusion
Congratulations! Now you’ve read this article, you can start helping lost baby birds by yourself or join one of many organizations out there, who are fighting for the same cause. You will need a lot of time, patience, tools and, most importantly, love.
Don’t forget: “Hand-feeding a baby bird is an emergency measure!”
You should always try to contact an expert veterinarian or wildlife rehabilitator before trying to feed the bird yourself because they will know what to do. They would be able to find a proper nourishment for its species and make the proper feeding schedule, so the bird doesn’t end up having any problems.
How to feed the found chick, how many times a day
If you find a chick, the first thing you need to do is determine its species. Feeding granivorous, insectivorous and predatory chicks have their own differences. But in the early stages of feeding, you can use the same feeding methods, and then, after finding out what kind of bird you found, transfer the chick to the appropriate feeding.
Here is one of the most common feeding options for granivorous and insectivorous chicks. This nutrient mixture is well used for feeding for chicks and fledglings from the passerine family. To prepare our mixture, we need the following products: Boiled egg, low-fat cottage cheese, raw carrots, meat (beef, chicken, turkey), greens (lettuce, dandelion leaves, wood lice), hamarus and daphnia, Calcium gluconate (shell from boiled eggs) glycerophosphate , children's dry dairy-free porridge or boiled millet (without salt and fat on the water).
Action one. Boil the egg, free from the shell. We free the shell from the shell film. Grind the egg as much as possible, you can use a grater with small holes.
Second step. Boiled meat, it is better to take the pulp from the breast of a turkey or chicken and also chop or divide into fibers. The mixture will require meat 40 (for granivorous) and 60 grams (for insectivorous).
Third step. Take washed carrots of a small size, grate them on a fine grater, then squeeze the juice and we will use the remaining pulp.
Fourth step. We take not sour and not fatty cottage cheese. Cottage cheese should have 0% fat content, anything above is considered fat for poultry. We need 90-110 grams of cottage cheese. Sour cottage cheese must be boiled twice changing the water and then it will be suitable.
Step five. You can use greens to add the mixture, but you can do without it for the chicks. And so you can take the greens listed above, chop and add 1.5 teaspoons to the mixture.
Action six. To the above ingredients, add 1.5 -2 tsp. dairy-free porridge or boiled millet (well boiled, without salt and fat in the water).
Step seven. To the mixture we add the shell from the boiled egg, which must first be ground in a coffee grinder, plus one fourth of the crushed tablet of glycerophosphate. If it is not possible to find glycerophosphate, then you can purchase bone meal and add one fourth tsp. in powder form. At the very least, the shells are enough for now.
Step eight. We take chopped hamarus and daphnia and add about 1 tsp to the resulting mixture. Then we mix everything, it turns out a very thick, crumbly porridge, it should not stick to the fingers. If the mixture is sticky, you can add dairy-free porridge or powdered cereals.
From the resulting mixture we roll small balls no larger than a small pea, focus on the size of the chick's beak. You can feed 2-5 balls at a time and after each feeding drink plain water from an insulin syringe with a removable needle (without a needle) 4-6 drops.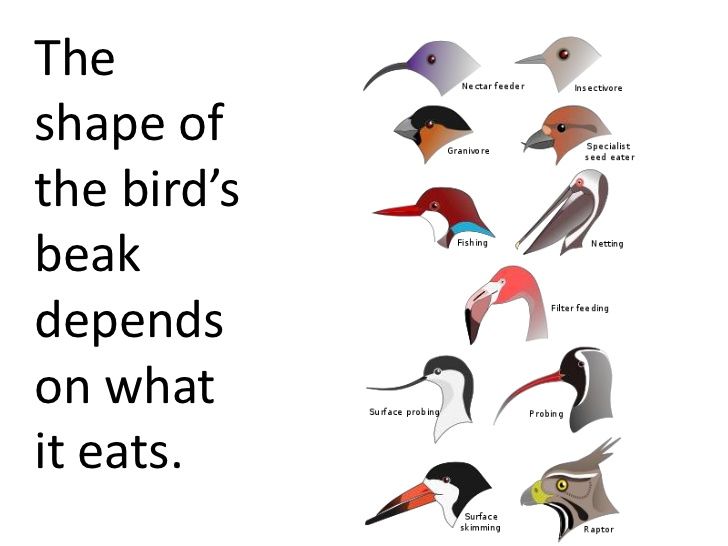 A week-old chick should be fed every 1-1.5 hours, older than two weeks of age every 2-4 hours, at three and four weeks of age you can feed 3-4 times a day. Do not forget that the chick is growing and, accordingly, one-time portions of food are growing. A very important point, do not forget to warm the chicks, because at their age they themselves cannot maintain normal body temperature. Warming up promotes better assimilation of feed. Don't forget to control your chick's weight. If possible, show the chick to a specialist. To control the work of the intestines, you can take the litter from the chick for a coprogram, this is an analysis of the digestibility of the feed.
Take care and love your feathered friends and they will love you back.
Veterinarian ornithologist
Chuguevsky VV
Veterinary clinic Bambi.
You can ask an ornithologist on the forum.
How to feed a chick that has fallen out of the nest
Tying materials (7)
1
Happiness fell on your head?
2
How not to harm?
3
How to create all conditions for survival?
4
Where to settle?
5
What difficulties will you face?
6
How to feed a chick?
7
Chick formula recipe
Happiness fell on your head?
Have you suddenly found a chick that has fallen out of the nest in the dacha, near the house or even on the balcony? Is there anything you can do to help this kid? Or is he already doomed? Help the chick, most often you can. And we will tell you how to do it.
How not to harm?
When you find a chick that has fallen out of the nest, do not rush to grab it in your hands. Perhaps there is a chance to return the baby to the nest. But if you take it with "bare" hands, your parents will not accept it back.
Pay attention to how the chick looks. If he is active, mobile and he already has feathers, then most likely you have the so-called “fledgling”. And if you find a fledgling in the park, in the garden, in the country - where he can hide and predators will not find him, then just do not touch. Parents continue to feed the fledglings! He will not be abandoned, he will simply hide, and he will be fed in the same way as the chicks left in the nest. The chick's parents have a much better chance of saving the chick than you.
If you see a nest from which the baby has fallen out, you can carefully take the chick with a handkerchief and put it back into the nest.
If you didn't find the nest, the chick is very small and leaving it where it is found is very dangerous, you will have to take it with you. For such cases - our following instructions.
How to create all conditions for survival?
There are two main factors that determine whether your chick will survive or not. The first factor is age. Chicks under the age of 4 - 5 days, having fallen out of the nest, almost never survive. Do you know how old the chick is? If the baby is still “naked”, without plumage, then he is definitely not yet 8-12 days old. It is very simple to calculate: if at the time of falling out of the nest the chick was 5 days old, then by the 8th day it should already have feathers. It is at the age of 8 - 12 days that the chicks are called "fledglings" - during this period they are very active and often fall out.
The second circumstance is metabolism. Chicks have an incredibly active metabolism. Left without food during daylight hours for 3-4 hours, they literally burn their internal resources. That is, if the baby was on the ground without food before you found him for more than 3 hours, his metabolism is probably already disturbed. You can start feeding him and he will look like everything is fine. But the metabolic disorder will not “pass away”, irreversible processes are already underway inside the small organism, and within 3 days (maximum) the chick will die quite suddenly.
The main conclusion is that the critical period is 3 days. If within 3 days the chick suddenly dies - it's not your fault, and you really could not do anything. It's all about age and metabolism. If the baby has lived with you for more than 3 days, then everything depends only on your efforts. This is especially important if the bird was picked up by children. Explain to them right away that during the first 3 days you should not give the chick a name and place high hopes on its survival.
Where to settle?
Place the chick in a box lined with a soft, lint-free cloth or dry grass. Do not keep the box in the open sun or in a draft. Keeping a box on the floor is a bad idea. If it's cold outside, place a plastic bottle of warm water under the fabric.
What difficulties will you face?
Deciding to take a chick and feed it, you take responsibility for its life and a huge number of worries. Firstly, the chick squeaks almost all the time during daylight hours. Secondly, the chick needs to be fed every 20 minutes. And don't just give him food. And feed enough. When the chick is full, he stops opening his mouth. When hungry, it stretches its neck and opens its huge mouth.
As soon as the chick has eaten, it begins to move backwards. The reflex makes him go all the way to the edge of the nest to stick his butt out and poop. Usually, adult birds pick up the "capsule" and carry it away from the nest. If the nest is soiled with droppings, predators will quickly find it by smell.
By the way, by the litter you can tell if you feed the chick too often. If too often, a protein film - a shell - does not have time to form on the litter. If the litter spreads, and does not resemble a capsule, it is time to feed the bird less often.
How to feed a chick?
Birds feed their young mainly on insects. So, if you have somewhere in the far corner of the kitchen cabinet a bag of cereals in which moths are wound up, the chick is lucky. For the first time, you are provided with worms. Meal worms, ant cocoons, fly larvae are also suitable.
Older chicks can be given boiled egg yolk, cottage cheese and carrots. The yolk should be grated on a fine grater, the cottage cheese should be washed in a sieve under running water, the carrots should be grated on a fine grater. Don't forget about vitamins and minerals. Remember: only insects can feed a chick. Only "regular" products without additives - no.
Food can be given with tweezers. Touch his head, wait for the chick to open its mouth, give it food. The younger the chick, the easier it is to develop a reflex for begging for food. At an older age, he will begin to hide from you with tweezers, and then generally run away. This is fine. Fledgling you will most likely have to force-feed the first few times.